

The Ultimate Buttermilk Cornbread Recipe (Easy & Moist)
Whip up the best buttermilk cornbread recipe! Tender, moist, with a golden-brown crust. Perfect for soaking up stews or enjoying with a drizzle of honey.
cookwithyara.com/recipes/cornbread-recipe
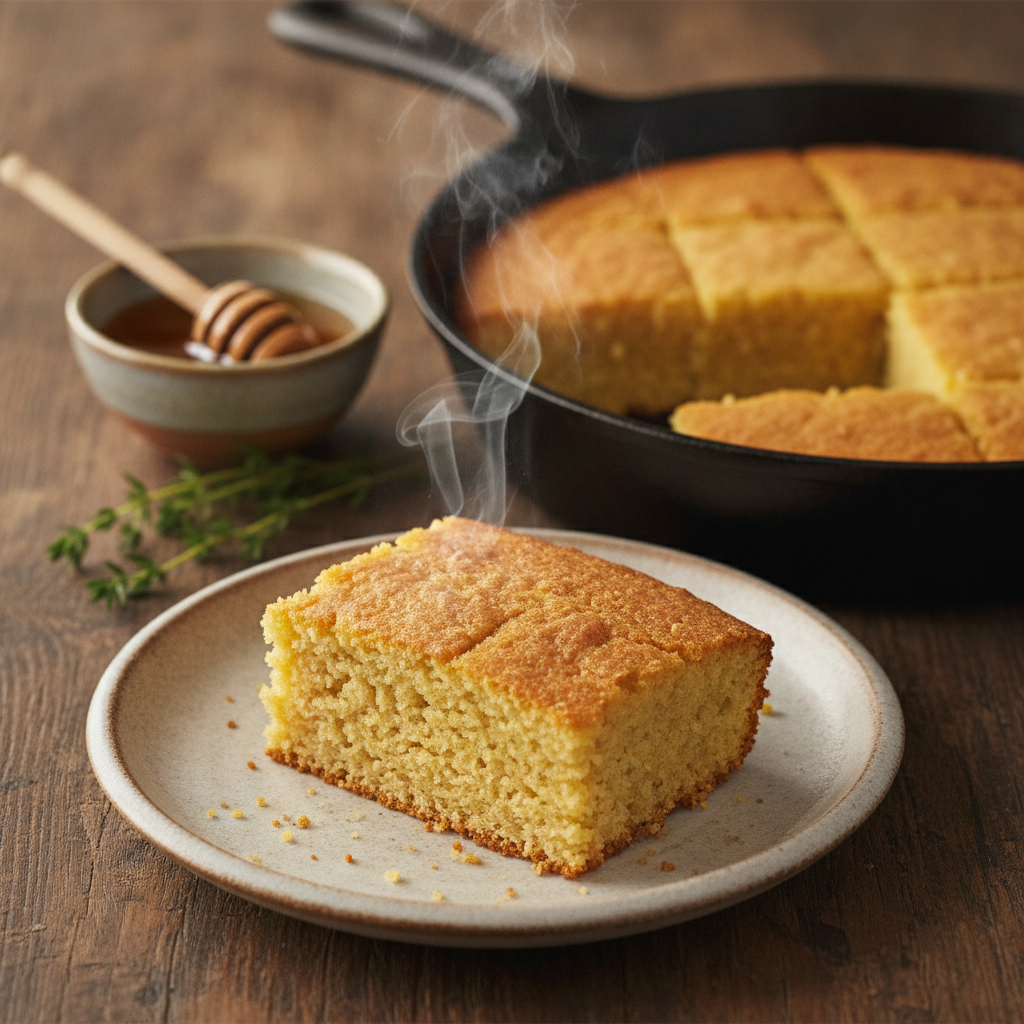
There are few things more comforting than the aroma of a freshly baked cornbread recipe filling the kitchen. It’s a scent that speaks of warmth, generosity, and gatherings. The perfect slice has a deeply golden, slightly rugged crust that gives way to a crumb that is astonishingly tender, moist, and flavorful. It’s the kind of bread that feels both rustic and refined, equally at home next to a hearty stew as it is on its own, warm from the pan with a pat of melting butter.
Many home cooks feel a little intimidated by cornbread. We’ve all experienced versions that are dry, crumbly, or sadly bland. It can feel like there’s a secret to achieving that perfect texture. But I’m here to tell you the secret is simply understanding the why behind each step. Once you grasp the simple science at play—the magic of buttermilk, the importance of a hot pan, the delicate touch required when mixing—the how becomes second nature. This isn't just about following instructions; it's about learning the language of the ingredients. With this foundational cornbread recipe, you’re not just making a side dish; you’re mastering a technique that will bring warmth and joy to your table time and time again.
The Science Behind the Perfect Cornbread
Baking is as much science as it is art, and a truly magnificent cornbread recipe is a beautiful example of kitchen chemistry. Understanding what's happening at each stage empowers you to bake with confidence and intuition. The star of the show is the reaction between the buttermilk and the leavening agents. Buttermilk is acidic, and when it meets the alkaline baking soda, it creates a chemical reaction that releases carbon dioxide gas. These tiny bubbles are what lift the batter, creating a light, airy crumb instead of a dense, heavy brick. The baking powder provides a secondary lift, ensuring a consistent and beautiful rise as the cornbread bakes in the oven's heat.
The texture of our cornbread is a delicate balance between the cornmeal and the all-purpose flour. Cornmeal provides the signature gritty, toothsome texture and sunny flavor, but it contains no gluten. Gluten is the protein network that gives bread its structure and chew. That’s where the all-purpose flour comes in. It adds just enough gluten to bind the batter and create a tender, cake-like structure that holds together beautifully. This is also why the final, most crucial step is to not overmix. Overmixing develops the gluten too much, resulting in a tough, rubbery texture. We want to mix just until the ingredients are combined, leaving the batter a bit lumpy, to keep that crumb wonderfully tender.
Finally, the secret to that incredible, crispy, golden-brown crust lies in the Maillard reaction, enhanced by a very hot pan. By preheating your cast-iron skillet with butter, you create an intensely hot surface. When the cool batter hits the sizzling fat, the sugars and proteins on the surface instantly begin to brown and caramelize, forming a deeply flavorful, shatteringly crisp crust that provides the perfect contrast to the soft interior. This isn't just a baking step; it's an essential flavor-building technique that elevates a good cornbread recipe into a great one.
Tools and Ingredients for This Cornbread Recipe
While this cornbread recipe is delightfully straightforward, using the right tools and high-quality ingredients will make a noticeable difference in the final result. Think of them as your partners in creating the perfect loaf. The most iconic tool for cornbread is, without a doubt, a well-seasoned 9-inch cast-iron skillet. Cast iron is prized for its ability to get screaming hot and retain that heat evenly, which is the key to achieving that coveted crispy, golden crust. If you don’t have one, don’t worry! A 9-inch round cake pan, a square baking dish, or another heavy-bottomed, oven-safe skillet will work well. Just be sure to preheat it properly.
Beyond the pan, you’ll need a few basic kitchen staples: two mixing bowls (one for dry ingredients, one for wet), a whisk for thorough combining, and a flexible spatula for scraping the bowl and ensuring no batter goes to waste. When it comes to ingredients, each one plays a critical role. For the cornmeal, I prefer a fine or medium grind of yellow cornmeal for a tender crumb and beautiful color. The all-purpose flour provides softness, so avoid bread flour, which has too much protein. The star liquid is full-fat buttermilk. Its acidity is essential for leavening and its fat content contributes to a moist, rich crumb. If you don't have it, you can make a substitute, but real buttermilk is always best.
We'll use both baking powder and baking soda for maximum lift. A touch of granulated sugar adds a subtle sweetness that balances the tangy buttermilk and earthy cornmeal, though this is a savory cornbread, not a dessert. Two large eggs bind the batter and add richness. Finally, we use unsalted butter, melted. Butter provides a richer, more complex flavor than neutral oil. Using high-quality butter will truly shine through in the taste of your finished cornbread. These simple, wholesome ingredients come together to create something truly special, proving that the best food often starts with the basics.
The Method, Step by Step
Let’s walk through the creation of this beautiful cornbread recipe together. Think of this as a conversation between you and your ingredients, where you’re listening for cues and responding with a gentle hand. The entire process is about building layers of flavor and texture, culminating in that perfect, golden bake.
First, we prepare our canvas: the pan and the oven. Place your 9-inch cast-iron skillet (or other baking dish) on the middle rack of your oven and preheat everything to 425°F (220°C). Getting the pan intensely hot from the start is non-negotiable for achieving that crispy crust. While the oven heats, we’ll assemble our components. In a large bowl, whisk together your dry ingredients: the cornmeal, all-purpose flour, sugar, baking powder, baking soda, and salt. Whisking does more than just combine them; it aerates the flour and ensures the leavening agents are evenly distributed, which guarantees a uniform rise. You shouldn't see any clumps.
Next, in a separate, medium-sized bowl, whisk together the wet ingredients. Start with the buttermilk and crack in the two large eggs. Whisk them vigorously until the mixture is smooth, pale yellow, and a little frothy. Now, slowly stream in the melted butter while continuing to whisk. This process, called emulsification, helps distribute the fat evenly throughout the batter, which is key for a consistently moist and tender crumb. Your wet mixture should look glossy and cohesive.
Now for the most critical moment: combining the two. Pour the wet ingredients into the bowl with the dry ingredients. Using a spatula or wooden spoon, gently fold the mixture together. Your goal is to mix just until the streaks of flour disappear. The batter should, and will, be lumpy. This is perfect! Those lumps are your insurance against a tough, dense cornbread. Resist the temptation to stir it smooth. Over-mixing is the single biggest mistake you can make with this cornbread recipe.
With the oven and pan fully preheated, carefully remove the hot skillet from the oven. Add your remaining butter directly to the skillet; it should sizzle and melt immediately. Swirl it around to coat the bottom and sides. Now, pour your prepared batter into the hot, buttered skillet. You should hear a satisfying sizzle as the batter hits the pan—that’s the sound of your crust beginning to form. Spread the batter evenly with your spatula and immediately return it to the hot oven. Bake for 20-25 minutes, or until the top is a beautiful golden brown and a wooden skewer inserted into the center comes out clean. Let it cool in the pan for a few minutes before slicing and serving warm. This is a cornbread recipe worth savoring.
Troubleshooting Your Cornbread
Even with the most detailed instructions, sometimes things don't go exactly as planned in the kitchen. But there’s no need to worry! Most common cornbread issues are easily diagnosed and even easier to prevent the next time you make this delicious cornbread recipe. Think of your first bake as a learning experience.
If your cornbread turns out dry and overly crumbly… This is the most frequent cornbread complaint. It’s usually caused by one of two things: over-baking or an imbalance in your ingredients. Ovens can run hot, so start checking for doneness a few minutes before the recipe suggests. The moment a skewer comes out clean, it’s done. Even a few extra minutes can bake out precious moisture. Also, double-check your measurements. Using measuring cups can be imprecise; if you pack in too much flour or cornmeal, you'll throw off the liquid-to-dry ratio. A kitchen scale is your best friend for consistent results.
If your cornbread is dense, gummy, or tough… The culprit here is almost always over-mixing. When you stir the batter too vigorously or for too long, you over-develop the gluten in the all-purpose flour. This creates a chewy, tough texture more suitable for a loaf of bread, not a tender cornbread. Remember the mantra: mix only until the dry ingredients are just moistened. Lumps are not only okay, they are desirable! Fold the ingredients gently with a spatula until you no longer see streaks of dry flour, and then stop.
If the bottom and sides aren’t brown and crispy… This means your pan wasn't hot enough when the batter went in. That initial sizzle is essential for creating the crust. Make sure you let your pan preheat in the oven for at least 10-15 minutes until it is thoroughly heated through. When you add the butter to the hot pan, it should melt and foam instantly. If it doesn't, your pan needs more time. This one small step makes a world of difference.
If your cornbread tastes bland… High-quality ingredients are key! The flavor of the cornmeal, the tang of real buttermilk, and the richness of good butter all contribute to the final taste. Also, don't skimp on the salt. Salt doesn't just make things salty; it enhances and brightens all the other flavors in the cornbread recipe. If you use a good quality coarse sea salt, you'll notice a significant improvement in the overall flavor profile.
Taking It to the Next Level
Once you've mastered this classic cornbread recipe, you have a wonderful canvas for creativity. Drawing from my Levantine culinary roots, I love to introduce new layers of flavor and texture. These additions can transform your cornbread from a simple side into a truly memorable part of the meal.
A simple and incredibly fragrant addition is a sprinkle of za'atar and sesame seeds over the top of the batter just before baking. The heat of the oven toasts the herbs and seeds, releasing their incredible aroma. The earthy, tangy flavor of the za'atar is a beautiful complement to the sweet corn. Another favorite is adding a handful of finely chopped scallions or chives and some crumbled feta cheese into the batter. The salty, briny feta creates little pockets of creamy flavor, while the scallions add a mild, fresh sharpness. Just be sure to find a good quality, halal-certified feta.
For a touch of warmth, you can add a pinch of warm spices like Aleppo pepper for a mild heat and beautiful color, or a sprinkle of nigella seeds on top for their unique, slightly peppery flavor. These are subtle changes that don't overwhelm the classic taste of the cornbread but instead add a layer of complexity.
Don't forget to think about how you serve it. Instead of plain butter, why not offer a side of thick, tangy labneh drizzled with good quality olive oil? Or, for a sweeter touch that feels right at home in a Mediterranean pantry, a drizzle of rich date syrup or carob molasses is a wonderful alternative to honey. These variations make the beloved cornbread recipe feel both familiar and excitingly new.
Storing Your Results
Proper storage is key to enjoying your delicious homemade cornbread for more than just one meal. Because it's so moist, it needs to be stored correctly to maintain its wonderful texture without becoming soggy or drying out. For the first day, you can store the cornbread right in the skillet or baking dish it was baked in. Simply cover it loosely with a clean kitchen towel or an inverted bowl once it has cooled completely. This allows for some air circulation, which helps prevent the crust from steaming and getting soft. I avoid plastic wrap at room temperature for this reason.
If you plan to keep it for longer, your best bet is the refrigerator. Cut the remaining cornbread into individual slices or squares and place them in an airtight container. They will keep well for up to 4-5 days this way. The cold temperature will make the cornbread firm up, so reheating is essential for the best experience.
The best way to reheat a slice of cornbread is not in the microwave, which can make it tough. Instead, place a slice in a dry skillet over medium-low heat for a minute or two per side. This method re-crisps the exterior while gently warming the inside, bringing it back to its just-baked glory. You can also warm slices in a toaster oven. Proper storage and reheating mean you can enjoy the fruits of this fantastic cornbread recipe all week long.
Common Questions About This Cornbread Recipe
Can I use a different type of pan for this cornbread recipe?
Absolutely. While a cast-iron skillet gives the best crust, a 9-inch round cake pan, a 9-inch square baking dish, or even a muffin tin for individual portions will work. The key is to preheat whatever vessel you use with the butter or oil to ensure a crispy exterior. Adjust baking time accordingly; muffins will bake much faster, likely in 15-18 minutes.
Can I make this cornbread recipe dairy-free?
Yes, you can make substitutions. For a dairy-free version, use a plant-based butter substitute and create a vegan 'buttermilk' by mixing unsweetened almond or soy milk with a tablespoon of lemon juice or apple cider vinegar. Let it sit for 5-10 minutes to curdle before using it in the recipe. The texture will be slightly different but still delicious.
How can I scale this recipe for a crowd?
This recipe doubles beautifully. To double it, simply multiply all ingredients by two and bake it in a 9x13-inch baking dish or a larger 12-inch cast-iron skillet. You will likely need to increase the baking time by 5-10 minutes, so keep a close eye on it and use a skewer to test for doneness.
What's the best type of cornmeal to use?
For this cornbread recipe, a fine or medium-grind yellow cornmeal provides the best balance of classic corn flavor and a tender, pleasant texture. Stone-ground cornmeal will give you a more rustic, heartier texture and deeper flavor. I would avoid coarse-ground cornmeal, as it can be too gritty, and cornflour (which is cornstarch in the UK), as it's a completely different product.
Can I prepare the batter in advance?
The short answer is no. The leavening agents (baking soda and baking powder) begin to react with the acidic buttermilk as soon as they are combined. If you let the batter sit for too long before baking, the chemical reaction will fizzle out, and your cornbread will not rise properly, resulting in a flat, dense loaf. For the best results, mix the batter right before you’re ready to bake.
Easy Buttermilk Cornbread
A classic, moist, and tender buttermilk cornbread with a beautifully golden crust. This recipe is simple to make and perfect as a side for any meal.
Prep Time
15 min
Cook Time
25 min
Total Time
40 min
Servings
8 servings
Ingredients
For 8 servings
- 1 1/4 cups yellow cornmeal, fine or medium grind
- 1 cup all-purpose flour
- 1/4 cup granulated sugar
- 1 tablespoon baking powder
- 1/2 teaspoon baking soda
- 1 teaspoon salt
- 1 1/4 cups full-fat buttermilk
- 2 large eggs
- 6 tablespoons unsalted butter, melted and divided
Instructions
- 1
Preheat Oven and Pan
Place a 9-inch cast-iron skillet or a 9-inch round cake pan in the middle of your oven. Preheat the oven and the pan together to 425°F (220°C). This step is crucial for a crispy crust.
- 2
Whisk Dry Ingredients
In a large mixing bowl, add the cornmeal, all-purpose flour, sugar, baking powder, baking soda, and salt. Whisk everything together for about 30 seconds to ensure the leavening agents are evenly distributed.
- 3
Whisk Wet Ingredients
In a separate medium bowl, whisk together the buttermilk and the two large eggs until they are well combined and slightly frothy. This helps create a more uniform batter.
- 4
Emulsify the Butter
Slowly pour 4 tablespoons of the melted butter into the buttermilk and egg mixture while whisking continuously. This creates an emulsion and ensures the fat is evenly distributed for a moist crumb.
- 5
Combine Wet and Dry
Pour the wet ingredients into the bowl containing the dry ingredients. Using a rubber spatula or wooden spoon, gently fold the mixture together until just combined. Do not overmix.
- 6
Check for Lumps
The final batter should be thick and lumpy. Seeing a few small streaks of flour is okay. Overmixing will develop gluten and result in tough cornbread, so err on the side of undermixing.
- 7
Heat Fat in Pan
Carefully remove the preheated skillet from the oven. Add the remaining 2 tablespoons of butter to the hot skillet. Swirl the pan so the butter melts and coats the entire bottom and sides.
- 8
Pour Batter and Bake
Immediately pour the cornbread batter into the hot, buttered skillet. You should hear a sizzle. Spread the batter into an even layer and place the skillet back into the preheated oven.
- 9
Check for Doneness
Bake for 20-25 minutes. The cornbread is done when the top is golden-brown, the edges have pulled away from the sides of the pan, and a wooden skewer inserted into the center comes out clean.
- 10
Cool and Serve
Remove the skillet from the oven and place it on a wire rack. Let the cornbread cool in the skillet for at least 10-15 minutes before slicing and serving. This allows the crumb to set.
Nutrition Facts
Per serving (estimated)
280 calories
Calories
35g
Carbs
7g
Protein
12g
Fat
2g
Fiber
550mg
Sodium
9g
Sugar


