My Favorite Cowboy Candy Recipe (Sweet & Spicy Jalapeños)
Learn to make the best Cowboy Candy! This easy recipe for sweet and spicy pickled jalapeños is perfect for adding a flavor kick to all your meals.
cookwithyara.com/recipes/cowboy-candy-recipe
Welcome to my kitchen! Today, we're stepping away from the daily routine of cooking full meals from scratch and embracing a different kind of preparation: flavor prep. Imagine this: it’s a busy Tuesday evening. You have simple grilled chicken and a scoop of rice, but you’re craving something to make it truly special. You open your pantry, and there it is—a beautiful, glistening jar of homemade Cowboy Candy. In an instant, your simple meal is transformed with a burst of sweet, spicy, and tangy flavor. This is the magic we’re bottling up today.
The constant pressure to plan, shop for, and cook a new meal every single day can be draining. It can turn a joyful act of nourishment into a chore. That's where the beauty of batch-prepping components comes in. By dedicating a single, focused session on a Sunday afternoon, you can create a flavor arsenal that serves you all week, or even all month, long. This Cowboy Candy recipe is the perfect starting point for this philosophy. It’s not a full meal, but it’s the secret ingredient that makes all your other quick meals sing. We’ll spend a little time slicing, simmering, and jarring, filling the kitchen with the most incredible spicy-sweet aroma. In return, we’ll have a shelf-stable condiment ready to elevate everything from sandwiches to grain bowls, turning the mundane into the memorable with just a spoonful.
Why This Recipe Is Perfect for Meal Prep
When we think of meal prep, we often picture neat rows of containers filled with complete meals. While that’s a fantastic strategy, there’s another, more flexible approach: prepping versatile components. This Cowboy Candy recipe is the shining star of this method. It's not about pre-cooking an entire dish that might get soggy by Wednesday; it’s about creating a powerful condiment that lasts for weeks and brings new life to fresh ingredients every single day. The core ingredients—jalapeños, vinegar, and sugar—are natural preservatives. This means that unlike a prepped salad, this condiment doesn't just hold up well; its flavors actually meld, deepen, and improve over time. The sharp heat of the jalapeños mellows slightly, intertwining beautifully with the sweet and tangy syrup. What you bottle on Sunday is even more delicious the following Friday.
The textures are also incredibly resilient. The candying process gives the jalapeño slices a delightful chew that they retain for weeks, even after opening the jar. They don’t become mushy or lose their integrity, which is crucial for a satisfying condiment. This means you can count on that perfect bite every time you add it to a meal. Nutritionally, while it’s a condiment and not a health food, it provides a huge flavor impact for a relatively small serving. This allows you to keep the base of your meals simple and clean—think steamed grains, lean proteins, fresh greens—and use the Cowboy Candy as your primary source of excitement and taste. It’s the ultimate secret weapon for avoiding meal prep fatigue and ensuring your healthy choices are also incredibly delicious.
What You'll Need
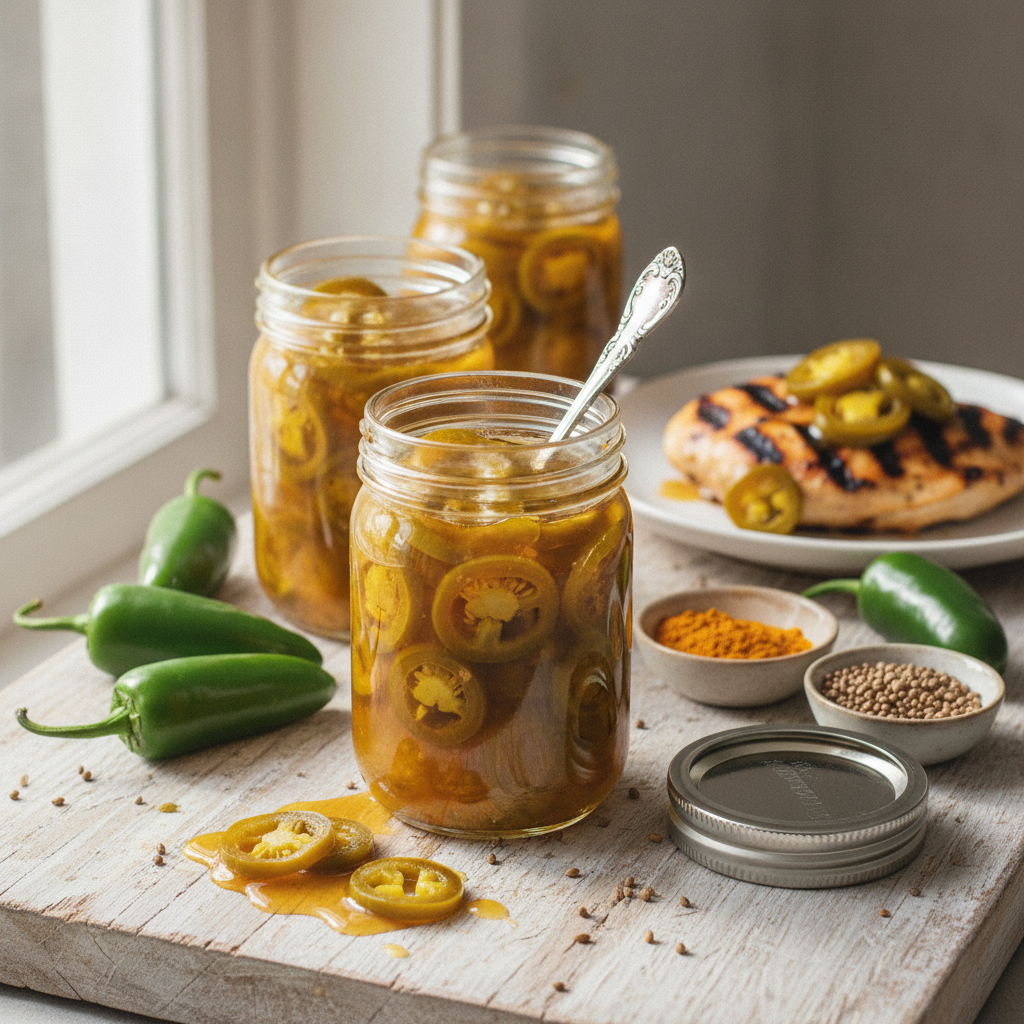
At its heart, this Cowboy Candy recipe is a simple pickle, relying on a few key ingredients to create its signature flavor. Let’s walk through them with a focus on making a big, beautiful batch. First and foremost, the jalapeños. You'll need about two pounds of fresh, firm, and glossy green jalapeños. Look for peppers that are smooth and free of blemishes. The thickness of your slices will determine the final texture; I prefer about 1/4-inch rings for a nice, toothsome bite. Remember to wear gloves while handling them—the capsaicin oils can be potent!
Next, the pickling liquid, or what I call the magic syrup. This starts with apple cider vinegar, which provides a mellow, fruity tang that is less harsh than white vinegar. For the sweetness, we use a combination of granulated white sugar and light brown sugar. The white sugar provides clean sweetness and clarity to the syrup, while the brown sugar adds a subtle molasses note that brings warmth and depth. For the spices, we'll use a blend that complements the heat and sweetness. Ground turmeric gives the syrup its gorgeous golden hue, while ground coriander adds a lemony, floral note. A pinch of garlic powder and a bit of mustard seed round out the flavor profile with a savory backbone. You can, of course, add your own favorite warm spices; a little allspice or a single clove could be wonderful here. Finally, you’ll need good quality glass jars with two-part lids for storage. I recommend half-pint jars, as they are the perfect size for gifting or for keeping in the fridge after opening. Make sure they are impeccably clean and sterilized to ensure your Cowboy Candy lasts for months on the shelf.
The Batch Cooking Method
Making a large batch of this Cowboy Candy recipe is a straightforward and deeply rewarding process. The key is to set up your workspace for an efficient assembly line. First things first: safety and preparation. Put on your gloves! Slice all two pounds of your jalapeños into uniform rings and set them aside in a large bowl. This is the most time-consuming part, so putting on some music or a podcast makes it fly by. Next, prepare your canning jars. Ensure they are washed, rinsed, and kept hot until you're ready to fill them. You can do this by running them through a dishwasher cycle or simmering them in a large pot of water.
Now, for the syrup. In a large, heavy-bottomed pot or Dutch oven, combine the apple cider vinegar, both sugars, and all your spices: turmeric, coriander, garlic powder, and mustard seed. Bring this mixture to a rolling boil over medium-high heat, stirring until the sugar is completely dissolved. The aroma that fills your kitchen at this stage is absolutely incredible—a sweet, tangy, and spicy perfume. Once the syrup is boiling, carefully add your sliced jalapeños. Stir them in and bring the mixture back to a boil. Reduce the heat and let the peppers simmer for exactly five minutes. We are not trying to cook them until soft; this brief simmer is just enough to tenderize them slightly and allow them to absorb the syrup. Do not overcook them, or they will lose their signature crisp-chewy texture. After five minutes, use a slotted spoon to transfer the jalapeño rings from the pot into your prepared hot jars, packing them in tightly but gently. Then, bring the remaining syrup back to a full rolling boil for another five to six minutes. This reduces it slightly, concentrating the flavor. Finally, carefully ladle the hot syrup over the peppers in the jars, leaving about a 1/2-inch of headspace at the top. This process is your one-hour investment for months of flavor.
The Weekly Game Plan
Once you have a few jars of your beautiful homemade Cowboy Candy recipe cooling on the counter, the fun really begins. This isn't a meal you eat once; it's a flavor-booster you deploy all week long to make every meal better. Let's map out a potential week of deliciousness. Your game plan starts on Sunday: that's your prep day where you make the full batch. By Monday, the flavors have already started to meld, and it's ready to go.
Monday: Keep it simple after the weekend. Grill or pan-sear some chicken breasts and serve with a simple quinoa salad. Top the chicken with a generous spoonful of Cowboy Candy. The sweet and spicy syrup will glaze the chicken beautifully, and the peppers will add a zesty crunch.
Tuesday: Elevate your sandwich game. Whether you're making a turkey sandwich or a vegetarian one with hummus and grilled vegetables, a layer of chopped Cowboy Candy will add an incredible burst of flavor that cuts through the richness and makes your lunch anything but boring.
Wednesday: Grain bowl day. Start with a base of brown rice or farro. Add some black beans, corn, avocado, and a sprinkle of crumbled cotija or feta-style cheese. The Cowboy Candy acts as both a topping and a dressing, its syrup mingling with the other ingredients to create a cohesive, vibrant dish.
Thursday: Breakfast for dinner! Scramble some eggs and serve them with a side of savory beef sausage and whole-wheat toast. A small pile of Cowboy Candy on the side is the perfect counterpoint to the rich eggs and savory meat. The combination is surprisingly addictive.
Friday: End the week with a homemade pizza night or flatbreads. Use a simple white sauce or even just olive oil as a base, top with shredded chicken, thinly sliced red onions, and mozzarella. After baking, dot the entire pizza with your Cowboy Candy. The sweet heat is a phenomenal pairing with the melted cheese and savory toppings. This plan shows just how a single batch can turn simple staples into exciting meals day after day.
Smart Storage and Reheating
Properly storing your Cowboy Candy recipe is essential to ensure it remains safe and delicious for as long as possible. Your storage method will depend on how you process the jars. For long-term, shelf-stable storage (up to a year), you’ll need to process the filled jars in a water bath canner. This involves submerging the sealed jars in boiling water for about 10-15 minutes (depending on your altitude) to create a vacuum seal. Once processed and cooled, you’ll hear the satisfying “ping” of the lids sealing. These jars can be stored in a cool, dark place like a pantry.
If you don't want to go through the canning process, you can simply make a “refrigerator pickle” version. After filling the jars and screwing on the lids, just let them cool to room temperature and then store them directly in the refrigerator. This quick method will keep your Cowboy Candy fresh and delicious for at least two to three months, which is plenty of time to enjoy it. I always recommend using glass jars with two-part lids for the best seal and longevity, whether you’re canning or not. Glass is non-reactive and won’t absorb flavors or odors. As for reheating, it's generally not necessary or recommended. Cowboy Candy is best served at room temperature or chilled, straight from the jar. The beauty of this condiment is its ready-to-eat nature. When you add it to a hot dish, like spooning it over grilled chicken or stirring it into a warm grain bowl, the ambient heat of the food will warm it up perfectly. Attempting to microwave it could make the peppers mushy and can alter the delicate balance of the sweet and tangy syrup. Simply scoop and serve for the best texture and flavor every time.
Customization Ideas
One of the best things about this Cowboy Candy recipe is how easily it can be adapted to your personal taste. Think of this recipe as a fantastic blueprint for you to build upon. If you're a true heat-seeker, you can easily dial up the spice. Try swapping out a quarter of the jalapeños for spicier serrano or even habanero peppers. Just be sure to handle them with extra care! Conversely, if you want to share this with family members who are more sensitive to heat, you can make a milder version. Use a mix of jalapeños and mini sweet peppers, or even make a batch entirely with sweet peppers for a tangy, candied treat without the kick.
The syrup itself is a playground for flavor. You can experiment with different vinegars; while apple cider is my go-to for its mellow profile, white wine vinegar would add a brighter, sharper note, and rice vinegar could offer a milder tang. The spice blend is also ripe for personalization. Drawing from my Levantine pantry, I sometimes love to add a pinch of ground allspice or a few whole cloves to the syrup for an extra layer of warmth. A strip of lemon peel simmered in the syrup can also add a lovely citrusy aroma. For a different kind of sweetness, you could replace the brown sugar with an equal amount of honey or maple syrup, which would add their own unique and delicious background notes to the finished product. Don't be afraid to make it your own!
Meal Prep FAQ
How long does this Cowboy Candy really last?
If you process the jars using a water bath canner, they will be shelf-stable in a cool, dark place for up to one year. If you opt for the simpler refrigerator pickle method, your Cowboy Candy will last for a solid 2-3 months in the fridge. The high concentration of vinegar and sugar are excellent natural preservatives.
What are the best containers to use for storage?
Glass canning jars with two-part lids (a flat lid and a screw band) are the gold standard. They provide the best seal and are non-reactive. For this Cowboy Candy recipe, half-pint (8-ounce) jars are the perfect size for personal use or for sharing with friends and family.
How can I use this to avoid meal prep fatigue?
This is where Cowboy Candy truly shines! It’s a flavor bomb that can transform the same base ingredients. You can have grilled chicken three times a week, but with Cowboy Candy one night, a yogurt-dill sauce the next, and a chimichurri the third, it feels like three completely different meals. It's the perfect tool to keep your simple, healthy meals exciting.
Can I pack this for lunch at work?
Absolutely! It's incredibly portable. I recommend packing it in a small, separate container with a tight-fitting lid to avoid making your entire lunchbox spicy. You can then add it to your salad, sandwich, or grain bowl right before eating to maintain the best texture.
Can I make a less spicy version for my family?
You certainly can. The easiest way is to remove the seeds and white membranes from the jalapeños before slicing, as this is where most of the heat resides. For an even milder version, you can substitute half of the jalapeños with mini sweet peppers for all the flavor and color with just a gentle warmth.
Cowboy Candy Recipe (Sweet & Spicy Pickled Jalapeños)
An easy and delicious recipe for making Cowboy Candy at home. These sweet and spicy pickled jalapeños are a versatile condiment perfect for adding a kick to any dish.
Prep Time
20 min
Cook Time
25 min
Total Time
45 min
Servings
4 half-pint jars
Ingredients
For 4 half-pint jars
- 2 lbs fresh jalapeño peppers, sliced into 1/4-inch rings
- 2 cups apple cider vinegar
- 3 cups granulated white sugar
- 1 cup light brown sugar, packed
- 1 tsp ground turmeric
- 1 tsp ground coriander
- 1/2 tsp garlic powder
- 1/2 tsp mustard seeds
Instructions
- 1
Prepare the Peppers
Wearing protective gloves, carefully wash and dry the jalapeño peppers. Slice them into uniform 1/4-inch thick rings. For a milder result, you can remove the seeds and membranes, but traditionally they are left in. Set the sliced peppers aside in a large bowl.
- 2
Sterilize Your Jars
Prepare four half-pint glass canning jars with two-part lids. Wash the jars, lids, and bands in hot, soapy water and rinse well. To keep them hot and sterile, place the jars in a large pot of simmering water until you are ready to fill them.
- 3
Create the Syrup Base
In a large, heavy-bottomed pot or Dutch oven, combine the apple cider vinegar, granulated sugar, and light brown sugar. Stir the ingredients together over medium-high heat.
- 4
Add Spices and Boil
Add the ground turmeric, ground coriander, garlic powder, and mustard seeds to the pot. Continue stirring until the sugars are completely dissolved and the mixture comes to a full, rolling boil.
- 5
Simmer the Jalapeños
Carefully add the sliced jalapeños to the boiling syrup. Stir gently to coat all the peppers. Bring the mixture back to a boil, then reduce the heat to maintain a steady simmer.
- 6
Cook for Five Minutes
Allow the jalapeños to simmer in the syrup for exactly 5 minutes. This is just enough time to soften them slightly without making them mushy. Do not overcook, as you want them to retain a slight bite.
- 7
Pack the Jars
Using a slotted spoon, carefully remove the jalapeño rings from the pot and pack them tightly into your prepared hot jars. Leave about 1 inch of headspace at the top of each jar.
- 8
Reduce the Syrup
Return the pot with the remaining syrup to high heat. Bring it to a hard, rolling boil and cook for an additional 5-6 minutes. This helps to slightly thicken the syrup and concentrate its flavor.
- 9
Fill the Jars with Syrup
Carefully ladle the hot syrup over the jalapeños in the jars, making sure to cover them completely. Fill each jar, leaving a 1/2-inch of headspace at the top.
- 10
Remove Air Bubbles and Seal
Use a clean chopstick or bubble-remover tool to run along the inside of the jars, releasing any trapped air bubbles. Wipe the rims of the jars with a clean, damp cloth to ensure a good seal. Place the flat lids on top and screw on the bands until they are fingertip-tight.
- 11
Process or Refrigerate
For long-term storage, process the jars in a water bath canner for 15 minutes. Otherwise, allow the jars to cool to room temperature before storing them in the refrigerator. The flavors are best after letting them rest for at least 48 hours.
Nutrition Facts
Per serving (estimated)
60 calories
Calories
15g
Carbs
0.2g
Protein
0.1g
Fat
0.5g
Fiber
5mg
Sodium
14g
Sugar