Easy Falafel Recipe (Authentic, Crispy & Fluffy)
My easy falafel recipe gives you perfectly crispy, fluffy, and flavorful falafel every time! Made with simple ingredients and baked or fried.
cookwithyara.com/recipes/easy-falafel-recipe
There are few culinary delights as universally loved as a perfectly made falafel. That delightful crunch of the golden-brown exterior giving way to a warm, fluffy, and vibrantly green interior is pure magic. It’s the star of countless pita sandwiches, the hero of hearty grain bowls, and a welcome appetizer at any gathering. For years, I thought this level of perfection was reserved for street food vendors and specialty restaurants. I assumed it required secret techniques or complicated equipment. But I'm here to tell you that the most delicious, authentic falafel is incredibly achievable right in your own kitchen. The key is a handful of simple, fresh ingredients and a method that honors the texture and flavor of each component. This easy falafel recipe is the result of much testing and a deep respect for tradition. It skips the canned chickpeas—a shortcut that always leads to disappointment—and instead relies on the humble dried chickpea to create that signature light, airy crumb that sets truly great falafel apart. Forget dense, pasty, or dry falafel forever. We're about to create beautiful, aromatic morsels of joy that will transport you to a bustling Middle Eastern market with the very first bite. Get ready to master this staple; your weeknight dinners are about to get a major upgrade.
The Soul of an Authentic Falafel
To truly understand how to make an easy falafel recipe, we have to understand its soul. Falafel is not just a fried patty; it's a celebration of texture and fresh, vibrant flavor. The philosophy behind perfect falafel is built on a few non-negotiable principles. The most important of these is the foundation: the chickpeas. Authentic falafel is never made with canned chickpeas. Canned chickpeas are cooked and water-logged, which creates a pasty, dense texture when processed. The magic lies in using dried chickpeas that have been soaked in water overnight. This process rehydrates them perfectly, leaving them tender enough to grind but still firm and raw. This raw, starchy texture is precisely what creates that coveted fluffy, crumbly interior that steams perfectly when cooked. It’s the difference between a falafel that feels heavy and one that feels light as air. The second principle is the celebration of herbs. A great falafel should be visibly green inside, a testament to a generous hand with fresh parsley and cilantro. These aren't just for color; they provide an essential, bright herbaceousness that cuts through the richness of the fried exterior and the earthiness of the spices. Finally, a perfect falafel respects the integrity of its ingredients. It isn't ground into a uniform paste. Instead, the mixture should have a coarse, almost sandy texture. This allows for tiny air pockets to form, which expand during cooking, contributing to that incredible fluffiness. This is more than a recipe; it's a technique that, once mastered, will connect you to a long and beautiful culinary tradition.
What Goes Into This Easy Falafel Recipe
Simplicity is at the heart of this dish, where each ingredient plays a crucial and distinct role. The quality of your falafel is directly tied to the quality of these components. Let's walk through what makes this recipe sing.
Dried Chickpeas: As I mentioned, this is the non-negotiable star. You'll need standard dried chickpeas (garbanzo beans). When you buy them, look for beans that are uniform in color and not overly shriveled. They are the structural backbone and provide the nutty flavor and perfect crumbly texture that defines this easy falafel recipe.
Fresh Parsley & Cilantro: These are the soul of the flavor. I use a very generous amount of both, stems and all, as the stems pack a ton of flavor. I prefer flat-leaf parsley for its robust, less bitter taste compared to curly parsley. Together with cilantro, they create a fresh, zesty, and aromatic profile that makes the falafel taste alive and vibrant.
Yellow Onion & Fresh Garlic: These are our aromatic foundation. A yellow onion provides a subtle sweetness and depth when raw, which balances the other flavors. Fresh garlic cloves add that essential pungent kick. Don't be tempted to substitute with powders; the flavor of fresh alliums is critical here.
Warm Spices: My preferred blend is a classic trio: ground cumin, ground coriander, and a pinch of cayenne pepper. Cumin brings a warm, earthy, and slightly smoky depth. Coriander adds a bright, citrusy, and floral note that complements the fresh herbs beautifully. The cayenne is for a whisper of background heat—not enough to make it spicy, but just enough to make the other flavors pop. Of course, good quality sea salt and freshly ground black pepper are essential to tie everything together.
Baking Powder: This is my secret weapon for the fluffiest falafel. Just a small amount reacts with the moisture and heat during cooking, creating tiny bubbles that lighten the interior texture. It's a simple addition that makes a world of difference, ensuring your falafel is never dense.
Neutral Oil for Frying: If you choose to fry your falafel, the oil matters. You need a neutral-flavored oil with a high smoke point. Canola, grapeseed, sunflower, or vegetable oil are all excellent choices. You want the flavor of the falafel to shine, not the flavor of the oil.
Mastering the Falafel Mixture: A Step-by-Step Guide
The process of creating the falafel mixture is where the magic truly happens. It's not difficult, but it does require attention to detail to achieve that perfect texture. Rushing these steps is the number one reason falafel can fail.
First, the soak. This is the most passive yet most important step. You must soak your dried chickpeas in a large bowl with plenty of cold water for at least 8 hours, or preferably overnight. They will more than double in size, so be sure your bowl is large enough. This long soak fully rehydrates the beans, making them tender enough to process while retaining their essential raw, starchy structure. After soaking, you must drain them thoroughly and pat them dry. Excess water is the enemy of a cohesive falafel mixture.
Next, it's time for the food processor. This is the ideal tool for achieving the perfect consistency. Combine the soaked and dried chickpeas, roughly chopped onion, garlic cloves, parsley, and cilantro in the bowl of the processor. Now, the key is to pulse, not blend. You want to pulse the mixture in short bursts, scraping down the sides of the bowl frequently. You're aiming for a texture that resembles coarse sand or fine gravel. It should not be a smooth paste. If you over-process, you'll end up with a hummus-like consistency, which will result in dense, heavy falafel. A good visual cue is when all the large pieces are gone and the mixture looks uniformly crumbly and vibrant green.
Once you have the right texture, transfer the mixture to a large bowl. Now it's time to add the flavorings and binder. Sprinkle in the ground cumin, ground coriander, salt, pepper, a pinch of cayenne, and the baking powder. Gently mix everything together with a spoon or your hands until just combined. Don't overmix. The final, crucial step before shaping is to let the mixture rest. Cover the bowl and place it in the refrigerator for at least 30 minutes, and up to an hour. This chilling period is vital. It allows the flavors to meld and, more importantly, lets the starch from the chickpeas hydrate and become stickier, which helps the falafel hold its shape beautifully without needing eggs or a lot of flour. This patient approach is what makes this easy falafel recipe foolproof.
The Great Debate: Frying vs. Baking Your Falafel
How you cook your falafel is a matter of personal preference, and both methods can yield delicious results with this versatile easy falafel recipe. One offers unparalleled crispy texture, while the other provides a lighter, healthier alternative.
The Art of Frying: For the most authentic, shatteringly crisp exterior and moist interior, frying is the way to go. The key is oil temperature. You'll want to heat about 2-3 inches of a neutral, high-smoke-point oil in a heavy-bottomed pot or Dutch oven to between 350-360°F (175-182°C). A thermometer is your best friend here. If the oil is too cool, the falafel will absorb too much oil and become greasy and heavy. If it's too hot, the outside will burn before the inside is cooked through. Once the oil is ready, gently lower the shaped falafel balls or patties into the oil, being careful not to overcrowd the pot. Cook them in batches for about 3-5 minutes, turning occasionally, until they are a deep golden brown and beautifully crisp. You'll know they're ready when they float to the surface and sound hollow and crisp when tapped. Use a slotted spoon to transfer them to a wire rack set over a baking sheet to drain. Sprinkling them with a tiny pinch of salt while they're still hot is a pro move that makes them even more delicious.
The Beauty of Baking: For a lighter option that's still wonderfully flavorful, baking is an excellent choice. Preheat your oven to 400°F (200°C) and line a baking sheet with parchment paper. Brush or spray the parchment paper with a little olive oil. Shape your falafel into slightly flattened patties, which promotes more even baking and browning. Arrange them on the prepared baking sheet, leaving some space between each one. Lightly brush or spray the tops of the falafel with oil. This is essential for helping them develop a golden, crispy crust. Bake for 25-30 minutes, flipping them carefully halfway through, until they are golden brown and firm to the touch. While baked falafel won't have the same deep-fried crunch, they develop a wonderfully toasted exterior and remain deliciously moist and fluffy inside. This method makes our easy falafel recipe a fantastic choice for healthy weeknight meals.
How to Serve Falafel Like a Pro
Once you have a fresh batch of warm, fragrant falafel, the fun truly begins. Serving them thoughtfully can elevate the entire experience from a simple meal to a memorable feast. While delicious on their own, falafel truly shine when paired with complementary sauces, salads, and breads.
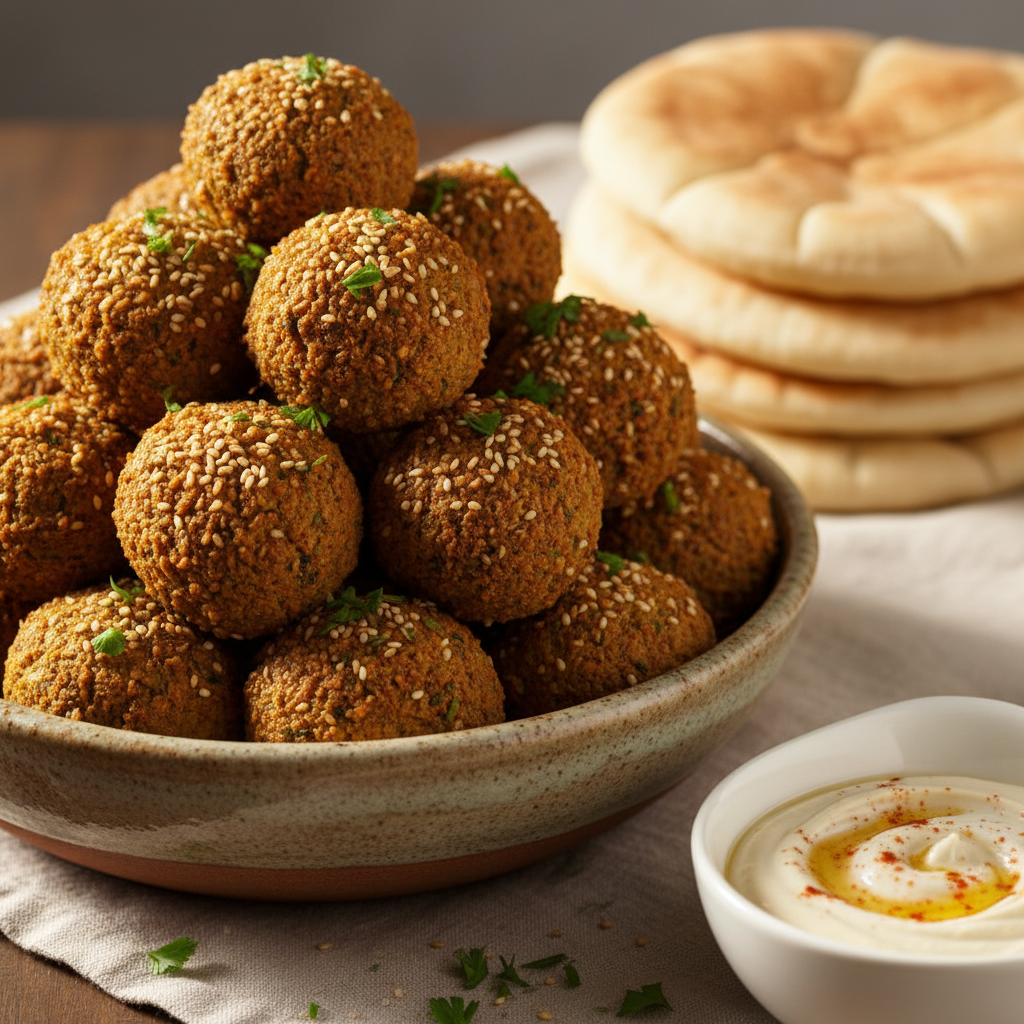
The most classic presentation is, of course, the falafel pita sandwich. Start with a soft, warm pita bread. Gently open the pocket and slather the inside with a generous layer of creamy hummus and a drizzle of tangy tahini sauce. For the tahini sauce, simply whisk together tahini paste, lemon juice, a minced garlic clove, and a splash of cold water until you have a smooth, pourable consistency. Season with salt. Next, tuck in three or four hot falafel, gently crushing them slightly to distribute them. Then, pile in the fresh components: crisp lettuce, diced juicy tomatoes, and thinly sliced cucumbers. The final, essential touch is something pickled. The sharp, salty acidity of Middle Eastern pickled turnips or even simple dill pickles cuts through the richness of the falafel perfectly.
Another fantastic way to enjoy this easy falafel recipe is in a falafel bowl. This deconstructed approach is perfect for a balanced and satisfying meal. Start with a base of fluffy couscous, quinoa, or a bed of mixed greens. Arrange a generous serving of falafel on top, and then surround it with colorful toppings. Think roasted red peppers, marinated artichoke hearts, Kalamata olives, and a scoop of tabbouleh. A generous drizzle of that same tahini sauce over the entire bowl ties all the flavors together beautifully. For an even simpler presentation, especially for gatherings, serve the falafel on a large platter as an appetizer, surrounded by bowls of hummus, baba ghanoush, and tahini for dipping. A platter of fresh, crunchy vegetables like carrots, bell peppers, and cucumbers makes a wonderful accompaniment.
Storing, Freezing, and Reheating
One of the best things about this easy falafel recipe is how well it lends itself to meal prep. Both the uncooked mixture and the cooked falafel can be stored for later, saving you precious time on busy weeknights.
Storing the Mixture: If you want to get a head start, you can prepare the falafel mixture (up to the point before adding the baking powder) and store it in an airtight container in the refrigerator for up to 3 days. When you're ready to cook, simply stir in the baking powder, shape, and proceed with frying or baking. The flavors will have melded even more beautifully overnight.
Freezing Uncooked Falafel: For longer-term storage, freezing the uncooked patties is the best method for preserving that perfect texture. Shape the mixture into balls or patties and arrange them in a single layer on a parchment-lined baking sheet. Place the sheet in the freezer until the falafel are frozen solid, about 1-2 hours. Once firm, transfer them to a freezer-safe bag or container. They can be stored for up to 3 months. You can cook them directly from frozen; just add a few extra minutes to the frying or baking time.
Storing and Reheating Cooked Falafel: Leftover cooked falafel can be stored in an airtight container in the refrigerator for 3-4 days. The challenge with reheating is to bring back that signature crispiness without drying them out. The microwave is not your friend here; it will make them soft and rubbery. The best way to reheat falafel is in the oven or an air fryer. Preheat your oven or air fryer to 375°F (190°C) and bake the falafel for 5-8 minutes, until they are heated through and the exterior is crisp again.
Your Falafel Questions, Answered
Can I really not use canned chickpeas for this easy falafel recipe?
I know it's tempting, but I strongly advise against it. Canned chickpeas are fully cooked and have a high moisture content, which results in a mushy, paste-like mixture. This paste doesn't hold together well during frying and leads to a dense, heavy falafel. The raw, soaked dried chickpeas are the essential secret to the light, crumbly, and fluffy interior that makes falafel so special.
My falafel fell apart when I tried to fry them. What went wrong?
This is a common issue with a few possible causes. The most likely culprit is a mixture that is too wet. Make sure you drain and pat your soaked chickpeas very dry. It could also be that the mixture wasn't processed to the right consistency—if it's too coarse, it won't hold together. Lastly, ensure you let the mixture rest in the fridge for at least 30 minutes. This chilling step is crucial for allowing the starches to bind everything together. If you're still having trouble, you can mix in a tablespoon of chickpea flour as a binder.
How can I get my baked falafel extra crispy?
There are a few tricks for maximizing crispiness when baking. First, shape them into flatter patties rather than balls to increase the surface area that makes contact with the hot pan. Second, don't skimp on the oil. Brushing or spraying both the parchment paper and the tops of the falafel with oil is key to helping them brown and crisp up. Finally, use a high oven temperature, around 400°F (200°C), and make sure you flip them halfway through cooking to crisp up both sides evenly.
Can I freeze the falafel?
Absolutely! Freezing is a fantastic way to enjoy this easy falafel recipe anytime. For the best results, I recommend freezing them uncooked. Shape the patties, place them on a baking sheet, and freeze until solid. Then transfer them to a freezer bag. You can fry or bake them directly from frozen, just add a few extra minutes to the cooking time. You can also freeze cooked falafel, though they may lose a bit of their texture upon reheating.
What is the best oil for frying falafel?
You want a neutral oil with a high smoke point so it doesn't burn or impart a strong flavor. Excellent choices include canola oil, vegetable oil, sunflower oil, grapeseed oil, or peanut oil. The key is to maintain a steady temperature of around 350-360°F (175-182°C) for that perfect golden-brown, crispy result without the greasiness.
Easy Falafel Recipe (Authentic & Crispy)
A foolproof, authentic, and easy falafel recipe that delivers perfectly crispy, fluffy, and flavorful falafel every time. Suitable for frying or baking.
Prep Time
20 min
Cook Time
15 min
Total Time
35 min
Servings
6 servings
Ingredients
For 6 servings
- 1 cup dried chickpeas (about 200g)
- 1/2 medium yellow onion, roughly chopped
- 4 cloves garlic, peeled
- 1 packed cup fresh parsley (stems included)
- 1 packed cup fresh cilantro (stems included)
- 1 tsp ground cumin
- 1 tsp ground coriander
- 1/2 tsp sea salt, or to taste
- 1/4 tsp black pepper
- 1/8 tsp cayenne pepper (optional)
- 1 tsp baking powder
- Neutral oil for frying (such as canola, vegetable, or sunflower oil)
Instructions
- 1
Soak the Chickpeas
Place the dried chickpeas in a large bowl and cover with at least 3 inches of cold water. Let them soak for at least 8 hours or overnight. Do not use canned chickpeas. The chickpeas will more than double in size.
- 2
Drain and Dry
Once soaked, drain the chickpeas thoroughly in a colander. Pat them completely dry with a clean kitchen towel or paper towels. This step is crucial to prevent the mixture from being too wet.
- 3
Process the Base
Combine the drained chickpeas, chopped onion, garlic, parsley, and cilantro in the bowl of a food processor. Pulse in short bursts, scraping down the sides of the bowl as needed.
- 4
Achieve the Right Texture
Continue pulsing until the mixture has a texture resembling coarse sand or fine gravel. Be careful not to over-process into a paste. The mixture should be crumbly but should hold together when squeezed in your hand.
- 5
Add Seasonings
Transfer the mixture to a large bowl. Add the ground cumin, ground coriander, salt, black pepper, cayenne pepper (if using), and baking powder. Mix gently with a spoon until everything is well combined.
- 6
Chill the Mixture
Cover the bowl and refrigerate the falafel mixture for at least 30 minutes, or up to 1 hour. This resting period allows the flavors to meld and helps the mixture bind together, making it easier to shape.
- 7
Shape the Falafel
Using your hands or a falafel scoop, shape the mixture into small balls or patties, about 1.5 inches in diameter. Pack the mixture firmly so they hold their shape. This recipe should yield about 20-24 falafel.
- 8
Prepare for Cooking
Decide whether you will fry or bake. For frying, proceed to the next step. For baking, preheat your oven to 400°F (200°C) and line a baking sheet with parchment paper.
- 9
Fry the Falafel (Method 1)
Pour 2-3 inches of neutral oil into a heavy-bottomed pot. Heat the oil to 350-360°F (175-182°C). Carefully lower 5-6 falafel balls into the hot oil, ensuring not to overcrowd the pot.
- 10
Fry Until Golden
Fry for 3-5 minutes, turning occasionally, until they are deep golden brown and crispy on all sides. Use a slotted spoon to remove them from the oil and place them on a wire rack to drain. Sprinkle with a little salt while hot.
- 11
Bake the Falafel (Method 2)
For the baking method, arrange the shaped patties on the prepared baking sheet. Lightly brush or spray the tops with olive oil. This helps them get crispy and golden.
- 12
Bake Until Firm
Bake for 25-30 minutes, flipping halfway through, until the falafel are golden brown and firm to the touch. They will be less crispy than fried falafel but still delicious and moist inside.
Nutrition Facts
Per serving (estimated)
320 calories
Calories
35g
Carbs
10g
Protein
16g
Fat
9g
Fiber
450mg
Sodium
3g
Sugar