Easy Flag Fruit Pizza Recipe (Perfect for Gatherings!)
Learn how to make the best Flag Fruit Pizza! A soft cookie crust, creamy topping, and fresh berries make this easy dessert a showstopper for any celebration.
cookwithyara.com/recipes/flag-fruit-pizza
There’s a special kind of magic that happens when food becomes art. It’s a tradition as old as time, from the intricate patterns on Levantine pastries to the beautiful plating in modern kitchens. It’s the idea that what we eat should delight the eyes before it ever touches the lips. This is exactly the spirit captured in a Flag Fruit Pizza. It’s more than just a dessert; it’s a centerpiece, a conversation starter, and a joyful expression of creativity that brings everyone to the table with a sense of wonder. At its heart, it’s a simple concept: a giant, tender sugar cookie base, a luscious and tangy cream cheese spread, and a vibrant mosaic of fresh fruit. When you bring one out, you see the smiles form immediately. The beauty of this recipe is its deceptive simplicity. It might look intricate and complex, something reserved for a skilled baker, but I promise you, it’s one of the most forgiving and enjoyable desserts you can make. The process is a series of easy, manageable steps. Once you understand the why behind each step—why the cookie crust needs to be sturdy yet soft, why the frosting needs to be cool and stable—the how becomes intuitive and effortless. This recipe isn’t about perfection; it’s about the pleasure of creating something beautiful and delicious to share with people you care about. So let’s break down the barriers and build this beautiful flag fruit pizza together.
The Delicious Science Behind a Perfect Fruit Pizza
Every great recipe is a quiet dance of science, and understanding the steps of that dance makes you a more confident and intuitive cook. A Flag Fruit Pizza is a fantastic example of a few simple scientific principles working in perfect harmony to create a delicious outcome. Let's start with the foundation: the sugar cookie crust. The goal here is a texture that is tender and soft, almost like a very thick cookie, but sturdy enough to hold its shape when sliced. This is all about gluten development. When you mix flour with water (in this case, the moisture from the butter and egg), two proteins called glutenin and gliadin link together to form gluten strands. The more you mix, the stronger and more elastic this network becomes, which is wonderful for chewy bread but not for a tender cookie. That's why the instructions emphasize mixing just until the flour is combined. The fat from the butter also plays a crucial role by coating the flour particles, which physically shortens the potential gluten strands, a process aptly named “shortening.” As it bakes, the edges undergo the Maillard reaction, a beautiful chemical reaction between amino acids and reducing sugars that gives us those deeply golden, toasted, and nutty flavors, while the center stays soft and pale. Next, the creamy frosting. This is a classic emulsion of fat (from the cream cheese) and sugar. Using full-fat, block-style cream cheese is non-negotiable here. Its lower water content and high fat content create a thick, stable structure that won’t become watery or weep into the cookie crust. The powdered sugar dissolves completely, creating a smooth, non-gritty texture, and its fine cornstarch content helps to further stabilize the frosting. Finally, the fruit topping. The biggest challenge with fresh fruit is oxidation—the enzymatic browning that occurs when fruits like apples or bananas are exposed to air. While the berries in our flag fruit pizza are less prone to this, a simple glaze of warmed apricot or apple jelly does more than just add a beautiful, professional-looking shine. It creates a barrier, sealing the fruit from the air, which keeps it looking vibrant and fresh for much longer and prevents it from drying out.
Essential Tools and Ingredients You'll Need
One of the best things about making a flag fruit pizza is that it doesn’t require any highly specialized or expensive equipment. You likely have everything you need in your kitchen already. The most important tool is a good mixer. A stand mixer with a paddle attachment makes creaming the butter and sugar effortless, but a reliable electric hand mixer works just as beautifully. If you have neither, a sturdy whisk, a good bowl, and a bit of determination will get you there! For baking the crust, a rectangular 10x15-inch rimmed baking sheet (often called a jelly roll pan) is perfect for creating the classic flag shape. However, don't feel limited by this! A large 12 or 14-inch round pizza pan is a fantastic alternative for creating a stunning radial design. The key is to have a large, flat surface. To ensure your masterpiece comes out of the pan perfectly, I always recommend lining it with parchment paper. It’s a simple step that guarantees an easy lift and no sticking. Lastly, an offset spatula will be your best friend for spreading the frosting. Its angled shape allows you to create a perfectly smooth, even canvas without dragging your knuckles through the cream cheese. If you don't have one, the back of a large spoon will work in a pinch. When it comes to ingredients, quality makes a noticeable difference. For the crust, use unsalted butter so you can control the salt content. It absolutely must be at room temperature—soft enough to indent with a finger but not greasy or melted. This is crucial for properly aerating the dough. For the frosting, always choose full-fat, block-style cream cheese. The whipped kind in a tub has too much air and water and will result in a runny frosting. For our fruit, look for the freshest, most vibrant berries you can find. Blueberries should be plump and firm, and strawberries should be fragrant and ruby-red all the way through. This is the star of the show, so choose wisely! Finally, for a beautiful finish, a simple jar of apricot preserves, which we'll warm to create a glaze, adds that professional touch and a subtle, fruity sweetness that complements the berries perfectly.
The Method: Assembling Your Masterpiece, Step by Step
Let’s walk through the creation of your beautiful flag fruit pizza, focusing on the sensory cues and techniques that ensure success. Think of this as a delicious, edible art project.
Stage 1: The Cookie Foundation. Begin by creaming your room-temperature butter and granulated sugar. In your mixer, beat them together on medium speed for a good 3-4 minutes. You're not just combining them; you're whipping air into the butter. Watch as the color transforms from a pale yellow to a creamy, almost-white, and the texture becomes light and fluffy. This aeration is what helps give the cookie its tender crumb.
Stage 2: Building the Dough. Scrape down the sides of the bowl, then add your egg and non-alcoholic vanilla extract. Mix until they are fully incorporated, creating a smooth, cohesive mixture. Now, for the most important part: adding the dry ingredients. Whisk your flour, baking powder, and salt together in a separate bowl first to ensure they're evenly distributed. Add them to the wet ingredients and mix on the lowest possible speed just until the last streaks of flour disappear. Over-mixing at this stage is the number one cause of a tough crust, so be gentle. The dough will be very soft, almost like a thick batter.
Stage 3: The Bake. Press the soft dough into your parchment-lined rectangular pan. To do this without creating a sticky mess, you can lightly flour your hands or use another piece of parchment on top to press it out evenly. An even thickness is key to an even bake. Bake in a preheated oven until the edges are a light golden brown and the center is set. The aroma of a giant sugar cookie baking will fill your home—it’s one of the best parts!
Stage 4: The Crucial Cool-Down. This step requires patience but is absolutely critical. You must let the cookie crust cool completely in the pan, and then on a wire rack. I mean completely. Even a slightly warm crust will melt your beautiful cream cheese frosting into a soupy mess. This is a great time to wash your berries and pat them thoroughly dry.
Stage 5: The Creamy Canvas. While the crust cools, prepare the frosting. Make sure your block cream cheese is softened but still cool to the touch. Beat it on its own for a minute to get it perfectly smooth and eliminate any lumps. Then, gradually add the powdered sugar and vanilla, mixing on low speed at first (to avoid a sugar cloud!) and then on medium until it's perfectly smooth, creamy, and spreadable.
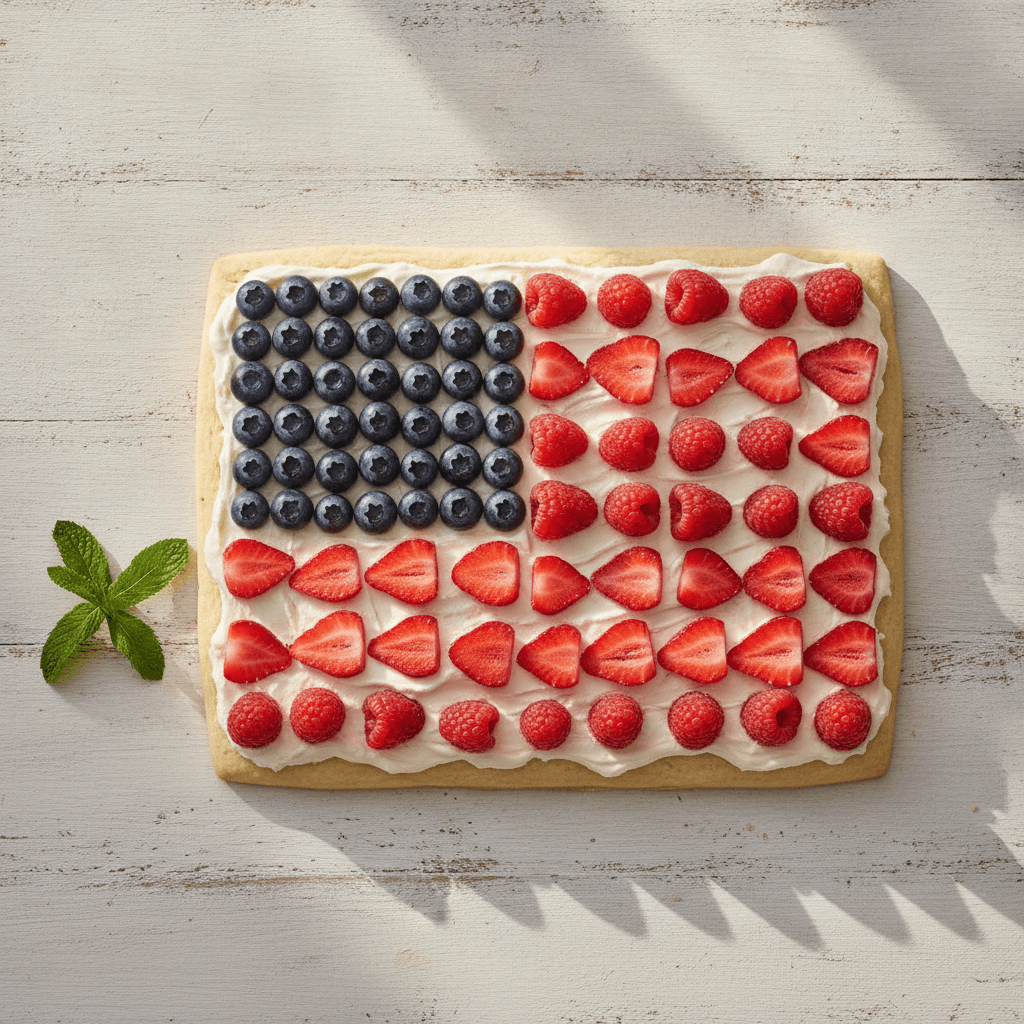
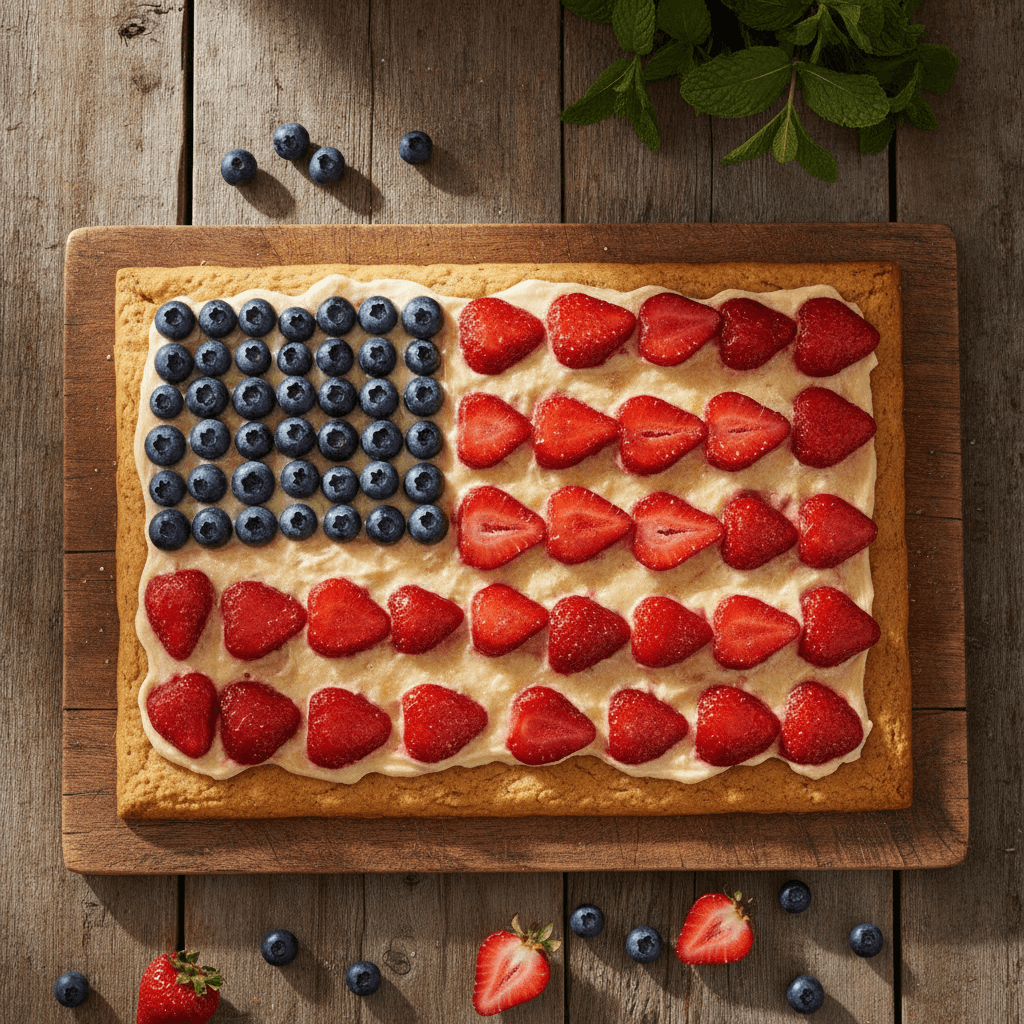
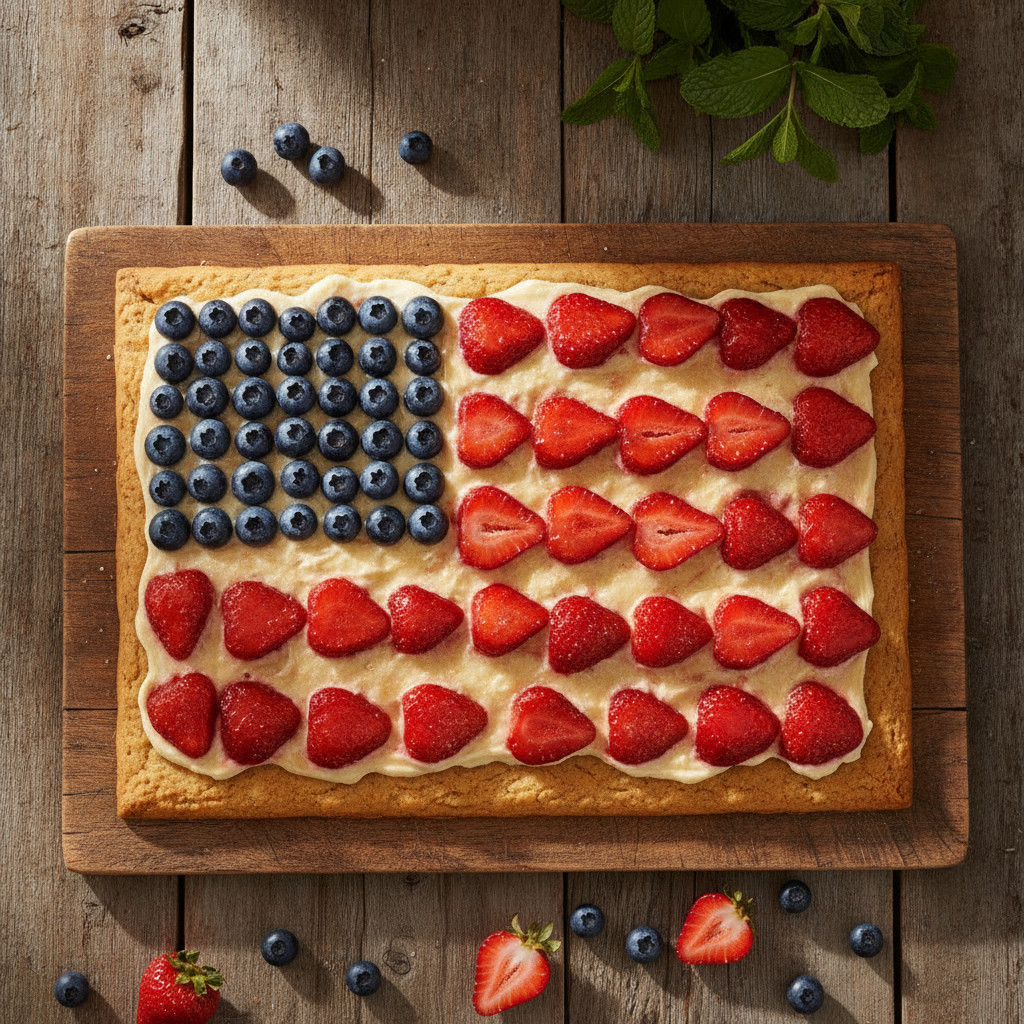
Stage 6: The Artistic Arrangement. Once the crust is cool, it's time to assemble your flag fruit pizza. Spread the frosting evenly over the top with your offset spatula. Now for the fun part! Create the canton (the blue square) in the top left corner by arranging your blueberries closely together. Then, create the stripes by laying down rows of sliced strawberries or raspberries. Take your time with this; it's a relaxing and rewarding process.
Stage 7: The Professional Finish. The final touch is the glaze. Gently warm a few tablespoons of apricot preserves with a teaspoon of water in a small saucepan or the microwave until it's liquid and brushable. Using a pastry brush, lightly dab the glaze over the fruit. This adds a gorgeous shine and helps keep the fruit looking fresh and vibrant. Chill your finished flag fruit pizza for at least 30 minutes before slicing and serving to allow the frosting to set up, ensuring clean, beautiful slices.
Troubleshooting Your Flag Fruit Pizza
Even the most straightforward recipes can sometimes present a challenge, but don't worry! Most issues with a flag fruit pizza are easily preventable or fixable. Here are some common problems and how to solve them.
If your cookie crust is tough and hard, not soft and tender... This is almost always due to one of two things: over-mixing the dough after adding the flour, or over-baking the crust. When you over-mix, you develop too much gluten, resulting in a tough, chewy texture instead of a soft, tender one. Next time, mix only until the flour is just incorporated. If it’s over-baked, the edges will be dark brown and the whole crust will be hard. Keep a close eye on it in the oven; you want just a hint of golden color at the very edges.
If your cream cheese frosting is runny or soupy... This common issue usually happens when the cream cheese is too warm or when you use whipped cream cheese from a tub instead of the block variety. Block cream cheese has a much lower water content, which is essential for a stable frosting. Make sure your cream cheese is softened but still cool. If your frosting does turn out too thin, you can usually rescue it by chilling it in the refrigerator for 30-60 minutes to help it firm up before spreading.
If your fruit weeps and makes the crust soggy... Moisture is the enemy of a crisp crust. This problem arises if the fruit isn't dried completely after washing or if the fruit pizza sits for too long before being served. Always pat your berries completely dry with a paper towel before arranging them. Assembling the flag fruit pizza on the day you plan to serve it, ideally just a few hours ahead, is the best strategy. The optional apricot glaze also provides a helpful barrier between the moist fruit and the frosting.
If your cookie crust stuck to the pan... There's nothing more frustrating than a beautiful bake that won't come out of the pan. This is a simple preparation issue. The foolproof solution is to always use a sheet of parchment paper. Cut it to fit the bottom of your pan with a little overhang on two sides to act as 'handles,' making it incredibly easy to lift the entire cookie crust out once it's cooled.
If your design doesn't look as neat as you'd like... Don't be hard on yourself! This is about having fun. To get cleaner lines, take your time. Plan your layout before you start placing fruit. You can use the edge of a knife to gently score guidelines in the frosting for your stripes. Also, try to use berries that are similar in size for a more uniform look. Remember, even a rustic-looking flag fruit pizza is still incredibly delicious and will be appreciated by everyone.
Taking It to the Next Level
Once you've mastered the classic flag fruit pizza, there are so many ways to add your own creative, personal touch. Think of the basic recipe as a canvas for your culinary imagination. One of the easiest ways to elevate the flavor is by infusing the components. Add the finely grated zest of a lemon or an orange to either the cookie dough or the cream cheese frosting. This adds a bright, fragrant citrus note that cuts through the richness beautifully. For a touch of my own Levantine kitchen, a very small drop of rosewater or orange blossom water in the frosting can transform the dessert into something truly special and aromatic. You can also play with the texture of the crust. For a nutty crunch, try adding a half-cup of finely chopped toasted almonds or even pistachios to the cookie dough. This adds another layer of flavor and a wonderful textural contrast to the soft frosting and juicy berries. For an even more professional presentation, don’t underestimate the power of a decorative border. Simply reserve a small amount of the frosting, place it in a piping bag with a star tip, and pipe a simple shell or star border around the entire edge of the pizza. It’s a simple technique that makes your flag fruit pizza look like it came straight from a bakery.
Storing and Serving Your Creation
A Flag Fruit Pizza is at its absolute peak of deliciousness on the day it is made. The textural contrast between the slightly crisp-edged, soft-centered cookie, the creamy frosting, and the fresh, juicy berries is best enjoyed within a few hours of assembly. However, if you do have leftovers or need to store it for a short time, you certainly can. The key is proper storage to preserve its integrity as much as possible. Cover the fruit pizza loosely with plastic wrap. To prevent the wrap from sticking to the fruit and messing up your beautiful design, you can insert a few toothpicks into the pizza to create a tent-like structure. Store it in the refrigerator for up to two days. It's important to be aware that the longer it sits, the more moisture from the frosting will migrate into the cookie crust, causing it to soften. While it will still be very tasty on day two, it won't have that same perfect cookie texture as it did on day one. I always recommend serving this dessert chilled, straight from the refrigerator. The cool temperature makes it incredibly refreshing, especially on a warm day, and it helps the frosting stay firm, which ensures cleaner, neater slices when you serve your beautiful flag fruit pizza.
Common Questions About Flag Fruit Pizza
Can I make this dessert ahead of time?
Yes, you can definitely prep parts of it in advance to save time! The best approach is to bake the sugar cookie crust up to one day ahead. Once it's completely cooled, store it tightly wrapped at room temperature. You can also make the cream cheese frosting a day or two in advance and keep it in an airtight container in the refrigerator. On the day you plan to serve it, all you need to do is give the frosting a quick stir, spread it on the crust, and arrange the fruit.
What if I don't have a rectangular pan?
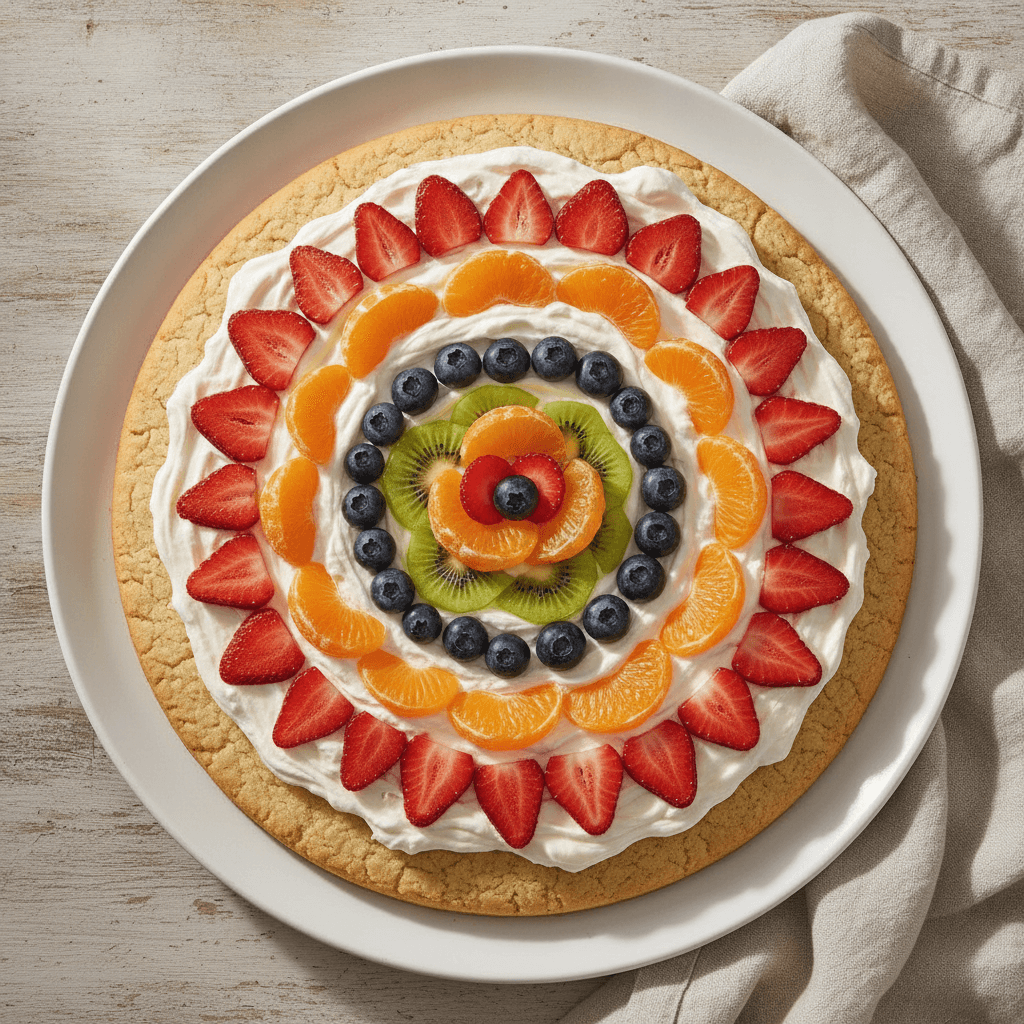
A rectangular pan is great for the classic flag design, but it's not the only option! A large round pizza pan (12-14 inches) works wonderfully. Instead of a flag, you can create a beautiful mandala or radial pattern with the fruit, starting from the center and working your way out. You could also press the dough into two 9-inch round cake pans to make two smaller fruit pizzas.
My berries aren't very sweet. How can I improve my flag fruit pizza?
This can happen, especially with out-of-season fruit. There are a couple of easy fixes. First, you can make your apricot glaze a little sweeter by adding a tablespoon of sugar to it while it warms. A sweeter glaze will balance the tartness of the berries. Alternatively, you can macerate the sliced strawberries. Simply toss them in a bowl with a tablespoon of sugar about 15-20 minutes before you assemble the pizza. The sugar will draw out their juices and sweeten them up nicely.
Can I use different fruits for the topping?
Absolutely! While blueberries and strawberries or raspberries are traditional for the flag fruit pizza design, you can use any fruit you love for a general fruit pizza. Sliced kiwi, mandarin orange segments, mango chunks, and grapes are all fantastic choices. The key is to choose fruits that are not excessively watery, like watermelon, as they can make the crust soggy very quickly.
Is there a good gluten-free alternative for the crust?
Yes, making a gluten-free version is quite simple. You can substitute the all-purpose flour in the cookie crust with a high-quality 1-to-1 or 'measure-for-measure' gluten-free baking flour blend. These blends already contain xanthan gum, which will provide the structure the dough needs. The texture might be a bit more delicate and crumbly than the traditional version, but it will be equally delicious.
Easy Flag Fruit Pizza
A stunning and delicious dessert with a soft sugar cookie crust, creamy frosting, and fresh berries arranged in a beautiful flag pattern. Perfect for gatherings.
Prep Time
30 min
Cook Time
20 min
Total Time
50 min
Servings
12 servings
Ingredients
For 12 servings
- For the Cookie Crust:
- 1 cup unsalted butter, softened to room temperature
- 1 cup granulated sugar
- 1 large egg
- 2 teaspoons non-alcoholic vanilla extract
- 2 ½ cups all-purpose flour
- 1 teaspoon baking powder
- ½ teaspoon salt
- For the Cream Cheese Frosting:
- 8 ounces full-fat block cream cheese, softened
- ½ cup powdered sugar, or more to taste
- 1 teaspoon non-alcoholic vanilla extract
- 1 tablespoon milk or cream (optional, for consistency)
- For the Topping:
- 1 pint fresh blueberries, washed and dried
- 1 pound fresh strawberries, washed, dried, hulled, and sliced
- For the Optional Glaze:
- ¼ cup apricot preserves or apple jelly
- 1 teaspoon water
Instructions
- 1
Prepare Oven and Pan
Preheat your oven to 350°F (175°C). Line a 10x15-inch rimmed baking sheet with parchment paper, allowing some overhang on the sides to act as handles for easy removal.
- 2
Cream Butter and Sugar
In a large bowl with a stand mixer or electric hand mixer, beat the softened butter and granulated sugar together on medium-high speed for 3-4 minutes, until the mixture is very light, pale, and fluffy. Scrape down the sides of the bowl as needed.
- 3
Add Wet Ingredients
Add the egg and non-alcoholic vanilla extract to the creamed butter mixture. Beat on medium speed until everything is well combined and the mixture is smooth.
- 4
Combine Dry Ingredients
In a separate medium bowl, whisk together the all-purpose flour, baking powder, and salt. Add the dry ingredients to the wet ingredients in two batches, mixing on low speed only until the flour is just incorporated. Do not overmix.
- 5
Press and Bake Crust
The dough will be very soft. Transfer the dough to the center of your prepared baking sheet. Using lightly floured hands or a spatula, press the dough evenly to cover the entire bottom of the pan. Bake for 18-22 minutes, or until the edges are lightly golden brown and the center is set.
- 6
Cool the Crust Completely
Let the cookie crust cool completely in the pan on a wire rack. This is a crucial step; a warm crust will melt the frosting. This will take at least one hour.
- 7
Make the Frosting
While the crust cools, prepare the frosting. In a medium bowl, beat the softened block cream cheese with a mixer until it's completely smooth and free of lumps. Add the powdered sugar and vanilla, and beat on low speed until combined, then increase to medium and beat until light and fluffy. If it's too thick, add a tablespoon of milk.
- 8
Frost the Cooled Crust
Once the crust is completely cool, use the parchment paper handles to lift it out of the pan and place it on a serving platter or cutting board. Spread the cream cheese frosting evenly over the top using an offset spatula.
- 9
Arrange the Fruit Flag
Now, create the flag design. Place the blueberries in the top-left corner to form a rectangle. Arrange the sliced strawberries in horizontal rows to create the red stripes, leaving white space (the frosting) for the white stripes.
- 10
Apply the Glaze
For the optional glaze, combine the apricot preserves and water in a small, microwave-safe bowl. Heat for 20-30 seconds until melted and smooth. Use a pastry brush to gently dab the warm glaze over the fruit topping for a beautiful shine.
- 11
Chill and Serve
Refrigerate the finished flag fruit pizza for at least 30 minutes before serving. This helps the frosting to set, making it easier to slice cleanly. Slice and enjoy immediately for the best texture.
Nutrition Facts
Per serving (estimated)
380 calories
Calories
52g
Carbs
5g
Protein
18g
Fat
2g
Fiber
210mg
Sodium
35g
Sugar