5 Best Graduation Cake Ideas for Boys (Easy Recipe!)
Celebrate your grad! Discover creative graduation cake ideas for boys, all using one perfect from-scratch vanilla sheet cake recipe. Easy and festive.
cookwithyara.com/recipes/graduation-cake-ideas-for-boys
There are few aromas more universally comforting than that of a cake baking in the oven. It’s the scent of celebration, of warmth, of a special moment being marked in the most delicious way possible. For me, that smell instantly transports me to a kitchen filled with love, where simple ingredients like flour, sugar, and vanilla are transformed into something truly magical. When it comes to honoring life's biggest milestones—like a graduation—that magic feels more important than ever.
I’ve always believed that a homemade cake is an act of love. But when planning a celebration, the pressure can be immense. I wanted to create a recipe that was not only deeply delicious but also served as a reliable, stress-free foundation for creativity. This is especially true when searching for graduation cake ideas for boys, where you want something that feels personal and celebratory without being overly complex. This Classic Vanilla Bean Sheet Cake is my answer. It’s moist, rich with the flavor of real vanilla, and sturdy enough to be the perfect canvas for your decorations. In this post, I'll not only share this foolproof recipe but also walk you through several inspiring, yet achievable, decorating ideas to make your graduate’s day truly unforgettable.
The Story Behind This Dish
The humble sheet cake is a cornerstone of American celebrations, beloved for its straightforward nature and its ability to feed a happy crowd. Its origins are practical, designed to be baked in the rectangular pans that were common in most homes, making it accessible to everyone. It’s the cake of community gatherings, family get-togethers, and potlucks—a dessert meant for sharing.
Over the generations, home cooks have taken this simple concept and elevated it. While a store-bought cake can be convenient, the homemade version is in a league of its own. It’s the difference between a whisper and a song. By using high-quality ingredients like real butter, tangy buttermilk, and fragrant vanilla bean paste, we transform a simple cake into a memorable centerpiece. This philosophy aligns so perfectly with my Levantine roots, where hospitality means offering guests something made with care and the best ingredients you have. This recipe is a tribute to that tradition of generous, heartfelt baking, creating the perfect foundation for any festive occasion.
What Makes This Recipe the Perfect Base for Graduation Cake Ideas for Boys
When you're planning a celebration, the last thing you need is a fussy, unreliable recipe. This vanilla bean sheet cake is my go-to for any large gathering, and it's particularly well-suited as a base for your most creative graduation cake ideas for boys. Here’s why this recipe will become your favorite:
-
Incredibly Versatile Flavor: The cake has a rich, buttery crumb that’s perfumed with beautiful specks of real vanilla bean. It’s a classic, sophisticated flavor that is universally loved and pairs wonderfully with any type of frosting, filling, or decoration you can dream up. It’s delicious enough to stand on its own but neutral enough not to compete with your creative additions.
-
Perfectly Sturdy Texture: There’s nothing more frustrating than a cake that falls apart the moment you try to frost it. Thanks to the use of cake flour and buttermilk, this cake has a tender, moist crumb, but it’s also structurally sound. It can handle a generous layer of buttercream, fondant accents, and various toppings without crumbling, making it ideal for decorating.
-
Generously Feeds a Crowd: Baked in a standard half-sheet pan, this recipe yields about 24 generous servings. This makes it absolutely perfect for a graduation party, ensuring that every single guest can enjoy a slice of your beautiful creation. No need to bake multiple cakes!
-
Simple, Nearly One-Bowl Method: The mixing process is straightforward and forgiving. While we use the classic creaming method for a light texture, the steps are simple enough for even a novice baker to follow with confidence. It’s an elegant result without any complicated techniques.
-
A Beautiful Blank Canvas: The beauty of a sheet cake is its large, flat surface. It’s like a fresh canvas waiting for an artist. This smooth, even landscape is the perfect stage to bring all your amazing graduation cake ideas for boys to life, from school logos to themed decorations.
-
Make-Ahead Friendly: Graduation season is a busy time! The cake layer can be baked a day or two in advance and stored, and the frosting can be made and refrigerated. This allows you to break up the work, so you can focus on the joyful task of decorating on the day of the party.
Breaking Down the Ingredients
A truly great cake is a symphony of its parts, and understanding the role of each ingredient is key to success. Here’s a closer look at what makes this vanilla sheet cake so special:
Cake Flour: This is the secret to a supremely tender, fine crumb. Cake flour has a lower protein content than all-purpose flour, which results in less gluten development. This gives the cake its signature soft, light-as-air texture that melts in your mouth.
Buttermilk: I love the magic of buttermilk in baking. Its acidity reacts with the baking soda for a beautiful lift, but it also tenderizes the crumb and adds a subtle, pleasant tang that cuts through the sweetness of the cake and frosting. If you don’t have any, you can make a simple substitute by adding a tablespoon of lemon juice or white vinegar to a cup of whole milk and letting it sit for 5-10 minutes.
Vanilla Bean Paste: This is where the deep, authentic vanilla flavor comes from. Unlike extract, vanilla bean paste contains the actual seeds from the vanilla pod, infusing the cake with a rich aroma and beautiful visual specks. For halal baking, always ensure your vanilla is alcohol-free, and paste is often a wonderful option.
Unsalted Butter: We use unsalted butter so we can control the exact amount of salt in the recipe. Using butter that is properly softened to room temperature is crucial. It allows the sugar to incorporate fully during the creaming stage, creating tiny air pockets that give the cake its light and fluffy structure.
Eggs: Eggs provide structure, richness, and moisture. Bringing them to room temperature before mixing allows them to emulsify more easily into the batter, resulting in a smoother, more uniform texture.
For the Buttercream: The American buttercream is a simple, classic choice that’s perfect for decorating. High-quality unsalted butter provides the rich flavor, powdered sugar gives it sweetness and stability, and a splash of heavy cream makes it incredibly smooth and pipeable. A pinch of salt is essential to balance the sweetness and make the flavors pop.
The Cooking Process Explained
Baking this vanilla sheet cake is a rhythmic and rewarding process. Let’s walk through the key stages so you know exactly what to look for on your way to creating a masterpiece for your graduate.
Stage 1: The Creaming Method. This is the foundation of the cake's texture. You’ll start by beating the room-temperature butter with the sugar for a full 5-7 minutes. Don’t rush this! You’re looking for a distinct visual change: the mixture will transform from dense and yellow to pale, light, and wonderfully fluffy. This step is physically whipping air into the fat, which will create a tender crumb and help the cake rise beautifully.
Stage 2: Building the Emulsion. Next, you’ll add the eggs one at a time, followed by the vanilla bean paste. Adding the eggs slowly is important; it helps them incorporate fully into the butter-sugar mixture without breaking the emulsion. The batter should look smooth and cohesive before you move on to the next step.
Stage 3: Alternating Wet and Dry. This technique is key to preventing a tough cake. You will add the pre-mixed dry ingredients (flour, baking powder, salt) in three additions, alternating with the buttermilk in two additions. Always begin and end with the dry ingredients. Mix on low speed only until the ingredients are just combined after each addition. This minimizes gluten development, ensuring the final cake is tender, not tough.
Stage 4: The Bake and Cool. Once you spread the thick, fragrant batter evenly into your prepared pan, it’s time for the oven. The cake will bake for about 30-35 minutes. You’ll know it’s ready when the top is a light golden brown, the edges are pulling away slightly from the sides of the pan, and a wooden skewer inserted into the center comes out with a few moist crumbs attached, but no wet batter. The most important step follows: let the cake cool completely in the pan before you even think about frosting. A warm cake will melt your beautiful buttercream into a soupy mess.
Top 5 Graduation Cake Ideas for Boys
Now for the fun part! This beautiful vanilla sheet cake is your canvas. Here are five creative, impressive, and completely achievable graduation cake ideas for boys to celebrate their incredible accomplishment. Each one can be adapted with school colors, personal touches, and the graduate's favorite flavors.
1. The 'School Spirit' Signature Cake
This is a classic for a reason—it’s bold, celebratory, and full of pride. It’s one of the most popular graduation cake ideas for boys because it’s so easy to personalize.
- The Technique: Start by giving the entire cooled cake a smooth, even coat of white buttercream using a large offset spatula. Don't worry about perfection; a slightly rustic look is charming. Divide the remaining buttercream into two or three bowls and use gel food coloring to tint them in the graduate’s school colors. Pro tip: Gel coloring is far superior to liquid as it won’t water down your frosting. Transfer the colored frostings into piping bags fitted with a large star tip (like a Wilton 1M). Pipe a decorative border around the top edge of the cake, alternating colors. In the center, you can pipe the graduation year, the graduate’s initials, or a simple “Congrats!”
- Level Up: For a professional touch, you can order an edible image of the school’s logo or mascot online. Simply peel and place it in the center of the cake for an instant 'wow' factor.
2. The 'Major or Hobby' Themed Cake
Celebrate the graduate's passion and their next chapter with a cake themed around their field of study or a beloved hobby. This is where you can get really creative and personal.
- The Technique: The design depends on the theme!
- For the Future Engineer/Architect: Frost the cake in a light gray or blue to resemble a blueprint. Use a piping bag with a small round tip and black frosting to draw simple schematics, geometric shapes, or even a building silhouette.
- For the Computer Science Whiz: Frost the cake with dark chocolate buttercream. Use rectangular chocolate wafer cookies or pieces of fondant to create a keyboard layout on top. You can even pipe a 'Hello, World!' message in green frosting for a fun inside joke.
- For the Athlete: Frost the cake green for a field or brown for a court. Use white frosting to pipe the yard lines of a football field, the foul lines of a baseball diamond, or the three-point line of a basketball court. Add small toy figures for extra fun.
- Simplicity is Key: The best versions of these themed cakes focus on one or two strong visual elements rather than trying to cram too much on top. It's one of the most thoughtful graduation cake ideas for boys you can choose.
3. The 'Elegant Gold & Black' Drip Cake
For a more sophisticated and modern celebration, a drip cake is a stunning choice. It looks incredibly impressive but is surprisingly simple to execute.
- The Technique: Frost the cake smoothly with either vanilla or chocolate buttercream. Chill the frosted cake in the refrigerator for at least 30 minutes until the frosting is firm to the touch—this is a critical step. Prepare a simple chocolate ganache by melting semi-sweet chocolate chips with heavy cream. Let the ganache cool for about 10-15 minutes until it's slightly thickened but still pourable. Using a spoon or a squeeze bottle, carefully apply the ganache around the top edge of the chilled cake, allowing it to drip artfully down the sides. Pour the remaining ganache on top and spread gently.
- Finishing Touches: Before the ganache sets, sprinkle the top with edible gold dust, gold sprinkles, or chocolate shavings. You can also add clusters of chocolate-covered cookies or berries for height and texture.
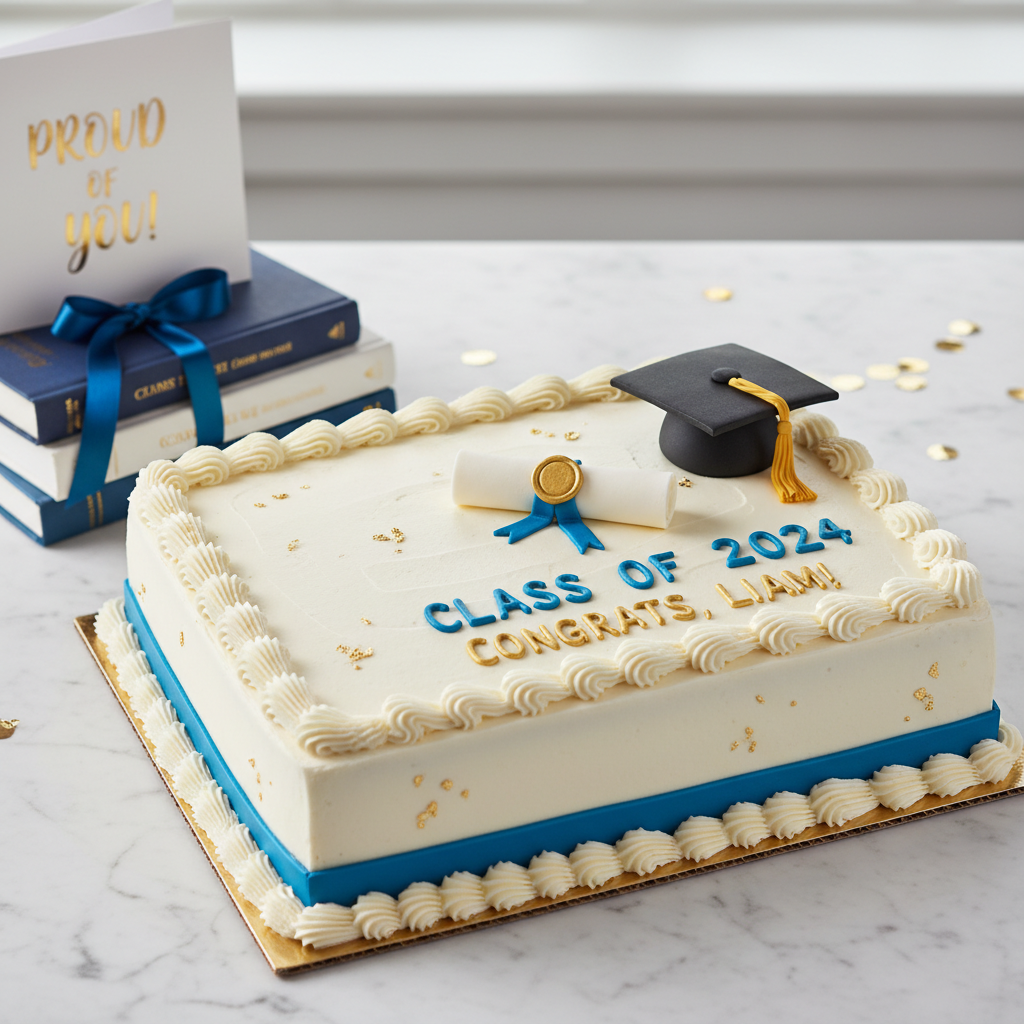
4. The 'Diploma Scroll' Classic
This design is timeless, elegant, and directly tied to the achievement being celebrated. It's a symbolic and beautiful way to say 'Congratulations'.
- The Technique: Frost the cake with a smooth layer of white or off-white buttercream. To create the diploma, you can use a large sheet of white fondant or even a few Fruit Roll-Ups laid side-by-side. Gently roll it up from both ends toward the middle to create the scroll shape. For the ribbon, use a colored fruit leather strip or a thin piece of colored fondant and tie it loosely around the center of your scroll. Place the diploma diagonally across the top of the cake. Use a fine-tipped piping bag or an edible ink marker to write a congratulatory message or the graduate’s name on the cake.
- Extra Detail: Sprinkle the border of the cake with sanding sugar in one of the school colors to add a touch of sparkle and finish the look.
5. The 'Favorite Treats' Overload Cake
When you’re out of specific graduation cake ideas for boys, why not just pile on everything he loves? This maximalist approach is fun, playful, and guaranteed to be a hit.
- The Technique: Frost the cake with a thick layer of chocolate or vanilla buttercream. Create a slightly raised border of frosting around the top edge of the cake—this will act as a 'dam' to hold all your toppings. Then, go wild! Artfully arrange a collection of the graduate's favorite treats on top. Think mini chocolate bars, chopped cookies, chocolate-covered pretzels, caramel popcorn, and brownie bites.
- The Final Drizzle: For a final decadent touch, warm up a little bit of caramel sauce or chocolate sauce and drizzle it over the entire landscape of treats. It’s a guaranteed crowd-pleaser and a fantastic way to end a celebratory meal.
How to Serve This
Presenting your beautiful graduation cake is the final flourish. Since the cake is the star of the show, the accompaniments should be simple and complementary.
A scoop of high-quality vanilla bean ice cream is a classic pairing that never fails. The cool creaminess is a wonderful contrast to the soft cake crumb. For a lighter option, a dollop of freshly whipped cream, sweetened with just a touch of powdered sugar, is perfect.
To cut through the richness and add a pop of vibrant color to the plate, serve each slice with a side of fresh berries. Strawberries, raspberries, or a mix of both provide a lovely tartness that balances the sweetness of the buttercream.
For beverages, a freshly brewed pot of coffee or a selection of teas are excellent choices for the adults, while a tall, cold glass of milk is the perfect nostalgic pairing for the graduate and younger guests. When cutting, a large sheet cake is best served by cutting it into a grid pattern for clean, uniform slices that are easy to distribute to a crowd.
Make-Ahead and Storage Guide
Planning ahead is the key to a stress-free celebration. Luckily, this cake recipe is very forgiving and can be prepared in stages.
Make-Ahead: You can bake the vanilla sheet cake up to two days in advance. Once it has cooled completely in the pan, cover it tightly with a double layer of plastic wrap and store it at room temperature. The buttercream can be made up to a week ahead of time. Store it in an airtight container in the refrigerator. Before using, let it come to room temperature for an hour or so, then re-whip it with your mixer for a few minutes to restore its light and fluffy texture.
Storage: Once the cake is frosted and decorated, it can be stored in the refrigerator. If you have a cake carrier large enough, that’s ideal. Otherwise, you can tent it loosely with foil. It will stay fresh and moist for up to 4 days. Let it sit at room temperature for about 30 minutes before serving for the best flavor and texture.
Freezing: The unfrosted cake layer freezes beautifully. Wrap the completely cooled cake tightly in two layers of plastic wrap and a layer of aluminum foil. It can be frozen for up to 3 months. To thaw, leave it wrapped on the counter at room temperature for several hours.
Reader Questions Answered
### Can I make this cake recipe into cupcakes?
Absolutely! This batter is perfect for cupcakes. It will yield approximately 30-36 standard-sized cupcakes. Line your muffin tins with paper liners, fill them about two-thirds full, and bake at 350°F (175°C) for 18-22 minutes, or until a skewer inserted into the center comes out clean.
### What if I don't have buttermilk on hand?
No problem at all! You can easily make a homemade substitute. For every 1 cup of buttermilk required in the recipe, simply measure out 1 tablespoon of white vinegar or fresh lemon juice into a liquid measuring cup. Then, add enough whole milk to reach the 1-cup line. Stir and let it sit for 5-10 minutes; it will curdle slightly and be ready to use.
### My buttercream is too sweet! How can I fix it?
This is a common issue with American buttercream. The easiest way to balance the sweetness is to add a generous pinch of salt. Salt is a flavor enhancer and will cut the sweetness beautifully. You can also add an extra splash of heavy cream or even a teaspoon of lemon juice to provide a bit of tang that counteracts the sugar.
### How do I get my colored frosting so vibrant?
The secret is using gel food coloring, not the liquid kind you find in standard grocery stores. Gel coloring is highly concentrated, so you only need a tiny amount to achieve deep, rich colors. It also won't add excess liquid to your buttercream, which can make it runny and difficult to pipe.
### Can I prepare the entire frosted cake ahead of time?
Yes, you can. You can assemble and frost the entire cake one day before your event. Store it covered in the refrigerator. This is a great way to save time on the day of the party, leaving you free to enjoy the celebration with your graduate.
Classic Vanilla Bean Sheet Cake (for Graduation)
A moist, tender, and flavorful vanilla bean sheet cake. It's the perfect sturdy yet delicious canvas for all your graduation cake decorating ideas.
Prep Time
25 min
Cook Time
35 min
Total Time
1h
Servings
24 servings
Ingredients
For 24 servings
- 3 cups (360g) cake flour
- 1 1/2 teaspoons baking powder
- 1/2 teaspoon baking soda
- 1 teaspoon salt
- 1 cup (226g) unsalted butter, softened to room temperature
- 2 cups (400g) granulated sugar
- 4 large eggs, at room temperature
- 2 teaspoons vanilla bean paste (or halal-certified vanilla extract)
- 1 1/2 cups (360ml) buttermilk, at room temperature
- 1 1/2 cups (340g) unsalted butter, softened to room temperature
- 6 cups (720g) powdered sugar, sifted
- 1/2 cup (120ml) heavy cream
- 2 teaspoons vanilla bean paste (or halal-certified vanilla extract)
- 1/4 teaspoon salt
Instructions
- 1
Preheat and Prepare Pan
Preheat your oven to 350°F (175°C). Grease and flour a 12x18 inch half-sheet pan, or line with parchment paper, leaving an overhang on the sides to lift the cake out easily.
- 2
Combine Dry Ingredients
In a medium bowl, whisk together the cake flour, baking powder, baking soda, and 1 teaspoon of salt. Set aside.
- 3
Cream Butter and Sugar
In the bowl of a stand mixer fitted with the paddle attachment, beat the 1 cup of softened butter on medium-high speed until creamy, about 1 minute. Add the granulated sugar and continue to beat for 5-7 minutes until the mixture is very pale, light, and fluffy.
- 4
Add Eggs and Vanilla
Add the room-temperature eggs one at a time, beating well after each addition and scraping down the sides of the bowl as needed. Beat in the 2 teaspoons of vanilla bean paste until combined.
- 5
Alternate Wet and Dry
With the mixer on low speed, add the dry ingredients in three additions, alternating with the buttermilk in two additions, beginning and ending with the dry ingredients. Mix only until just combined; do not overmix.
- 6
Pour and Spread Batter
Pour the batter into the prepared sheet pan and use an offset spatula to spread it into an even layer, making sure it reaches all the corners.
- 7
Bake and Cool Completely
Bake for 30-35 minutes, or until a wooden skewer inserted into the center comes out with a few moist crumbs attached. Let the cake cool completely in the pan on a wire rack before frosting.
- 8
Make the Buttercream
While the cake cools, prepare the buttercream. In the clean bowl of your stand mixer with the paddle attachment, beat the 1 1/2 cups of softened butter and 1/4 teaspoon of salt on medium speed until smooth and creamy.
- 9
Add Powdered Sugar
With the mixer on low speed, gradually add the sifted powdered sugar, one cup at a time, until it is all incorporated. The mixture will be thick.
- 10
Add Cream and Vanilla
Add the heavy cream and the remaining 2 teaspoons of vanilla bean paste. Scrape down the sides of the bowl.
- 11
Whip Until Fluffy
Increase the mixer speed to medium-high and beat for 3-5 minutes until the buttercream is light, fluffy, and smooth. If it's too thick, add more cream one tablespoon at a time. If it's too thin, add more powdered sugar.
- 12
Frost and Decorate
Once the cake is completely cool, spread the buttercream evenly over the top using an offset spatula. Decorate as desired using your favorite graduation theme.
Nutrition Facts
Per serving (estimated)
480 calories
Calories
65g
Carbs
4g
Protein
24g
Fat
1g
Fiber
250mg
Sodium
50g
Sugar