Easy Mini Cannoli Cups Recipe (No Frying!)
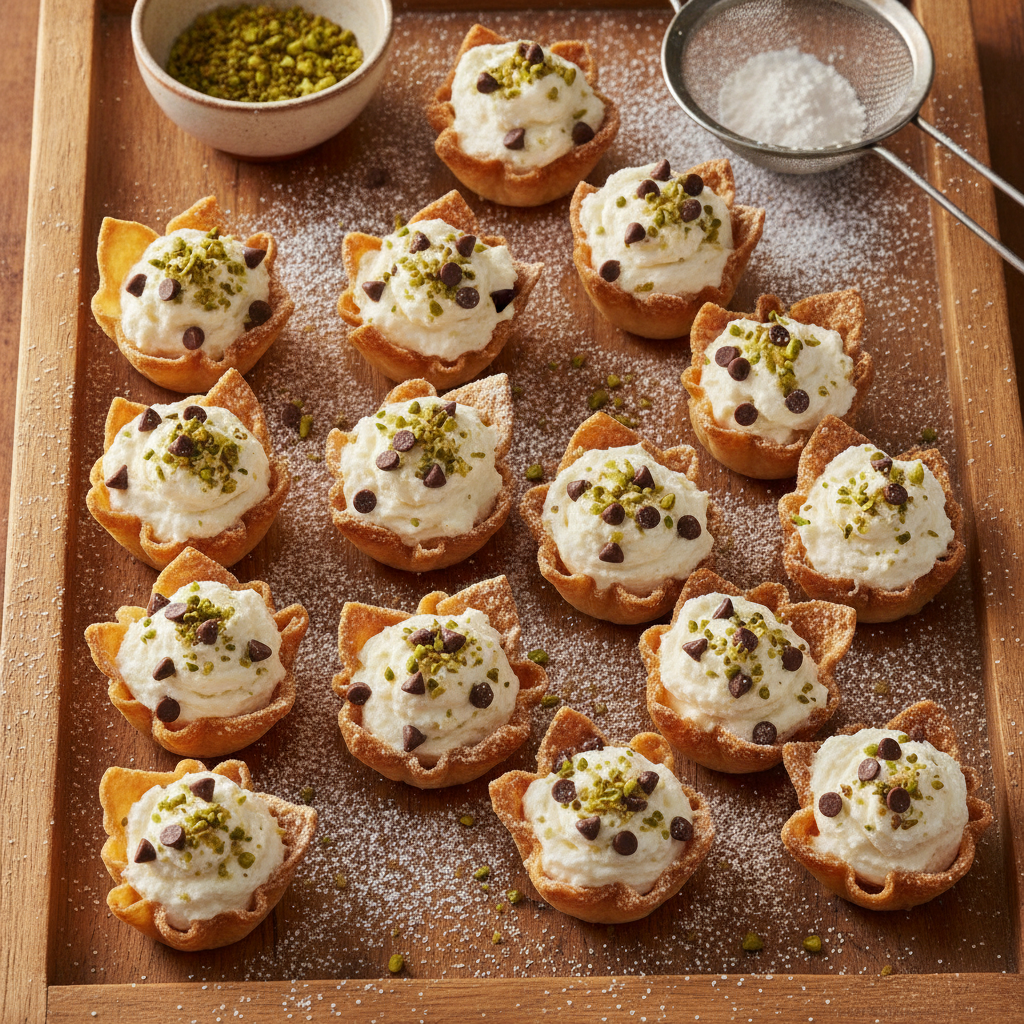
Discover how to make the best Mini Cannoli Cups! A crisp wonton shell holds a creamy ricotta filling. This easy, no-fry recipe is perfect for any gathering.
cookwithyara.com/recipes/mini-cannoli-cups
There’s a certain magic to Mediterranean desserts. They aren't always about overwhelming sweetness, but rather a beautiful, delicate balance of textures and aromas—crisp pastry, creamy fillings, the bright notes of citrus, and the warmth of spice. While cannoli are famously Sicilian, they carry this same spirit, one that feels so familiar and beloved in Levantine kitchens as well. The first time I tried a truly perfect cannolo, the memory was imprinted on my senses: the incredible shattering sound of the shell, giving way to a cool, subtly sweet, and fragrant ricotta cream. It was a moment of pure bliss.
That experience is what inspired this recipe for Mini Cannoli Cups. The traditional method of deep-frying pastry tubes can be intimidating and time-consuming for many home cooks. I wanted to capture the soul of that classic dessert in a way that felt more approachable, more suited to our modern kitchens, without sacrificing the joy of the original. This recipe is a labor of love, a project that requires a little attention to detail, but I promise you, it is worth every single moment. This guide is designed to help you master every element, from achieving the perfect crisp on the shells to whipping up a luxuriously smooth filling. Let's create something truly special together.
The Origins and History of Cannoli
The story of the cannolo is as rich and layered as its flavor. Its roots are firmly planted in Sicily, specifically in the area around Palermo and Messina. The name itself, “cannolo,” means “little tube,” a nod to the river reeds that were historically used to shape the pastry shells before frying. While it’s now a symbol of Italian pastry worldwide, its origins may stretch back even further, to the time of Arab rule in Sicily between the 9th and 11th centuries. Many culinary historians believe that the Arabs introduced sugar cane, citrus fruits, and nuts like pistachios to the island, laying the foundation for many of Sicily’s most famous sweets. It's thought that a precursor to the cannolo—a fried tube of dough filled with a sweet, nutty cream—was born during this era of cultural and culinary exchange.
Traditionally, cannoli were a special treat prepared for Carnevale, the festive season before Lent. Over time, their popularity grew, transforming them from a seasonal specialty into a year-round staple available in every pasticceria. As Sicilians emigrated across the globe, they brought their cherished recipes with them, introducing cannoli to new audiences. This journey also led to new interpretations, especially in America, where the fillings often became sweeter. This evolution is part of what makes food so fascinating. The Mini Cannoli Cups we are making today are a perfect example of this modern evolution, taking a classic concept and adapting it for ease and convenience, making a once-laborious treat accessible for any family gathering or weekend dinner.
Understanding the Flavor Profile
A perfect bite of one of these Mini Cannoli Cups is a masterclass in contrast. It’s a complete sensory experience that plays with texture, temperature, and taste in the most delightful way. The flavor profile is a carefully constructed harmony where each element has a distinct role. It all begins with the shell. Baked instead of fried, our wonton cups become incredibly crisp and delicate, offering a satisfying crunch. They are brushed with melted butter and dusted with a cinnamon-sugar mixture, giving them a warm, toasty, and subtly spiced flavor that forms the perfect savory-sweet foundation.
Then comes the heart of the dessert: the filling. It should be cool, cloud-like, and creamy, providing a stark yet wonderful contrast to the crisp shell. The primary flavor comes from high-quality whole milk ricotta, which lends a mild, slightly tangy, and milky sweetness. This is enriched with mascarpone for an even more luxurious, velvety texture. Powdered sugar dissolves seamlessly to sweeten without any graininess, while a hint of bright orange zest and pure vanilla cuts through the richness, preventing it from feeling heavy. Finally, the mix-ins and garnishes add the finishing touches. Mini semi-sweet chocolate chips provide little bursts of deep cocoa flavor, while finely chopped pistachios offer a nutty, earthy crunch. It's a beautiful dance of creamy and crunchy, warm spice and cool cream, rich dairy and bright citrus.
Essential Ingredients Explained
Great baking starts with great ingredients. For a recipe as seemingly simple as these Mini Cannoli Cups, the quality of each component truly shines through. Here’s a closer look at what you’ll need and why each element is so important.
- Wonton Wrappers: This is our brilliant shortcut. These thin sheets of dough, typically found in the refrigerated section of most grocery stores, bake up into incredibly light and shatteringly crisp cups. They mimic the delicate crunch of a traditional fried shell without any of the fuss. Look for square wrappers for the neatest cups.
- Whole Milk Ricotta Cheese: This is the soul of the filling and not a place to compromise. Whole milk ricotta is essential for a rich, creamy, and flavorful result. Part-skim versions can be watery and grainy. The most crucial step is to drain it thoroughly to remove excess whey, which is key to a thick, stable filling.
- Mascarpone Cheese: Think of this as ricotta’s luxurious cousin. Adding a bit of mascarpone cheese lends an unparalleled smoothness and a slight, pleasant tang to the filling. It also helps stabilize the ricotta, ensuring a thick, pipeable consistency that holds its shape beautifully.
- Powdered Sugar: Also known as confectioners' sugar, this is a must for the filling. Its ultra-fine texture dissolves instantly into the cheese mixture, creating a perfectly smooth, silky mouthfeel. Using granulated sugar would result in a gritty, unpleasant texture.
- Orange Zest: A non-negotiable for me! A little freshly grated orange zest provides a bright, floral, and citrusy aroma that lifts the entire dessert. It cuts through the richness of the dairy and adds a layer of complexity. Lemon zest is a fine substitute if that's what you have on hand.
- Cinnamon: This warm spice is used to dust the wonton wrappers before baking. It infuses the shells with a classic, comforting flavor that pairs perfectly with the creamy filling. A touch of nutmeg can also be added for more depth.
- Pure Vanilla Extract: Vanilla enhances the sweetness and adds a fragrant, aromatic background note. I recommend using a high-quality, non-alcoholic vanilla extract or vanilla bean paste for the purest flavor.
- Mini Semi-Sweet Chocolate Chips: These are classic for a reason. Their small size ensures they are evenly distributed throughout the filling, providing a lovely textural contrast and a hint of chocolate in every bite. Using high-quality chocolate makes a noticeable difference.
- Raw, Unsalted Pistachios: For garnish, nothing beats the vibrant color and nutty flavor of pistachios. This is a nod to the Sicilian origins of the dish and a flavor that feels right at home in Mediterranean and Levantine cuisine. Buy them raw and unsalted so you can control the flavor, and give them a light toast to deepen their taste before chopping.
Mastering the Technique
Creating exceptional Mini Cannoli Cups is all about technique. While the steps are straightforward, paying close attention to the details will elevate your dessert from good to unforgettable. Let’s walk through the key stages of the process.
-
Crafting the Crispy Shells: The foundation of this dessert is a perfectly baked, crisp shell. Start by generously brushing a mini muffin tin with melted butter. Press a wonton wrapper into each cup, gently pleating the corners as you go. The key is to brush the inside of the wonton wrapper with more melted butter and then sprinkle it with the cinnamon-sugar mixture. This process essentially oven-fries the wrapper, creating a laminated, super-crisp texture. Bake them until they are deeply golden brown and firm to the touch. Don’t pull them out too early; that color equals flavor and crunch.
-
The Critical Ricotta Drain: This is arguably the most important step for the filling. Watery ricotta is the enemy of a good cannoli cream. To prevent a soggy mess, you must drain the excess whey. The best method is to line a fine-mesh sieve with cheesecloth, place the ricotta in it, and set it over a bowl in the refrigerator for at least 4-6 hours, or even better, overnight. You’ll be shocked at how much liquid drains out. This single step ensures your filling is thick, luscious, and stable.
-
Achieving a Silky Filling: Once your ricotta is drained, the goal is a perfectly smooth cream. Start by beating the drained ricotta and mascarpone cheese together on medium speed until they are well-combined and smooth. Then, with the mixer on low, gradually add the powdered sugar. Mixing on low prevents a sugar cloud from exploding in your kitchen. Once the sugar is incorporated, add the orange zest, vanilla, and a pinch of salt. Mix just until combined. It’s important not to over-whip the mixture, as this can sometimes cause the ricotta to break down and become grainy.
-
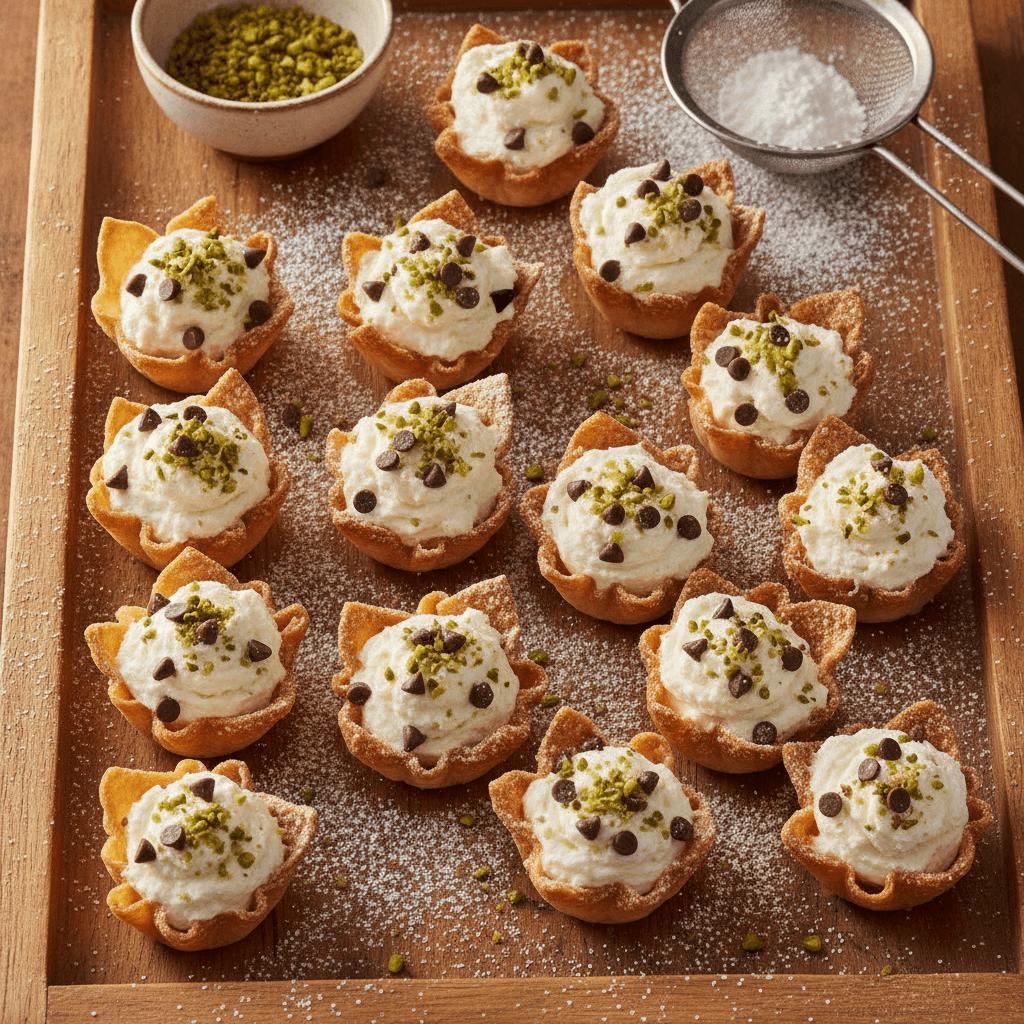
The Final Assembly: The golden rule of cannoli is to fill them just before serving. This preserves the delightful textural contrast between the crisp shell and the creamy filling. If you fill them too far in advance, the shells will absorb moisture from the filling and become soft. For a beautiful presentation, transfer the filling to a piping bag fitted with a star tip. This allows you to fill each of the Mini Cannoli Cups neatly and create an attractive swirl on top. Garnish immediately with chopped pistachios and a final, elegant dusting of powdered sugar.
Common Pitfalls and How to Fix Them
Even with the best recipes, things can sometimes go slightly off track in the kitchen. The good news is that most issues with these Mini Cannoli Cups are easily preventable or fixable. Here are a few common challenges you might encounter and how to navigate them.
-
Problem: My filling is watery or runny. This is almost always due to not draining the ricotta sufficiently. Excess whey is the number one culprit for a loose filling. If you’ve already mixed it and it's too thin, you can try to salvage it by folding in a little more mascarpone cheese to help thicken it up, or even a tablespoon of cornstarch (though this can slightly alter the texture). The best fix, however, is prevention: drain, drain, drain your ricotta!
-
Problem: The wonton cup shells are soft, not crispy. This usually happens for one of two reasons: they were under-baked, or they were filled too far in advance. If they feel soft right out of the oven, pop them back in for another 2-4 minutes until they are a true golden brown. If they softened after filling, there isn’t a fix, which is why the “fill just before serving” rule is so crucial. Store baked, unfilled shells in an airtight container at room temperature to keep them crisp.
-
Problem: My filling tastes gritty. A gritty texture is the result of using granulated sugar instead of powdered sugar. The larger crystals of granulated sugar don't dissolve properly in the cold cheese mixture. Unfortunately, once it's gritty, it's impossible to fix. Always use powdered (confectioners') sugar for the smoothest, silkiest cannoli cream.
-
Problem: The shells stuck to the muffin tin. This simply means the tin wasn't greased thoroughly enough. Be sure to use melted butter or a good quality baking spray and get into every nook and cranny of the mini muffin cups. If they are stuck, let them cool for a few minutes and then try to gently release them using a thin offset spatula or the tip of a butter knife.
Regional Twists Worth Trying
Once you’ve mastered the classic version of these Mini Cannoli Cups, you can start having fun and experimenting with different flavor profiles. The basic recipe is a wonderful canvas for creativity. Here are a few variations, including one with a special Levantine touch, that are absolutely worth exploring.
-
A Levantine Whisper: To bring these cups closer to my own culinary roots, try incorporating the beautiful floral notes of the Levant. Omit the vanilla and orange zest and instead add 1/2 teaspoon of orange blossom water or rose water to the filling. These fragrant waters add an exotic, perfumed quality that is simply divine. Garnish not only with pistachios but also with some edible dried rose petals for a stunning visual effect.
-
The Coffee Lover's Dream: For a sophisticated, mocha-inspired twist, dissolve one or two teaspoons of high-quality instant espresso powder in the vanilla extract before adding it to the cheese mixture. The subtle bitterness of the coffee beautifully balances the sweetness of the filling and pairs wonderfully with the mini chocolate chips.
-
A Nod to Tradition: True Sicilian cannoli often include finely chopped candied fruit, most commonly orange peel. If you enjoy that classic flavor, fold in a few tablespoons of finely diced, high-quality candied citrus peel along with the chocolate chips. It adds a chewy texture and a concentrated burst of citrus sweetness.
-
Nut-Forward Filling: Instead of just garnishing with nuts, you can incorporate them into the filling itself. Finely chopped toasted almonds or hazelnuts would be a delicious alternative to the chocolate chips, creating a nutty, rich, and deeply satisfying version of these delicious Mini Cannoli Cups.
The Perfect Spread
While these Mini Cannoli Cups are a showstopper all on their own, they truly shine as part of a larger spread for a special occasion or a relaxed family meal. When thinking about what to serve alongside them, I focus on balance. The cups are rich, creamy, and sweet, so accompaniments should offer a touch of freshness or a contrasting flavor profile.
A simple platter of fresh berries is the perfect companion. The bright, tart flavors of raspberries, sliced strawberries, or blackberries provide a wonderful counterpoint to the richness of the ricotta filling, cleansing the palate between bites. Their vibrant colors also look beautiful next to the golden-brown cups.
For beverages, I love to pair these with something that can cut through the sweetness. A pot of strong, dark-roast coffee, served black, is a classic choice. Even better, in my opinion, is a fragrant pot of mint tea or a simple black tea infused with cardamom. In the Levantine tradition, these unsweetened, aromatic teas are the perfect digestif and complement the dessert's flavors without competing with them. Serving these Mini Cannoli Cups as the finale to a meal, alongside fresh fruit and a warm beverage, creates a sense of occasion and warm hospitality.
Keeping and Reheating
Proper storage is key to enjoying your Mini Cannoli Cups at their absolute best. Because the goal is to maintain that crucial textural contrast, the components should always be stored separately until the very last minute.
The baked wonton shells have a good shelf life. Once completely cooled, they can be stored in a single layer in an airtight container at room temperature for up to three days. Do not refrigerate them, as the humidity in the fridge can make them go soft. If you find they’ve lost a bit of their crispness, you can place them on a baking sheet and pop them into a 300°F (150°C) oven for just 2-3 minutes to refresh them. Let them cool completely again before filling.
The cannoli filling can also be made ahead of time. Prepare the filling as directed, but hold off on folding in the chocolate chips and pistachios if you can, as they can sometimes bleed color. Transfer the filling to an airtight container and store it in the refrigerator for up to three days. When you’re ready to serve, give it a gentle stir to loosen it up, fold in your mix-ins, transfer it to a piping bag, and fill your prepared shells. Never, ever store the cups after they have been filled—they are meant to be enjoyed immediately!
Your Questions Answered
### Can I make these Mini Cannoli Cups gluten-free?
Yes, you can adapt this recipe to be gluten-free. The filling is naturally gluten-free. For the shells, you would need to source gluten-free wonton or egg roll wrappers, which are becoming more available in specialty stores. Alternatively, you could make a simple gluten-free cookie cup by pressing a gluten-free sugar cookie dough into the mini muffin tins and baking until golden.
### My ricotta seems very wet, even for whole milk ricotta. What should I do?
Some brands of ricotta have more whey than others. If it looks particularly wet, you can give the draining process a boost. After placing it in the cheesecloth-lined sieve, you can gently fold the cheesecloth over the top, place a small plate on top, and add a light weight (like a can of beans) to help press out even more liquid. This extra step will ensure a perfectly thick filling.
### Can I prepare parts of this recipe in advance for a gathering?
Absolutely! This is a great recipe to prep in stages. You can bake the wonton shells up to three days ahead and store them in an airtight container at room temperature. The filling can also be made up to three days in advance and kept in the fridge. On the day of your gathering, all you need to do is the final, quick assembly, which takes just a few minutes.
### How many cups does this recipe make, and can it be scaled up?
This recipe makes about 24 mini cups, which is perfect for a small to medium-sized group. It scales incredibly easily. You can double or even triple all the ingredients to serve a larger crowd. Just be sure to bake the wonton shells in batches if you don't have enough mini muffin tins.
### Can I use something other than a piping bag to fill the cups?
A piping bag gives the neatest, most professional-looking result, but it's not essential. You can simply use a small spoon to fill each cup. Another great alternative is to use a zip-top plastic bag. Just spoon the filling into the bag, press out the air, seal it, and then snip off one of the bottom corners to create a makeshift piping bag.
Mini Cannoli Cups
Crisp, cinnamon-sugar wonton cups filled with a sweet, creamy ricotta and mascarpone filling, studded with mini chocolate chips and pistachios. An easy, no-fry version of the classic Italian dessert.
Prep Time
25 min
Cook Time
15 min
Total Time
40 min
Servings
24 cups
Ingredients
For 24 cups
- 24 square wonton wrappers
- 3 tablespoons unsalted butter, melted
- 2 tablespoons granulated sugar
- 1/2 teaspoon ground cinnamon
- 15 ounces (about 1 3/4 cups) whole milk ricotta cheese, drained well
- 4 ounces mascarpone cheese, at room temperature
- 3/4 cup powdered sugar, sifted
- 1 teaspoon pure vanilla extract (non-alcoholic)
- 1 teaspoon finely grated orange zest
- 1/8 teaspoon fine sea salt
- 1/2 cup mini semi-sweet chocolate chips
- 1/4 cup raw, unsalted pistachios, finely chopped, for garnish
- Extra powdered sugar, for dusting
Instructions
- 1
Prepare Oven and Muffin Tin
Preheat your oven to 375°F (190°C). Generously brush the cups of a 24-cup mini muffin tin with some of the melted butter. This step is crucial to prevent sticking and helps the shells get crispy.
- 2
Make Cinnamon Sugar
In a small bowl, mix together the 2 tablespoons of granulated sugar and 1/2 teaspoon of ground cinnamon until well combined. Set this mixture aside for coating the shells.
- 3
Shape the Wonton Cups
Gently press one wonton wrapper into each buttered muffin cup. Use your fingers to pleat the corners as needed so the wrapper forms a cup shape against the sides of the tin.
- 4
Butter and Season Shells
Using a pastry brush, lightly brush the inside of each wonton wrapper with the remaining melted butter. Immediately sprinkle the inside of each cup with the cinnamon-sugar mixture, ensuring an even coating.
- 5
Bake the Shells
Bake for 10-12 minutes, or until the wonton cups are golden brown, crisp, and firm to the touch. Keep a close eye on them in the last few minutes as they can brown quickly. Let them cool in the tin for 5 minutes before carefully transferring them to a wire rack to cool completely.
- 6
Drain the Ricotta (Crucial Step)
For the best filling, ensure your ricotta is well-drained. If you haven't done so overnight, place the ricotta in a fine-mesh sieve lined with cheesecloth set over a bowl. Let it drain for at least 20 minutes to remove as much excess whey as possible.
- 7
Whip the Cheeses
In the bowl of a stand mixer fitted with the paddle attachment, or in a large bowl with a hand mixer, beat the drained ricotta and room-temperature mascarpone cheese on medium speed until smooth and creamy, about 1-2 minutes.
- 8
Add Flavorings to Filling
Turn the mixer to low and gradually add the sifted powdered sugar. Once incorporated, add the vanilla extract, orange zest, and salt. Mix on low speed just until everything is combined. Avoid over-mixing.
- 9
Fold in Chocolate Chips
Remove the bowl from the mixer and use a spatula to gently fold in the mini chocolate chips until they are evenly distributed throughout the creamy filling.
- 10
Chill the Filling
For the best texture and flavor, cover the bowl with plastic wrap and chill the filling in the refrigerator for at least 30 minutes. This allows the flavors to meld and the filling to firm up slightly.
- 11
Fill the Cooled Cups
Just before you are ready to serve, transfer the chilled filling to a piping bag fitted with a large star tip (or a zip-top bag with the corner snipped off). Pipe the filling generously into each of the completely cooled wonton cups.
- 12
Garnish and Serve Immediately
Sprinkle the tops of the filled cups with the finely chopped pistachios. For a final touch, give them a light dusting of powdered sugar. Serve immediately to enjoy the perfect contrast of crisp shell and creamy filling.
Nutrition Facts
Per serving (estimated)
115 calories
Calories
11g
Carbs
3g
Protein
7g
Fat
0.5g
Fiber
95mg
Sodium
7g
Sugar