Easy Patriotic Cookies (Soft Red, White & Blue Recipe)
Get the best recipe for soft, chewy patriotic cookies! Perfect for summer gatherings, these red, white, and blue sugar cookies are festive and delicious.
cookwithyara.com/recipes/patriotic-cookies
There is a special kind of magic that lives in the aroma of freshly baked cookies. It’s a scent that transcends ingredients, becoming a warm, buttery cloud of comfort that fills every corner of a home. For me, that smell is intertwined with the feeling of togetherness, of a kitchen buzzing with happy chatter and hands, both large and small, working together. It’s the feeling of creating something simple and sweet to share, a small act of generosity that brings immense joy.
While my heart often leans towards the spice-laden sweets of the Levant, there is a universal appeal to a classic, perfectly executed sugar cookie that I deeply admire. I was drawn to creating this recipe for Patriotic Cookies not just for their festive appearance, but for the shared experience they represent. They are a canvas for celebration, a simple bake that brings smiles to faces at neighborhood potlucks, family cookouts, and community gatherings. My goal was to perfect a recipe that wasn't just visually striking but also incredibly delicious—soft, chewy, and rich with the flavor of good butter and vanilla.
What sets this particular recipe apart is its texture. We’re not making a crisp, snappy cookie here. Instead, you'll discover a cookie with a delightful softness that yields with each bite, a tender crumb that melts in your mouth. This isn't just about mixing ingredients; it's about technique. In this post, I will walk you through every step, from achieving the perfect dough consistency to ensuring your colors stay vibrant and distinct. You’ll leave here not just with a recipe, but with the confidence to bake beautiful and delicious Patriotic Cookies that will become the star of any dessert table.
The Story Behind These Festive Cookies
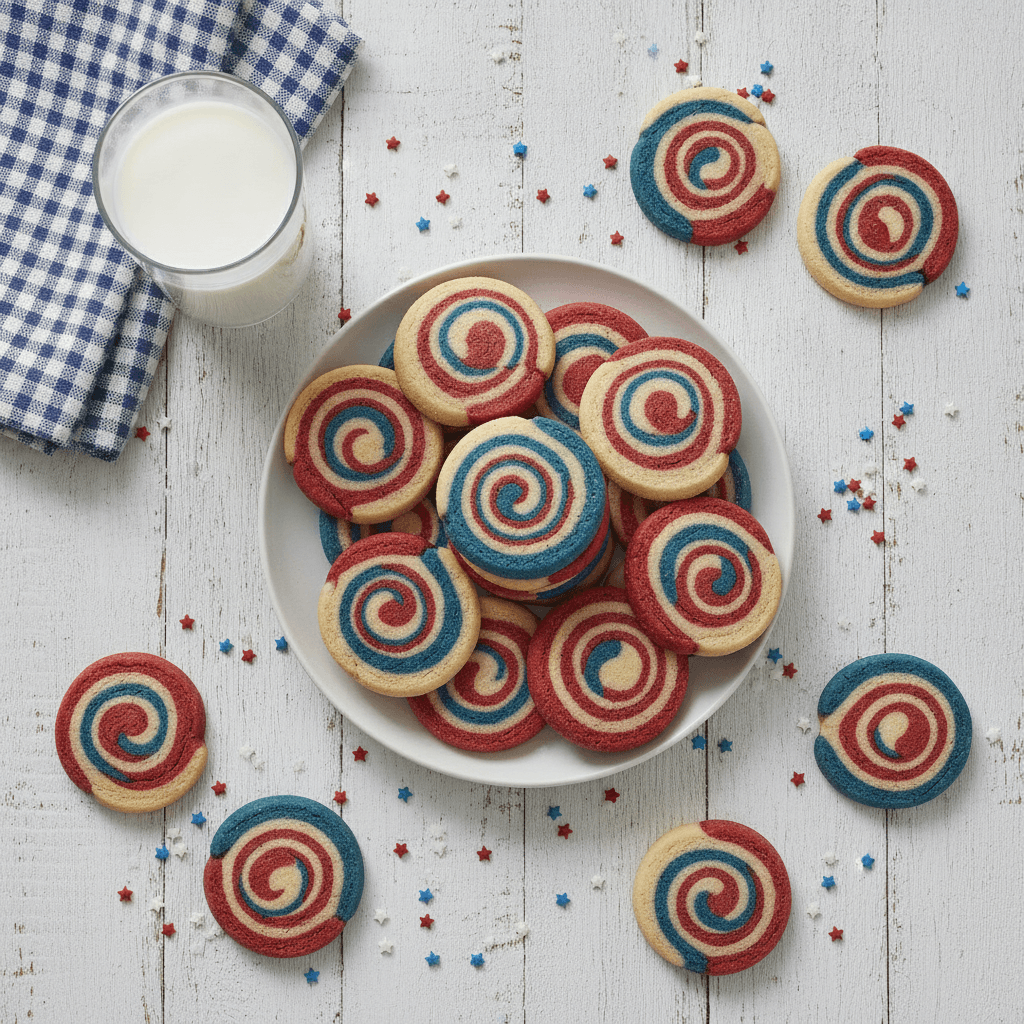
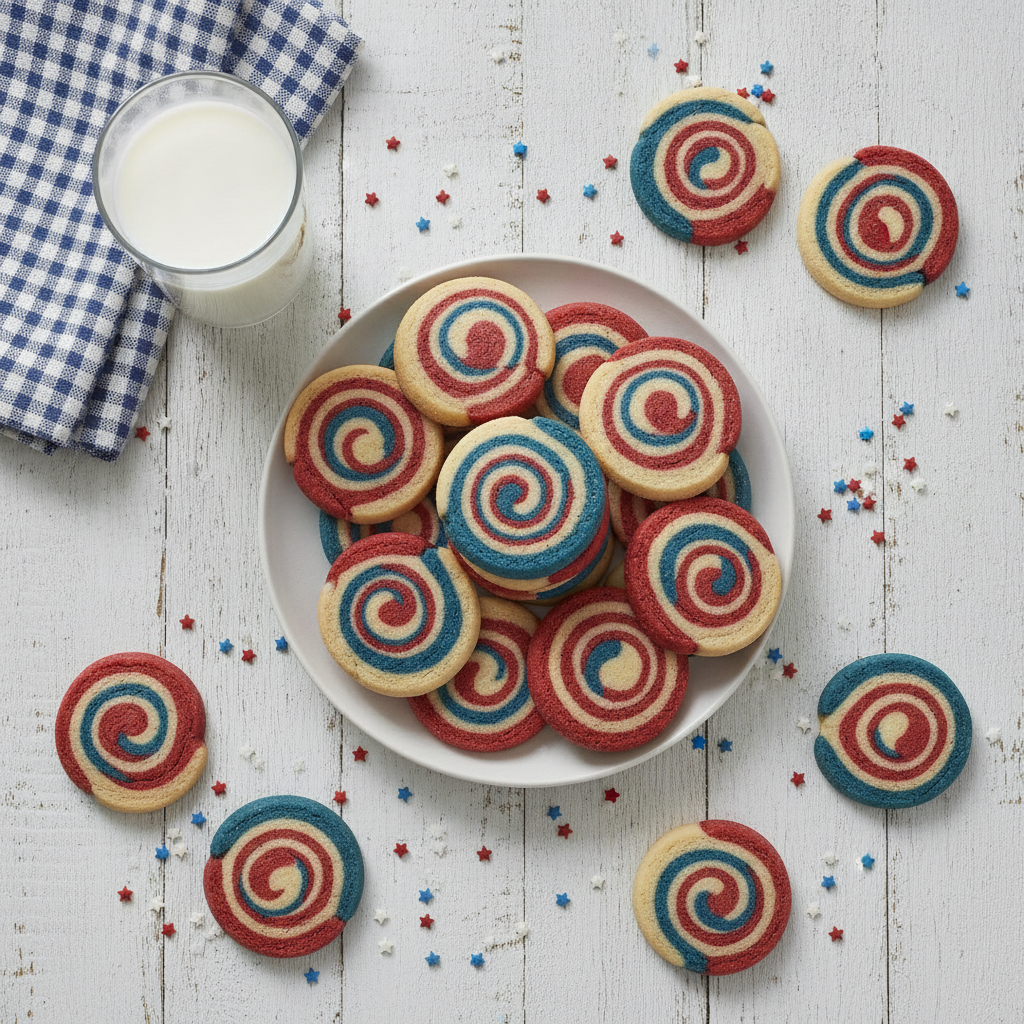
The tradition of creating themed foods for special occasions is as old as celebrations themselves. Across cultures and continents, we mark moments of significance with special meals and symbolic dishes. In American baking culture, the sugar cookie has become a beloved canvas for this kind of culinary art. Its simple, delicious base and sturdy structure make it the perfect medium for creative expression, from intricate icing designs to the vibrant, joyful swirls you see in these Patriotic Cookies.
These cookies are part of a wonderful tradition of home baking that turns an ordinary treat into something memorable. They don't hail from a single, ancient origin story but rather from countless home kitchens where bakers wanted to bring a touch of festive color to their tables. Generations of cooks have adapted slice-and-bake icebox cookie techniques to create these beautiful pinwheels and stripes, a kind of edible folk art that’s both charming and accessible to everyone.
Making these Patriotic Cookies at home is infinitely more rewarding than buying a store-bought version. When you bake them yourself, you control the quality of the ingredients—the real butter, the pure vanilla—that make a cookie truly special. The store-bought varieties often taste flat and artificial, but a homemade cookie is infused with a richness and warmth that simply can’t be replicated. More than that, the process itself—the coloring of the dough, the rolling of the log, the slicing of each unique swirl—is a joyful activity to share with family and friends, making the final treat all the sweeter.
What Makes This Recipe Special
When developing a recipe, I always aim for it to be the definitive version for my readers, and these Patriotic Cookies are no exception. This recipe has been tested and tweaked to ensure perfect results every time. Here’s exactly why this will be your new go-to for any festive gathering:
- Incredible Buttery Flavor: These aren’t just about looks. The foundation is a rich, buttery sugar cookie dough that uses high-quality unsalted butter and pure vanilla extract. Each bite is sweet, fragrant, and deeply satisfying, a flavor that stands on its own, far superior to bland, mass-produced cookies.
- Perfectly Soft and Chewy Texture: If you're tired of dry, crumbly sugar cookies, this recipe is your answer. The specific ratio of ingredients and a crucial chilling period prevent the cookies from spreading too thin, resulting in a wonderfully soft center and slightly firm edges. They have a tender bite that is simply irresistible.
- Vibrant, No-Bleed Colors: The secret to those stunningly sharp red and blue swirls is using gel food coloring. Unlike liquid coloring, which can water down the dough and produce pale, washed-out hues, gel coloring provides intense, vibrant shades without compromising the cookie's texture. We’ll also discuss how proper chilling locks those colors in place.
- Amazingly Simple Technique: While the final pinwheel design looks impressive, the process is surprisingly straightforward. It's a one-bowl dough, and the steps for coloring and rolling are simple enough for even beginner bakers or for little ones who want to help in the kitchen. There’s no intricate icing or decorating required to make a show-stopping treat.
- Make-Ahead and Freezer-Friendly: This is one of my favorite aspects. The cookie dough log can be prepared days or even months in advance. You can store it in the refrigerator for a few days or freeze it for up to three months, allowing you to have fresh, homemade Patriotic Cookies on demand. It’s perfect for planning ahead for a big event.
- Feeds a Crowd: This recipe yields a generous batch of cookies, making it ideal for summer cookouts, bake sales, or any large gathering. It can also be easily doubled if you’re expecting an even bigger crowd, ensuring no one misses out on these delightful treats.
Breaking Down the Ingredients
A truly great cookie relies on the quality and function of each ingredient. There are no fancy or hard-to-find items here—just simple pantry staples that, when treated with care, come together to create something truly special. Let's walk through the key players in our Patriotic Cookies recipe.
First and foremost is unsalted butter. This is the heart and soul of our cookie, responsible for both flavor and that coveted tender texture. Using unsalted butter allows us to control the salt content precisely. It’s crucial that your butter is at room temperature—soft enough that your finger leaves an indent, but not greasy or melted. This state allows it to cream properly with the sugar, incorporating air that gives the cookies their light, non-dense structure.
Next, we have all-purpose flour. Flour provides the structure that holds everything together. The key to a soft cookie is to measure your flour correctly (spoon it into the measuring cup and level it off, don’t scoop from the bag!) and to avoid overmixing it. Overworking the flour develops gluten, which is great for bread but results in tough, hard cookies. We want to mix just until the flour disappears.
Granulated sugar does more than just sweeten the dough. It also plays a vital role in the texture. During the creaming process, the sharp sugar crystals cut into the butter, creating those essential air pockets. This process contributes to the cookie’s tenderness and helps with leavening.
A single large egg acts as our primary binder, holding the dough together. It also adds richness, flavor, and moisture. Just like the butter, your egg should be at room temperature to ensure it incorporates smoothly into the creamed mixture without causing the butter to seize up and become lumpy.
For flavor, we rely on pure vanilla extract. In a simple recipe like this, the quality of your vanilla really shines through. It adds a beautiful aromatic depth and warmth that complements the butter perfectly. And of course, baking powder provides a gentle lift, ensuring our cookies puff up slightly and stay soft rather than spreading into thin, crispy wafers.
Finally, the stars of the show: red and blue gel food coloring. I cannot stress enough the importance of using gel-based coloring. It is highly concentrated, so you only need a tiny amount to achieve deep, brilliant colors. Liquid food coloring contains a lot of water, which can thin out the dough, affect the texture, and result in disappointingly pale colors. Always check that your food coloring is from a reputable, halal-certified source if that is a concern for your family.
The Cooking Process Explained
Baking these beautiful Patriotic Cookies is a methodical and rewarding process. Let’s break it down into the key stages, focusing on the sensory cues that will guide you to perfect results every time. Think of it less as a list of instructions and more as a journey from simple ingredients to a stunning final product.
The first stage is all about building the foundation: the cookie dough itself. We begin by whisking our dry ingredients—flour, baking powder, and a touch of salt—in a bowl. This simple step ensures the leavening is evenly distributed, which is key for a consistent bake. In a separate, larger bowl, we embark on the most critical step: creaming the butter and sugar. Using an electric mixer, you'll beat the softened butter and sugar together for a full 3-4 minutes. You're looking for a visible transformation here. The mixture should go from a dense, yellow paste to a light, pale, and fluffy texture, almost like a buttercream frosting. This process whips air into the dough, which is essential for a soft, tender cookie.
Once the base is perfectly aerated, we introduce the binders and flavor. The room-temperature egg and pure vanilla extract are beaten in just until they are fully incorporated. Now, it's time to combine the wet and dry ingredients. Add the flour mixture to the butter mixture in a few additions, mixing on low speed only until the last streaks of flour disappear. This is where you must resist the urge to overmix! Overworking the dough at this stage will result in tough cookies, and we are aiming for ultimate softness.
Now for the fun part: adding the color. We’ll divide the dough into three equal portions. Leave one portion plain (your white), and then add the red gel coloring to the second and the blue to the third. Mix each color in gently until the hue is uniform and vibrant. The next step is assembly. On a piece of parchment paper, you'll gently press and roll each color of dough into a rectangle of roughly the same size. Then, you'll carefully stack the three colored rectangles on top of one another: blue on the bottom, then white, then red. Starting from one of the long edges, use the parchment paper to help you tightly roll the stacked dough into a uniform log. This log is what will create the beautiful pinwheel design in your Patriotic Cookies.
The final, and perhaps most important, stage before baking is chilling. Wrap your dough log tightly in plastic wrap and let it chill in the refrigerator for at least two hours, or even overnight. This step is non-negotiable. Chilling solidifies the butter, which prevents the cookies from spreading excessively in the oven. It also allows the flavors to meld and deepen, and it makes the log firm and easy to slice. When you're ready to bake, you’ll simply slice the chilled log into rounds, place them on a prepared baking sheet, and bake until the edges are just set but the centers are still soft. The aroma that fills your kitchen will be your delicious reward.
Mistakes to Avoid
Even the simplest recipes have little pitfalls that can trip up a baker. Think of me as your friendly guide, here to help you steer clear of common mistakes so that your Patriotic Cookies turn out perfectly on the very first try. Here are a few key things to watch out for:
-
Using Cold Butter or a Melted Mess. The temperature of your butter is paramount. If it's too cold, it won't cream properly with the sugar, and you'll end up with dense, heavy cookies. If it's too soft or melted, it won't hold air, and your cookies will spread into thin, greasy discs in the oven. The sweet spot is room temperature, where it's pliable but still holds its shape.
-
Skipping the Chilling Time. I know it’s tempting to rush when you want fresh cookies, but chilling the dough log is a critical step. This solidifies the fat, which is the secret to cookies that hold their shape and have a wonderful, soft texture. If you skip this, the butter will melt instantly in the heat of the oven, causing the cookies to spread out way too much and the colors to blur together.
-
Overmixing the Flour. Once you add the dry ingredients to the wet, your goal is to mix as little as possible. Mix on low speed and stop the moment you no longer see streaks of flour. Every extra rotation of the mixer blade develops more gluten, and excess gluten is the enemy of a tender cookie. It will make your Patriotic Cookies tough and bread-like instead of soft and melty.
-
Relying on Liquid Food Coloring. To get those deep, jewel-toned reds and blues, you must use gel food coloring. The liquid drops you find in standard grocery store multipacks are water-based and will not only give you pale, pastel colors but will also add extra liquid to your dough, throwing off the texture. A tiny drop of gel coloring goes a long way and keeps your dough consistency perfect.
-
Overbaking the Cookies. The visual cue for a perfectly baked sugar cookie is subtle. You want to pull them from the oven when the edges are set and look matte, but the centers still appear slightly soft and puffy. They will continue to cook from the residual heat of the baking sheet. If you wait until they are golden brown all over, they will be hard and crunchy once they cool, and we are aiming for a gloriously soft texture here.
How to Serve This
These beautiful Patriotic Cookies are a celebration in themselves and require very little accompaniment to shine. Their vibrant, swirling colors make them a stunning centerpiece on any dessert platter, instantly adding a festive touch to your table. They are the perfect standalone treat to be enjoyed with a simple beverage.
For a classic, comforting pairing, serve them with a tall, cold glass of milk. The creamy milk is the perfect counterpoint to the sweet, buttery cookie, a combination that is beloved for a reason. During a warm summer gathering or a community cookout, these cookies are wonderful alongside refreshing drinks like freshly squeezed lemonade, iced tea, or a sparkling fruit punch. The light, bright flavors of these drinks complement the richness of the cookies without overpowering them.
When arranging them for a party, consider a large white platter to make the red and blue colors truly pop. You can stack them neatly in rows or arrange them in a circular pattern fanning out from the center. For an extra touch of festivity, you can scatter some silver or star-shaped sprinkles around the platter. These cookies are also perfect for packing up as a thoughtful contribution to a potluck or as a lovely, edible gift for a neighbor. Simply place them in a clear bag tied with a ribbon for a beautiful and delicious presentation.
Make-Ahead and Storage Guide
One of the best features of this Patriotic Cookies recipe is how wonderfully it lends itself to being made in advance. Proper storage will ensure they taste just as fresh and delicious as the day they were baked. Here’s everything you need to know.
Making the Dough Ahead: The cookie dough log is your secret weapon for easy entertaining. You can prepare the dough, roll it into a log, and wrap it tightly in plastic wrap. It can be stored in the refrigerator for up to 3 days before slicing and baking. This is perfect for breaking up the baking process over a couple of days.
Freezing the Dough: For longer storage, the dough freezes beautifully. After wrapping the log in plastic wrap, add a second layer of aluminum foil to protect it from freezer burn. The dough log can be frozen for up to 3 months. When you're ready to bake, you can either let it thaw in the refrigerator overnight or slice it while still frozen—you’ll just need to add 1-2 minutes to the baking time.
Storing Baked Cookies: Once your Patriotic Cookies have cooled completely, they can be stored in an airtight container at room temperature. They will stay soft and fresh for up to 5 days. Placing a slice of sandwich bread inside the container can help maintain their softness, as the cookies will absorb moisture from the bread.
Freezing Baked Cookies: You can also freeze the finished cookies. Let them cool completely, then arrange them in a single layer on a baking sheet and freeze until solid. Once frozen, transfer them to a freezer-safe bag or container, placing a sheet of parchment paper between each layer to prevent sticking. They will keep well for up to 2 months. To serve, simply let them thaw at room temperature for an hour or so.
Reader Questions Answered
Here are answers to some of the most common questions I receive about making these festive cookies. I hope these tips help you feel even more confident in the kitchen!
Can I make these cookies gluten-free?
Absolutely. To make gluten-free Patriotic Cookies, I recommend using a high-quality, measure-for-measure gluten-free flour blend that contains xanthan gum. Xanthan gum is essential for providing the structure and binding that gluten normally would. Simply substitute it one-for-one with the all-purpose flour in the recipe. The texture may be slightly different, but they will still be delicious.
My colors look pale. What went wrong?
The most likely culprit is the type of food coloring you used. For truly vibrant, deep colors, you must use a gel-based food coloring. The liquid drops sold in small squeeze bottles are not concentrated enough and will result in pastel shades. A little bit of gel coloring goes a very long way, so start with a tiny amount and add more until you reach your desired shade.
Can I use different shapes instead of a pinwheel?
Of course! This dough is very versatile. Instead of rolling it into a log, you can keep the three colors separate after chilling the dough blocks for about 30 minutes. Roll each color out, use cookie cutters to cut shapes, and bake. You could also try a marbled effect by gently kneading the three colors together just once or twice before rolling and cutting.
How can I make this recipe more kid-friendly to prepare?
This is a fantastic recipe to make with children. The dividing and coloring of the dough is a perfect job for little helpers. They will love seeing the colors mix in and transform the plain dough. You can let them help with rolling the dough into rectangles (it doesn’t have to be perfect!) and rolling up the final log. Slicing and handling the hot baking sheets should be reserved for the adults, of course.
My cookies spread too much and lost their shape. Why?
This almost always comes down to one of two things: the dough wasn't chilled for long enough, or the butter was too soft to begin with. Chilling the dough log for at least two hours is crucial for solidifying the butter. This ensures that the butter melts slowly in the oven, allowing the cookie to set before it can spread too far. Also, ensure your baking sheets are cool before placing the cookie dough slices on them; a warm pan will start melting the butter immediately.
Patriotic Cookies
Soft, chewy, and vibrant red, white, and blue sugar cookies. This easy recipe is perfect for summer gatherings and festive celebrations.
Prep Time
30 min
Cook Time
12 min
Total Time
2h 45m
Servings
24 cookies
Ingredients
For 24 cookies
- 2 1/2 cups (300g) all-purpose flour
- 1/2 teaspoon baking powder
- 1/4 teaspoon salt
- 1 cup (226g) unsalted butter, at room temperature
- 1 cup (200g) granulated sugar
- 1 large egg, at room temperature
- 2 teaspoons pure vanilla extract
- 1/2 teaspoon red gel food coloring
- 1/2 teaspoon blue gel food coloring
Instructions
- 1
Whisk Dry Ingredients
In a medium bowl, whisk together the all-purpose flour, baking powder, and salt. This ensures the leavening is evenly distributed for a consistent rise.
- 2
Cream Butter and Sugar
In the bowl of a stand mixer fitted with the paddle attachment, or in a large bowl with a hand mixer, beat the room temperature butter and granulated sugar on medium-high speed for 3-4 minutes until very light, pale, and fluffy. Scrape down the sides and bottom of the bowl as needed.
- 3
Add Egg and Vanilla
Add the room temperature egg and vanilla extract to the creamed butter mixture. Beat on medium speed until just combined, about 30 seconds. Scrape the bowl again to ensure everything is well-mixed.
- 4
Combine Wet and Dry
With the mixer on low speed, gradually add the flour mixture to the wet ingredients in two or three additions. Mix only until the last streaks of flour have disappeared. Do not overmix.
- 5
Divide and Color Dough
Divide the dough into three equal portions (about 250g each if using a scale). Leave one portion plain. Add the red gel food coloring to the second portion and the blue gel food coloring to the third. Mix each color on low speed or by hand just until the color is uniform.
- 6
Shape the Dough Rectangles
On a piece of parchment paper, gently press and shape the red dough into a rectangle roughly 8x10 inches in size. Place another piece of parchment on top and use a rolling pin to even it out. Repeat this process on separate parchment sheets for the white and blue doughs.
- 7
Stack and Roll the Log
Carefully flip the white dough rectangle on top of the blue one, then flip the red dough rectangle on top of the white. Gently press them together. Starting from one of the long 10-inch sides, tightly roll the stacked dough into a log, using the parchment paper to help you.
- 8
Chill the Dough
Wrap the dough log tightly in plastic wrap. Refrigerate for at least 2 hours, and up to 3 days. This step is crucial for preventing the cookies from spreading.
- 9
Preheat and Prepare
When ready to bake, preheat your oven to 350°F (177°C). Line two large baking sheets with parchment paper.
- 10
Slice the Cookies
Remove the chilled dough log from the refrigerator. Using a sharp knife, slice the log into rounds that are 1/4-inch thick. If the log flattened slightly during chilling, gently roll it on the counter to round it out before slicing.
- 11
Arrange on Baking Sheets
Place the cookie slices about 2 inches apart on the prepared baking sheets. They will spread slightly during baking.
- 12
Bake the Cookies
Bake for 10-12 minutes, or until the edges are just set and appear matte. The centers should still look soft and slightly puffy. Avoid overbaking to maintain a soft texture.
- 13
Cool and Enjoy
Let the cookies cool on the baking sheet for 5 minutes before transferring them to a wire rack to cool completely. This allows them to set fully without breaking.
Nutrition Facts
Per serving (estimated)
145 calories
Calories
18g
Carbs
2g
Protein
7g
Fat
0.5g
Fiber
65mg
Sodium
9g
Sugar