

Easy Watermelon Popsicles with Mint & Lime
The best homemade watermelon popsicles recipe! Perfectly sweet, refreshing, and healthy. Made with fresh mint and lime for an unforgettable summer treat.
cookwithyara.com/recipes/watermelon-popsicles
There's a special kind of magic that happens on a hot, sun-drenched afternoon when someone brings out a tray of frozen treats. The conversation stills for a moment, and all eyes turn to the vibrant, jewel-toned offerings. These are not just any frozen pops; these are homemade Watermelon Popsicles, glistening with tiny ice crystals, their brilliant ruby color a testament to the peak-season fruit within. You can almost feel the refreshing coolness before you even take the first bite. This is the essence of summer, captured on a stick.
What I love most about serving these is the element of beautiful surprise. They look so impressive, so artfully crafted, that guests assume they must be complicated. But the secret, which I'm delighted to share with you, is their profound simplicity. The magic isn't in a complex technique; it's in the thoughtful combination of a few perfect ingredients. We take the humble, beloved watermelon and elevate it with a whisper of bright mint and a zesty squeeze of fresh lime. It’s a simple act of culinary alchemy that transforms a familiar flavor into something truly special, a treat that feels both nostalgic and refreshingly modern. This recipe is your key to creating those small, perfect moments of summer joy.
What Makes These Watermelon Popsicles a Showstopper
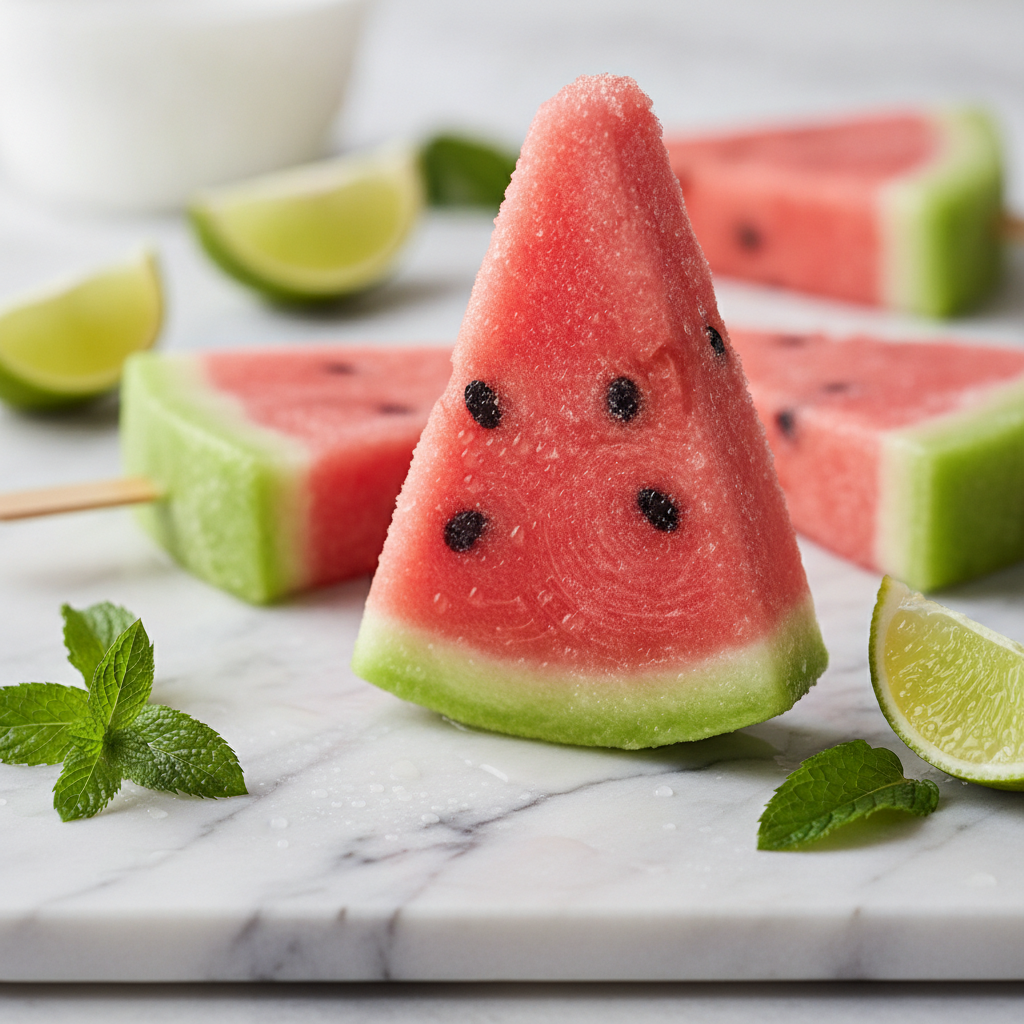
In a world of store-bought frozen novelties, a homemade creation stands out, and this Watermelon Popsicles recipe is designed to do just that. Its showstopper quality begins with the color—a deep, translucent red that captures the sunlight and seems to glow from within. Speckled with tiny, dark green flecks of fresh mint, each popsicle is a miniature work of art. It’s a visual promise of the pure, unadulterated flavor of summer, a stark and beautiful contrast to the artificial hues of commercial alternatives.
But the true magic reveals itself with the first taste. You expect the familiar, sugary sweetness of watermelon, and you get it, but it's immediately followed by a wave of vibrant, zesty lime that cuts through the sweetness and awakens your palate. Just as you’re processing that delightful tang, a cool, herbal note of fresh mint emerges, lingering just long enough to leave you feeling utterly refreshed. It's a carefully orchestrated trio of flavors that dance together, each one enhancing the others. This isn’t just frozen fruit juice; it's a layered flavor experience that evolves with each bite. It’s the kind of sophisticated, palate-cleansing treat you might be served at a fine Mediterranean restaurant after a rich meal, yet it’s wonderfully achievable in your own kitchen.
The Ingredients That Matter Most
The beauty of this Watermelon Popsicles recipe lies in its simplicity, which means the quality of each component is paramount. There are no complex flavors to hide behind, so choosing well is the key to an exceptional result.
First and foremost is the watermelon. This is where you should seek out the best you can find. Look for a seedless variety that feels heavy for its size, with a deep, uniform color and a prominent creamy yellow spot where it rested on the ground—a sure sign of ripeness. The sweetness of your melon will dictate how much, if any, additional sweetener you’ll need. This is the heart and soul of the recipe, providing the juicy, hydrating base.
Next, fresh mint is non-negotiable. Its bright, cooling aroma and flavor are what elevate these popsicles from a simple fruit treat to something more elegant. Spearmint is my preference here for its classic, clean taste that complements the watermelon without overpowering it. Avoid dried mint, as it lacks the vibrant essential oils that make this pairing so special.
Equally important is the lime juice. Please, use freshly squeezed juice. The bottled varieties often have a muted or slightly bitter taste that simply can't compare to the zesty, aromatic punch of a fresh lime. This acidity is crucial; it balances the melon’s sweetness and makes all the flavors taste brighter and more distinct.
For a touch of sweetness, I recommend a light-flavored honey or agave nectar. These liquid sweeteners dissolve easily and add a smooth richness. You may not even need any if your watermelon is perfectly ripe, so be sure to taste the mixture before you freeze it. A tiny pinch of fine sea salt is our secret weapon—it doesn't make the popsicles salty, but it intensifies the sweetness of the fruit, making the watermelon taste even more like itself.
Finally, for that signature Levantine touch, consider a tiny drop of rosewater or orange blossom water. A little goes a very long way, but it adds an intoxicating floral aroma that is subtle yet unforgettable. It’s an optional step, but one that truly makes these Watermelon Popsicles a signature dessert.
Building It Step by Step
Creating these beautiful Watermelon Popsicles is less about complex cooking and more about a simple, thoughtful process. Let’s walk through the key stages to ensure a perfect result every time. The journey from fresh fruit to frozen delight is a rewarding one, filled with vibrant colors and fragrant aromas.
First is the preparation of the fruit. We begin by cubing our ripe, cold watermelon. Working with chilled fruit helps the final mixture stay cool, which leads to a better texture upon freezing. As you chop, take a moment to admire that incredible color. At the same time, finely chop your fresh mint leaves and squeeze your limes. Having all your ingredients ready—what chefs call 'mise en place'—makes the process smooth and enjoyable.
Next comes the blending. Combine the watermelon cubes, fresh mint, lime juice, your chosen sweetener, and that crucial pinch of salt in a high-speed blender. The goal is to create a perfectly smooth, liquid purée. Blend just until everything is combined and liquefied. Over-blending can incorporate too much air, which can lead to a frothy texture rather than the dense, sorbet-like consistency we're aiming for. The color of the purée at this stage should be a stunning, opaque pinkish-red.
Now, a pivotal decision: to strain or not to strain. For the most elegant, jewel-like, and professional-looking Watermelon Popsicles with a super smooth texture, I highly recommend straining the mixture through a fine-mesh sieve. This removes any pulp and tiny bits of mint, resulting in a clearer, more refined popsicle. If you prefer a more rustic, fibrous texture, you can skip this step. Both ways are delicious; it’s purely a matter of preference.
Before you freeze, you must taste. This is the most critical moment. The mixture will taste less sweet once it's frozen, so it should be slightly sweeter than you think you want it to be right now. Is it bright enough? Add another squeeze of lime. Does the melon flavor sing? If not, perhaps a touch more sweetener is needed. Adjust now, because you can't change it once it's in the molds.
Finally, the freezing. Carefully pour the vibrant liquid into your popsicle molds, leaving a little bit of space at the top for expansion. To get those perfectly centered sticks, I recommend a two-stage freezing process. Freeze the molds for about 1.5 to 2 hours, or until the mixture is slushy and semi-firm. Then, insert your popsicle sticks. They will stand up perfectly straight. Return them to the freezer for at least another 4-6 hours, or until completely solid. This little bit of patience is the key to a picture-perfect finish.
Presentation and Plating Tips
Part of the joy of these Watermelon Popsicles is their inherent beauty, and how you present them can elevate the experience from a simple snack to a memorable dessert moment. Think beyond simply handing them out; a little bit of thoughtful styling makes all the difference.
For a gathering, the best way to serve them is on a chilled platter. A white ceramic, marble, or slate platter creates a stunning contrast against the vibrant red of the popsicles. To prevent them from melting too quickly, create a bed of crushed ice for them to rest on. The way the popsicles glisten against the ice is incredibly appealing and keeps them perfectly frozen as guests help themselves.
Garnishes add another layer of visual and textural interest. Just before serving, you can lightly press some finely chopped pistachios onto one side of the popsicles. The green of the nuts against the red of the fruit is a classic and beautiful Mediterranean color combination. Alternatively, a very light dusting of sumac can add a surprising tangy note and a deeper red speckle. For a simpler touch, a single, perfect mint leaf placed on the platter next to each popsicle is elegantly understated. If you’re feeling particularly artful, try freezing a tiny mint leaf or a very thin slice of lime inside the popsicle for a beautiful suspended effect.
Consider your audience. For a casual family get-together, serving them straight from the mold is perfectly fine and part of the fun. But for a more formal dinner party, the chilled platter method adds a touch of sophistication that your guests will surely appreciate. It signals that this isn't just a treat for kids, but a gourmet dessert for everyone to enjoy.
Scaling Up for a Crowd
One of the best features of this Watermelon Popsicles recipe is how easily it can be scaled to serve a larger group. Whether you're hosting a summer barbecue, a family reunion, or just want to stock the freezer for the weeks ahead, making a large batch is incredibly straightforward. With a little planning, you can have dozens of these beautiful treats ready to go.
To double or triple the recipe, simply multiply the ingredients accordingly. The main logistical challenge you'll face is the capacity of your blender and the number of popsicle molds you have. If your blender isn't large enough to handle the entire volume at once, work in batches. Blend half of the watermelon, mint, and lime, pour it into a large bowl or pitcher, and then blend the second half. It is crucial to combine all the blended batches into one large container and stir them together thoroughly before pouring into the molds. This ensures that the flavor and sweetness are perfectly consistent across all your popsicles.
Time management is key when preparing for a crowd. The watermelon purée can be made up to 24 hours in advance. Prepare the entire liquid mixture, taste and adjust it, and then store it in a sealed container in the refrigerator. This breaks up the work and frees up your time on the day of your event. When you’re ready, just give the mixture a quick stir and pour it into your molds to freeze. If you don't have enough molds, you can also freeze in batches. Unmold the first set, wrap them individually for storage in the freezer, and reuse the molds for the next batch. These Watermelon Popsicles are the perfect make-ahead dessert for any large summer gathering.
Storing Any Leftovers
While these Watermelon Popsicles are so delicious they rarely last long, proper storage is essential if you make a large batch or have a few leftovers. Once unmolded, the popsicles are exposed to the dry air of the freezer, which can lead to ice crystals forming on the surface (freezer burn) and a loss of their vibrant flavor.
To keep them tasting as fresh as the day you made them, you need to protect them individually. The best method is to wrap each popsicle tightly in plastic wrap or a small piece of wax paper. This creates a barrier that prevents air from reaching the surface of the popsicle. Once each one is wrapped, place them together in a large, freezer-safe, zip-top bag or an airtight container. Squeeze out as much air as possible from the bag before sealing it.
Properly stored this way, your homemade popsicles will maintain their beautiful texture and intense flavor for up to 3-4 weeks. Any longer, and you might start to notice some degradation in quality, though they will still be safe to eat. When you're ready for a treat, you can just grab one from the freezer without having to unmold it, making it the perfect instant refreshment. Taking these few extra minutes to store them correctly ensures that your delicious efforts are preserved beautifully.
Variations to Explore
Once you’ve mastered the classic Watermelon Popsicles with mint and lime, you can use it as a wonderful canvas for your culinary creativity. The simple base is incredibly versatile and invites experimentation. Here are a few variations to inspire you.
For those who enjoy a bit of heat with their sweet, try a Spicy Watermelon version. Add a thin slice or two of jalapeño (seeds removed for less intensity) or a tiny pinch of cayenne pepper to the blender. The subtle warmth at the back of your throat is a fantastic and surprising contrast to the cool sweetness of the melon.
To introduce a creamy element, create a Creamy Watermelon Swirl. Prepare the watermelon purée as directed. Before pouring it into the molds, add a dollop of thick coconut cream, full-fat Greek yogurt, or labneh into each mold. Pour the watermelon mixture over it and use a skewer to gently swirl the two together, creating a beautiful two-toned effect and a richer, creamier texture.
A Berry Burst variation is perfect when summer berries are also in season. Add a handful of fresh raspberries or strawberries to the blender along with the watermelon. This will deepen the color to a gorgeous magenta and add a lovely tartness and complexity to the flavor profile.
Finally, for a fun project, you can create Layered Watermelon Popsicles. Start with a layer of blended kiwi and a little sweetener at the bottom of the mold to mimic the green rind. Freeze until firm. Add a thin layer of a coconut cream mixture for the white part of the rind, and freeze again. Finally, top with the watermelon purée for the main layer. It takes more time, but the impressive result is well worth the effort and makes for a truly show-stopping treat.
Questions You Might Have
My watermelon isn't very sweet. What can I do?
This is a common issue! The beauty of making Watermelon Popsicles at home is that you can adjust for this. Simply add a tablespoon of honey or agave nectar at a time to the blender, tasting after each addition until the purée is slightly sweeter than you’d want the final popsicle to be, as freezing dulls sweetness.
Can I make these without a special popsicle mold?
Absolutely! You can easily use small paper or plastic cups as molds. Pour the mixture into the cups, cover the top of each with a small piece of foil, and poke a small slit in the center with a knife to insert your wooden popsicle stick. The foil will hold the stick perfectly in place as it freezes.
Why are my popsicles icy instead of smooth?
The texture of a popsicle is determined by the size of the ice crystals. A higher sugar or fat content leads to smaller crystals and a smoother texture. If your popsicles are too icy, it likely means your watermelon was a bit watery or you didn't add enough sweetener to balance it out. A tablespoon of honey or agave does wonders for the final texture.
How do I get the sticks to stand up straight?
The easiest trick is to freeze the popsicles for about 1.5 to 2 hours without the sticks. Once the mixture is thick and slushy, you can insert the sticks, and they will stand perfectly upright. Then, return them to the freezer to harden completely.
Can I use a different herb instead of mint?
Of course! Basil is a wonderfully sophisticated and delicious pairing with watermelon, offering a slightly peppery, anise-like note. You could also try lemon verbena for a more intense citrus-herbal flavor. Feel free to experiment with your favorite fresh herbs.
Watermelon Mint Popsicles with Lime
The ultimate refreshing summer treat! These easy homemade watermelon popsicles are made with fresh mint and a hint of lime for a perfectly balanced, healthy dessert.
Prep Time
15 min
Cook Time
6h
Total Time
6h 15m
Servings
8 popsicles
Ingredients
For 8 popsicles
- 6 cups seedless watermelon, cubed (from about a 4-5 lb melon)
- 1/4 cup fresh mint leaves, lightly packed
- 1/4 cup fresh lime juice (from 2-3 limes)
- 2-4 tablespoons honey or agave nectar, to taste
- 1/8 teaspoon fine sea salt
- 1/4 teaspoon rosewater (optional)
Instructions
- 1
Prepare the Ingredients
Wash the mint leaves and pat them dry. Juice the limes to get 1/4 cup of fresh juice. Cut the watermelon into 1-inch cubes. Having all your ingredients prepped and ready will make the process go smoothly.
- 2
Blend the Mixture
In a high-speed blender, combine the cubed watermelon, fresh mint leaves, fresh lime juice, 2 tablespoons of honey or agave, and the pinch of sea salt. If using, add the optional rosewater now.
- 3
Process Until Smooth
Blend on high speed for 30-60 seconds, or until the mixture is completely smooth and no specks of mint remain. The liquid should be a vibrant, uniform pinkish-red color. Avoid over-blending to prevent making the mixture too frothy.
- 4
Taste and Adjust Sweetness
This is a crucial step. Pour a small amount into a spoon and taste it. The mixture will taste less sweet once frozen, so it should be slightly sweeter than you'd prefer. Add more honey or agave, one tablespoon at a time, and blend briefly to combine until the desired sweetness is reached.
- 5
Strain for a Smoother Texture (Optional)
For an ultra-smooth, professional-quality popsicle, place a fine-mesh sieve over a large bowl or pitcher and pour the blended mixture through it. Use a spatula to gently press on the solids to extract all the liquid. Discard the pulp.
- 6
Pour Into Molds
Carefully pour the liquid watermelon mixture into your popsicle molds. Be sure to leave about a 1/4-inch of space at the top of each mold, as the liquid will expand when it freezes.
- 7
First Freeze and Add Sticks
Place the molds in the freezer on a level surface. Let them freeze for 1.5 to 2 hours, or until the mixture is slushy and beginning to firm up. Insert a popsicle stick into the center of each mold; the semi-frozen mixture will hold them perfectly upright.
- 8
Final Freeze Until Solid
Return the molds to the freezer and continue to freeze for at least 4 more hours, or overnight, until the popsicles are completely solid.
- 9
Unmold and Serve
To release the popsicles, run the outside of the mold under warm (not hot) water for about 15-20 seconds. Gently pull on the sticks to release the popsicles. Serve immediately or wrap individually for later.
Nutrition Facts
Per serving (estimated)
65 calories
Calories
17g
Carbs
1g
Protein
0.5g
Fat
1g
Fiber
45mg
Sodium
15g
Sugar


