Ultimate Browned Butter Monster Blondies (Festive Bars)
Discover the BEST Browned Butter Monster Blondies! Chewy, nutty, and packed with chocolate and oats, these easy, festive bars are perfect for any gathering.
cookwithyara.com/recipes/4th-of-july-monster-cookies
There is a special kind of magic that fills a home when something wonderful is baking. It’s a universal language of comfort, a scent that promises warmth and sweetness. For me, that aroma is often a mix of warm spices, toasting nuts, or fresh bread. But today, it’s the rich, intoxicatingly nutty scent of browned butter, the foundation for a treat that feels both wonderfully familiar and excitingly new: my ultimate Browned Butter Monster Blondies. This isn't just a recipe; it's a celebration in a pan. It's the kind of dessert that begs to be shared, placed in the center of a table where friends and family gather, its colorful top a joyful invitation to take a piece. Imagine a bar that marries the chewy, caramel-like goodness of a classic blondie with the anything-goes generosity of a monster cookie. We're talking oats, chocolate chips, and colorful coated candies all suspended in a dense, fudgy, butterscotch-rich crumb. The secret, the soul of this recipe, is the browned butter. It’s a simple step that transforms the entire experience, lending a depth of flavor that is profoundly satisfying. This is how we take a beloved American classic and give it the soul and complexity I cherish in Mediterranean and Levantine sweets. It’s a tribute to generous, joyful gatherings, no matter the occasion.
A Taste of the Culture
While blondies and monster cookies are cornerstones of American home baking, the spirit behind them resonates deeply with my own culinary heritage. These desserts are part of a culture of sharing—of potlucks, bake sales, and community gatherings where everyone brings something to the table. This act of offering food, made with care to share with others, is a value that transcends borders. In the Levant, we call it ‘karam’—a spirit of generosity and hospitality that is most beautifully expressed through food. A tray of these Browned Butter Monster Blondies, with their abundance of delicious ingredients, feels like a perfect expression of that spirit. The blondie itself, often called a “blonde brownie,” has been a part of the American baking repertoire since the late 19th or early 20th century. Its defining characteristic is the deep, molasses-rich flavor from brown sugar, which creates a delightful chewiness. The “monster cookie,” a more recent invention from the 1970s, is famous for its combination of peanut butter, oats, and a medley of chocolate chips and candies. It’s a cookie that joyfully breaks all the rules, throwing everything delicious into one bowl. This recipe for Browned Butter Monster Blondies takes the best of both worlds. It captures the dense, chewy texture of the blondie and the generous, multi-textured spirit of the monster cookie. By introducing the technique of browning butter—a method used across the globe to develop rich, nutty flavors in both sweet and savory dishes—we elevate this humble bar into something truly special. It’s a beautiful fusion of technique and tradition, creating a dessert that feels both nostalgic and sophisticated, perfect for any and every celebration.
The Ingredients That Define This Dish
Great baking begins with great ingredients, and in this Browned Butter Monster Blondies recipe, each component plays a crucial role in building layers of flavor and texture. The magic is in the synergy, how these simple pantry staples come together to create something extraordinary. Let's explore the key players. First and foremost, unsalted butter. This is the heart of the recipe. We use unsalted so we can control the salt level, but more importantly, we transform it into browned butter, or beurre noisette. This process toasts the milk solids, creating a complex, nutty, and deeply aromatic liquid gold that infuses the entire blondie with an incredible depth that melted butter alone cannot achieve. Next is light brown sugar, which is non-negotiable for a true blondie. Its molasses content provides moisture, a classic caramel-like flavor, and that signature chewy texture. We also use a little granulated sugar for structure and crisp edges. For that classic monster cookie feel, we have creamy peanut butter. It adds a savory richness and tenderness to the crumb. Look for a conventional creamy brand for the best texture here. Rolled oats (old-fashioned oats) are essential for their hearty, chewy bite. They absorb moisture and contribute to the dense, satisfying texture that makes these bars so addictive. Please avoid instant or quick-cooking oats, as they will break down and result in a pasty texture. Of course, we need our chocolate. A combination of semi-sweet chocolate chips and colorful coated chocolate candies creates visual appeal and pockets of melty goodness. Using both gives you a delightful mix of flavors and textures. The foundation of our blondie is all-purpose flour, providing the structure that holds everything together. A high-quality pure vanilla extract and a pinch of sea salt are crucial flavor enhancers. Vanilla complements the caramel notes of the brown sugar, while salt is the secret to balanced sweetness, making all the other flavors pop. Finally, two large eggs act as our binder, adding richness, leavening, and contributing to the fudgy texture of our finished Browned Butter Monster Blondies.
Cooking the Authentic Way
The process of making these Browned Butter Monster Blondies is a wonderfully sensory experience. It’s not just about mixing ingredients; it’s about watching, smelling, and feeling the transformation at each stage. Paying attention to these cues is what separates a good blondie from a truly unforgettable one. The journey begins with the most important step: browning the butter. In a light-colored saucepan over medium heat, you’ll melt the butter. It will foam, then sputter and pop as the water cooks off. This is when you must be vigilant. Swirl the pan continuously. Soon, the sputtering will subside, and you'll see golden-brown specks—the toasted milk solids—settling at the bottom. The aroma will change from simply melted butter to something deeply nutty and fragrant, like toasted hazelnuts. Immediately remove it from the heat and pour it into a large mixing bowl to stop the cooking process. The second stage is building the flavor base. To the hot browned butter, you'll add both the brown and granulated sugars, along with the peanut butter. Whisk them together vigorously. The heat from the butter will begin to melt the sugars, creating a glossy, deep amber-colored mixture. This step is crucial for developing that foundational toffee flavor. Next, we incorporate the eggs and vanilla. It’s important to let the butter mixture cool for a few minutes before this step to avoid scrambling the eggs. Whisk them in one at a time until the mixture is thick, smooth, and emulsified. You're creating the rich, custardy base that will result in a perfectly fudgy blondie. The fourth stage involves the dry ingredients. In a separate bowl, you'll whisk together the flour, oats, baking soda, and salt. Add this mixture to the wet ingredients and fold it in gently with a spatula. The cardinal rule of any great baked good applies here: do not overmix. Mix only until the last streaks of flour disappear. Overmixing develops gluten, which will lead to tough, cakey blondies instead of the dense, chewy bars we want. Finally, the fun part: folding in the mix-ins. Gently stir in your semi-sweet chocolate chips and most of the coated chocolate candies, reserving some to press on top for a vibrant, professional look. Spread the thick, glorious dough into your prepared baking pan, press the reserved candies on top, and bake. The final secret is patience. The blondies must cool completely in the pan before you even think about slicing them. This allows them to set, ensuring clean cuts and the perfect fudgy, chewy texture. This patient wait is the final, essential step in crafting the perfect Browned Butter Monster Blondies.
Bringing It All Together
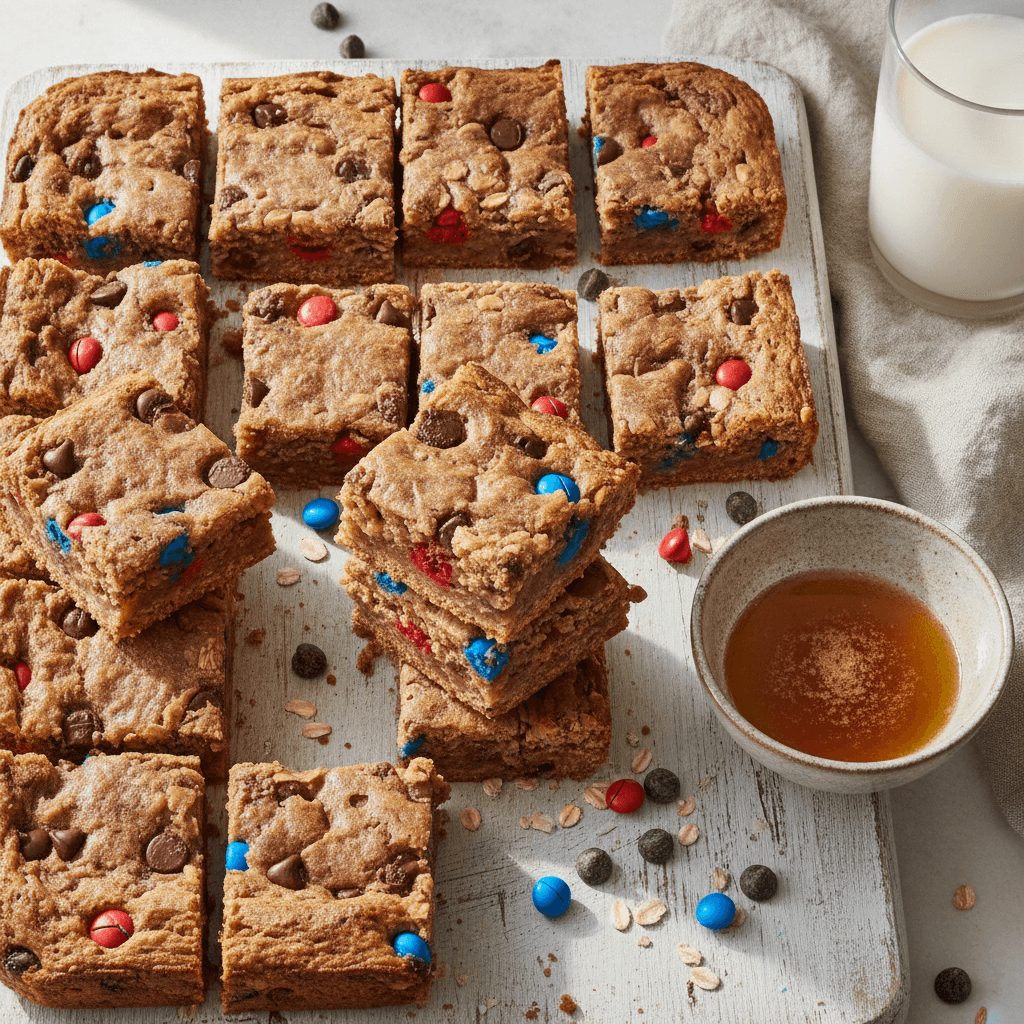
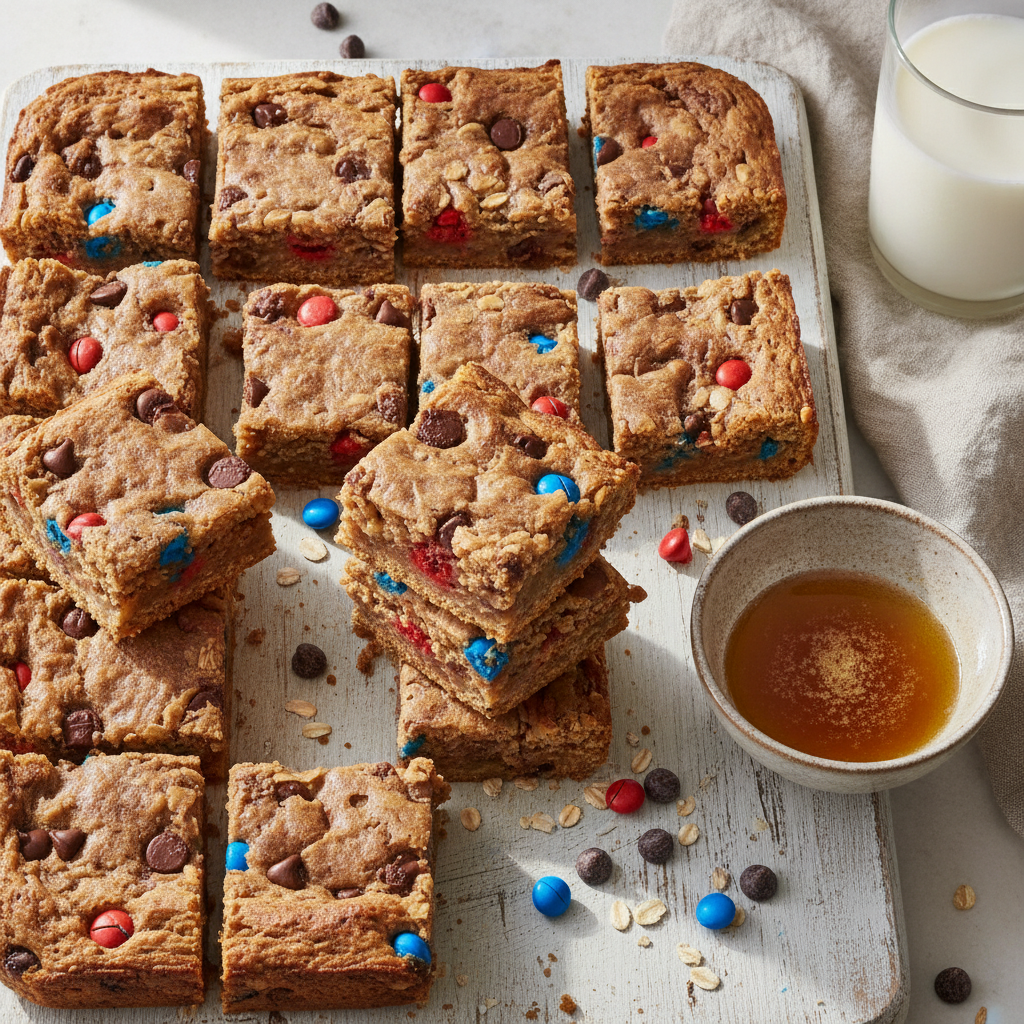
Once your beautiful pan of Browned Butter Monster Blondies has cooled completely—a true test of willpower!—the final act of bringing it all together begins. This is where the dessert transforms from a delicious bake into a centerpiece for your gathering. The presentation is part of the joy. Using the parchment paper overhangs as handles, carefully lift the entire slab of blondies out of the pan and onto a cutting board. This not only makes for easy removal but also protects your pan. The first thing you'll notice is the stunning surface: a glossy, crackled top, deep golden-brown from the brown sugar and browned butter, studded with vibrant pops of red and blue and pools of dark chocolate. Before you slice, take a moment to appreciate the incredible aroma of nutty butter, caramel, and warm chocolate. For perfectly clean squares, use a large, sharp chef's knife. I like to run the blade under hot water and wipe it dry between cuts. This simple trick prevents the fudgy interior from dragging and ensures each piece looks as good as it tastes. You can cut them into 16 large squares for a truly decadent treat, or 24 smaller bars for a larger crowd. Arrange the cut blondies on a large platter, a rustic wooden board, or a simple ceramic plate. I love to overlap them slightly, creating a sense of abundance and invitation. For an extra touch of elegance and a final flavor flourish, a very light sprinkle of flaky sea salt over the top is absolute perfection. It contrasts beautifully with the sweetness and makes the deep, complex flavors of the Browned Butter Monster Blondies sing. The eating experience is a journey of textures and flavors: the crisp, chewy edges give way to a dense, fudgy center. You get the hearty bite of the oats, the creamy richness of the peanut butter, and then the delightful bursts of melted chocolate and the crisp shell of the coated candies. It's a dessert that's meant to be eaten with your hands, shared amongst loved ones, and savored with a cup of tea or a simple glass of cold milk.
Make It Your Own
One of the greatest joys of baking is taking a beloved recipe and adding your own personal touch. These Browned Butter Monster Blondies are a fantastic canvas for your creativity. While the original recipe is a masterpiece of flavor and texture, there are countless ways to adapt it to your taste or to use what you have on hand. For a different nutty dimension, consider swapping out the mix-ins. Instead of or in addition to the chocolate chips, try folding in toasted walnuts, pecans, or even pistachios for a lovely Mediterranean twist. White chocolate chips would also be delicious, creating a creamier, sweeter bite that pairs beautifully with the brown butter. You can also play with the flavor profile by adding a hint of spice. Half a teaspoon of ground cinnamon or a quarter teaspoon of ground cardamom added to the dry ingredients would introduce a warm, aromatic note that is simply divine with the caramel and nut flavors. This is a common practice in Levantine baking, where a subtle touch of spice can elevate a simple sweet. If you have a nut allergy or simply want to try something different, the peanut butter can be easily substituted. Sunflower seed butter is a fantastic one-to-one replacement that provides a similar richness and a lovely, earthy flavor. For an even more decadent version, consider using tahini, which would lend a sophisticated, slightly savory sesame note that is absolutely incredible with the brown sugar and chocolate. Don't be afraid to experiment with the finishing touches either. A drizzle of melted dark or white chocolate over the cooled and sliced bars adds a touch of elegance. You could also sprinkle them with toasted shredded coconut for another layer of texture. The core of this Browned Butter Monster Blondies recipe is its forgiving and versatile nature, so feel free to make it uniquely yours.
Keeping and Reusing Leftovers
While a fresh-from-the-pan (and cooled!) Browned Butter Monster Blondie is a thing of pure joy, they are also a fantastic make-ahead dessert and store beautifully. Proper storage ensures they stay just as chewy and delicious for days to come. The most important rule is to keep them airtight. Once the blondies are completely cooled and cut into bars, store them in an airtight container at room temperature. I like to place a small piece of parchment paper between the layers to prevent them from sticking together. Stored this way, they will remain fresh and chewy for up to four days. If your kitchen is particularly warm, you can store them in the refrigerator, which will make them firmer and even fudgier. Just let them sit at room temperature for about 15-20 minutes before serving to soften slightly. These blondies also freeze exceptionally well, which is perfect if you want to have a delicious treat on hand for unexpected guests. You can freeze the entire uncut slab by wrapping it tightly in two layers of plastic wrap and then a layer of aluminum foil. Or, for individual treats, wrap the cut bars separately. They will keep in the freezer for up to three months. To thaw, simply leave them on the counter at room temperature for a couple of hours. Should you find yourself with a few leftover bars, they can be repurposed in creative ways. Crumble a bar over a bowl of vanilla ice cream for an instant, texturally amazing topping. You can also use the crumbles to create a simple trifle, layering them in a glass with whipped cream or a thick yogurt and some fresh berries. This turns your delicious leftovers into an entirely new and elegant dessert.
Your Questions Answered
Can I make these blondies gluten-free?
Yes, you absolutely can! To make these Browned Butter Monster Blondies gluten-free, substitute the all-purpose flour with a high-quality measure-for-measure gluten-free flour blend that contains xanthan gum. Also, be sure to use certified gluten-free rolled oats to avoid any cross-contamination. The texture will be nearly identical and just as delicious.
Why did my blondies turn out dry or cakey?
This is usually due to one of two things: over-measuring the flour or overbaking. When measuring flour, I highly recommend using a kitchen scale for accuracy. If you don't have one, use the “spoon and level” method: spoon the flour into your measuring cup and level it off with a knife, rather than scooping directly from the bag. Also, keep a close eye on the blondies in the oven. You want to pull them out when the edges are set and golden, but the center is still slightly soft. It will continue to cook and set from the residual heat in the pan as it cools.
Can I use quick-cooking oats instead of rolled oats?
I strongly advise against it. Rolled oats, or old-fashioned oats, are whole oats that have been steamed and flattened. They maintain their shape and provide a distinct, hearty chewiness. Quick-cooking oats are more processed and cut finer, and they will absorb the liquid differently, often resulting in a mushier, pastier texture in the final blondie.
Do I really have to brown the butter?
While you could make this recipe with simple melted butter, you would be missing out on the key flavor component that makes these blondies truly special. Browning the butter creates a deep, nutty, and complex flavor profile that elevates the entire dessert from good to absolutely exceptional. It's an extra 5-10 minutes of effort that pays off immensely in the final taste.
What are some good things to serve with these festive monster blondies?
The beauty of these bars is their rich, self-contained flavor, so they need very little accompaniment. A simple glass of cold milk is a classic and perfect pairing. For a warmer, more comforting option, they are wonderful with a cup of fresh mint tea or a simple black coffee, which helps cut through the sweetness. For a more decadent dessert, serve a warm blondie with a small scoop of high-quality vanilla bean ice cream.
Browned Butter Monster Blondies
Incredibly chewy and fudgy blondies packed with oats, peanut butter, chocolate chips, and colorful candies, all elevated by the nutty, rich flavor of browned butter.
Prep Time
25 min
Cook Time
30 min
Total Time
55 min
Servings
24 bars
Ingredients
For 24 bars
- 1 cup (226g) unsalted butter
- 1 cup (220g) packed light brown sugar
- 1/2 cup (100g) granulated sugar
- 1/2 cup (128g) creamy peanut butter
- 2 large eggs, at room temperature
- 2 teaspoons pure vanilla extract
- 1 1/2 cups (180g) all-purpose flour
- 1 cup (90g) old-fashioned rolled oats
- 1 teaspoon baking soda
- 1/2 teaspoon fine sea salt
- 1 cup (170g) semi-sweet chocolate chips
- 1 cup (200g) colorful coated chocolate candies (e.g. red and blue)
Instructions
- 1
Prepare Pan and Preheat
Preheat your oven to 350°F (175°C). Line a 9x13 inch baking pan with parchment paper, leaving an overhang on the two long sides to act as handles later. This will ensure easy removal of the blondies.
- 2
Brown the Butter
In a light-colored, medium saucepan, melt the unsalted butter over medium heat. Continue to cook, swirling the pan frequently, as the butter foams and sputters. Watch carefully until you see golden-brown specks form at the bottom and the butter smells nutty and fragrant, about 5-8 minutes. Immediately pour the browned butter, including the brown bits, into a large heatproof bowl to stop the cooking.
- 3
Mix Sugars and Peanut Butter
To the hot browned butter, add the light brown sugar, granulated sugar, and creamy peanut butter. Whisk vigorously for about one minute until the mixture is smooth, glossy, and well combined. The heat will help melt the sugars.
- 4
Add Eggs and Vanilla
Let the butter-sugar mixture cool for 5 minutes. Add the eggs one at a time, whisking well after each addition until fully incorporated. Whisk in the pure vanilla extract until the batter is thick and smooth.
- 5
Combine Dry Ingredients
In a separate medium bowl, whisk together the all-purpose flour, rolled oats, baking soda, and fine sea salt. This ensures the leavening and salt are evenly distributed throughout the dough.
- 6
Fold in Dry Ingredients
Pour the dry ingredient mixture into the wet ingredients. Using a rubber spatula, gently fold everything together until just combined. Be careful not to overmix; stop as soon as the last streaks of flour disappear.
- 7
Add the Mix-Ins
Gently fold in the semi-sweet chocolate chips and about 3/4 of the coated chocolate candies. Reserve the remaining candies for the top.
- 8
Press into Pan
Transfer the thick dough into your prepared 9x13 inch pan. Use the spatula or your hands to spread it into an even layer, pressing it into the corners. The dough will be sticky.
- 9
Top and Bake
Sprinkle the reserved coated chocolate candies evenly over the top of the dough, gently pressing them in slightly. Bake at 350°F (175°C) for 25-30 minutes, or until the edges are golden brown and a wooden skewer inserted into the center comes out with moist crumbs attached, but not wet batter.
- 10
Cool Completely
This step is crucial. Place the pan on a wire rack and let the blondies cool completely in the pan, for at least 3-4 hours. Do not attempt to cut them while warm, as they will be too gooey and will fall apart.
- 11
Slice and Serve
Once fully cooled, use the parchment paper handles to lift the entire blondie slab out of the pan. Place on a cutting board and use a sharp knife to cut into 24 squares. Store in an airtight container at room temperature.
Nutrition Facts
Per serving (estimated)
280 calories
Calories
35g
Carbs
5g
Protein
14g
Fat
2g
Fiber
150mg
Sodium
22g
Sugar