Easy Bar.One Cheesecakes in an Ice Tray (No-Bake!)
Learn how to make perfect, bite-sized Bar.One Cheesecakes in an Ice Tray! This easy, no-bake recipe is a guaranteed crowd-pleaser for any gathering.
cookwithyara.com/recipes/barone-cheesecakes-in-an-ice-tray
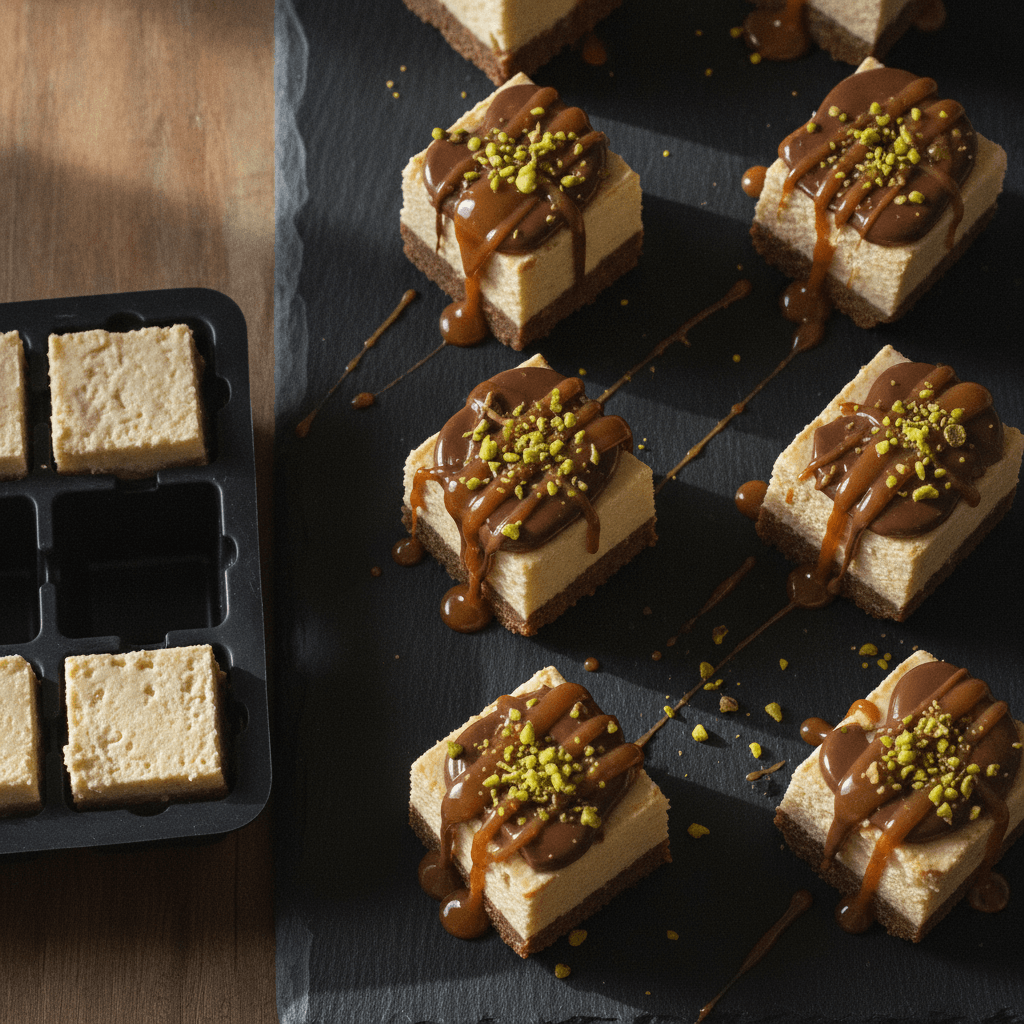
There's a special kind of hush that falls over a table when a truly spectacular dessert arrives. It’s a moment of shared anticipation, a collective pause before the joy begins. Picture this: a chilled platter, artfully arranged with dozens of perfect, gleaming cubes of dessert. Each one is a miniature masterpiece—a crisp, buttery base, a thick layer of creamy white cheesecake, and a decadent, swirled topping of melted chocolate, caramel, and nougat. This is the magic of these incredible Bar.One Cheesecakes in an Ice Tray. They are the kind of treat that has everyone reaching for their phones to capture the moment before they grab a sweet bite for themselves. The best part? This show-stopping dessert, which looks like it came from a high-end patisserie, is made using the humblest of kitchen tools: a simple ice cube tray. It’s our little secret. This recipe is all about creating maximum impact with minimum fuss. It’s about delighting your loved ones with something unexpected, beautiful, and utterly delicious. So, let’s unlock the potential of that forgotten tray in your freezer and create something truly memorable together.
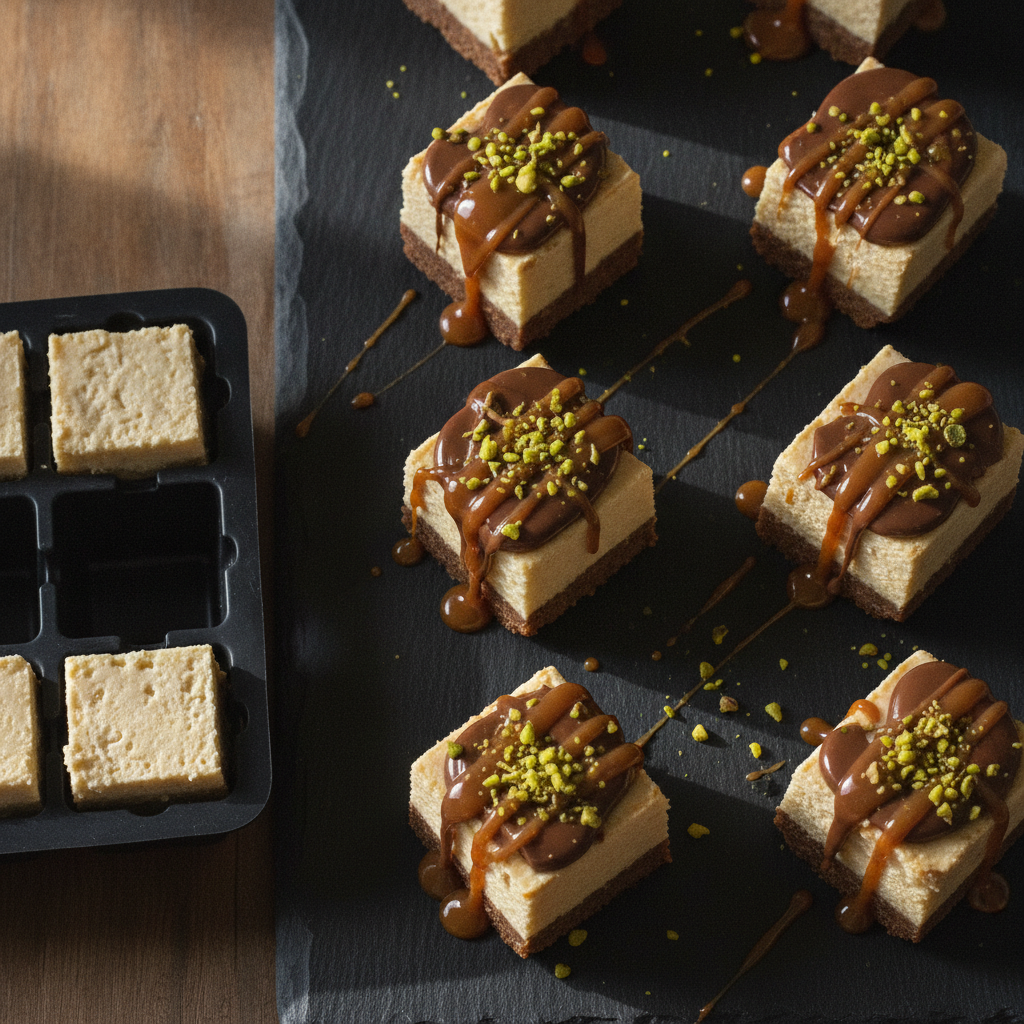
What Makes This a Showstopper
What elevates a simple dessert into a showstopper? It’s a combination of visual appeal, flavor complexity, and an element of surprise. These Bar.One Cheesecakes in an Ice Tray tick every single box, creating an experience that far exceeds the sum of their simple parts. The first impression is purely visual. The sharp, clean lines of the little cubes, the distinct layers of texture and color, and the glossy, tempting topping create a look of polished elegance. Arranged on a platter, they look like a collection of precious jewels, promising a rich reward. It's a presentation that speaks of care and attention to detail, yet it's achieved with such a wonderfully simple technique. Beyond the look, the flavor and texture journey of each bite is what truly captivates. You first encounter the rich, smooth chocolate and chewy caramel of the Bar.One topping. This gives way to the cool, velvety cheesecake filling—creamy, tangy, and just sweet enough to be decadent without being overwhelming. Finally, you reach the buttery, slightly salty crunch of the digestive biscuit base, which provides the perfect textural contrast to the smoothness above. It’s a complete, multi-layered experience in one perfect mouthful. What makes this recipe so special is that it delivers a restaurant-quality dessert experience without requiring any professional baking skills. There's no water bath, no worrying about cracks, no complicated techniques. The ice tray is the genius here; it acts as a perfect mold, creating uniform portions that are easy to serve and even easier to enjoy. It’s the ultimate dessert for gatherings, allowing guests to help themselves to a perfectly portioned treat. These delightful Bar.One Cheesecakes in an Ice Tray are proof that the most impressive dishes are often born from the cleverest ideas, not the most complex ones.
The Ingredients That Matter Most
In my kitchen, which is deeply rooted in the Levantine tradition of making the most of beautiful ingredients, quality is everything. Even in a fun, modern recipe like these Bar.One Cheesecakes in an Ice Tray, the final result is a direct reflection of the ingredients you begin with. This isn't about extravagance; it's about choosing components that will deliver the best possible flavor and texture. Let’s talk about the key players. The star, of course, is the Bar.One chocolate bar. This isn't just any chocolate; its unique combination of malt-flavored nougat, thick caramel, and milk chocolate coating is what gives our topping its signature chewiness and complex flavor. Using the real deal is non-negotiable for that authentic taste. Next is the full-fat cream cheese. Please, this is not the place for low-fat substitutes! For that luxuriously thick and creamy texture, reminiscent of a dense, rich labneh, you need the richness of full-fat cream cheese, brought to room temperature to ensure a silky-smooth, lump-free filling. For the base, classic digestive biscuits provide a wonderful, wholesome flavor and a sturdy crunch. Their slightly savory note is the perfect counterbalance to the sweet filling. These are bound together with good-quality unsalted butter, which lends its own rich flavor. The sweetness and structure of our no-bake filling come from sweetened condensed milk. It’s a magical ingredient that helps the cheesecake set beautifully without any cooking. To cut through all that richness, a splash of fresh lemon juice is essential. It brightens the flavor of the cream cheese and adds a subtle tang that keeps the dessert from feeling too heavy. Finally, a dash of high-quality, non-alcoholic vanilla extract adds a layer of aromatic warmth. While not traditional, a tiny drop of orange blossom water in the filling would be a beautiful Levantine-inspired twist, adding a delicate floral note that pairs wonderfully with the chocolate and cream.
Building It Step by Step
The true beauty of making Bar.One Cheesecakes in an Ice Tray lies in the process. It’s a simple, methodical layering of flavors and textures that is deeply satisfying. Think of it as constructing a tiny, edible work of art, cube by cube. The journey begins with the foundation: the crust. We crush the digestive biscuits into a fine, sandy crumb—you can use a food processor for speed or a rolling pin and a bag for a more rustic texture. This crumb is then mixed with melted butter until it resembles damp sand, ready to form a solid base. The first key technique is to press this mixture firmly and evenly into the bottom of each compartment of your ice tray. A small spoon or even the end of a wooden spoon handle works perfectly for this. This firm pressure is crucial for a base that holds together perfectly. Next comes the heart of our cheesecake: the filling. In a large bowl, we beat the softened cream cheese until it’s completely smooth and ethereal. This step is where patience pays off; beating out any lumps now ensures a velvety final texture. We then stream in the sweetened condensed milk, vanilla, and that all-important lemon juice, mixing until everything is just combined into a thick, luscious cream. This glorious mixture is then carefully spooned or piped over the biscuit base in each cube, filling it almost to the top. A gentle tap of the tray on the counter helps settle the filling and remove any air bubbles. Now for the crowning glory. The Bar.One bars are chopped and gently melted with a touch of cream until smooth and pourable. You can do this in a microwave in short bursts or over a double boiler. The key is low, gentle heat to avoid scorching the chocolate. This decadent, molten topping is then drizzled over the cheesecake filling in each cube. You can swirl it gently with a toothpick for a marbled effect or leave it as a distinct top layer. The final, and perhaps most important, stage is the chill. The entire tray goes into the freezer for at least four to six hours, or ideally overnight. This isn't just about getting it cold; the freezing process is what sets the cheesecake firmly, allowing you to pop out perfect, sharp-edged cubes. This patient wait is where the magic truly sets in, transforming simple layers into an irresistible frozen treat.
Presentation and Plating Tips
We eat first with our eyes, a principle held dear in Mediterranean and Levantine cultures where hospitality is an art form. The way a dish is presented is a gesture of care and generosity. After the patient work of creating your Bar.One Cheesecakes in an Ice Tray, the final presentation is your moment to shine. The beauty of these treats is their inherent elegance, so plating is all about enhancing their clean lines and rich colors. First, choose your serving vessel wisely. A flat, cool surface is best. A dark slate board, a simple white ceramic platter, or even a beautiful wooden board will create a stunning contrast with the cheesecakes. Chill the platter in the freezer for about 15 minutes before plating; this will help keep the cheesecakes firm and perfect as you serve them. When you're ready to serve, carefully pop the frozen cheesecake cubes out of the tray. If they resist, a brief run of the tray’s underside with warm water will help release them. Arrange them on your chilled platter with a little space between each one. You can line them up in neat rows for a modern, minimalist look or arrange them in a more organic, free-form cluster. Garnishes are where you can add a personal touch. A simple drizzle of extra melted chocolate or a high-quality caramel sauce over the entire platter adds a dramatic, delicious flair. For a touch of texture and a nod to my Levantine roots, a sprinkle of finely chopped, vibrant green pistachios is absolutely beautiful. A very light dusting of unsweetened cocoa powder or even a few delicate flakes of sea salt can also elevate the flavors. Think about angles and height; creating a bit of a mound in the center of the platter can be more visually interesting than a completely flat arrangement. The goal is to create a sense of abundance and invitation, encouraging everyone to reach in and enjoy the beautiful Bar.One Cheesecakes in an Ice Tray you’ve so lovingly prepared.
Scaling Up for a Crowd
One of the greatest joys of cooking is sharing food with people you love. Whether it’s a large family dinner, a community gathering, or a festive get-together with friends, having a go-to dessert that can be easily scaled up is invaluable. These Bar.One Cheesecakes in an Ice Tray are an entertainer’s dream because they are incredibly easy to make in large quantities. The modular nature of using ice trays means that doubling or tripling the recipe is as simple as multiplying the ingredients and using more trays. A standard ice tray holds about 16 cubes. If you’re expecting 20-25 guests, aiming for two cheesecakes per person is a good rule of thumb, so you'd plan on making about three to four trays' worth. The key to success when cooking for a crowd is preparation. The wonderful thing about this recipe is that almost all the work can be done well in advance. You can prepare the entire dessert—base, filling, and topping—up to a week before your event. Simply assemble the cheesecakes in the trays, cover them tightly with plastic wrap to prevent freezer burn and any lingering freezer odors from seeping in, and leave them be. This frees you up entirely on the day of the gathering to focus on other dishes. When planning, consider your freezer space. These trays are stackable, which is a huge space-saver. About 30 minutes before you plan to serve dessert, simply pop the cheesecake cubes out of their trays and arrange them on your serving platters. Keep the platters in the refrigerator until the very last minute to ensure they are perfectly chilled and firm when they hit the table. This make-ahead strategy transforms an impressive dessert into a stress-free finale for any large gathering, making these Bar.One Cheesecakes in an Ice Tray a reliable favorite.
Storing Any Leftovers
While it's rare to have many of these delectable Bar.One Cheesecakes in an Ice Tray left over, it's always good to know how to store them properly to preserve their wonderful texture and flavor. The key to storage is protecting them from the two enemies of frozen desserts: air and moisture. The best way to store leftovers is to transfer them from the platter into a freezer-safe, airtight container. To prevent them from sticking together and to protect their perfect shape, it's wise to place them in a single layer. If you need to stack them, separate the layers with a sheet of parchment or wax paper. This small step makes a huge difference when you want to grab just one or two later. Stored this way in the freezer, the cheesecakes will remain fresh and delicious for up to two weeks. Any longer, and you might risk a little freezer burn, which can slightly alter the creamy texture. If you plan on enjoying the leftovers within a day or two, you can also store them in an airtight container in the refrigerator. They will soften from a frozen treat into a more traditional, chilled no-bake cheesecake texture, which is equally delicious. When you're ready to enjoy a frozen cheesecake from the freezer, it’s best to let it sit at room temperature for just a few minutes (no more than 5-10) before serving. This slight thaw softens the texture just enough to make it perfectly creamy and easy to bite into, restoring it to its near-original glory. Proper storage ensures that your last bite of these Bar.One Cheesecakes in an Ice Tray is just as delightful as the first.
Variations to Explore
While the classic recipe for Bar.One Cheesecakes in an Ice Tray is a certified hit, a great recipe should always serve as a canvas for your own creativity. There are so many wonderful ways to put your own spin on these little treats, adapting them to your taste or the ingredients you have on hand. Here are a few variations to inspire you:
- Switch Up the Base: The biscuit base is a fantastic place to experiment. Try using chocolate-flavored digestive biscuits for a double-chocolate experience, or crushed ginger snaps for a warm, spicy kick that pairs beautifully with the creamy filling. For a more sophisticated, nutty flavor, a base made from crushed toasted almonds or pecans mixed with a little butter would be divine.
- Infuse the Filling: The creamy cheesecake filling is wonderfully receptive to new flavors. For coffee lovers, dissolving a teaspoon of instant espresso powder into the filling will create a rich mocha version. A tablespoon of high-quality cocoa powder will transform it into a chocolate cheesecake filling. Or, for that subtle Levantine touch I love, a quarter teaspoon of finely ground cardamom in the filling adds an exotic, aromatic warmth.
- Explore Different Toppings: While Bar.One is the star, you can certainly try this method with other chocolate bars. A chopped peppermint crisp bar would create a wonderfully fresh and crunchy topping. A chocolate bar with nuts would add another layer of texture. You could also forgo the candy bar entirely and top with a simple fruit coulis, like raspberry or passionfruit, for a brighter, tangier version.
- The Weeknight Deconstructed Version: Don't have an ice tray or the time to freeze? You can capture the same flavors in a glass. Simply layer the biscuit crumb, cheesecake filling, and melted Bar.One topping in small glasses or ramekins and chill in the refrigerator for a few hours. It’s a quicker, rustic version of the Bar.One Cheesecakes in an Ice Tray that's perfect for a spontaneous dessert craving.
Questions You Might Have
Even with a straightforward recipe, questions can always pop up. Here are answers to a few common queries you might have while making your Bar.One Cheesecakes in an Ice Tray.
Can I make these ahead of time?
Absolutely! This is one of the best features of this recipe. You can assemble them completely and store them in the freezer for up to two weeks. Just make sure they are well-covered in their tray with plastic wrap to keep them fresh and free from any freezer odors.
Why are my cheesecakes sticking to the ice tray?
This usually happens for one of two reasons. Either they haven't been frozen for long enough to become completely solid, or your freezer isn't quite cold enough. Ensure they freeze for a minimum of six hours. If they still stick, simply hold the bottom of the tray under warm running water for about 5-10 seconds to slightly melt the exterior, and they should pop right out.
Can I use a different kind of chocolate bar?
Of course! While this recipe is designed around the specific textures of a Bar.One, you can substitute it with other chocolate bars containing caramel, nougat, or nuts. A Mars bar, Snickers, or even a crunchy chocolate bar would work well, each giving the dessert a slightly different personality.
What can I use instead of digestive biscuits?
If you can't find digestive biscuits, any simple, dry, crumbly biscuit will work. Graham crackers are a classic cheesecake base and a perfect substitute. Shortbread cookies or even chocolate wafer cookies would also be delicious alternatives for your Bar.One Cheesecakes in an Ice Tray.
My cheesecake filling seems a bit runny. Will it still set?
Yes, it will. The no-bake cheesecake filling is naturally softer than a baked version before it's chilled. The combination of the cream cheese, condensed milk, and the acidity from the lemon juice, combined with the freezing process, is what will make it perfectly firm. Trust the process and give it adequate time in the freezer.
Bar.One Cheesecakes in an Ice Tray
Perfectly portioned, no-bake mini cheesecakes with a buttery biscuit base, creamy filling, and a decadent Bar.One chocolate topping, all made in a simple ice tray.
Prep Time
25 min
Cook Time
5 min
Total Time
6h 30m
Servings
32 mini cheesecakes (2 trays)
Ingredients
For 32 mini cheesecakes (2 trays)
- 200g digestive biscuits
- 100g unsalted butter, melted
- 500g full-fat cream cheese, at room temperature
- 1 can (397g) sweetened condensed milk
- 1 teaspoon non-alcoholic vanilla extract
- 3 tablespoons fresh lemon juice
- 4 standard (55g) Bar.One chocolate bars
- 4 tablespoons heavy cream
Instructions
- 1
Prepare the Biscuit Base
Place the digestive biscuits in a food processor and pulse until they form fine crumbs. Alternatively, place them in a sealed bag and crush with a rolling pin. Transfer the crumbs to a medium bowl.
- 2
Combine Base Ingredients
Pour the melted unsalted butter over the biscuit crumbs. Mix with a fork until the mixture is well combined and resembles wet sand. Set aside.
- 3
Press Crust into Tray
Take two standard plastic or silicone ice cube trays. Spoon about one heaping teaspoon of the biscuit mixture into each compartment. Use the back of the spoon or your fingertips to press the crust down firmly and evenly.
- 4
Chill the Crust
Place the ice trays in the freezer for about 10-15 minutes. This will help the buttery base to firm up before you add the filling.
- 5
Make the Cheesecake Filling
In a large bowl, using an electric mixer or a stand mixer with the paddle attachment, beat the room temperature cream cheese on medium speed until completely smooth and free of lumps, about 2-3 minutes.
- 6
Combine Filling Ingredients
Reduce the mixer speed to low and pour in the sweetened condensed milk, non-alcoholic vanilla extract, and fresh lemon juice. Mix until everything is just combined and the filling is thick and smooth. Avoid overmixing.
- 7
Fill the Ice Trays
Remove the trays with the chilled bases from the freezer. Carefully spoon or pipe the cheesecake filling into each compartment, filling it up to the top. Gently tap the trays on the counter to level the filling and release any air bubbles.
- 8
Prepare the Bar.One Topping
Chop the Bar.One chocolate bars into small pieces. Place the chopped chocolate and the heavy cream in a microwave-safe bowl. Microwave in 20-second intervals, stirring in between, until the chocolate is melted and the mixture is smooth.
- 9
Add the Topping
Drizzle the melted Bar.One mixture over the cheesecake filling in each compartment. You can leave it as a top layer or use a toothpick to gently swirl it into the cheesecake filling for a marbled effect.
- 10
Freeze Until Firm
Cover the ice trays with plastic wrap. Place them in the freezer and let them freeze for at least 6 hours, or preferably overnight, until they are completely solid.
- 11
Demold and Serve
When ready to serve, remove the trays from the freezer. Gently twist the tray to loosen the cheesecake cubes. If needed, run the bottom of the tray under warm water for a few seconds to help release them. Pop them out onto a chilled serving platter.
Nutrition Facts
Per serving (estimated)
150 calories
Calories
14g
Carbs
2g
Protein
9g
Fat
0.5g
Fiber
85mg
Sodium
11g
Sugar