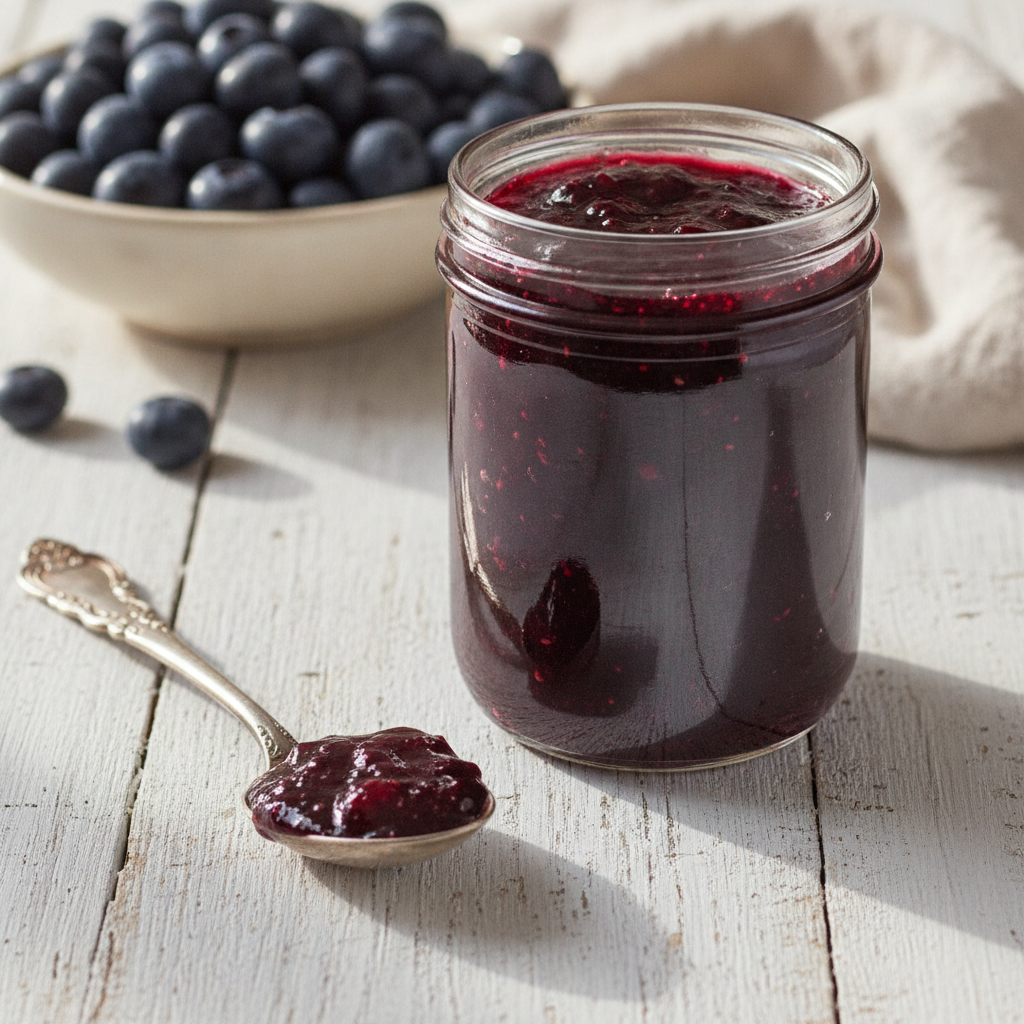
Easy Homemade Blueberry Jam Recipe (No Pectin!)
Learn to make the most delicious homemade blueberry jam without pectin! This simple recipe uses lemon for a perfect set and has an incredible, deep fruit flavor.
cookwithyara.com/recipes/blueberry-jam
There's a certain magic that fills the kitchen when fruit is simmering on the stove. It’s a fragrance that speaks of warmth, patience, and the simple joy of creating something beautiful from nature’s bounty. For me, that scent—the sweet, slightly tart perfume of bubbling berries—is one of the most comforting aromas I know. It reminds me of the Levantine tradition of mouneh, the art of preserving the harvest to be enjoyed throughout the year. It’s a practice rooted in resourcefulness and a deep appreciation for the seasons.
While my grandmother’s pantry was filled with jars of fig and apricot preserves, I was drawn to create a blueberry jam that captured that same spirit of homemade goodness. I wanted a recipe that was pure and simple, one that let the vibrant character of the blueberries shine through without complicated ingredients or techniques. My goal was to achieve that perfect, spoonable, glistening set using only the natural pectin found in fruit, a method that feels both traditional and wonderfully straightforward.
What truly sets this blueberry jam apart is its incredible depth of flavor. By slowly cooking the berries with just a touch of sugar and bright lemon, we concentrate their essence into something truly special. This isn't just a spread for toast; it's a spoonful of summer, ready to brighten your yogurt, elevate a cheese board, or become the star of your favorite dessert. In this post, I’ll guide you through every step, from choosing your berries to understanding the science behind the perfect set, so you can fill your own pantry with this delightful jam.
The Story Behind This Dish
Preserving fruit is a culinary tradition as old as time, a universal method for capturing the fleeting sweetness of a harvest. From the sun-drenched groves of the Mediterranean to the berry patches of North America, cooks have always found ways to transform fresh fruit into shelf-stable treasures. Jam, in its most essential form, is a testament to this shared human ingenuity. It’s a simple concept: fruit, sugar, and heat, combined to create a delicious concentrate that defies the seasons.
In the Levant, making preserves is a cherished ritual. Families gather to prepare everything from apricot leather (qamar al-din) to rich, fragrant quince jam. Each jar tells a story of the season it was made in. While blueberries aren't a traditional Levantine crop, the principle remains the same. This recipe for blueberry jam applies that same time-honored philosophy—honoring the fruit and using simple, natural methods.
The beauty of a homemade blueberry jam lies in its authenticity. Unlike many commercial varieties that rely on added pectin, artificial flavors, or excessive amounts of sugar, this recipe puts you in control. You can taste the journey of the fruit, from its initial bright burst to the deep, caramelized notes that develop during cooking. Making it at home connects you to a long lineage of cooks who understood that the best food is often the simplest.
What Makes This Recipe Special
This isn't just another recipe; it's a tried-and-true method for creating the most flavorful and perfectly textured blueberry jam you've ever had. Here’s what makes it stand out:
-
Deep, Concentrated Fruit Flavor: We cook the blueberries down slowly, allowing their natural sugars to caramelize slightly and their flavor to become incredibly intense. This process coaxes out a complexity you simply won't find in a store-bought jar. The final product is bursting with the pure, unadulterated taste of blueberries.
-
No Commercial Pectin Needed: Many recipes call for boxed pectin, but we're keeping it natural. This recipe relies entirely on the natural pectin present in the blueberries and, most importantly, the lemon. The lemon juice and zest provide the necessary acidity and pectin to help the jam set beautifully without any extra additives.
-
A Subtle Kiss of Warm Spice: To give this blueberry jam a unique and memorable character, I love to add a single green cardamom pod or a small piece of a cinnamon stick to the pot. This is a little nod to my Levantine roots, where warm spices are often used to add depth to sweet dishes. It doesn't overpower the fruit; it simply enhances it, adding a whisper of fragrant warmth.
-
Perfectly Balanced Sweetness: This recipe uses just enough sugar to preserve the jam and help it set, but not so much that it masks the natural tartness of the berries. You get a perfect balance of sweet and tangy, allowing the true fruit flavor to be the star of the show. You also have the control to adjust it slightly to your preference.
-
Incredibly Simple and Forgiving: With just a handful of ingredients and one pot, this is one of the most accessible preserving recipes you can tackle. The process is straightforward, and I’ll walk you through the key visual cues (like the cold plate test) to ensure you get a perfect set every single time, even if you're a beginner.
Breaking Down the Ingredients
Great cooking begins with great ingredients, and the beauty of this blueberry jam is its simplicity. Each component plays a crucial role in creating the final, luscious product.
First and foremost, the blueberries. They are the heart and soul of this recipe. You can use either fresh or frozen berries with excellent results. If using fresh, look for plump, dark blue berries that are firm to the touch. If using frozen, there's no need to thaw them first; simply add them to the pot. The berries provide the flavor, color, and much of the liquid.
Next is granulated sugar. Sugar is more than just a sweetener here; it's a vital preservative. It draws water out of the fruit, which inhibits microbial growth and allows the jam to be stored. It also plays a critical role in helping the jam achieve its thick, gel-like consistency by interacting with the natural pectin.
The unsung hero of this recipe is the lemon. We use both the juice and the zest. Lemon juice provides the acid necessary to activate the pectin molecules, helping them bond together to create the gel structure. It also brightens the overall flavor, cutting through the sweetness and keeping the jam tasting fresh and vibrant. The zest adds a lovely, fragrant citrus note that complements the blueberries beautifully.
A tiny splash of water is used at the very beginning. Its main purpose is to help dissolve the sugar and prevent it from scorching on the bottom of the pot before the blueberries have had a chance to release their own juices. Just a few tablespoons are all you need.
Finally, the optional but highly recommended warm spice. A single crushed green cardamom pod or a one-inch piece of a cinnamon stick infuses the jam with a subtle, aromatic warmth that elevates it from ordinary to extraordinary. It's a signature touch that makes this blueberry jam truly special.
The Cooking Process Explained
The transformation of fresh berries into a shimmering, jewel-toned jam is a satisfying process to watch. It's all about patience and paying attention to the cues the mixture gives you.
First, we begin by combining the blueberries, sugar, lemon juice, zest, and a splash of water in a heavy-bottomed pot. Stir everything together over medium heat until the sugar dissolves completely. This initial step is important to prevent the sugar from crystallizing or burning. You’ll see the berries begin to soften and release their deep purple juices, creating a syrupy base.
Once the mixture comes to a boil, you'll reduce the heat to maintain a steady, rolling simmer. This is where the magic happens. For the next 20-30 minutes, the jam will bubble away, thickening as the water content evaporates and the natural pectin begins to work. Stir it occasionally to prevent it from sticking to the bottom of the pot. You'll notice the texture changing from a thin, watery syrup to a thicker, glossier consistency. The tiny, frantic bubbles will become larger, slower, and more lava-like.
Now, we test for the set point. This is the most crucial stage. The easiest and most reliable method is the cold plate test. Before you start cooking, place a few small plates in your freezer. When you think the jam is ready, spoon a small amount onto a cold plate and return it to the freezer for one to two minutes. Then, run your finger through it. If the jam wrinkles and holds its shape, it's ready. If it’s still runny, continue cooking for another 3-5 minutes and test again.
Once you’ve reached the perfect set, remove the pot from the heat. If you see any foam on the surface, you can skim it off with a spoon for a clearer, more beautiful final product. Let the jam cool in the pot for about 10 minutes before carefully ladling your gorgeous homemade blueberry jam into clean, sterilized jars.
Mistakes to Avoid
Making jam is a simple pleasure, but a few common missteps can lead to a less-than-perfect result. Here is some friendly advice to help you get it right on the first try.
-
Don't Rush the Cooking Process. The most common mistake is not cooking the jam long enough. It might look syrupy in the pot, leading you to believe it hasn't set. Remember, the jam will thicken significantly as it cools. Trust the cold plate test—it's the most reliable indicator of doneness. Be patient and let it simmer until it passes the test.
-
Avoid Scorching the Bottom. A heavy-bottomed pot is your best friend here, as it distributes heat more evenly. Be sure to stir the mixture, especially in the first few minutes as the sugar dissolves, and then continue to stir occasionally throughout the simmering process. This prevents the sugars from catching and burning on the bottom of the pot, which would impart a bitter taste to your beautiful jam.
-
Don't Overcook the Jam. The flip side of undercooking is overcooking. If you cook it for too long, the sugar will caramelize too much and the jam will become overly thick and candy-like once it cools. Once your jam passes the wrinkle test on the cold plate, take it off the heat immediately.
-
Never Skip the Lemon Juice. It might seem like a small amount, but the lemon juice is non-negotiable. Its acidity is essential for activating the pectin in the blueberries, which is what allows the jam to gel. Without it, you'll likely end up with a runny blueberry syrup instead of a proper blueberry jam.
How to Serve This
Once you have a jar of this beautiful homemade blueberry jam, the possibilities are endless. It’s far too special to be relegated to just morning toast (though it is absolutely divine on a slice of warm, crusty sourdough).
For a simple and elegant breakfast or snack, swirl a generous spoonful into a bowl of thick Greek yogurt or labneh. The contrast between the cool, tangy yogurt and the sweet, rich jam is a classic Mediterranean pairing. Garnish with a sprinkle of toasted nuts or fresh mint for added texture and aroma.
This jam also shines on a cheese board. Its sweet-tart flavor is the perfect counterpoint to salty, savory cheeses. Try it with creamy feta, grilled halloumi, or a sharp, aged cheddar. The vibrant color looks stunning and adds a touch of elegance to any gathering.
Don't forget about baking! This blueberry jam makes an incredible filling for thumbprint cookies, Linzer tarts, or as a vibrant layer in a simple vanilla cake. You can even warm it slightly and thin it with a touch of water to create a beautiful glaze for scones, muffins, or even a simple pound cake.
Make-Ahead and Storage Guide
One of the best things about making jam is that you're creating a little pot of preserved sunshine to enjoy later. Proper storage is key to keeping your blueberry jam fresh and delicious.
For the Refrigerator: Once the jam has been transferred to clean, sterilized jars and has cooled completely, seal the lids tightly. Stored in the refrigerator, this jam will last for up to 3 weeks. Always use a clean spoon to serve the jam to prevent introducing any bacteria that could cause it to spoil faster.
For the Freezer: This jam freezes wonderfully, which is a great option for longer-term storage without going through a full canning process. Ladle the cooled jam into freezer-safe containers or jars, making sure to leave about a half-inch of headspace at the top to allow for expansion. It will keep beautifully in the freezer for up to a year. To use, simply thaw it overnight in the refrigerator.
Reheating: The jam is ready to eat after thawing, but if you find it has firmed up too much in the cold, you can gently warm it in a small saucepan over low heat until it reaches your desired consistency. You can also microwave it in short bursts, stirring in between.
Reader Questions Answered
Can I use a different type of sugar?
You can experiment with other sugars, but it will change the final product. For example, brown sugar will add a molasses flavor and a darker color. Using a sugar substitute designed for baking may work, but it will likely not set in the same way, as granulated sugar is crucial for the jam's structure. I recommend sticking with granulated sugar for the best classic blueberry jam texture.
My jam is too runny! How can I fix it?
Don't worry, this is an easy fix! If you've let it cool completely and it's still more of a syrup than a jam, you can simply pour it back into the pot. Bring it back to a simmer and cook it for another 5-10 minutes, then perform the cold plate test again. This extra cooking time will evaporate more water and allow the pectin to set properly.
Can I double this recipe?
Yes, you can absolutely double the recipe to make a larger batch. However, be aware that it will take significantly longer to reach the setting point because you're starting with a larger volume of liquid that needs to be reduced. Use a wider pot if possible to increase the surface area, which will help it cook down more efficiently.
Is it possible to make this recipe with less sugar?
You can reduce the sugar, but it will affect both the set and the shelf life. Sugar acts as a preservative, so a lower-sugar jam will not last as long in the refrigerator (plan on about 1-2 weeks). It may also result in a softer set. I wouldn't recommend reducing the sugar by more than 25% for the best results.
What other spices can I use?
While I love cardamom, other warm spices work beautifully here. A small cinnamon stick is a classic choice. You could also try a star anise for a subtle licorice note, or a few whole cloves for a more traditional spiced flavor. Just be sure to use whole spices that can be easily removed before jarring the jam.
Easy Homemade Blueberry Jam (No Pectin)
A simple, delicious recipe for homemade blueberry jam without any commercial pectin. Lemon juice provides a natural set, and an optional hint of cardamom adds a unique, warm spice.
Prep Time
10 min
Cook Time
30 min
Total Time
40 min
Servings
2 cups
Ingredients
For 2 cups
- 4 cups (600g) fresh or frozen blueberries
- 1 1/2 cups (300g) granulated sugar
- 1/4 cup (60ml) fresh lemon juice
- 1 teaspoon lemon zest
- 2 tablespoons water
- 1/8 teaspoon salt
- 1 green cardamom pod, lightly crushed (optional)
Instructions
- 1
Prepare Your Tools
Before you begin, place 2-3 small ceramic or glass plates in the freezer. These will be used later to test if the jam has set properly. Also, ensure your jars are clean and sterilized.
- 2
Combine Ingredients
In a heavy-bottomed, wide pot or Dutch oven, combine the blueberries, granulated sugar, lemon juice, lemon zest, water, and salt. If using, add the crushed cardamom pod.
- 3
Dissolve the Sugar
Place the pot over medium heat. Stir the mixture continuously until the sugar has completely dissolved and the blueberries begin to release their juices. This should take about 5-7 minutes.
- 4
Bring to a Boil
Increase the heat to medium-high and bring the mixture to a rolling boil. As the berries cook, you can use the back of your spoon or a potato masher to gently crush some of them to your desired consistency.
- 5
Simmer and Thicken
Reduce the heat to maintain a strong, steady simmer. Allow the jam to cook, stirring occasionally to prevent sticking, for about 20-25 minutes. The mixture will thicken noticeably and the bubbles will become larger and slower.
- 6
Perform the First Set Test
After about 20 minutes of simmering, begin testing for doneness. Take one of the cold plates from the freezer. Spoon a small amount of jam onto the plate and place it back in the freezer for 1-2 minutes.
- 7
Check for the Gel Point
Remove the plate from the freezer and push the edge of the jam with your finger. If it wrinkles and holds its shape, the jam is ready. If it's still runny and floods back into the space, continue to cook for another 3-5 minutes and test again on a fresh cold plate.
- 8
Skim and Rest
Once the jam has reached its setting point, remove the pot from the heat. Use a spoon to skim off any foam that has collected on the surface. Let the jam rest in the pot for 5-10 minutes; this helps prevent the fruit from floating to the top of the jars.
- 9
Jar the Jam
If you used a cardamom pod or other whole spice, remove it now. Carefully ladle the hot jam into your clean, sterilized jars, leaving about 1/4 inch of headspace at the top. Wipe the rims of the jars clean with a damp paper towel.
- 10
Cool and Store
Seal the jars with lids. Let them cool completely to room temperature on the counter. Once cooled, store the jam in the refrigerator for up to 3 weeks.
Nutrition Facts
Per serving (estimated)
45 calories
Calories
11g
Carbs
0.1g
Protein
0g
Fat
0.5g
Fiber
10mg
Sodium
10g
Sugar