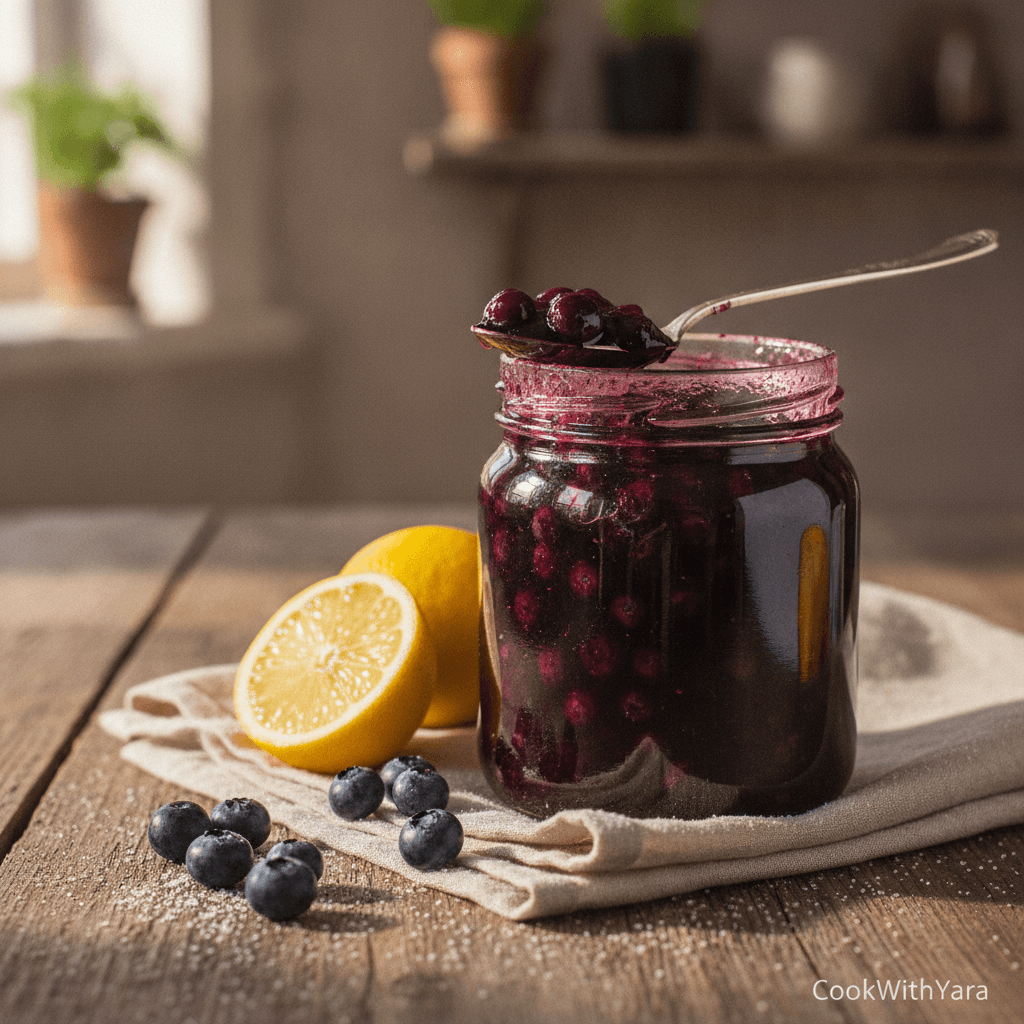
Easy No-Pectin Blueberry Jam Recipe
Learn how to make the best homemade blueberry jam with this easy, no-pectin recipe! Deeply flavorful, perfectly set, and bursting with fresh fruit.
cookwithyara.com/recipes/blueberry-jam-recipe
There’s a unique kind of magic in capturing the essence of a season in a jar. It’s the art of preservation, a tradition that connects us to the earth’s rhythm and allows us to savor peak-season flavor long after the harvest has passed. This is especially true when making a beautiful, glistening blueberry jam recipe. The process is more than just cooking fruit and sugar; it's about transforming humble, plump berries into a jewel-toned spread that can brighten a simple piece of toast or elevate a whole meal. The goal is a jam that boasts a perfect balance: a texture that is soft and spreadable but holds its shape, a flavor that is intensely fruity with a bright, clean finish, and a color so deep it’s almost violet. Many home cooks feel a flicker of intimidation when they think of making jam. Words like “pectin,” “gel point,” and “canning” can seem like a complex science reserved for experts. But I want to reassure you that it’s far simpler than it sounds. The secret isn't in fancy equipment or complicated steps; it's in understanding the beautiful, simple chemistry happening in your pot. Once you understand the why behind each step—why you add lemon juice, why you bring it to a specific temperature—the how becomes second nature. This guide is designed to walk you through every detail, turning you into a confident jam-maker by the end.

The Science Behind the Method
At its heart, making jam is a beautiful dance between three key elements: fruit, sugar, and acid. When you understand how these partners interact, you’ve unlocked the secret to a perfect set every single time. The star of our blueberry jam recipe is, of course, the blueberries, which contain a natural setting agent called pectin. Pectin is a type of starch that, when heated with sugar and acid, forms a molecular mesh that traps liquid, creating the gel-like consistency we love in jam. However, the pectin in blueberries needs a little encouragement to do its job properly. This is where sugar and lemon juice come in. Sugar is much more than just a sweetener here. Through a process called osmosis, it draws water out of the blueberries, which helps to concentrate their flavor and break them down. It also acts as a preservative, binding with the remaining water molecules and making them unavailable for the growth of unwanted microorganisms, which is why jam can be stored for so long. As you cook the mixture, the sugar and heat work together to activate the pectin chains, helping them unravel and link up. The final, crucial player is acid, which we get from fresh lemon juice. Acid changes the electrical charge of the pectin molecules, allowing them to repel each other less and bond together more easily into that all-important gel network. It also brightens the flavor of the blueberries, preventing the jam from tasting flat or overly sweet, and it helps bring out the fruit's vibrant, deep purple hue. The cooking process itself is also critical. As you bring the mixture to a rolling boil, you are evaporating excess water. The target temperature for jam, around 220°F (105°C), is the point at which enough water has evaporated for the sugar concentration to be just right for the pectin to set as it cools. Understanding this simple science transforms you from someone just following steps to a cook who is in control, able to troubleshoot and adapt with confidence.
Tools and Ingredients You'll Need
One of the most appealing things about making this blueberry jam recipe is its simplicity, which extends to the tools and ingredients. You don’t need a kitchen full of specialized canning equipment to create a truly spectacular jam. Let's start with the pot. A wide, heavy-bottomed pot or Dutch oven is your best friend here. The wide surface area helps the water evaporate more quickly, reducing your cooking time, while the heavy base ensures even heat distribution, preventing the sugar from scorching on the bottom. You’ll also need a long-handled spoon, preferably made of wood or silicone, to stir the jam without scratching your pot and to keep your hands safely away from the bubbling-hot mixture. For testing the jam's doneness, a classic trick is to place two or three small ceramic plates in the freezer before you begin. This is a wonderfully reliable, low-tech way to check for the gel point. Of course, a digital kitchen thermometer is also a fantastic tool for precision if you have one. Finally, you’ll need clean glass jars with tight-fitting lids. For the ingredients, quality is paramount. Seek out the best blueberries you can find. Whether fresh or frozen, look for berries that are plump, firm, and deeply colored. Fresh, in-season berries will always offer the most complex flavor and highest natural pectin content. If using frozen, there’s no need to thaw them first; they can go straight into the pot. For the sugar, simple granulated white sugar is the perfect choice. It has a neutral flavor that allows the blueberry taste to shine through. While you might be tempted to use other types of sugar, their molasses content can muddy the flavor and color of the jam. Lastly, fresh lemon juice is non-negotiable. The bottled variety often has a dull, slightly metallic taste and can lack the acidity needed to ensure a proper set. A single fresh lemon will provide all the juice and zest you need to make this delicious blueberry jam recipe truly sing.
The Method, Step by Step
Let’s walk through the creation of our beautiful blueberry jam recipe together, focusing on the sensory cues at each stage. This isn’t just about following instructions; it’s about observing, smelling, and feeling your way to a perfect result. The first stage is preparation. Begin by washing your fresh blueberries gently under cool water and picking out any stems or bruised fruit. If you're using lemon zest for an extra layer of brightness, this is the time to zest your lemon before you juice it. Place your berries, sugar, lemon juice, and zest into your heavy-bottomed pot. Give everything a gentle stir to combine, coating the berries in the sugar. You can let this mixture sit for 30 minutes to an hour, a process called maceration. You'll see the sugar begin to dissolve as it draws the juices from the fruit, creating a gorgeous, syrupy base before you even turn on the heat. Now, place the pot over medium-high heat. As it warms, stir constantly with your long-handled spoon to help the sugar dissolve completely. You'll feel the initial grittiness give way to a smooth liquid. Once the sugar is dissolved, bring the mixture to a full rolling boil—that’s a boil that you can’t stir down. This is where the magic happens. The mixture will foam up and bubble vigorously. You’ll want to stir frequently to prevent sticking, scraping the bottom and sides of the pot. Cook at this rolling boil for about 15-25 minutes. During this time, you’ll notice a visible transformation. The foam will begin to subside, and the bubbles will become smaller, thicker, and almost glossy. The sound will change from a rapid boil to a lower, thicker “plop.” The aroma filling your kitchen will be incredible—sweet, fruity, and warm. When you suspect it's getting close, it's time to test for the gel point. Turn off the heat and spoon a small amount of jam onto one of your frozen plates. Return it to the freezer for two minutes. Then, run your finger through the jam on the plate. If it wrinkles and holds a clear path, it's ready. If it’s still runny, turn the heat back on and boil for another 2-3 minutes before testing again. Once it’s ready, skim off any remaining foam with a spoon for a clearer final product, and you’re ready to jar your stunning homemade blueberry jam.
Troubleshooting Guide
Even with the best instructions, sometimes things don't go exactly as planned. But don't worry! Most jam-making issues are easily fixable and offer a great learning opportunity. Here’s a guide to some common hurdles you might encounter with your blueberry jam recipe and how to overcome them. If your jam is too runny and fails the gel test even after 25-30 minutes of boiling, it usually means one of two things. Either it simply hasn't cooked long enough to evaporate sufficient water, or your fruit was a bit low in natural pectin. The fix is simple: just keep cooking. Boil for another 5 minutes and test again. Patience is often the key. If it's still very loose, you can add another tablespoon of lemon juice to help the natural pectin along and boil for 5 more minutes. On the other end of the spectrum, if your jam becomes incredibly thick in the pot or sets up hard as a rock in the jar, it means it was overcooked. Too much water evaporated, leading to an over-concentration of sugar and pectin. While you can't completely reverse this, you can salvage it. Gently reheat the jam with a tablespoon or two of water to loosen it back to a more desirable consistency. Think of it as a very thick fruit spread! Another common issue is excessive foam on top of the cooking jam. This foam is just air bubbles trapped in the fruit's proteins and is completely harmless. However, it can make the finished jam look cloudy. The best way to deal with it is to skim it off with a spoon just before you ladle the jam into jars. Some cooks swear by adding a tiny dot of unsalted butter to the pot, which can reduce foaming, but I find simple skimming to be perfectly effective. Lastly, if your jam tastes a bit one-note or cloyingly sweet, it's almost always a lack of acid. Lemon juice is essential for balancing the sweetness and bringing out the bright, tangy flavor of the blueberries. Always use fresh juice, and don't be afraid to taste the mixture (carefully!) before it gets too hot. A well-balanced blueberry jam recipe should have a vibrant, fruity flavor with a hint of tartness on the finish.
Taking It to the Next Level
Once you’ve mastered the classic blueberry jam recipe, you can begin to play with it, turning a simple preserve into a signature creation that reflects your personal taste. This is where the beautiful world of spices and herbs, so central to Levantine cooking, can be invited into the pot. These additions should complement the blueberries, not overpower them, adding a subtle layer of complexity and warmth. One of my favorite variations is to add a single cinnamon stick and two or three whole green cardamom pods to the pot as the jam cooks. They infuse the mixture with a gentle, warm spice that is absolutely beautiful with the deep fruit flavor. Just remember to remove them before jarring. For a more herbaceous, slightly savory note, try adding a fresh sprig of rosemary or thyme during the last 10 minutes of cooking. The woodsy aroma is a fantastic counterpoint to the sweetness of the berries, making the jam an excellent pairing for savory dishes. A few whole star anise can also add a delicate, fragrant licorice note that is both surprising and delightful. Beyond whole spices, a tiny splash of floral water added after the jam is removed from the heat can be transformative. A mere half-teaspoon of orange blossom water or rose water will lend an exotic, perfumed aroma that evokes the gardens of the Mediterranean. When experimenting, start with a small amount; you can always add more, but you can't take it away. These small, thoughtful additions are what elevate a homemade goodie into a truly artisanal product, making your blueberry jam recipe uniquely yours and a cherished gift to share with loved ones.
Storing Your Results
After all your careful work, proper storage is essential to preserve the beautiful flavor and texture of your homemade blueberry jam. There are two primary methods, depending on how long you want to store it. The simplest method is to make a refrigerator jam. Once you’ve cooked your jam and skimmed the foam, simply ladle the hot jam into clean, dry glass jars, leaving about a half-inch of headspace at the top. Wipe the rims of the jars clean with a damp cloth to ensure a good seal, screw on the lids, and let the jars cool completely to room temperature. Once cooled, store them in the refrigerator. This type of jam is not shelf-stable and must be kept refrigerated, but it will last for at least 3-4 weeks, giving you plenty of time to enjoy it. For long-term, shelf-stable storage, you’ll need to use a technique called water bath canning. This process uses heat to destroy any potential microorganisms and creates a vacuum seal that keeps the jam fresh for up to a year in a cool, dark place. To do this, you’ll need a large, deep pot with a rack at the bottom. Prepare your jars and lids by washing them in hot, soapy water and keeping them hot. Ladle the hot jam into the hot jars, leaving a quarter-inch of headspace. Wipe the rims, place the lids on, and screw the bands on until they are “fingertip tight”—secure, but not overly tight. Place the filled jars on the rack in your canning pot, ensuring they don't touch. Add enough hot water to cover the jars by at least one inch. Bring the water to a rolling boil and process the jars for 10 minutes (adjusting for altitude if necessary). Afterward, carefully remove the jars and let them cool on a towel, undisturbed, for 12-24 hours. You'll hear the satisfying “ping” of the lids as they seal. Your beautifully preserved blueberry jam recipe will now be ready to grace your pantry.
Common Questions
Can I use frozen blueberries for this recipe?
Absolutely! Frozen blueberries work wonderfully in this blueberry jam recipe. In fact, since they are typically frozen at peak ripeness, they can be even more flavorful than out-of-season fresh berries. The freezing process also helps to break down their cell walls, so they may release their juices and cook down a bit faster. You don’t even need to thaw them; just add them to the pot straight from the freezer and proceed with the recipe as written, perhaps adding a few extra minutes to the initial heating time.
Can I reduce the amount of sugar?
This is a common question, and it's important to understand the role of sugar in jam. Sugar is not just for sweetness; it's a crucial preservative and is essential for achieving the proper gel structure with the pectin. Drastically reducing the sugar will result in a looser, more sauce-like consistency and a much shorter shelf life. You can safely reduce the sugar by about 25%, but I wouldn't recommend going lower than that for this no-pectin recipe, as you risk the jam not setting properly. If you want a lower-sugar fruit spread, you would need to look into recipes that use commercial low-sugar pectin.
My jam didn't set. What can I do to fix it?
Don't despair—runny jam is usually fixable! The most common reason for jam not setting is that it wasn't cooked to the correct temperature to activate the pectin and evaporate enough water. The easiest fix is to pour the jam back into the pot, bring it back to a rolling boil, and cook it for another 5-10 minutes, testing for the gel point on a frozen plate again. Adding another tablespoon of fresh lemon juice can also help boost the pectin's setting power.
Why does this blueberry jam recipe not use commercial pectin?
This recipe is designed to celebrate the simplicity of traditional jam-making. Blueberries, especially when combined with the zest and juice of a lemon, have enough natural pectin to create a beautiful, soft set without any commercial additives. This method results in a jam with a pure, intense fruit flavor that isn't masked by other ingredients. While commercial pectin works great and can speed up the process, mastering the no-pectin method connects you to a more classic technique and gives you more control over the final texture.
How do I know for sure if my jars have sealed properly after canning?
Once your jars have cooled completely for 12-24 hours, you can check the seal in two ways. First, press down on the center of the lid. If it doesn't move, pop, or flex at all, it's sealed. A sealed lid will be slightly concave and firm to the touch. Second, you can remove the screw band and gently try to lift the jar by the edges of the lid itself. A properly sealed lid will hold fast. Any jars that haven't sealed should be stored in the refrigerator and used first.
Homemade Blueberry Jam (No Pectin)
An easy and delicious recipe for homemade blueberry jam without commercial pectin. This jam is intensely flavorful with a perfect soft-set texture, made with just three simple ingredients.
Prep Time
15 min
Cook Time
30 min
Total Time
45 min
Servings
4 half-pint jars
Ingredients
For 4 half-pint jars
- 4 cups (about 2 lbs) fresh or frozen blueberries
- 2 cups granulated sugar
- 1/4 cup fresh lemon juice (from 1 large lemon)
- 1 tablespoon lemon zest (optional, from 1 large lemon)
Instructions
- 1
Prepare Freezer Plates
Before you begin, place 2-3 small ceramic or glass plates in the freezer. These will be used later to test if the jam has reached its setting point.
- 2
Combine Ingredients
In a wide, heavy-bottomed pot or Dutch oven, combine the blueberries, granulated sugar, fresh lemon juice, and optional lemon zest. Stir everything together until the berries are coated in sugar.
- 3
Macerate the Berries
Let the mixture sit at room temperature for 30-60 minutes. This process, called maceration, allows the sugar to draw juice from the blueberries, creating a syrup and helping the sugar dissolve.
- 4
Dissolve the Sugar
Place the pot over medium-high heat. Stir continuously as the mixture heats up until the sugar is completely dissolved. You can test this by lifting the spoon; you should not see any sugar granules.
- 5
Bring to a Boil
Increase the heat and bring the mixture to a full rolling boil. This is a vigorous boil that cannot be stirred down. The jam will foam up significantly at this stage.
- 6
Cook the Jam
Continue to boil, stirring frequently to prevent scorching on the bottom of the pot, for 15-25 minutes. The foam will start to subside and the bubbles will become smaller and glossier as the jam thickens.
- 7
Mash the Berries
About halfway through the cooking time, you can use the back of your spoon or a potato masher to gently crush some of the berries against the side of the pot. This helps release more pectin and creates a better texture. Leave some berries whole for variety.
- 8
Test for Gel Point
After about 15 minutes of boiling, begin testing for doneness. Turn off the heat. Spoon a small amount of jam onto one of the frozen plates and return it to the freezer for 2 minutes.
- 9
Check the Set
Remove the plate from the freezer and push the edge of the jam with your fingertip. If the surface wrinkles and the jam holds its shape, it is ready. If it is still watery, return the pot to a boil for another 3-5 minutes and test again.
- 10
Skim and Rest
Once the jam has reached its setting point, remove the pot from the heat. Use a spoon to carefully skim off any remaining foam from the surface. Let the jam rest in the pot for 5 minutes before jarring.
- 11
Ladle into Jars
Ladle the hot jam into clean, warm glass jars, leaving about 1/4 to 1/2 inch of headspace at the top. A canning funnel makes this process much cleaner.
- 12
Seal and Store
Wipe the rims of the jars with a clean, damp cloth. Secure the lids. For refrigerator jam, let cool completely then store in the fridge for up to 4 weeks. For shelf-stable jam, process in a water bath canner for 10 minutes.
Nutrition Facts
Per serving (estimated)
45 calories
Calories
12g
Carbs
0.1g
Protein
0g
Fat
0.3g
Fiber
1mg
Sodium
11g
Sugar