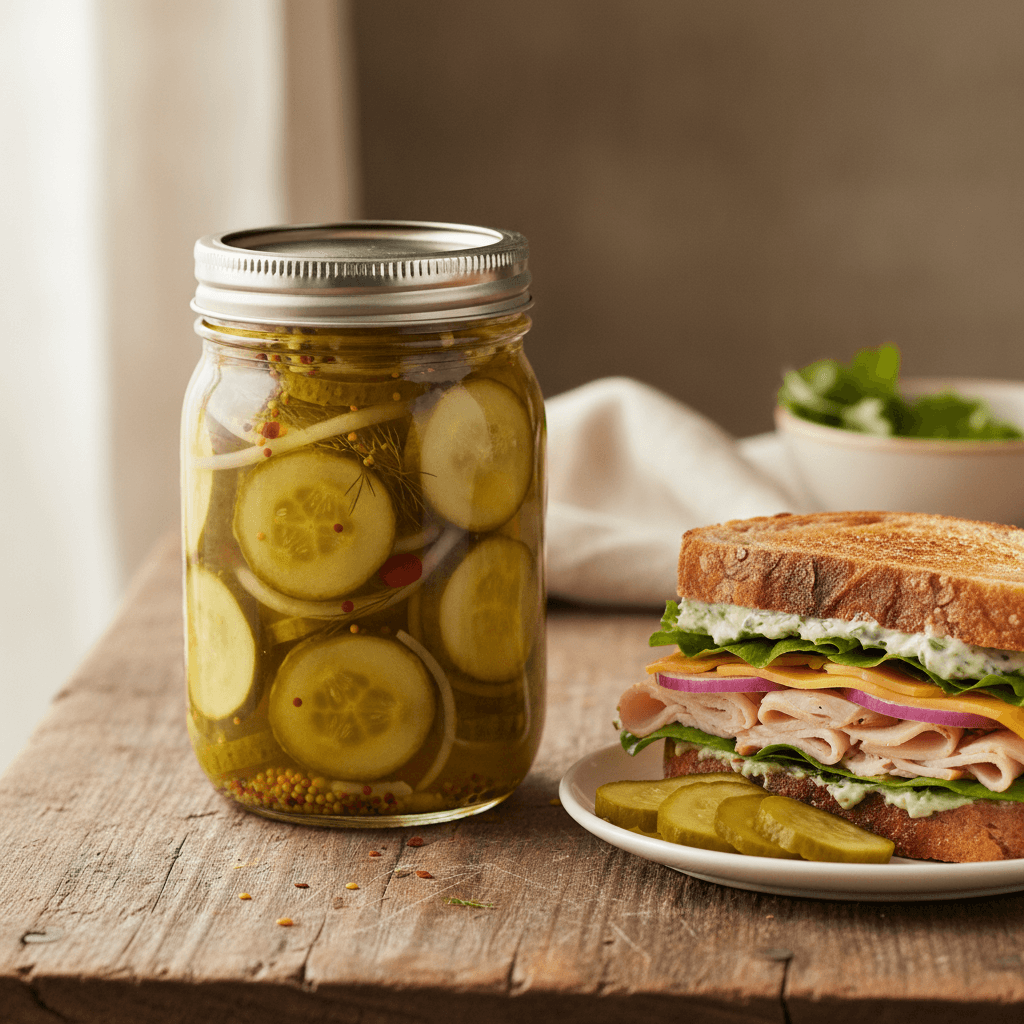
Easy Bread and Butter Pickles (Refrigerator Recipe)
Learn how to make perfectly crisp, sweet, and tangy bread and butter pickles at home! This simple refrigerator pickle recipe is beginner-friendly.
cookwithyara.com/recipes/bread-and-butter-pickles
There's a special kind of magic in preservation. It's the art of capturing a fleeting moment of seasonal perfection and transforming it into something that can be savored for weeks to come. This is especially true of pickling, a culinary alchemy that turns a humble cucumber into a crisp, tangy, and utterly irresistible snack. When you master the technique, you unlock a world of flavor, and there's no better place to start than with a classic recipe for bread and butter pickles. The goal is pure sensory delight: a pickle that snaps when you bite into it, releasing a wave of balanced sweetness and sharp vinegar, all underscored by the warm hum of mustard and celery seed. The perfect pickle is a burst of texture and flavor that can elevate a simple sandwich or stand proudly on its own.
For many, the idea of making pickles at home can seem intimidating, conjuring images of complex canning equipment and precise, high-stakes procedures. I'm here to completely demystify the process for you. We're making refrigerator pickles, which means all the reward with none of the fear. The secret isn't in fancy gear; it's in understanding the beautiful balance of the brine. Once you grasp why each ingredient—the salt, the sugar, the vinegar, the spices—plays its essential role, the method itself becomes incredibly straightforward and enjoyable. Get ready to fill your fridge with jars of the best bread and butter pickles you've ever tasted.

What Makes Bread and Butter Pickles So Special?
The charm of these particular pickles lies in their signature sweet and tangy flavor profile, a delightful departure from their purely sour cousins. But what’s happening on a scientific level to create that perfect texture and taste? It’s a beautiful dance of chemistry and technique. The first and most critical process is osmosis. When you layer the fresh cucumber and onion slices with salt, you're initiating a powerful reaction. Salt is a desiccant, meaning it draws moisture out. The cell walls of the cucumber are semi-permeable, and the high concentration of salt outside the cells pulls water from inside them. This crucial step removes a significant amount of water, which is the key to achieving that coveted crisp, snappy texture. Without this step, you’d end up with a much softer, less satisfying pickle.
Next comes the brine, the heart and soul of our bread and butter pickles. The primary players here are vinegar and sugar. Vinegar, a mild acid, not only provides the tangy flavor but also acts as a preservative, creating an environment where spoilage bacteria cannot thrive. The sugar does more than just add sweetness; it perfectly balances the acidity of the vinegar, creating a harmonious flavor profile that is complex and deeply satisfying. When you gently heat the brine, the sugar dissolves completely, creating a uniform solution that will infuse every single slice. This gentle heating also helps the spices, like mustard seed and celery seed, to release their essential oils, blooming their aromas and ensuring the flavor is distributed throughout the batch. The vibrant, golden color comes from turmeric, a spice celebrated in my Levantine kitchen not just for its earthy flavor but for the beautiful hue it imparts. It's a natural dye that makes the pickles look as good as they taste. This combination of science and culinary wisdom is what transforms simple ingredients into something truly special.
Essential Equipment and Ingredients for Perfect Pickles
One of the best things about making refrigerator pickles is that you don't need a kitchen full of specialized canning equipment. You likely have everything you need already. First and foremost, you'll need clean glass jars with tight-fitting lids. I prefer using a mix of quart-sized and pint-sized jars, as the smaller ones are perfect for sharing. There's no need for a formal water bath sterilization process here, but do make sure your jars and lids are washed thoroughly with hot, soapy water and dried completely before you begin.
Next, you'll need a large, non-reactive pot to make the brine and gently cook the pickles. A stainless steel stockpot or an enameled Dutch oven is perfect. It's important to avoid reactive materials like aluminum, copper, or cast iron, as the high acidity of the vinegar can react with these metals, imparting a metallic taste and discoloring your beautiful pickles. You'll also need a large, non-reactive bowl (glass or stainless steel) for salting the vegetables. For slicing, a mandoline is your best friend. It creates perfectly uniform slices in a fraction of the time it would take by hand, ensuring that every pickle cooks evenly and has the same texture. If you use one, please always use the safety guard. If you don't have a mandoline, a very sharp chef's knife and a steady hand will work just as well.
As for the ingredients, quality is key. For the crispiest bread and butter pickles, seek out pickling cucumbers, often sold as Kirby cucumbers. They have thin, bumpy skin, fewer seeds, and a lower water content than their English or slicing counterparts. Look for firm, fresh cucumbers without any soft spots. For the onions, a sweet variety like Vidalia or Walla Walla is ideal, as their natural sweetness complements the brine. For the salt, it is crucial to use either pickling salt or non-iodized salt like kosher salt. Table salt contains iodine and anti-caking agents that can turn your brine cloudy and negatively impact the flavor and color. Apple cider vinegar lends a lovely, fruity complexity, but distilled white vinegar can also be used for a slightly sharper, cleaner tang. Finally, use fresh spices. The mustard seeds, celery seeds, and turmeric are the aromatic backbone of this recipe, and fresh, potent spices will make all the difference.
Crafting Your Bread and Butter Pickles: A Detailed Walkthrough
Let’s walk through the beautiful, aromatic process of creating your own pickles. Think of it less as a chore and more as a rewarding kitchen project. The first stage is the maceration, where we draw the water out of our vegetables. After slicing your cucumbers and onions with care, you'll layer them in a large bowl with a generous amount of kosher or pickling salt. As you gently toss them, you're starting a transformation. Within the first hour, you’ll begin to see a significant amount of liquid pooling at the bottom of the bowl. After the full three hours, it will seem like your vegetables are swimming. This is a sign of success! You've successfully removed the excess water that leads to soggy pickles.
The next step is rinsing, and it is absolutely non-negotiable. You must wash away all of that surface salt. Transfer the vegetables to a large colander and rinse them under cool, running water. I like to use my hands to gently move them around, ensuring every slice gets rinsed. Taste a slice; it should taste like a fresh cucumber, not a salt lick. Once rinsed, let them drain thoroughly. You can even pat them gently with clean kitchen towels. While they drain, it's time to build the heart of our recipe: the brine. In your large, non-reactive pot, combine the apple cider vinegar, sugar, and all your lovely spices. As you warm it over medium heat, stirring to dissolve the sugar, your kitchen will fill with the most incredible tangy-sweet aroma. This is the scent of delicious things to come.
Once the sugar is fully dissolved and the brine is hot, it's time to unite everything. Gently add your drained cucumbers and onions to the pot. Stir them into the fragrant, golden liquid. Now, you’ll heat them together, but this is a delicate stage. You are not trying to boil them into submission. The goal is to heat them just enough so they absorb the brine and their color transforms. This takes only about 5 to 7 minutes. You will physically see the change: the bright, raw green of the cucumber will deepen into a more translucent, olive-pickle hue. This is your cue that they are ready. Any longer, and you risk sacrificing that wonderful crispness. Using a slotted spoon, immediately transfer the hot pickles into your clean jars, packing them in snugly. Finally, ladle that gorgeous hot brine over the top, making sure every last pickle is submerged in the liquid gold. This is how you make truly spectacular bread and butter pickles.
Troubleshooting Your Homemade Pickles
Even with the simplest recipes, questions can arise. Let's walk through a few common issues so you can pickle with confidence. The most frequent concern is texture: what if your pickles turn out soft instead of crisp? This usually happens for one of a few reasons. The most likely culprit is overcooking. Heating the cucumbers for even a few minutes too long in the hot brine can break down their structure. Remember to watch for that subtle color change from bright green to olive and pull them from the heat immediately. Another cause could be the type of cucumber used; slicing cucumbers with their high water content will almost always yield a softer pickle. Lastly, don't skip the initial 3-hour salting step. This process of drawing out water is absolutely essential for a crisp final product.
Another common question is about cloudy brine. You've made a beautiful batch of bread and butter pickles, but the liquid in the jar looks murky. This is almost always caused by using the wrong kind of salt. Standard table salt contains anti-caking agents and iodine, which can leach into the liquid and cause that cloudiness. Always use pure kosher salt or specific pickling salt to keep your brine crystal clear. Hard water from your tap can also sometimes contribute to a cloudy appearance. If you know you have very hard water, using filtered water for your brine is an easy fix.
What if the flavor balance seems off? Perhaps they taste too salty. This means the vegetables weren't rinsed thoroughly enough after the salting stage. Be sure to rinse them under cool water for a solid two to three minutes. Conversely, if they taste bland, it could be that your spices weren't fresh. Spices lose their potency over time, so using a fresh batch will ensure a robust, aromatic flavor. Perfecting the sweet-to-sour ratio is a matter of personal taste. My recipe provides a classic balance, but feel free to adjust the sugar by a quarter cup in your next batch to suit your preference.
Elevating Your Bread and Butter Pickles
Once you've mastered the classic recipe, you can start to play and make it your own. Think of this base recipe as a canvas for your culinary creativity. One of my favorite ways to add a little Levantine warmth is by introducing whole spices to the brine. Tossing in a few allspice berries, a couple of whole cloves, or even a small cinnamon stick along with the other spices can add a beautiful depth and complexity that complements the sweetness wonderfully. For those who enjoy a bit of heat, a pinch of red pepper flakes or a few thin slices of a fresh chili pepper added to the pot will provide a gentle, lingering warmth on the finish.
You can also experiment with the vegetables themselves. While cucumbers and onions are the classic duo, there’s no reason to stop there. Adding thinly sliced bell peppers (red, yellow, or orange for a pop of color) or even crisp fennel to the mix can be absolutely delicious. They'll absorb the brine just as beautifully and add another layer of flavor and texture to your pickle jars. For an extra guarantee of crispness, an old-timer's trick is to add a food-grade grape leaf or a piece of horseradish root to the bottom of each jar. These contain natural tannins, which help to inhibit the enzymes that cause softening, keeping your bread and butter pickles snappy for longer.
Storing Your Refrigerator Pickles
It is very important to understand the distinction between refrigerator pickles and shelf-stable canned pickles. This recipe is for refrigerator pickles. They have not been processed in a boiling water bath, which is required to kill any microorganisms that would allow for safe long-term pantry storage. Therefore, these pickles must be kept in the refrigerator at all times.
After you've filled and sealed your jars and allowed them to cool to room temperature, they should go directly into the fridge. While you can technically eat them right away, their flavor will be much, much better if you let them mature for at least 24 to 48 hours. This waiting period allows the brine to fully penetrate the vegetables, melding the sweet, tangy, and spicy notes into a cohesive and delicious flavor. Your homemade bread and butter pickles will keep beautifully in the refrigerator for four to six weeks. Their texture may soften slightly toward the end of that window, but they will remain perfectly safe and tasty to eat. To ensure they last as long as possible, always use a clean fork or tongs to remove pickles from the jar. This prevents the introduction of any outside bacteria that could lead to spoilage.
Frequently Asked Questions About Bread and Butter Pickles
Can I use a different type of cucumber?
You certainly can, but it's important to manage your expectations regarding texture. The gold standard for pickling is the Kirby cucumber because its low seed content, thin skin, and dense flesh are ideal for staying crisp. If you use an English or garden cucumber, which has a much higher water content and thinner flesh, your final pickles will be noticeably softer. They will still taste delicious, but they won't have that signature snap.
Do I have to use a mandoline for slicing?
Not at all! A mandoline is a wonderful tool for achieving fast, consistent, paper-thin slices, which helps the pickles cook and marinate evenly. However, it is by no means a requirement. A well-sharpened chef's knife and a bit of patience will work perfectly. The main goal is to get the slices as uniform in thickness as possible, so just take your time with your knife work.
Can I reduce the amount of sugar in this recipe?
You can, but it will fundamentally change the character of the pickles. The name "bread and butter pickles" specifically refers to this sweeter style, where the sugar is a key component in balancing the sharp vinegar. If you reduce the sugar significantly, you will end up with a pickle that is much more sour and less complex. If you wish to experiment, I would suggest reducing the sugar by only about a 1/4 cup at a time until you find a balance you enjoy.
Why are my pickles hollow on the inside?
This is a frustrating but common issue that has nothing to do with your pickling process and everything to do with the cucumbers themselves. Hollowness is usually a result of inconsistent watering or stress while the cucumbers were growing. This causes the inside of the vegetable to grow unevenly, creating gaps. To avoid this, try to source the freshest, firmest, locally grown cucumbers you can find, as they are less likely to have been stressed during long-distance transport.
Can I scale this recipe up to make a larger batch?
Absolutely! This recipe is very easy to scale. Simply double or triple all of the ingredient quantities, making sure to maintain the correct ratios in the brine. The only thing you'll need to adjust for is equipment. You will need a much larger bowl for salting and a larger pot for heating the brine and pickles. Ensure you have enough clean jars ready to go before you start the process. A big batch is a great idea for sharing with friends and family.
Classic Bread and Butter Pickles
A simple refrigerator pickle recipe for perfectly crisp, sweet, and tangy bread and butter pickles. No complex canning required!
Prep Time
3h 30m
Cook Time
15 min
Total Time
3h 45m
Servings
2 quarts
Ingredients
For 2 quarts
- 3 pounds pickling cucumbers (like Kirby), sliced 1/4-inch thick
- 1.5 pounds sweet onions (like Vidalia), thinly sliced
- 1/2 cup pickling salt or kosher salt
- 3 cups apple cider vinegar (5% acidity)
- 2 cups granulated sugar
- 1 tablespoon mustard seeds
- 1 teaspoon celery seeds
- 1/2 teaspoon ground turmeric
- 1/4 teaspoon ground ginger
Instructions
- 1
Prep Cucumbers and Onions
Wash cucumbers thoroughly under cool water. Using a mandoline or a sharp knife, slice the cucumbers and the onions to a uniform 1/4-inch thickness. Uniformity is key for even pickling.
- 2
Salt and Macerate Vegetables
In a large, non-reactive bowl (like glass or stainless steel), combine the sliced cucumbers and onions. Sprinkle the pickling salt over them and toss gently to coat everything. Let this mixture sit at room temperature for 3 hours.
- 3
Rinse Thoroughly
Transfer the salted vegetables to a large colander in the sink. Rinse them very well under cold running water for several minutes, using your hands to gently turn them over to ensure all the excess salt is washed away.
- 4
Drain Well
After rinsing, leave the vegetables in the colander to drain for at least 20 minutes. You can gently press down on them to help expel more liquid. The drier they are, the crisper your final pickles will be.
- 5
Prepare the Pickling Brine
While the vegetables drain, combine the apple cider vinegar, granulated sugar, mustard seeds, celery seeds, ground turmeric, and ground ginger in a large, non-reactive pot.
- 6
Heat the Brine
Place the pot over medium heat. Stir the mixture until the sugar completely dissolves. Bring the brine to a gentle simmer; there is no need for a rapid boil.
- 7
Cook the Pickles
Add the drained cucumber and onion mixture to the hot brine in the pot. Stir gently to combine. Continue to heat until the brine returns to a simmer.
- 8
Watch for Color Change
Cook the pickles for 5-7 minutes, stirring occasionally. Watch for the cucumber slices to change color from bright green to a duller olive-green. Do not overcook, as this is the key to maintaining crispness.
- 9
Prepare Your Jars
While the pickles are heating, ensure your glass jars and lids are clean and ready. For refrigerator pickles, they need to be clean but do not require full sterilization.
- 10
Pack the Jars with Pickles
Using a slotted spoon, carefully transfer the hot cucumbers and onions from the pot into your clean jars. Pack them in snugly but be careful not to crush them.
- 11
Fill Jars with Brine
Ladle the remaining hot brine from the pot into the jars, ensuring the pickles are completely submerged. Leave about a 1/2-inch of headspace at the top of each jar.
- 12
Cool and Seal
Wipe the rims of the jars with a clean, damp cloth to ensure a good seal. Screw on the lids tightly. Allow the jars to cool to room temperature on your counter for 1-2 hours.
- 13
Refrigerate and Mature
Once completely cool, transfer the jars to the refrigerator. For the best flavor, allow the pickles to mature for at least 24-48 hours before enjoying. This gives the flavors time to meld.
- 14
Enjoy Your Homemade Pickles
Your homemade bread and butter pickles will last for up to 6 weeks in the refrigerator. Always use a clean utensil when removing pickles from the jar to maintain freshness.
Nutrition Facts
Per serving (estimated)
45 calories
Calories
10g
Carbs
0.5g
Protein
0.1g
Fat
1g
Fiber
320mg
Sodium
9g
Sugar