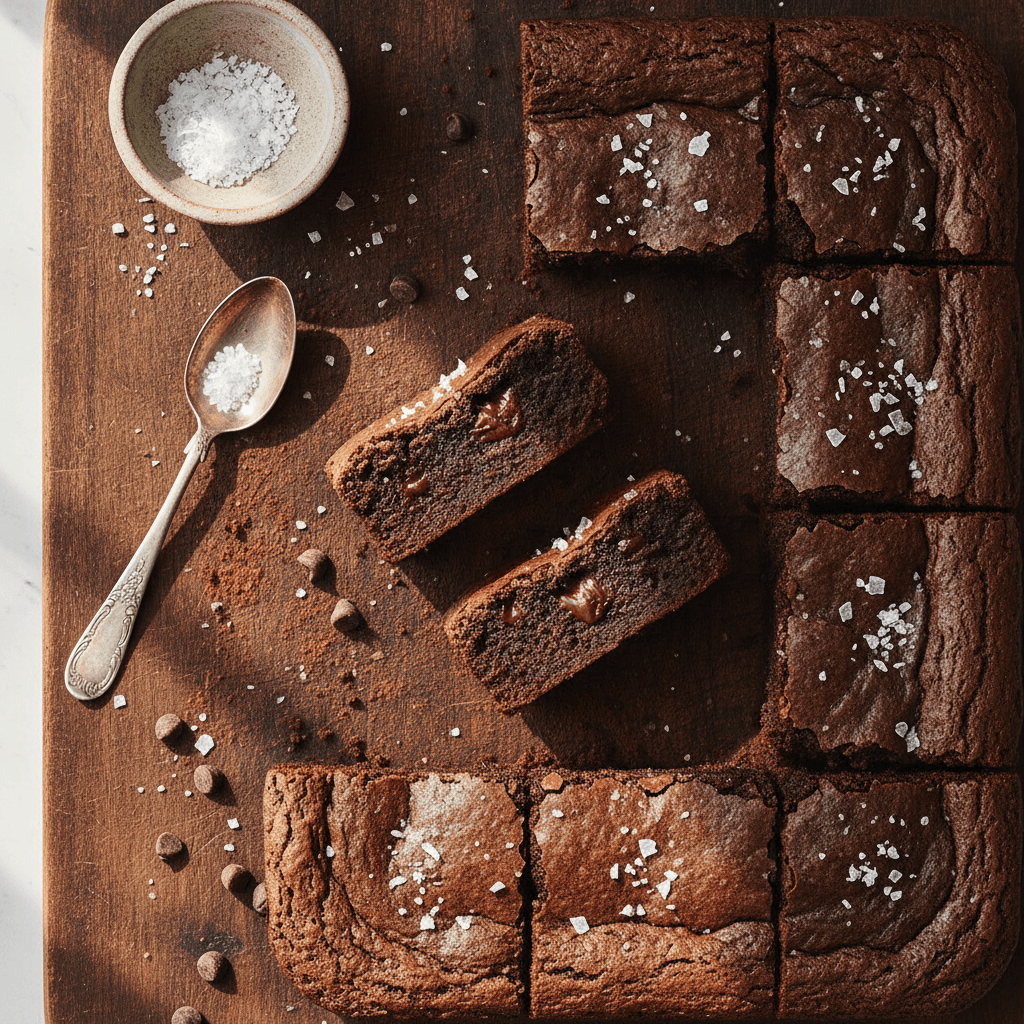
Ultimate Brown Butter Espresso Brownies (Easy Recipe)
Unbelievably fudgy Brown Butter Espresso Brownies with a crackly top! This easy recipe uses pantry staples to create a deeply flavorful, gourmet dessert.
cookwithyara.com/recipes/brown-butter-espresso-brownies
I believe with all my heart that some of the most memorable, soul-satisfying dishes come not from expensive, hard-to-find ingredients, but from humble pantry staples transformed with care and technique. Great food is about alchemy, not extravagance. It’s about knowing how to coax incredible flavor from the simplest things—a knob of butter, a scoop of flour, a spoonful of sugar. It’s a philosophy that guides my cooking, rooted in the resourcefulness and warmth of the Mediterranean kitchen, where olive oil, herbs, and time are the most precious ingredients.
And there is no better proof of this philosophy than these incredible Brown Butter Espresso Brownies. This recipe is my testament to accessible luxury. It takes the familiar, comforting idea of a chocolate brownie and elevates it into something truly special, all without a complicated shopping list. The secret lies in two simple steps: browning the butter until it sings with nutty, toasted notes, and blooming a touch of espresso powder to make the chocolate flavor deeper, darker, and more profound. The result is a pan of brownies so intensely fudgy, with a paper-thin, crackly top and a rich, complex flavor that tastes like it came from a high-end bakery. But here’s the best part: a generous pan, enough to share with family and friends, costs just a few dollars to make. This is how we bring joy to our tables—with smart, soulful cooking that nourishes both body and budget.
Why This Recipe Is a Budget Winner
In a world where a single gourmet brownie from a coffee shop can cost as much as a fancy latte, this recipe for Brown Butter Espresso Brownies feels like a delicious act of rebellion. It’s a powerful reminder that you are in complete control of creating luxury in your own kitchen, for a fraction of the cost. Let’s break down exactly why this recipe is such a champion of budget-friendly baking. The magic is in its reliance on pantry powerhouses. Ingredients like all-purpose flour, granulated sugar, brown sugar, and eggs are the affordable backbone of countless baked goods, and they are the stars here, too.
The most “specialty” ingredients are butter and espresso powder, but even these are models of fiscal efficiency. Butter, when purchased on sale, can be stored for months in the freezer, ready to be transformed. The act of browning it is a technique, a free infusion of flavor that costs nothing but a few minutes of your time. A small jar of instant espresso powder might seem like an investment, but you only use a teaspoon or two at a time; it will last you through dozens of batches, paying for itself over and over again. When you compare the cost of making a whole 9x9 inch pan—which yields 16 generous brownies—to purchasing them individually, the savings are staggering. One batch can serve as dessert for a family dinner, be packed into lunchboxes for a week, or become a welcome offering at a community gathering. It’s a recipe that multiplies joy and flavor without multiplying your grocery bill.
Affordable Ingredients, Maximum Impact
At the heart of any great, budget-friendly recipe is a cast of humble ingredients that punch far above their weight. These Brown Butter Espresso Brownies are a masterclass in this principle. Each component is chosen not just for its role in the final texture and taste, but for its accessibility and affordability. Let's take a closer look at the key players and how they contribute to this dessert's spectacular flavor without straining your wallet.
Unsalted Butter: This is the soul of the recipe. We don't just melt it; we transform it. By gently cooking it on the stove, we toast the milk solids, creating what the French call beurre noisette, or hazelnut butter. This process unlocks a deep, nutty, and complex aroma that infuses the entire brownie. Look for butter on sale and stock up—it freezes beautifully. Using this technique means you don't need other expensive flavorings to make your dessert taste gourmet.
Instant Espresso Powder: Think of this not as a coffee flavoring, but as a chocolate amplifier. A small amount doesn't make the brownies taste like coffee; instead, it deepens the cocoa's natural flavor, taming its sweetness and adding an incredible richness. One small jar is an economical pantry staple that will elevate countless chocolate desserts.
Unsweetened Cocoa Powder: This provides the foundational chocolate flavor. For the deepest, darkest brownies with a velvety texture, I recommend Dutch-processed cocoa powder. It's less acidic than natural cocoa and gives a beautiful color. Buying a larger container is often more cost-effective than small tins, and it will last for a very long time.
Eggs: Eggs do so much here. They add richness from the yolk, provide structure, and, most importantly, when whisked thoroughly with the sugar, they are the secret to that coveted shiny, paper-thin, crackly crust on top. They are an affordable source of protein and a baking powerhouse.
Sugars (Granulated and Brown): A combination of sugars yields the perfect brownie texture. Granulated white sugar contributes to the crisp edges and that crackly top, while packed brown sugar, with its molasses content, adds moisture, chewiness, and a subtle caramel note that pairs beautifully with the brown butter.
All-Purpose Flour: The humble binder that gives our brownies just enough structure to hold together without becoming cakey. We use just enough to create a dense, fudgy crumb. It's one of the most inexpensive ingredients in your pantry, proving that you don't need fancy flours for a spectacular result.
Vanilla Extract and Salt: These are the essential background singers. A good quality pure vanilla extract enhances all the other flavors, and a pinch of salt is non-negotiable. Salt doesn't just make things salty; in desserts, it balances sweetness and makes the chocolate and coffee notes pop. A small bottle of vanilla and a box of salt are tiny investments for a huge flavor return.
How to Make Brown Butter Espresso Brownies
Bringing these Brown Butter Espresso Brownies to life is a deeply satisfying process, full of beautiful sensory cues that signal you're on the right track. It’s less about complicated steps and more about paying attention to the transformation of simple ingredients into something extraordinary. Here’s a high-level look at the journey from pantry staples to a pan of warm, fudgy perfection.
First, you'll begin by making the liquid gold: the brown butter. In a light-colored saucepan over medium heat, you'll melt the butter. It will foam, then sizzle, and you'll swirl it gently. Listen closely, because as the water cooks off, the sizzling will quiet down. Soon, you'll see tiny golden-brown specks forming at the bottom and smell an intoxicatingly nutty aroma. This is the moment of magic. You’ll immediately take it off the heat and stir in your chocolate chips, espresso powder, and cocoa powder, allowing the residual heat to melt everything into a glossy, fragrant mixture. This step blooms the flavors, waking them up and deepening their character.
Next, in a separate large bowl, you’ll focus on creating the structure and the signature crackly top. This involves whisking the eggs, both sugars, vanilla, and salt together vigorously. You can use an electric mixer or just good old-fashioned arm power. The goal is to whip them until the mixture is pale, thick, and has almost doubled in volume. When you lift the whisk, the batter should fall back in a slow, thick ribbon that sits on the surface for a moment before dissolving. This step is crucial and shouldn't be rushed.
After that, it's time to marry the two mixtures. You'll pour the warm brown butter and chocolate mixture into the whipped eggs and sugar, gently whisking until just combined. The resulting batter will be glossy, dark, and beautifully smooth. Finally, you’ll sift the all-purpose flour over the top and, using a spatula, fold it in with minimal strokes. The key is to stop mixing the moment you no longer see streaks of flour. Over-mixing at this stage is the enemy of a fudgy brownie, so be gentle.
The final step is the bake. You’ll pour the thick, luscious batter into your prepared pan, smoothing the top, and bake until the edges are set and a toothpick inserted into the center comes out with moist, sticky crumbs attached, not wet batter. The hardest part of the entire recipe is letting them cool completely before slicing. This allows them to set properly, ensuring clean cuts and the perfect dense, fudgy texture that makes these Brown Butter Espresso Brownies so unforgettable.
Stretching It Further
One of the greatest joys of home baking, especially when you're mindful of your budget, is seeing how far one recipe can go. A single pan of these Brown Butter Espresso Brownies is not just one dessert; it's a foundation for multiple moments of delight. The key is to think creatively about how to serve and repurpose them. The most obvious way to stretch the batch is by slicing them into smaller squares. A 1.5-inch square is still a deeply satisfying treat, rich enough that a small portion feels generous, and it allows you to serve more people from a single pan.
But let's think beyond the square. Should you have a few brownies left over after a couple of days, they can be transformed into an entirely new dessert. Crumble a brownie into a small bowl or glass, top it with a spoonful of plain yogurt or a simple whipped cream, and a drizzle of fruit preserves for an elegant, trifle-style dessert. This is a wonderful way to use up any pieces that might have gotten a bit dry at the edges.
For a truly spectacular and fun dessert experience, create a brownie sundae bar. Warm the brownies slightly and set them out with a container of vanilla bean ice cream and a few simple toppings like toasted nuts, a sprinkle of flaky sea salt, or a simple chocolate sauce. It turns a simple brownie into a celebratory event, perfect for a cozy family evening. You can also freeze individual brownies, tightly wrapped, for a future treat. A quick 15 seconds in the microwave, and you have a warm, gooey dessert on demand, preventing any food waste and ensuring you get to enjoy every last crumb.
Smart Swaps and Variations
While this recipe for Brown Butter Espresso Brownies is truly wonderful as written, a great recipe should also serve as a canvas for your creativity and what you have on hand. The structure is robust enough to welcome a few smart substitutions and variations, many of which can also be guided by your budget or pantry inventory.
-
Add Texture with Nuts: For a classic brownie experience, fold in about a cup of toasted and chopped nuts along with the flour. Walnuts and pecans are traditional and delicious, but for a touch of Levantine flavor that I love, try toasted pistachios or even hazelnuts, which would beautifully echo the beurre noisette.
-
Play with Spices: The combination of brown butter, chocolate, and coffee is a perfect base for warm spices. Try adding half a teaspoon of ground cinnamon or a quarter teaspoon of finely ground cardamom to your dry ingredients. This adds a subtle, fragrant warmth that makes the brownies feel even more special and comforting.
-
A Savory Twist: For a truly sophisticated flavor profile, try swirling a tablespoon or two of tahini into the top of the batter with a knife before baking. The nutty, slightly savory sesame paste is a stunning complement to the rich chocolate.
-
Chocolate Choices: I call for a mix of cocoa powder and chocolate chips, but you can use what you have. If you only have chocolate bars, chop them up. If you prefer a darker, more intense brownie, use bittersweet chocolate. Semi-sweet or milk chocolate chips will yield a sweeter result. This is an easy way to customize the flavor to your liking.
-
Finishing Touches: A simple sprinkle of flaky sea salt on top of the batter just before baking is perhaps the easiest and most impactful variation. The salt crystals provide a delightful crunch and a perfect counterpoint to the brownie's sweetness, making every flavor pop.
Storage and Reheating
Properly storing your Brown Butter Espresso Brownies is key to preserving their perfect, fudgy texture. Once they have cooled completely in the pan—a crucial step for them to set properly—you can slice them. For short-term storage, they keep beautifully in an airtight container at room temperature for up to four days. In fact, many people (myself included) believe their flavor and texture are even better on the second day, as the flavors have had more time to meld and deepen.
If you want to save them for longer, these brownies freeze exceptionally well. For best results, I recommend wrapping the individual squares tightly in plastic wrap and then placing them in a freezer-safe bag or container. This double-wrapping method helps prevent freezer burn and preserves their moisture. They will keep well in the freezer for up to three months.
When you're ready to enjoy a brownie from the freezer, you can let it thaw at room temperature for about an hour. However, for that just-baked experience, my favorite method is to reheat it. A quick 10 to 15-second burst in the microwave is all it takes to warm it through, melting the chocolate chips slightly and restoring its glorious, gooey center. It's the perfect way to have a luxurious, ready-made dessert waiting for you anytime a craving strikes.
Your Questions Answered
Why are my brownies cakey instead of fudgy?
That dense, fudgy texture comes from a high fat-to-flour ratio. This recipe is specifically designed for maximum fudginess with a good amount of butter and minimal flour. Cakey brownies often result from over-mixing the batter after the flour is added, which develops too much gluten, or from a recipe that contains a chemical leavener like baking powder or soda, which this one intentionally omits.
What's the secret to a shiny, crackly brownie top?
That beautiful, tissue-paper thin crust is the hallmark of a great brownie! The secret lies in whipping the eggs and sugars together for several minutes until the mixture becomes pale, thick, and ribbony. This dissolves the sugar well and creates a delicate, meringue-like layer on top of the batter as it bakes, which then forms that signature crackle.
Can I make these Brown Butter Espresso Brownies without an electric mixer?
Absolutely! While a hand mixer or stand mixer makes whipping the eggs and sugar faster, you can achieve the same result with a simple whisk and some determination. Just be prepared for a good arm workout! Whisk vigorously for about 3-5 minutes until you see the mixture visibly lighten in color and thicken enough to form a ribbon when drizzled from the whisk.
How can I be sure I don't burn my butter when browning it?
Browning butter requires a little attention, but it's easy once you know what to look for. Use a light-colored saucepan so you can clearly see the color of the milk solids changing. Keep the heat on medium and swirl the pan frequently. Once it starts to foam, watch it closely. The moment you see golden-brown specks at the bottom and smell that wonderful nutty aroma, immediately remove it from the heat to prevent it from going from brown to burnt.
Is browning the butter really necessary for this recipe?
While you could make this recipe with simple melted butter and get a good brownie, you wouldn't have Brown Butter Espresso Brownies. The browning step is what elevates this recipe from ordinary to extraordinary. It's a simple, no-cost technique that adds a tremendous amount of nutty, toasty, caramel-like flavor that is absolutely central to the final taste. I highly encourage you not to skip it!
Brown Butter Espresso Brownies
Deeply fudgy and intensely flavorful brownies featuring nutty brown butter and a hint of espresso to amplify the rich chocolate taste. The perfect recipe for a gourmet dessert on a budget.
Prep Time
20 min
Cook Time
30 min
Total Time
50 min
Servings
16 brownies
Ingredients
For 16 brownies
- 10 tablespoons (142g) unsalted butter
- 1 cup (200g) granulated sugar
- 1/2 cup (110g) packed light brown sugar
- 3/4 cup (75g) unsweetened Dutch-processed cocoa powder
- 2 teaspoons instant espresso powder
- 1 teaspoon pure vanilla extract
- 1/2 teaspoon kosher salt
- 2 large eggs, cold from the fridge
- 1/2 cup (63g) all-purpose flour
- 1 cup (170g) semi-sweet chocolate chips, divided
- Flaky sea salt, for sprinkling (optional)
Instructions
- 1
Prepare Pan and Preheat Oven
Preheat your oven to 350°F (175°C). Line a 9x9 inch square baking pan with parchment paper, leaving an overhang on two sides to act as handles for easy removal later. Lightly grease the parchment paper and any exposed sides of the pan.
- 2
Brown the Butter
In a medium, light-colored saucepan, melt the butter over medium heat. Continue cooking, swirling the pan occasionally, until the butter foams, sizzles, and then quiets down. Watch closely for small, golden-brown specks to appear at the bottom of the pan and for the butter to smell nutty and toasted. This should take about 5-8 minutes.
- 3
Melt Chocolate and Bloom Flavors
Immediately remove the browned butter from the heat. Add 1/2 cup of the chocolate chips, the cocoa powder, and the espresso powder to the hot butter. Whisk until the chocolate chips are completely melted and the mixture is smooth and glossy. The heat will 'bloom' the cocoa and espresso, deepening their flavor.
- 4
Prepare Egg and Sugar Mixture
In a separate large bowl, combine the granulated sugar, brown sugar, vanilla extract, and kosher salt. Add the 2 cold eggs directly from the refrigerator. Cold eggs help create a fudgier texture.
- 5
Whip Eggs and Sugar
Using an electric hand mixer on medium-high speed (or a whisk and significant effort), beat the egg and sugar mixture for 3-5 minutes. The mixture should become pale, thick, and almost double in volume. When you lift the beaters, the batter should fall in a slow, thick ribbon.
- 6
Combine Wet Ingredients
Pour the warm brown butter and chocolate mixture into the whipped egg mixture. Using a spatula or whisk, gently combine the two mixtures until they are just incorporated and no streaks remain. The batter will be dark and glossy.
- 7
Fold in Dry Ingredients
Place a fine-mesh sieve over the bowl and sift the all-purpose flour directly onto the wet ingredients. Add the remaining 1/2 cup of chocolate chips. Using a spatula, gently fold everything together until just combined. Be careful not to overmix; stop as soon as you no longer see streaks of flour.
- 8
Pour and Spread Batter
Pour the thick batter into your prepared baking pan. Use the spatula to spread it evenly into all the corners. The batter will be thick, so take a moment to ensure the top is relatively level.
- 9
Add Topping and Bake
If using, sprinkle a little flaky sea salt over the top of the batter. Place the pan in the preheated oven and bake for 28-32 minutes. The edges should look set and the center should be slightly soft but not wet. A toothpick inserted in the center should come out with moist, fudgy crumbs, not raw batter.
- 10
Cool Completely
This is the most important step for fudgy brownies. Remove the pan from the oven and place it on a wire rack to cool completely to room temperature. This can take at least 2 hours. Do not attempt to slice them while warm, as they will be too gooey and fall apart.
- 11
Slice and Serve
Once completely cooled, use the parchment paper handles to lift the entire brownie slab out of the pan. Place it on a cutting board and use a large, sharp knife to cut it into 16 squares. For the cleanest cuts, wipe the knife clean between each slice.
- 12
Store Properly
Store the brownies in an airtight container at room temperature for up to 4 days. Their flavor and texture will deepen and become even fudgier on the second day.
Nutrition Facts
Per serving (estimated)
220 calories
Calories
28g
Carbs
3g
Protein
12g
Fat
2g
Fiber
95mg
Sodium
22g
Sugar