The Ultimate Fudgy & Chewy Brownie Recipe
The only brownie recipe you'll ever need! Get my secrets to an intensely fudgy, chewy brownie with a perfect crinkly, paper-thin top. Simple and foolproof.
cookwithyara.com/recipes/brownie-recipe
There's a certain magic in a perfect brownie, isn't there? It’s not just a square of chocolate cake. It’s a study in contrasts. It begins with that signature top, a delicate, paper-thin crust that shatters under the slightest pressure, giving way to a center so dense, so fudgy, it’s almost like a truffle. The edges offer a satisfying chew, a perfect counterpoint to the meltingly soft middle. Many people feel intimidated by this, believing a truly great brownie is the result of some secret, complicated process. I’m here to tell you that’s simply not true. The secret isn't in a rare ingredient or a complex technique; it's in understanding the why behind each step. Once you grasp the simple science of how butter, chocolate, sugar, and eggs come together, the how becomes second nature. This isn’t just about following instructions; it's about learning the rhythm of a batter. This foundational knowledge will empower you, turning you from someone who just follows a brownie recipe into someone who truly understands how to bake. Forget the boxed mixes forever. Together, we’ll create something deeply satisfying, a rich, chocolatey treat worthy of any gathering, big or small. This is more than just a dessert; it’s an experience, a moment of pure comfort you can create with your own hands.
What Makes This The Ultimate Brownie Recipe?
When I set out to create the ultimate brownie recipe, I had a very specific vision. For me, the perfect brownie isn't one-note. It must have three distinct, harmonious textures. First, the top must be glossy and crinkly. This isn't just for looks; that delicate, meringue-like crust provides an incredible textural contrast to what lies beneath. It’s the first thing you experience, and it should be light and crisp.
Second, the center must be profoundly fudgy. This is non-negotiable. We are not making a chocolate cake. A great brownie should be dense, moist, and intensely chocolatey, melting on your tongue. This deep, fudgy quality comes from a high fat-to-flour ratio, where melted chocolate and butter are the true stars of the show, and flour plays a supporting role just to hold everything together. We want a crumb that is tight and moist, not open and airy.
Finally, the edges must have a distinct, satisfying chew. While the center is soft and yielding, the perimeter that bakes against the hot pan should offer a bit of resistance, a firm, toffee-like texture that is deeply caramelized and delicious. This trifecta of textures—the shattering crust, the fudgy heart, and the chewy edge—is what elevates a simple treat into something extraordinary. This brownie recipe is meticulously balanced to deliver on all three fronts, creating a truly complete and unforgettable bite every single time.
The Science of a Perfect Brownie
Baking is as much chemistry as it is art, and understanding the reactions happening in your mixing bowl is the key to consistent success. The iconic crinkly top of a perfect brownie isn't an accident; it's a direct result of creating a very thin layer of meringue. When you vigorously whisk the eggs and sugar together, you are dissolving the sugar and incorporating air, creating a stable foam. As the brownies bake, this top layer of sugary egg foam dehydrates faster than the batter beneath it, forming that beautiful, delicate crust that cracks and shines. The more you whip, the more pronounced the crust.
Next is the fudgy versus cakey debate, which all comes down to the ratio of fat to flour. Fudgy brownies, like the ones in this recipe, have a higher proportion of fat (from butter and chocolate) and less flour. The fat coats the flour proteins, inhibiting the formation of gluten—the network that gives cakes their structure and spring. Less gluten development means a denser, moister, and richer final product. Cakey brownies, on the other hand, often use less fat, more flour, and a chemical leavener like baking powder to create a lighter, more open crumb.
Finally, there's the role of chocolate itself. Melting the chocolate with butter does more than just combine them; it creates an emulsion that forms the very foundation of the brownie's flavor and texture. Using high-quality chocolate with a higher cacao percentage doesn't just add flavor; it contributes to the structure and density. Understanding these simple principles transforms this brownie recipe from a list of steps into a reliable formula you can master.
Key Ingredients For Fudgy Brownies
While the technique is crucial, a truly memorable brownie recipe begins with high-quality ingredients. Each component has a specific job, and choosing wisely makes all the difference. Think of these as your core building blocks.
- Chocolate: This is the heart and soul of your brownies. I strongly recommend using a high-quality semi-sweet or bittersweet chocolate bar (between 60-72% cacao), finely chopped. Chocolate chips are designed to hold their shape and contain stabilizers that can prevent them from melting into the smooth, homogenous base we need. A good bar of baking chocolate will melt seamlessly with the butter, creating a luxurious, liquid foundation with a deep, complex flavor.
- Unsalted Butter: We use unsalted butter to control the final seasoning of the brownies. Melting it allows it to integrate fully with the chocolate, creating that rich, fudgy texture. The quality of your butter matters, as it contributes significantly to the overall flavor.
- Eggs: Large, room-temperature eggs are essential. When eggs are at room temperature, they whip up with more volume and emulsify more easily into the batter. This is critical for achieving that light, crinkly top and a smooth, cohesive texture throughout.
- Sugars: This recipe uses both granulated and brown sugar. Granulated sugar is key to creating the crisp, meringue-like crust. A small amount of brown sugar adds a touch of molasses flavor and, more importantly, contributes moisture, which enhances the fudgy texture and helps the brownies stay fresh longer.
- All-Purpose Flour: Flour provides structure, but we use it sparingly. The goal is to use just enough to bind the ingredients without making the brownies cakey. Be sure to measure your flour correctly—spoon it into the measuring cup and level it off rather than scooping directly from the bag, which can compact it and lead to dry brownies.
- Unsweetened Cocoa Powder: A little bit of cocoa powder amplifies the chocolate flavor, adding depth and cutting through the sweetness. I prefer Dutch-processed for its smooth, less acidic flavor, but natural unsweetened will also work beautifully.
- Vanilla Extract & Sea Salt: Never underestimate these two! Pure vanilla extract complements and enhances the chocolate. Salt is a flavor miracle-worker; it doesn't make the brownies salty, but rather balances the sweetness and makes the chocolate taste more intensely of itself. A pinch of fine sea salt in the batter is non-negotiable.
Essential Tools for Brownie Success
You don't need a professional kitchen to make an incredible batch of brownies, but having the right tools on hand will make the process smoother and your results more consistent. Here's what I recommend for this brownie recipe.
First and foremost is the baking pan. An 8x8 inch square metal pan is the ideal choice. Metal, particularly light-colored aluminum, conducts heat evenly and efficiently, which helps in creating those perfectly chewy edges and a uniformly baked center. If you only have a glass or ceramic dish, you can use it, but be aware that these materials retain heat differently. You'll likely need to reduce your oven temperature by 25°F (about 15°C) and may need to adjust the baking time to prevent the edges from over-baking before the center is done.
Next, you'll need a set of mixing bowls. A medium-sized, heatproof bowl (like glass or stainless steel) is perfect for melting the butter and chocolate together over a saucepan of simmering water. You'll also need a larger bowl for whipping the eggs and sugar and combining the final batter.
A good whisk is your best friend for creating that crinkly top. While a stand mixer or hand mixer can be used, a simple balloon whisk allows you to feel the change in the egg and sugar mixture as it thickens and lightens in color. For folding the ingredients together, a flexible silicone spatula is invaluable. It allows you to gently incorporate the dry ingredients without over-mixing and helps you scrape every last bit of that precious batter from the bowl into the pan.
Finally, the unsung hero of brownie baking: parchment paper. By creating a parchment paper 'sling' that overhangs on two sides of the pan, you guarantee an easy, clean release. No more wrestling with a knife around the edges! You can simply lift the entire slab of brownies out of the pan to cool and slice them into perfect squares.
A Step-by-Step Guide to Our Brownie Recipe
Let’s walk through the process together. By focusing on the visual and textural cues at each stage, you'll feel confident in creating the perfect batch of fudgy brownies every time.
First, we'll melt the fats and chocolate to create our flavor base. In a heatproof bowl set over a saucepan of simmering water (a double boiler, or bain-marie), combine your chopped chocolate and butter. Stir gently and occasionally until everything is completely melted and glossy. This gentle, indirect heat prevents the chocolate from scorching. Once smooth, remove it from the heat and set it aside to cool slightly. It should be warm to the touch, not hot.
Next, we build the structure and that signature crust. In a large bowl, combine the eggs, granulated sugar, brown sugar, and vanilla. Using a whisk, beat them together vigorously for 2 to 3 full minutes. You are looking for a noticeable transformation: the mixture will become pale, thick, and almost ribbony. When you lift the whisk, the batter should fall back on itself and leave a faint trail for a second before disappearing. This step is crucial for that crinkly top, so don’t cut it short.
Now, we combine the two mixtures. While whisking the egg mixture constantly with one hand, slowly stream in the warm (not hot!) melted chocolate mixture with the other. This process of slowly incorporating the warm fat into the eggs is called tempering, and it prevents the eggs from scrambling. Continue whisking until the batter is uniform, glossy, and has thickened slightly.
It's time for the dry ingredients. Sift the all-purpose flour, cocoa powder, and salt directly over your wet ingredients. Switch from the whisk to a flexible spatula. Gently fold the dry ingredients into the wet until just a few streaks of flour remain. Over-mixing at this stage is the number one cause of cakey brownies, as it develops gluten. We want to mix just until the batter is cohesive.
Finally, pour the batter into your parchment-lined 8x8 inch pan and smooth the top with your spatula. Bake in a preheated oven until a wooden skewer inserted into the center comes out with a few moist, sticky crumbs attached, but not wet batter. This is the key to a fudgy center. Let the brownies cool completely in the pan before lifting them out and slicing. This patience is difficult, but it's what allows them to set properly for clean cuts and the perfect texture.
Troubleshooting Common Brownie Problems
Even with the most reliable brownie recipe, things can sometimes go slightly awry. But don't worry! Most issues are easily fixable or, at the very least, a great learning opportunity for your next batch. Here are some common problems and how to solve them.
If your brownies turned out dry or cakey… This is almost always due to one of two things: over-baking or over-measuring the flour. The toothpick test can be misleading for brownies. You're looking for moist, sticky crumbs, not a clean toothpick like you would for a cake. Pull them from the oven a minute or two before you think they're done. Also, ensure you're measuring flour by spooning it into the cup and leveling it, as scooping can add up to 25% extra flour, which will soak up all the moisture.
If your brownies didn't get a crinkly, shiny top… The culprit is likely the egg and sugar stage. That glossy top is a delicate meringue formed by whipping air into the eggs and dissolving the sugar. If you don't whip them long enough or with enough vigor, that layer won't form properly. You really need to see the mixture turn pale, thick, and ribbony. Don't skip this crucial 2-3 minute step!
If your brownies seem greasy or oily… This usually happens if the butter and chocolate mixture was too hot when you added it to the eggs, or if the batter wasn't properly emulsified. Let the chocolate cool to just warm before streaming it into the eggs. And make sure you whisk continuously as you combine them to create a stable, glossy emulsion. A separated batter will lead to a greasy result.
If the center is gooey and under-baked but the edges are hard… This points to an oven temperature issue. Your oven might be running hotter than the dial says. An inexpensive oven thermometer is a baker's best friend for accuracy. It could also be the pan—a dark metal pan or a glass pan will bake the edges much faster than a light-colored metal pan. If using glass, remember to lower the temperature by 25°F.
If you can't get clean slices… Patience is the key! You must let the brownies cool completely—and I mean completely, for at least 2-3 hours at room temperature—before even thinking about slicing. This allows the center to set up properly. For extra-sharp squares, you can even chill the slab in the refrigerator for 30 minutes before slicing with a large, sharp knife, wiping the blade clean between each cut.
How to Serve Your Brownies
While this brownie recipe yields a treat that is spectacular all on its own, thinking about how you serve them can elevate the experience from a simple dessert to a truly memorable moment. The deep, rich chocolate flavor provides a wonderful canvas for a variety of pairings.
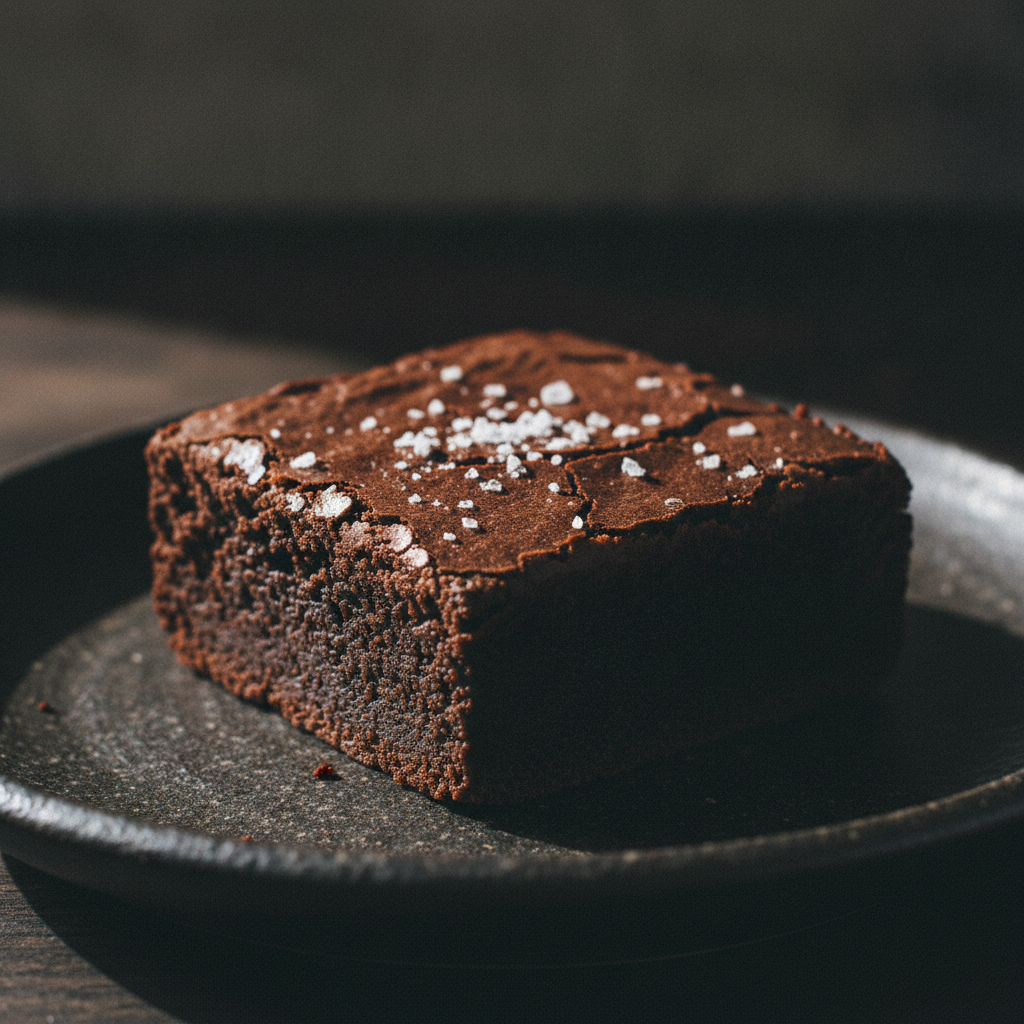
For a simple, elegant presentation, a light dusting of high-quality unsweetened cocoa powder or powdered sugar just before serving adds a touch of visual contrast and sophistication. My personal favorite is a sprinkle of flaky sea salt over the top. The crunchy crystals provide a delightful textural pop and enhance the sweetness of the chocolate in a beautiful way.
A classic pairing that never fails is a warm brownie with a scoop of creamy vanilla bean ice cream. The contrast in temperatures and textures—the warm, gooey brownie against the cold, melting ice cream—is pure bliss. It’s a combination that speaks of comfort and indulgence.
To bring a bit of my Levantine kitchen perspective to the table, try serving a square of brownie with a dollop of thick, tangy labneh (strained yogurt) and a scattering of fresh raspberries or pomegranate seeds. The tartness of the labneh and the fruit cuts through the richness of the chocolate beautifully, creating a balanced and refreshing bite. A swirl of tahini in the batter before baking or drizzled on top before serving also adds a wonderful nutty complexity that pairs exquisitely with chocolate.
No matter how you choose to serve them, these brownies are best enjoyed with good company and a warm cup of coffee or a cold glass of milk. They are a dessert made for sharing and savoring.
Taking It to the Next Level: Flavor Variations
Once you've mastered the foundational brownie recipe, you can start to play and make it your own. The batter is a wonderfully forgiving base for a host of creative additions and flavor twists. Here are a few of my favorite ways to take these brownies to the next level.
For a deeper, more adult chocolate flavor, add one or two teaspoons of instant espresso powder to the batter along with the other dry ingredients. Coffee has a magical ability to intensify the flavor of chocolate without making the brownies taste like coffee. It simply makes them taste more chocolatey.
To introduce a Mediterranean flair, consider the world of warm spices and nuts. A half-teaspoon of finely ground cardamom or cinnamon added with the flour lends a subtle, aromatic warmth that is absolutely divine with chocolate. For a textural and flavor surprise, try adding a generous swirl of tahini into the batter right before you pour it into the pan. Use a knife to gently marble it through for a beautiful pattern and pockets of nutty, savory flavor. A handful of roughly chopped pistachios or walnuts folded into the batter at the end also adds a wonderful crunch.
For the ultimate chocolate lover, you can fold in a cup of high-quality chocolate chunks or wafers right before baking. Using a mix of different cacao percentages—some semi-sweet and some darker 70%—creates pockets of melted chocolate with varying intensities. Another professional touch is to brown the butter. Before melting it with the chocolate, cook the butter on its own until the milk solids turn golden brown and it smells nutty. This small step adds an incredible layer of toasty, caramel-like depth to the final brownie. Experimentation is part of the joy of baking, so don't be afraid to try new combinations.
Storing and Freezing Homemade Brownies
One of the best qualities of this brownie recipe is that the brownies are arguably even better on the second day. As they sit, the flavors meld and deepen, and the fudgy texture becomes even more pronounced. Proper storage is key to preserving that perfect consistency.
Your brownies should be stored in an airtight container at room temperature. The refrigerator is not their friend; the cold, dry air can dull the flavor and make them hard and dry. Simply keep them well-sealed on your counter, and they will stay wonderfully moist and fudgy for up to four days. If you find the edges getting a little firm, a quick 10-second trip to the microwave will restore them to their warm, gooey glory.
If you want to keep them for longer, brownies freeze exceptionally well. For best results, I recommend freezing the entire slab before slicing it. Let the brownies cool completely, then lift them from the pan using the parchment sling. Wrap the whole slab tightly in two layers of plastic wrap, followed by a layer of aluminum foil. This triple-wrapping method prevents freezer burn and protects the delicate flavor. They can be frozen for up to three months.
When you're ready to enjoy them, simply unwrap the slab and let it thaw at room temperature on the counter for a few hours. Once fully thawed, you can slice and serve them as if they were freshly baked. You can also freeze individual squares, which is perfect for a quick single-serving treat. Just wrap each square tightly and thaw as needed.
Frequently Asked Questions
Can I use a glass pan instead of a metal one?
Yes, you absolutely can, but with a small adjustment. Glass is an insulator and holds heat differently than metal, which can cause the edges to cook much faster than the center. To compensate, I recommend reducing the oven temperature by 25°F (from 350°F to 325°F) and checking for doneness a few minutes earlier. This will help your brownies bake more evenly.
Is it possible to double this brownie recipe?
Certainly! This recipe doubles perfectly. Simply double all the ingredients and bake it in a 9x13 inch pan. The baking time will likely be longer, so start checking for doneness around the 35-minute mark and add more time as needed until a skewer comes out with moist, fudgy crumbs.
Why are my brownies too sweet for my taste?
Sugar plays a crucial role in both the texture and the crinkly top of this brownie recipe, so reducing it significantly can alter the final result. However, if you prefer a less sweet brownie, you can ensure you are using a high-percentage bittersweet chocolate (70% cacao or higher) and bloom a tablespoon of dark, unsweetened cocoa powder in the hot butter to add a more intense, bitter chocolate note that will balance the sweetness beautifully.
Can I make these brownies with gluten-free flour?
Yes, this recipe is quite adaptable to gluten-free baking. For the best results, use a high-quality one-to-one or measure-for-measure gluten-free all-purpose flour blend that contains xanthan gum. The low overall flour content in this brownie recipe makes it a great candidate for a gluten-free conversion without a major impact on that desirable fudgy texture.
Can I prepare the brownie batter in advance?
I wouldn't recommend it. Much of the magic, particularly the crinkly top, comes from the air incorporated into the egg and sugar mixture. If the batter sits for too long before baking, that air will deflate, and you'll lose that signature texture. The process is quick enough that it's best to mix and bake it all at once for optimal results.
The Ultimate Fudgy Brownie Recipe
An intensely chocolatey, fudgy, and chewy brownie recipe with a signature paper-thin, crinkly top. This easy, foolproof recipe is the only one you'll ever need.
Prep Time
15 min
Cook Time
30 min
Total Time
45 min
Servings
16 brownies
Ingredients
For 16 brownies
- 1/2 cup (113g) unsalted butter, cut into pieces
- 4 ounces (113g) high-quality semi-sweet or bittersweet chocolate (60-72% cacao), finely chopped
- 1 cup (200g) granulated sugar
- 1/4 cup (50g) packed light brown sugar
- 2 large eggs, at room temperature
- 1 teaspoon pure vanilla extract
- 1/2 cup (60g) all-purpose flour
- 1/4 cup (25g) unsweetened Dutch-processed cocoa powder
- 1/2 teaspoon fine sea salt
- Flaky sea salt, for sprinkling (optional)
Instructions
- 1
Preheat and Prep Pan
Preheat your oven to 350°F (175°C). Line an 8x8 inch square metal baking pan with parchment paper, leaving an overhang on two sides to act as a sling for easy removal later.
- 2
Melt Chocolate and Butter
In a medium heatproof bowl set over a saucepan of simmering water (a double boiler), combine the butter pieces and chopped chocolate. Stir occasionally until completely melted and smooth. Remove from heat and set aside to cool slightly for about 5-10 minutes.
- 3
Whip Eggs and Sugars
In a large mixing bowl, combine the granulated sugar, brown sugar, room-temperature eggs, and vanilla extract. Using a whisk, beat the mixture vigorously by hand for 2-3 minutes. The mixture should become pale, thick, and ribbony.
- 4
Combine Wet Ingredients
While whisking the egg mixture continuously, slowly stream in the slightly cooled melted chocolate and butter mixture. Continue to whisk until the batter is glossy, thick, and well combined. This step tempers the eggs and creates a stable emulsion.
- 5
Sift Dry Ingredients
Place a fine-mesh sieve over the bowl with the wet ingredients. Add the all-purpose flour, unsweetened cocoa powder, and fine sea salt to the sieve and sift them directly into the batter. This removes lumps and aerates the dry ingredients.
- 6
Fold the Batter
Switch from the whisk to a flexible silicone spatula. Gently fold the dry ingredients into the wet ingredients, scraping from the bottom of the bowl. Stop mixing as soon as the last streaks of flour disappear. Do not over-mix.
- 7
Pour and Spread Batter
Pour the thick, glossy batter into your prepared baking pan. Use the spatula to spread it evenly into the corners. If desired, sprinkle the top generously with flaky sea salt.
- 8
Bake to Perfection
Bake for 28-32 minutes. The edges should be set and the top should have a shiny, crinkly crust. A wooden skewer inserted into the center should come out with a few moist, sticky crumbs attached, but not wet batter.
- 9
Cool Completely
Place the pan on a wire rack and let the brownies cool completely in the pan for at least 2 hours. This step is crucial for the brownies to set properly, ensuring a fudgy texture and clean slices.
- 10
Lift and Slice
Once completely cool, use the parchment paper overhangs to lift the entire slab of brownies out of the pan. Transfer to a cutting board and slice into 16 even squares with a large, sharp knife. Wipe the knife clean between cuts for the neatest squares.
Nutrition Facts
Per serving (estimated)
190 calories
Calories
25g
Carbs
2g
Protein
10g
Fat
1.5g
Fiber
95mg
Sodium
20g
Sugar