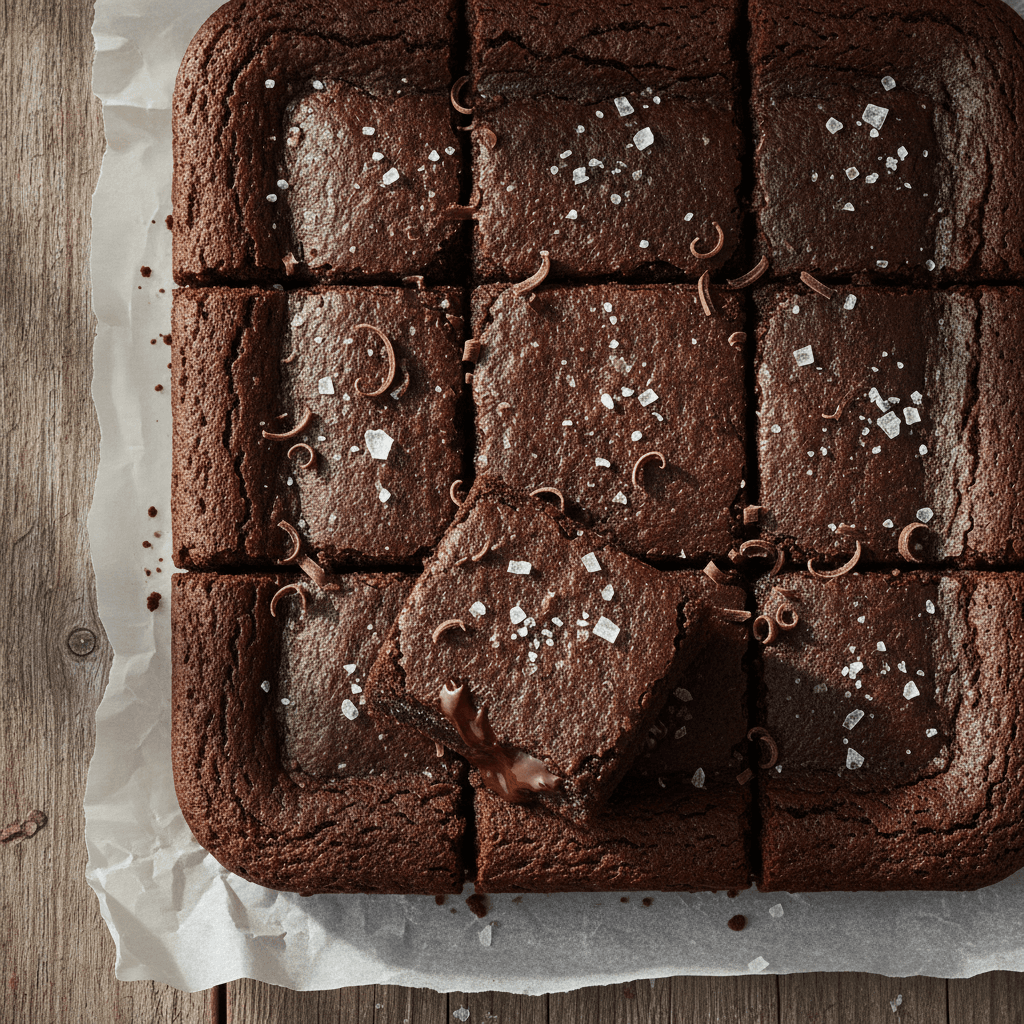
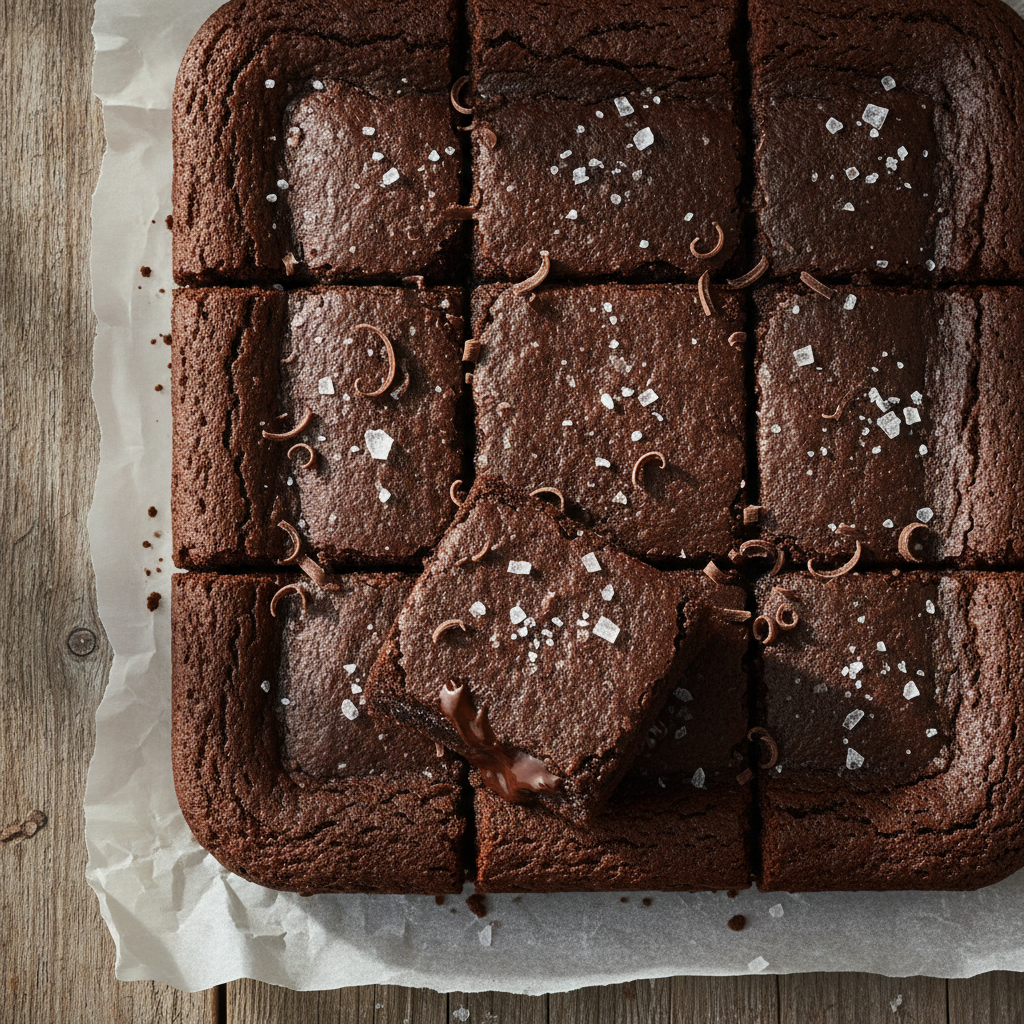
The Best Fudgy Homemade Brownies Recipe (Easy One-Bowl)
Discover the ultimate homemade brownies recipe! Perfectly fudgy, chewy, and rich with chocolate flavor. This easy, one-bowl recipe is a keeper.
cookwithyara.com/recipes/brownies-recipe-homemade
There's a special kind of magic in creating something truly decadent from the simplest, most humble ingredients. We often associate rich, deeply satisfying desserts with complicated techniques and expensive shopping lists, but I'm here to tell you that some of the most profound culinary joys come straight from the pantry. This very recipe is a testament to that belief. It’s a celebration of chocolate in its purest form, yielding brownies so fudgy, so chewy, and so intensely flavorful, you’ll find it hard to believe they came from your own oven and not a high-end bakery. This is the brownies recipe homemade that will become your go-to for every occasion, from a quiet evening treat to a dessert platter for a beloved gathering.
What I love most about this recipe is its accessibility. It's a testament to smart baking, proving that you don't need a long list of fancy items to achieve perfection. The ingredients are straightforward, things you likely have on hand right now: flour, sugar, eggs, butter, and of course, chocolate. The process is simple, forgiving, and comes together in a single bowl, which means less time cleaning and more time enjoying. Forget the boxed mixes that promise convenience but deliver a lackluster, one-note flavor. This from-scratch recipe is nearly as fast and infinitely more rewarding. The result is a pan of brownies with a glossy, paper-thin crackly top, dense and fudgy centers, and a deep, complex chocolate flavor that lingers beautifully. It's an affordable luxury, a simple moment of pure delight you can bake anytime.
Why This Recipe Works So Well
Every great recipe has a little bit of science and a lot of heart behind it, and this brownies recipe homemade is no exception. Its success lies in a few key principles that are intentionally designed to produce that perfect fudgy texture and deep chocolate flavor every single time. It's a foolproof method that I've refined to eliminate guesswork and maximize deliciousness.
The first secret is the foundation: melted butter and high-quality chocolate. By melting them together, we create a rich, liquid fat base. This high fat-to-flour ratio is the primary reason these brownies are so dense and fudgy rather than light and cakey. It coats the flour proteins, preventing excessive gluten development, which is the enemy of a chewy, moist brownie. A cakey brownie has more flour and often a leavening agent like baking powder; we skip that here to ensure a wonderfully dense result.
Second, we build flavor complexity by using two forms of chocolate: a melted chocolate bar for richness and mouthfeel, and Dutch-process cocoa powder for a deep, dark, and robust chocolate backbone. The melted chocolate provides the cocoa butter, which contributes to the fudgy texture, while the cocoa powder delivers a pure, concentrated flavor. Finally, the technique of whipping the eggs and sugar until they're light and foamy is crucial. This step isn't just about mixing; it's about dissolving the sugar and creating a delicate meringue-like structure. As it bakes, this structure sets into that beautiful, shiny, crackly crust that is the hallmark of a truly magnificent homemade brownie. This recipe isn’t just a list of ingredients; it’s a roadmap to brownie perfection.
The Science of Fudgy vs. Cakey Brownies
Have you ever wondered what truly separates a fudgy brownie from a cakey one? It’s a question bakers love to debate, but the answer is rooted in simple kitchen chemistry and the ratio of ingredients. Understanding this is the key to mastering your own brownies recipe homemade and tailoring it to your exact preference. At its core, the difference comes down to the proportion of fat, flour, and leavening.
Fudgy brownies, like the ones we’re making today, are all about richness and density. They have a significantly higher ratio of fat (butter and chocolate) to flour. Think of them as almost a flourless chocolate cake, but with just enough flour to give them structure and a satisfying chew. The high amount of fat coats the flour particles, which inhibits the formation of gluten strands. Less gluten means a denser, moister, and less bread-like texture. Fudgy brownies also typically use fewer eggs and contain no chemical leaveners like baking powder or baking soda, which prevents them from rising too much and keeps them wonderfully compact.
On the other side of the spectrum are cakey brownies. These contain a higher proportion of flour and less fat. They often call for creaming the butter and sugar together, just as you would for a cake, to incorporate air into the batter. This, combined with the use of baking powder, gives them a significant lift in the oven, resulting in a lighter, more open, and crumbly texture. They are essentially a simple chocolate cake baked in a square pan. While delicious in their own right, they lack that gooey, melt-in-your-mouth quality that makes a fudgy brownie so irresistible. This recipe is unapologetically in the fudgy camp, designed from the ground up to be the ultimate decadent chocolate experience.
Ingredient Deep Dive: The Keys to the Perfect Brownie
While the technique is important, a truly spectacular brownie begins with quality ingredients. Each component in this recipe plays a crucial role, and understanding that role will elevate your baking from good to extraordinary. Let's break down the cast of characters that make this brownies recipe homemade so special.
Chocolate: This is the star of the show. I recommend using a good quality semi-sweet or bittersweet chocolate bar (between 60-72% cacao), finely chopped. Chocolate bars melt more smoothly and have a higher cocoa butter content than chocolate chips, which contain stabilizers to help them hold their shape. This extra cocoa butter is vital for that ultra-fudgy texture. Use a chocolate you would enjoy eating on its own.
Dutch-Process Cocoa Powder: This is our secret weapon for deep, dark flavor. Unlike natural cocoa powder, Dutch-process cocoa has been treated to neutralize its acidity. This results in a smoother, less bitter, and more intensely chocolatey flavor, as well as a beautiful dark color in the final product. It’s worth seeking out for a truly professional-tasting brownie.
Unsalted Butter: We use unsalted butter so we can control the exact amount of salt in the recipe. Melting the butter is a key step. It not only combines with the chocolate to form the base but also contributes to a chewier, denser final product compared to recipes that call for creaming softened butter.
Eggs: Eggs do more than just bind; they are essential for the texture. Using large eggs at room temperature allows them to incorporate more easily and create a more stable emulsion. Whisking them thoroughly with the sugar is the secret to achieving that signature crackly top.
Sugars: I use a combination of granulated white sugar and light brown sugar. The white sugar contributes to the crisp, crackly crust, while the brown sugar, with its molasses content, adds a subtle caramel note and, more importantly, extra moisture that keeps the brownies soft and chewy for days.
Vanilla Extract and Sea Salt: These are the flavor enhancers, and they are non-negotiable! A pure vanilla extract complements and rounds out the chocolate flavor, while a pinch of fine sea salt makes the chocolate taste more complex and less one-dimensionally sweet. They are the supporting actors that make the star shine.
Mastering the Technique: Step-by-Step to Flawless Homemade Brownies
Baking this brownies recipe homemade is a sensory experience, a simple ritual that brings immense reward. Let’s walk through the process together, focusing on the small details that make a big difference. The beauty of this recipe is its simplicity—it all happens in one bowl, minimizing cleanup and maximizing enjoyment.
First, we create the heart of our brownie: the chocolate base. Begin by gently melting the chopped chocolate and butter together. You can do this in a saucepan over low heat or in the microwave in short bursts. The key is to go low and slow, stirring frequently until the mixture is completely smooth and glossy. The aroma that fills your kitchen at this stage is the first promise of the deliciousness to come. Once melted, set it aside to cool slightly. This is important; if it's too hot, it can scramble the eggs in the next step.
Next comes the secret to the crackly top. In a large bowl, you'll combine the eggs, both sugars, vanilla, and salt. Now, it's time for some elbow grease. Using a whisk, beat the mixture vigorously for a few minutes. You’re not just mixing; you’re dissolving the sugar and whipping air into the eggs. You’ll know you’re done when the mixture becomes lighter in color, slightly thickened, and foamy. You should see a trail of ribbons when you lift the whisk.
Now, it's time to bring it all together. Pour the slightly cooled, luscious chocolate-butter mixture into the egg and sugar foam. Gently fold them together with a spatula until just combined. You want to maintain as much of that airiness from the eggs as possible. Then, sift the flour and cocoa powder directly over the wet ingredients. This prevents clumps and ensures a smooth batter. Fold everything together with your spatula, scraping the bottom of the bowl, until just a few streaks of flour remain. Be careful not to overmix! Overmixing develops gluten and will lead to tough, dry brownies instead of fudgy ones. The moment you no longer see dry flour, stop mixing.
Finally, pour the thick, glossy batter into your prepared baking pan, lined with parchment paper for easy removal. Spread it evenly with your spatula, making sure it reaches all the corners. Now, into the preheated oven it goes. This is where the magic happens—the batter transforms, the top becomes shiny and crackled, and the house fills with the most incredible chocolate scent. The hardest part is waiting for them to cool before cutting, but patience is the final, crucial ingredient for perfect, clean-sliced brownies.
The Secret to That Perfect Crackly Top
That beautiful, tissue-paper-thin, shiny, crackly crust is the visual cue for an amazing homemade brownie. It's what separates a good brownie from a great one, and achieving it is less about luck and more about a specific, simple technique. Many bakers chase this elusive feature, but the secret is surprisingly straightforward and is built right into this brownies recipe homemade.
The crackly top is, in essence, a very thin, delicate meringue. It's formed during the initial stage of mixing when you vigorously whisk the eggs and sugars together. By whisking for a good 2 to 3 minutes, you are doing two things simultaneously. First, you are completely dissolving the sugar crystals into the eggs. Second, you are incorporating a significant amount of air, creating a stable foam. This sugar-egg foam is the foundation of the crust.
When the brownie batter goes into the hot oven, this delicate meringue layer rises to the surface. The heat causes the air bubbles to expand and the sugar to caramelize slightly. As the brownies bake and then cool, this thin layer sets and then cracks, creating that signature pattern. The key is to ensure the sugar is fully dissolved; undissolved sugar crystals will result in a dull, grainy top. This is why spending a few extra minutes whisking is so critical. You should be able to feel the mixture go from grainy to smooth between your fingers. It’s a small step that requires a little patience but pays off with a stunningly professional-looking and texturally perfect brownie every single time.
Delicious Variations on Our Brownies Recipe Homemade
While this classic brownies recipe homemade is perfection on its own, it also serves as a fantastic canvas for your culinary creativity. One of my favorite ways to add a personal touch is by incorporating flavors from my own Levantine kitchen heritage. These additions complement the deep chocolate notes beautifully and can transform a familiar treat into something truly special.
Tahini Swirl Brownies: This is a match made in heaven. The nutty, slightly savory flavor of tahini is a wonderful counterpoint to the sweet, rich chocolate. After pouring the brownie batter into the pan, dollop about 1/4 cup of good-quality tahini over the top. Use a knife or a skewer to gently swirl it into the batter, creating a beautiful marbled pattern. Don’t overmix the swirl; you want distinct ribbons of tahini.
Cardamom & Coffee Brownies: To add a warm, aromatic spice note, mix 1/2 teaspoon of freshly ground cardamom into your dry ingredients. To deepen the chocolate flavor, dissolve 1 teaspoon of instant espresso powder into the melted butter and chocolate mixture. Coffee is a classic trick that doesn’t make the brownies taste like coffee, but rather enhances the chocolate, making it taste richer and more complex.
Halva-Stuffed Brownies: For a delightful textural surprise, crumble about 1/2 cup of your favorite sesame halva (pistachio halva is particularly wonderful) and gently fold it into the batter at the very end. The halva will melt slightly as it bakes, creating pockets of sweet, nutty, and slightly crumbly goodness throughout the fudgy brownies.
Pistachio & Sea Salt Brownies: A simple but elegant variation. Roughly chop about 1/2 cup of shelled, unsalted pistachios. Fold half into the batter and sprinkle the other half over the top before baking. A final sprinkle of flaky sea salt on top just before it goes into the oven balances the sweetness and highlights both the chocolate and pistachio flavors. It's a beautiful combination of sweet, salty, and nutty.
Of course, you can also go the classic route by adding 1 cup of chopped walnuts or pecans, or a handful of your favorite chocolate chunks for extra gooey pockets of melted chocolate.
How to Store and Serve Your Brownies
Once you’ve baked a perfect pan of brownies, you’ll want to make sure they stay as fresh and delicious as possible. Proper storage is key to preserving that wonderful fudgy texture. The most important rule is to let them cool completely in the pan before you even think about cutting them. I know it’s tempting to dive in while they’re warm, but cutting them too soon will result in messy, gooey squares. Patience will be rewarded with clean, professional-looking cuts.
Once cooled, you can lift the entire slab out of the pan using the parchment paper overhang. For storage, the best place for these brownies is at room temperature. Cut them into squares and place them in a single layer in an airtight container. They will stay perfectly fresh and fudgy for up to four days. I strongly advise against storing them in the refrigerator. The cold air can dry them out and make them hard, robbing them of their signature chewy, moist texture.
When it comes to serving this brownies recipe homemade, the possibilities are endless. They are absolutely perfect as they are, alongside a cup of coffee or a glass of cold milk. For a more elevated dessert experience, try warming a brownie for just 10-15 seconds in the microwave. This brings it back to that just-out-of-the-oven state, making the center extra gooey. Serve it warm with a scoop of high-quality vanilla bean ice cream for a classic, soul-satisfying treat. For a touch of my own heritage, I sometimes like to drizzle a warm brownie with a bit of date syrup or top it with a dollop of thick yogurt and a sprinkle of chopped pistachios. It creates a beautiful balance of sweet, tangy, and rich flavors.
Your Questions Answered
Can I use chocolate chips instead of a chocolate bar?
You can in a pinch, but for the best texture, I highly recommend using a chopped chocolate bar. Chocolate chips contain stabilizers that help them hold their shape during baking, which means they don't melt as smoothly and won't contribute the same level of fudginess as pure baking chocolate.
Why are my brownies dry or cakey?
This usually comes down to one of two things: too much flour or overbaking. Be sure to measure your flour correctly (by spooning it into the measuring cup and leveling it off, not scooping). Most importantly, pull the brownies from the oven when a toothpick inserted in the center comes out with moist, fudgy crumbs attached, not clean. They will continue to set as they cool.
How do I know when my brownies are perfectly baked?
This is the most crucial part! The edges should be set and slightly pulled away from the sides of the pan. The center should look set but still be soft to the touch. The toothpick test is your best friend: moist crumbs are the goal. If it comes out with wet batter, they need a few more minutes; if it comes out clean, they are likely overbaked.
Can I double this recipe?
Absolutely! This brownies recipe homemade doubles perfectly. Simply double all the ingredients and bake it in a 9x13-inch pan. You may need to add about 5-10 minutes to the baking time, so start checking for doneness around the original recipe's suggested time and go from there.
Can I make this brownies recipe homemade gluten-free?
Yes, you can substitute the all-purpose flour with a good quality one-to-one gluten-free baking flour blend. Look for a blend that contains xanthan gum. The texture will be slightly different, but still incredibly delicious and fudgy.
What's the best way to cut clean brownie squares?
First, patience is key—let them cool completely, or even chill them in the fridge for 30 minutes. Use a large, sharp chef's knife. For ultra-clean cuts, run the knife under hot water and wipe it dry between each slice. This melts any chocolate residue on the blade, allowing it to glide through for perfect squares.
The Best Fudgy Homemade Brownies
An incredibly rich and fudgy homemade brownies recipe. This one-bowl method yields perfectly chewy brownies with a beautiful crackly top every time.
Prep Time
15 min
Cook Time
30 min
Total Time
45 min
Servings
16 brownies
Ingredients
For 16 brownies
- 3/4 cup (170g) unsalted butter, cubed
- 4 ounces (113g) high-quality semi-sweet chocolate (60-70% cacao), chopped
- 1 1/4 cups (250g) granulated sugar
- 1/2 cup (100g) packed light brown sugar
- 3 large eggs, at room temperature
- 1 tablespoon pure vanilla extract
- 3/4 cup (90g) all-purpose flour
- 1/2 cup (50g) unsweetened Dutch-process cocoa powder
- 1 teaspoon fine sea salt
Instructions
- 1
Preheat and Prepare Pan
Preheat your oven to 350°F (175°C). Line an 8x8-inch square baking pan with parchment paper, leaving an overhang on two sides to act as handles for easy removal later. Lightly grease the paper and any exposed sides of the pan.
- 2
Melt Butter and Chocolate
In a large microwave-safe bowl or a saucepan over low heat, combine the cubed unsalted butter and the chopped semi-sweet chocolate. Heat gently, stirring frequently, until the mixture is completely melted and smooth. Remove from heat and set aside to cool for about 5-10 minutes.
- 3
Whisk Eggs and Sugars
In a separate large bowl, add the granulated sugar, light brown sugar, room temperature eggs, and vanilla extract. Whisk vigorously for 2-3 minutes until the mixture is pale, thick, and foamy. This step is crucial for creating the crackly top.
- 4
Combine Wet Ingredients
Gently pour the slightly cooled chocolate-butter mixture into the whisked egg and sugar mixture. Using a rubber spatula, carefully fold the two mixtures together until they are just combined. Be careful not to deflate the air you whipped into the eggs.
- 5
Sift and Add Dry Ingredients
Place a fine-mesh sieve over the bowl with the wet ingredients. Sift the all-purpose flour, Dutch-process cocoa powder, and fine sea salt directly into the bowl. This prevents any lumps and ensures a smooth batter.
- 6
Fold the Batter
Using your rubber spatula, gently fold the dry ingredients into the wet ingredients. Mix only until the last streaks of flour disappear. Do not overmix; overmixing will develop gluten and result in cakey, tough brownies.
- 7
Pour and Spread
Pour the thick, glossy brownie batter into your prepared 8x8-inch pan. Use the spatula to spread the batter evenly, making sure it reaches all the corners of the pan for an even bake.
- 8
Bake the Brownies
Bake in the preheated oven for 28-32 minutes. The edges should look set and slightly pulled away from the sides, and the top should be shiny and crackled. The center should still feel slightly soft under the crust.
- 9
Check for Doneness
To check for doneness, insert a wooden toothpick into the center of the pan. It should come out with moist, fudgy crumbs attached. If it comes out with wet batter, bake for another 2-3 minutes. If it comes out clean, they are overbaked.
- 10
Cool Completely
Remove the pan from the oven and place it on a wire rack to cool completely. This is the most difficult step! Allowing the brownies to cool entirely in the pan (at least 2 hours) is essential for them to set properly and for clean cuts.
- 11
Lift and Cut
Once completely cool, use the parchment paper overhangs to lift the entire brownie slab out of the pan. Place it on a cutting board and use a large, sharp knife to cut into 16 squares. For extra clean cuts, wipe the knife clean between each slice.
- 12
Serve and Store
Serve the brownies immediately or store them in an airtight container at room temperature for up to 4 days. Avoid refrigerating, as it can dry them out.
Nutrition Facts
Per serving (estimated)
280 calories
Calories
35g
Carbs
3g
Protein
16g
Fat
2g
Fiber
150mg
Sodium
28g
Sugar