
Ultimate Campfire Skillet Cookie Recipe (Gooey & Delicious)
The only campfire dessert you'll ever need! This gooey skillet cookie with dates, pistachios, and tahini is a showstopper. Easy, shareable, and so good.
cookwithyara.com/recipes/campfire-desserts
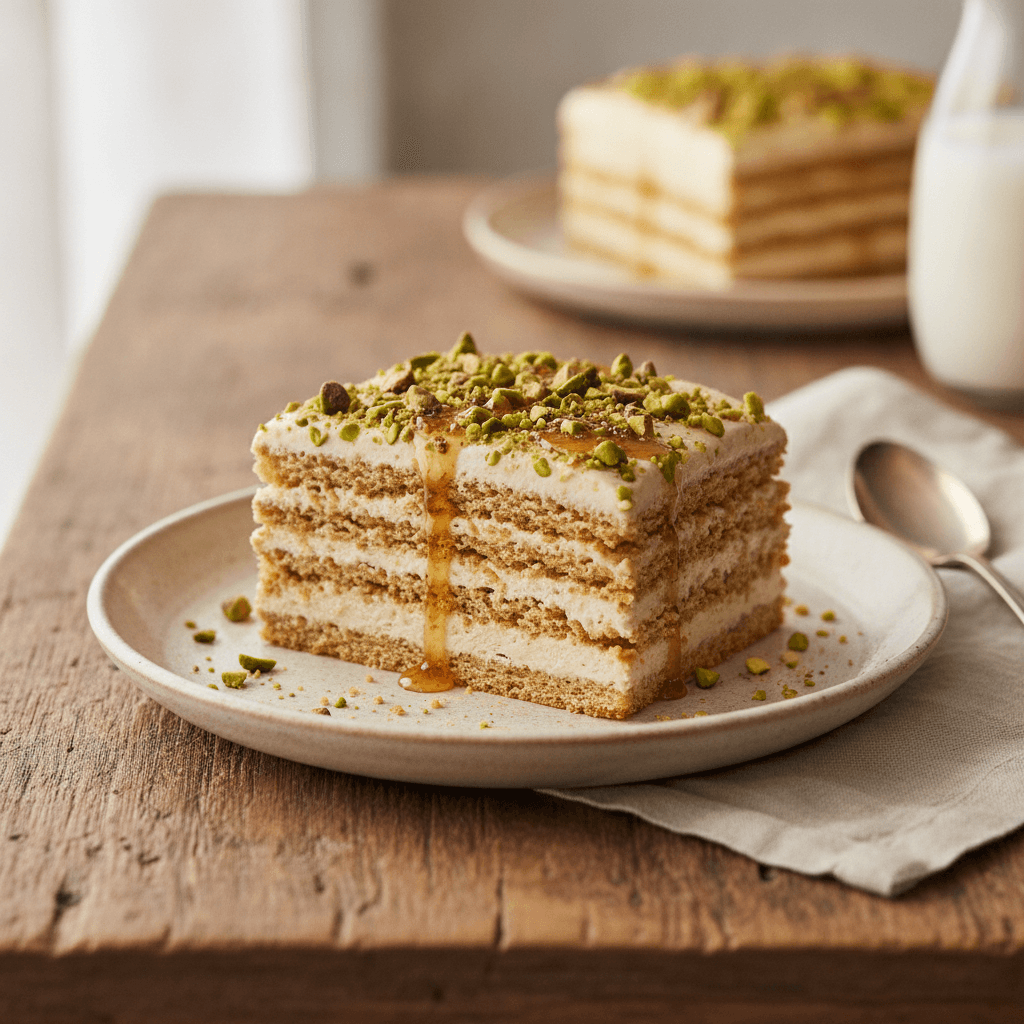
There's a moment, as the sun dips below the horizon and the campfire crackles to life, when the air fills with a unique kind of magic. It’s a time for stories, for connection, and for something truly special to eat. Imagine bringing this to the center of your gathering: a heavy, black cast-iron skillet, still sizzling from the embers, cradling a giant, golden-brown cookie. The top is a landscape of molten chocolate pools, deep amber-colored dates, and a scattering of vibrant green pistachios. As you set it down, the aroma—a warm, intoxicating blend of toasted butter, brown sugar, rich chocolate, and a whisper of exotic spice—envelopes everyone. This is not just dessert; it's an experience. This is the campfire skillet cookie that will have everyone leaning in closer, spoons at the ready.
At first glance, it looks like a masterpiece, something that requires intricate steps and years of practice. But I want to let you in on a little secret: this is one of the most forgiving and impressive campfire desserts you can possibly make. The beauty of it lies in its rustic charm and its communal nature. It’s designed to be a little messy, incredibly gooey, and shared directly from the skillet. The real showstopper here isn't just the chocolate and cookie dough, but a trio of flavors straight from my Levantine pantry: sweet, chewy Medjool dates, crunchy, salty pistachios, and the secret ingredient that ties it all together—creamy, nutty tahini. This is the recipe that will elevate your outdoor gatherings from memorable to utterly unforgettable.

What Makes This a Showstopper
In the world of campfire desserts, there are the classics, and then there are the legends. This Gooey Campfire Skillet Cookie firmly belongs in the latter category. What elevates it from a simple treat to a true showstopper is its thoughtful composition of textures, flavors, and that undeniable visual appeal. When you present this skillet, you’re not just serving a cookie; you’re creating a centerpiece. The deep, dark cast iron provides a dramatic frame for the dessert's stunning colors: the rich, golden-brown crust, the almost-black pools of melted chocolate, the jewel-like green of the pistachios, and a final, shimmering dusting of flaky sea salt that catches the firelight. It’s a feast for the eyes before the first spoon ever touches it.
The experience only deepens with the first bite. The magic of baking in cast iron over a live fire is the incredible texture it creates. You get those irresistibly crispy, caramelized edges where the cookie dough has met the hot pan, offering a satisfying crunch. But just millimeters away lies the heart of the dessert: a soft, deeply gooey, and slightly under-baked center that melts in your mouth. This textural contrast is what makes people’s eyes widen in delight. It’s a journey in every spoonful—from the chewy pockets of jammy dates to the firm snap of a roasted pistachio, all held together by a tender, buttery cookie crumb. It’s a symphony of sensations that is both comforting and thrillingly complex. The kind of dessert you'd be delighted to order at a rustic, upscale restaurant, yet here you are, making it yourself under a canopy of stars. That sense of accomplishment and shared delight is what truly makes it a showstopper.
The Ingredients That Matter Most
A truly spectacular dish is always a story of its ingredients, and this skillet cookie is no exception. While the foundation is classic, a few key players from my Mediterranean pantry are what make this recipe sing. Choosing quality here will make a world of difference in the final flavor of one of the best campfire desserts you'll ever taste.
Medjool Dates: Please, if you can, seek out Medjool dates for this recipe. Unlike their drier, smaller counterparts, Medjools are plump, soft, and have a deep, honeyed caramel flavor. When they bake, they don't just add sweetness; they melt into the dough, creating pockets of fudgy, chewy texture that are absolutely divine. They are the heart of the cookie's sweetness profile, allowing us to use a bit less refined sugar.
High-Quality Tahini: Tahini, a paste made from ground sesame seeds, is the secret weapon here. A good-quality tahini should be smooth, pourable, and have a rich, nutty flavor, not a bitter or chalky one. It adds a subtle savory depth that balances the sweetness of the dates and chocolate beautifully. It also contributes to the cookie's wonderfully soft and tender texture. Think of it as the bass note in a chord—it grounds all the other flavors.
Raw, Unsalted Pistachios: Their vibrant green color is a visual delight, but their flavor is the real prize. Pistachios have a delicate, slightly sweet, and almost floral nuttiness that pairs perfectly with dates and cardamom. Using raw, unsalted nuts allows you to control the seasoning and lets their true flavor shine. A rough chop provides a satisfying crunch that contrasts with the cookie's soft interior.
Chocolate Chunks: While chocolate chips are fine, I strongly advocate for using chocolate chunks or a roughly chopped high-quality chocolate bar (around 60-70% cacao). Chunks melt into glorious, molten pools rather than just holding their shape. This creates that gooey, pull-apart texture that is so satisfying in a skillet cookie. The slight bitterness of dark chocolate is essential to cut through the richness.
Ground Cardamom: This is the whisper of the Levant in this dessert. You don't need much, but a small amount of ground cardamom adds a warm, aromatic, and slightly citrusy spice that elevates the entire profile. It bridges the gap between the nutty tahini, sweet dates, and rich chocolate, making the whole thing taste more complex and intentional.
Flaky Sea Salt: This is a non-negotiable finishing touch. A generous sprinkle over the top before and after baking does two things: it adds a delicate, pleasing crunch, and its sharp salinity cuts through the sweetness, making every flavor pop. It's the final flourish that makes the dessert feel complete and keeps you coming back for another bite.
Building It Step by Step
The magic of this dessert is that it looks far more complicated than it is. The process is straightforward, and the campfire does most of the heavy lifting. The key to a relaxed experience, especially when you're outdoors, is preparation. Think of this as a two-act play: the prep at home, and the performance at the campsite.
Act I: The Home Prep. Before you even think about packing the car, you can get 90% of the work done. In one bag or container, whisk together your dry ingredients: flour, baking soda, cardamom, and salt. In a separate, well-sealed container, you can chop your dates and pistachios. This 'mise en place' is your best friend. It means that when you’re ready for dessert by the fire, you’re not fumbling with measuring spoons and multiple bags; you’re simply combining a few key components. You can even make the entire cookie dough at home, wrap it well, and store it in a cooler until you're ready to bake. This is the professional secret to effortless outdoor cooking.
Act II: The Campfire Assembly. Once the dinner embers are glowing beautifully, it’s showtime. Melt your butter in the cast-iron skillet right over the grate. Take it off the heat and stir in your sugars, followed by the eggs, vanilla, and the all-important tahini. Now, gently fold in your pre-mixed dry ingredients until just combined—over-mixing is the enemy of a tender cookie. Finally, stir in those glorious chocolate chunks, dates, and pistachios. All that's left is to press the dough evenly into the skillet it was mixed in. One-pan perfection.
The Cooking Process. This is where your campfire skills come into play. You don't want to cook this over a roaring flame; that's a recipe for a burnt bottom and a raw middle. You're looking for consistent, medium heat from a bed of hot embers. Place a grill grate over the embers and set your skillet on top. The goal is to bake, not to fry. Rotate the skillet every 5-7 minutes to ensure even cooking. You’ll know it’s ready when the edges are golden brown and set, and the center is still slightly soft and jiggly. It will look underdone, but trust the process. This is the secret to the perfect gooey texture for all great campfire desserts.
The All-Important Rest. This step is as crucial as the cooking itself. Once you pull the skillet from the heat, you must let it rest for at least 10-15 minutes on a heat-proof surface. During this time, the residual heat from the cast iron will continue to cook the center to gooey perfection. It allows the cookie to set up just enough so that when you scoop into it, it holds its shape without being liquid. This patience is rewarded tenfold with the perfect texture and a dessert that's cool enough to eat without injury. Sprinkle with that final flourish of flaky sea salt right before serving. This methodical approach transforms a simple recipe into a reliable masterpiece, cementing its status as one of the ultimate campfire desserts.
Presentation and Plating Tips
The rustic beauty of a skillet dessert is that it’s its own serving vessel. The presentation is built right in, celebrating a communal, family-style approach to eating that I absolutely adore. The key is to enhance its natural charm, not overcomplicate it.
Your primary strategy should be to serve it directly in the skillet. After its resting period, place the hot skillet on a thick wooden board or a sturdy trivet in the middle of your table or gathering circle. The dramatic reveal as you bring this sizzling, fragrant dessert to the center is part of the experience. Hand out spoons, and let everyone dig in. This act of sharing from a single pan creates a wonderful sense of togetherness and informality, which is perfect for an outdoor setting.
To elevate the look, think about garnishes that add a final layer of texture and flavor. Just before serving, a final, generous sprinkle of roughly chopped pistachios adds a pop of vibrant green. A light drizzle of tahini thinned with a tiny bit of water or maple syrup can create beautiful, artistic swirls across the top. And of course, that last scattering of flaky sea salt is essential for both taste and visual appeal, as the crystals catch the light.
For the ultimate indulgence, nothing beats a scoop of high-quality vanilla ice cream placed right in the center of the hot cookie. The contrast of hot and cold is sensational, and watching the ice cream slowly melt and ooze into the nooks and crannies of the cookie is pure theatre. For a lovely Levantine alternative, try a dollop of thick, tangy labneh or full-fat Greek yogurt. The tanginess provides a beautiful counterpoint to the cookie's sweetness. From a photography standpoint, the 'scoop shot' is king. Capture the moment a spoon pulls away a serving, stretching the molten chocolate and revealing the gooey interior. It’s a guaranteed showstopper for anyone's camera roll.
Scaling Up for a Crowd
One of the most frequent questions I get is how to adapt a recipe for a larger gathering, and this campfire skillet cookie is wonderfully suited for scaling. The joy of this dessert is in the sharing, so making sure there's enough to go around is key to a happy crowd. My primary advice is this: instead of trying to make one enormous skillet cookie, which can cook unevenly, it's far better to use two or even three 10-inch skillets. This ensures that each cookie bakes properly, with those perfect crispy edges and a gooey center, and it also means you can place them in different spots around the fire for more even heat distribution.
The secret to managing this for a crowd is all in the prep-ahead strategy. You can make the cookie dough for all the skillets up to three days in advance. Simply portion the dough for each skillet, wrap it tightly in plastic wrap or place it in a sealed container, and keep it refrigerated in a cooler. When you're ready to bake, let the dough sit out for about 30 minutes to take the chill off, which makes it easier to press into the pans. If you need even more of a head start, this dough freezes beautifully for up to a month. Just thaw it in the cooler overnight before you plan to bake.
For your cooking timeline, think in waves. If you only have space for one skillet at a time over the fire, that's perfectly fine. The first skillet can be served while the second one is baking. A skillet cookie stays warm for a surprisingly long time, so you don't need to have them all ready at the exact same moment. Have your toppings and garnishes—the ice cream, extra nuts, flaky salt—prepped and ready to go in bowls. This way, as each skillet comes off the fire and finishes its 10-minute rest, you can garnish and serve it immediately. This organized approach removes the stress and lets you enjoy the gathering, confident that a warm, gooey skillet of happiness is always just a few minutes away.
Storing Any Leftovers
While the concept of having leftover skillet cookie might seem purely theoretical, on the off chance you do find yourself with a portion remaining, it's important to store it properly to preserve its delicious texture. The enemy of a good cookie is air, which can make it dry and stale.
The best and simplest way to store leftovers is right in the cast-iron skillet itself. Once it has cooled completely to room temperature, cover the skillet tightly with a layer of plastic wrap, followed by a layer of aluminum foil for a good seal. Stored this way, the cookie will keep well at room temperature for a day, or in the refrigerator for up to three days. Keep in mind that refrigeration will change the texture; the cookie will become much firmer and denser, more like a fudgy brownie. This isn't necessarily a bad thing—it's delicious eaten cold right from the fridge!
To bring it back to its warm, gooey glory, reheating is key. You can reheat individual slices in the microwave for 20-30 seconds, but be careful not to overdo it, as this can make the cookie tough. The best method is to use the oven or the campfire again. For the whole skillet, place it in a preheated 325°F (160°C) oven for 10-15 minutes, or until warmed through. Alternatively, you can place it back on a grate over very low campfire embers, covered with foil to prevent the top from burning, until it's soft and the chocolate is re-melted. This gentle reheating will help restore that delightful, just-baked texture.
Variations to Explore
Once you've mastered the base recipe for this incredible campfire skillet cookie, it becomes a wonderful canvas for your culinary creativity. The formula is so versatile that you can swap in different ingredients to suit your taste, the season, or simply what you have on hand. Here are a few variations to get your imagination going:
-
The White Chocolate & Apricot Dream: For a brighter, fruitier version, swap the semisweet chocolate for high-quality white chocolate chunks and replace the Medjool dates with chopped dried apricots. The tartness of the apricots provides a beautiful contrast to the sweet, creamy white chocolate. A pinch of ground ginger or cinnamon in the dry ingredients would complement these flavors perfectly.
-
The Ultimate Nut-Lover's Swirl: If you love nutty flavors, lean into them. Substitute the pistachios with a combination of toasted walnuts and pecans. In place of the tahini, use a creamy almond butter or even a sunflower seed butter for a nut-free option. A swirl of this nut butter on top of the dough before baking creates a beautiful marbled effect and an extra layer of flavor.
-
The Citrus & Spice Edition: Brighten up the entire profile by adding the zest of one large orange to the wet ingredients. Orange has a classic and beautiful affinity for both chocolate and cardamom. The fresh citrus oils will permeate the dough, adding a fragrant, zesty note that cuts through the richness and makes the dessert feel even more special.
-
Individual Servings: For a more formal presentation or for easier portion control, you can bake the dough in individual 6-inch mini cast-iron skillets or oven-safe ramekins. The presentation is incredibly charming, and everyone gets their own personal dessert. You'll need to reduce the baking time significantly, so start checking them after about 12-15 minutes.
-
The Weeknight Oven Version: Don't wait for a camping trip to enjoy this treat! This recipe works perfectly in a conventional oven. Simply preheat your oven to 350°F (175°C), prepare the cookie as directed in your 10-inch cast-iron skillet, and bake on the center rack for 20-25 minutes. It’s the perfect, low-effort dessert for a cozy evening at home.
Questions You Might Have
Can I make the cookie dough ahead of time?
Absolutely! This is my preferred method for making campfire desserts as stress-free as possible. You can prepare the entire batch of dough, without the toppings, and store it in an airtight container in the refrigerator (or a well-iced cooler) for up to 3 days. Let it sit at room temperature for about 30 minutes before pressing it into the skillet to make it more pliable.
What if I don't have a cast-iron skillet?
While a cast-iron skillet gives the absolute best result with those coveted crispy edges, you can still make this dessert. An oven-safe stainless steel or even a sturdy tri-ply skillet will work over a campfire grate with careful heat management. If you're baking in a conventional oven, a 9 or 10-inch round cake pan or a pie dish will also work well; just be aware the texture of the edges might be a bit softer.
My skillet cookie burned on the bottom but is raw in the middle. What went wrong?
This is the most common challenge when cooking over a live fire, and it almost always means your heat source was too hot and too direct. You want to bake the cookie with ambient heat from glowing embers, not scorch it with active flames. Always use a grill grate to elevate the skillet above the coals, and make sure to rotate the pan every 5-7 minutes for even heat exposure.
Can I make this skillet cookie gluten-free?
Yes, you should be able to. I've had good success using a high-quality, measure-for-measure (or 1-to-1) gluten-free all-purpose flour blend in this recipe. The texture may be slightly more delicate or crumbly than the original, but it will still be incredibly delicious. Just ensure your blend contains xanthan gum or a similar binder.
How many people does one skillet cookie serve?
This is a very rich and decadent dessert, so a little goes a long way, especially when topped with ice cream. I find that one 10-inch skillet will comfortably serve 6-8 people, assuming everyone gets a generous scoop. If you have a larger crowd or very enthusiastic dessert eaters, I highly recommend making two skillets.
Gooey Campfire Skillet Cookie with Dates & Pistachios
The ultimate campfire dessert! A warm, gooey skillet cookie loaded with Medjool dates, pistachios, and a hint of cardamom, perfect for sharing under the stars.
Prep Time
20 min
Cook Time
25 min
Total Time
45 min
Servings
8 servings
Ingredients
For 8 servings
- 1 1/2 cups (180g) all-purpose flour
- 1/2 teaspoon baking soda
- 1/2 teaspoon ground cardamom
- 1/2 teaspoon kosher salt
- 1/2 cup (113g) unsalted butter
- 3/4 cup (165g) packed light brown sugar
- 1/4 cup (50g) granulated sugar
- 1 large egg
- 1 large egg yolk
- 2 teaspoons vanilla extract
- 1/4 cup (60g) well-stirred tahini
- 1 cup (170g) semisweet or dark chocolate chunks
- 3/4 cup (125g) Medjool dates, pitted and roughly chopped
- 1/2 cup (60g) raw, unsalted pistachios, roughly chopped
- Flaky sea salt, for sprinkling
- Vanilla ice cream or sweet labneh, for serving (optional)
Instructions
- 1
Prepare Fire and Skillet
Prepare your campfire, allowing it to burn down to a bed of medium-hot embers. Place a grill grate over the embers. Alternatively, preheat a conventional oven to 350°F (175°C). Have a 10-inch cast-iron skillet ready.
- 2
Whisk Dry Ingredients
In a medium bowl, whisk together the all-purpose flour, baking soda, ground cardamom, and kosher salt. This can be done at home and stored in a sealed bag for easy transport.
- 3
Melt Butter and Sugars
Place the 1/2 cup of unsalted butter in the cast-iron skillet and set it on the grill grate over the embers until just melted. Remove the skillet from the heat and stir in the light brown sugar and granulated sugar until well combined. The mixture will look like wet sand.
- 4
Incorporate Eggs and Vanilla
Add the large egg, large egg yolk, and vanilla extract to the skillet. Whisk vigorously until the mixture is smooth, glossy, and slightly lightened in color, about 30 seconds.
- 5
Add Tahini
Pour in the well-stirred tahini and continue to whisk until it is fully incorporated and the mixture is uniform. The tahini adds richness and a wonderful nutty flavor.
- 6
Combine Wet and Dry
Add the dry ingredient mixture to the wet ingredients in the skillet. Using a spatula or wooden spoon, gently fold everything together until just a few streaks of flour remain. Do not overmix.
- 7
Fold in Mix-Ins
Add the chocolate chunks, chopped Medjool dates, and most of the chopped pistachios to the dough, reserving a small handful of pistachios for the top. Gently fold until the mix-ins are evenly distributed throughout the dough.
- 8
Press Dough into Skillet
Using your spatula, spread the cookie dough evenly across the bottom of the cast-iron skillet. Sprinkle the top with the reserved pistachios and a generous pinch of flaky sea salt.
- 9
Cook Over Fire or Bake
Carefully place the skillet back on the grill grate over the embers. Cook for 20-25 minutes, rotating the skillet a quarter turn every 5-7 minutes to ensure even baking. If baking in an oven, place on the center rack and bake for 20-25 minutes.
- 10
Check for Doneness
The skillet cookie is done when the edges are set and golden brown, and the center is still slightly soft and appears a little under-baked. It will continue to cook from the residual heat of the skillet.
- 11
Rest and Garnish
Carefully remove the hot skillet from the fire or oven and place it on a heatproof surface. Let the cookie rest for at least 10-15 minutes. This step is crucial for the center to set into a perfect gooey texture.
- 12
Serve Warm
Sprinkle with another pinch of flaky sea salt just before serving. Serve the cookie warm, directly from the skillet, with large spoons for sharing. Top with scoops of vanilla ice cream or a dollop of sweet labneh, if desired.
Nutrition Facts
Per serving (estimated)
480 calories
Calories
55g
Carbs
8g
Protein
26g
Fat
4g
Fiber
250mg
Sodium
35g
Sugar