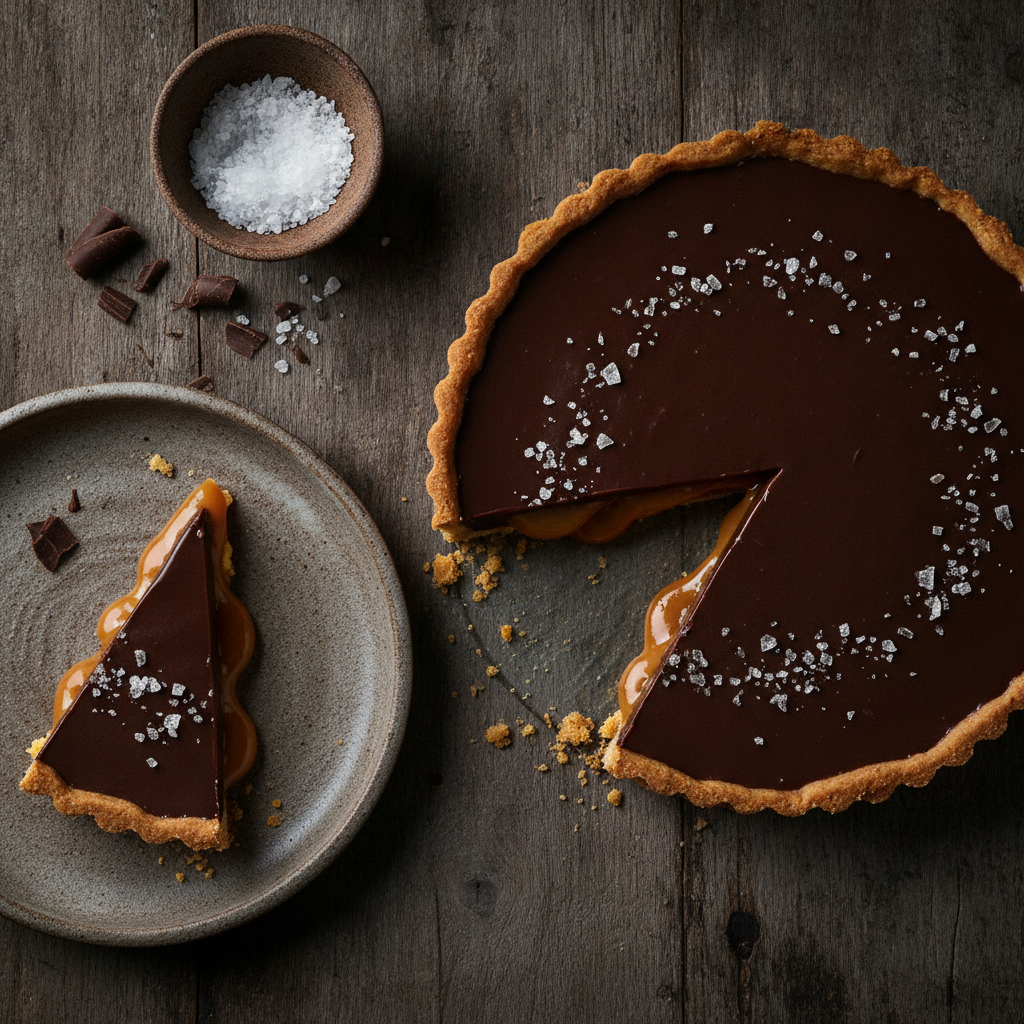
Easy Chocolate Salted Caramel Tart (Budget-Friendly!)
Indulge in a decadent Chocolate Salted Caramel Tart without the bakery price tag! This easy, budget-friendly recipe is pure, show-stopping bliss.
cookwithyara.com/recipes/chocolate-salted-caramel-tart
There’s a common belief that truly spectacular food, the kind that hushes a room and makes eyes widen, must come with a hefty price tag. We walk past glowing patisserie windows, admiring glossy tarts and intricate desserts, and assume they are creations reserved for special occasions and professional kitchens. I am here today, with all my heart, to tell you that this is simply not true. The most profound and delicious flavors often come from the simplest, most humble ingredients, transformed by care and technique.
This Chocolate Salted Caramel Tart is the ultimate proof. It looks like a million dollars, tastes like pure indulgence, and yet, it’s one of the most budget-friendly showstoppers you can make. With a crisp, buttery crust, a layer of soft, chewy caramel, and a silky-smooth chocolate ganache topping, it’s a symphony of textures and tastes. That final sprinkle of flaky sea salt is the secret that elevates it from merely sweet to utterly sublime, cutting through the richness and making every flavor pop.
We’re talking about a dessert that can serve over ten people, with each slice costing less than a simple coffee shop pastry. It’s a recipe built almost entirely from pantry staples—flour, sugar, butter, chocolate—things you might already have on hand. So, let’s dismiss the notion that elegance is expensive. Today, we’re making a restaurant-quality Chocolate Salted Caramel Tart that proves the greatest luxury in the kitchen is knowledge, not a big budget.
Why This Recipe Is a Budget Winner
When I design recipes, I’m always thinking about value—not just in terms of cost, but in flavor, satisfaction, and the joy it brings to the table. This Chocolate Salted Caramel Tart ticks every single box, but its budget-friendliness is truly something to celebrate. It’s a masterpiece of culinary economics, proving that you don’t need to spend a lot to create something truly memorable.
The foundation of this tart is built on the most basic, and therefore most affordable, pantry staples. Flour, sugar, and butter are the workhorses of the baking world for a reason. They are accessible, inexpensive, and versatile. The shortbread crust, or pâte sablée, requires just a few simple ingredients, yet yields a base that is wonderfully crisp, tender, and far more delicious than any pre-made shell you could buy. Making it from scratch not only gives you superior flavor and texture but costs mere pennies.
The real magic in the savings comes from the homemade salted caramel. A small jar of pre-made caramel sauce from a gourmet shop can be surprisingly pricey. But what is caramel? It's simply sugar, cooked until it transforms into a beautiful amber liquid, enriched with cream and butter. A large bag of sugar costs very little and can be used for dozens of recipes. By taking ten minutes to make your own, you are unlocking an incredible depth of flavor for a fraction of the retail cost. It’s an empowering and delicious lesson in kitchen alchemy.
Finally, think about the yield. This is not a single-serving dessert. One 9-inch tart can be sliced into 10 or even 12 elegant, rich portions. Because of its decadent nature, a small slice is deeply satisfying. When you compare the total cost of the ingredients to the price of a single slice of a similar tart at a bakery—which can often be upwards of five or six dollars—the value is astounding. You can serve a whole gathering of family and friends a truly stunning dessert for the price of two or three bakery slices. This is how we cook smart: with an eye on both flavor and finances.
Affordable Ingredients, Maximum Impact
Great cooking is about understanding how to coax the most flavor out of each ingredient. For this Chocolate Salted Caramel Tart, we rely on simple, accessible components that work together in perfect harmony. You don't need fancy, imported products; the magic is in the technique and the quality you can find right in your local grocery store.
For the Buttery Crust: The foundation is all-purpose flour, unsalted butter, and powdered sugar. All-purpose flour is the perfect choice here, providing enough structure without making the crust tough. The real key is using very cold butter, cut into small cubes. This creates tiny pockets of fat in the dough, which release steam during baking and result in a wonderfully flaky, tender texture. I prefer powdered sugar over granulated for this type of crust, as it dissolves more easily and contributes to a finer, melt-in-your-mouth crumb. A single egg yolk binds it all together and adds a touch of richness.
For the Golden Salted Caramel: This is where the transformation happens. We start with simple granulated sugar. When heated, it undergoes the beautiful process of caramelization, developing complex, nutty, and slightly toasted flavors. To turn this into a soft, flowing caramel, we enrich it with heavy cream and unsalted butter. While heavy cream can sometimes be a splurge item, a small carton is all you need, and the richness it provides is irreplaceable. A touch of light corn syrup is my secret weapon; it’s an invert sugar, which means it helps prevent the caramel from crystallizing and becoming grainy, ensuring a perfectly smooth texture every time. And of course, salt—a fine sea salt mixed in, and flaky sea salt for the top. Salt is a flavor enhancer, and in this tart, it's a star player, balancing the sweetness and making the chocolate and caramel notes sing.
For the Silky Chocolate Ganache: Ganache is the epitome of simple elegance. It is a perfect emulsion of just two ingredients: chocolate and heavy cream. The ratio is everything. For this tart, we use a ratio that allows the ganache to set to a firm-yet-fudgy consistency, easy to slice but not runny. The choice of chocolate is important. You don’t need the most expensive brand, but I recommend using a good-quality baking bar (around 60-70% cacao) rather than chocolate chips. Chips often contain stabilizers to help them keep their shape, which can prevent them from melting as smoothly. A dark chocolate provides a deep, slightly bitter counterpoint to the sweet caramel, creating a balanced and sophisticated dessert. Store-brand baking bars are often excellent and very affordable.
A Step-by-Step Journey to Your Perfect Chocolate Salted Caramel Tart
Making this tart is a mindful, rewarding process broken down into four distinct, manageable stages. Each step builds upon the last, culminating in a dessert that is truly a work of art. Don't be intimidated by the multiple components; each one is simple on its own. Let’s walk through the journey together.
Stage 1: Mastering the Buttery Crust. We begin with the foundation. The key to a perfect shortbread crust is keeping everything cold and handling the dough as little as possible. You'll combine the flour, powdered sugar, and salt, then cut in the cold, cubed butter until the mixture resembles coarse breadcrumbs. The egg yolk and a splash of cold water bring it all together into a cohesive dough. Instead of rolling it, I love to press it directly into the tart pan with my fingers. It's easier, less fussy, and ensures an even thickness. The most crucial step here is to let the crust chill thoroughly in the freezer. This relaxes the gluten and solidifies the fat, which is the secret to preventing it from shrinking during baking. After a quick chill, we'll blind bake it—baking the shell on its own—until it's a pale, golden brown. This ensures your crust stays crisp even after it’s filled.
Stage 2: The Alchemy of Golden Caramel. While the crust cools, we turn our attention to the heart of the tart: the salted caramel. This part feels like magic, but it’s pure kitchen science. You’ll gently heat sugar, corn syrup, and water in a saucepan, watching as it transforms from a clear syrup to a bubbling, beautiful amber liquid. Patience is key here; don't stir, just swirl the pan gently. The moment it reaches that perfect color, you’ll carefully whisk in the warm heavy cream. It will bubble up dramatically—this is normal!—then settle down. Off the heat, you'll stir in the butter and salt. The result is a smooth, luscious caramel that smells absolutely divine. You’ll pour this liquid gold into your cooled tart shell and let it set in the refrigerator until firm.
Stage 3: Creating a Silky, Dreamy Ganache. With the caramel chilling, it's time for the final layer. Ganache is beautifully simple. You'll gently heat the heavy cream until it's just simmering around the edges. Then, you pour this warm cream over your finely chopped dark chocolate. Let it sit for a few minutes to allow the heat to gently melt the chocolate, then slowly stir until it comes together in a glossy, completely smooth emulsion. It will look broken at first, but keep stirring gently, and it will magically transform. This gentle method prevents the chocolate from overheating and seizing.
Stage 4: The Grand Assembly and Final Flourish. This is the moment it all comes together. Retrieve your tart with its set caramel layer. Pour the warm, smooth ganache over the top, gently tilting the pan to spread it into an even, beautiful layer. The final touch, the one that makes this a true Chocolate Salted Caramel Tart, is a generous sprinkle of flaky sea salt over the ganache. Those little crystals provide a delightful crunch and a burst of flavor that balances the richness perfectly. All that's left is to let the tart chill one last time, allowing the ganache to set completely before slicing and serving your masterpiece.
Making It Go Further: Portions, Presents, and Possibilities
One of the most wonderful things about a recipe like this Chocolate Salted Caramel Tart is how its richness allows it to be stretched in elegant ways. This isn't just about leftovers; it's about a mindset of abundance and zero waste, turning one baking project into multiple moments of joy.
First, let's talk about serving. Because this tart is so intensely flavorful—with the crisp butteriness of the crust, the deep sweetness of the caramel, and the rich complexity of the dark chocolate—a small slice is genuinely all you need to feel satisfied. Instead of cutting eight large wedges, try slicing it into 12 or even 16 slender, elegant portions. This allows the tart to serve a much larger gathering, making it an ideal dessert for family dinners or get-togethers. Paired with a simple cup of coffee or mint tea, a small slice feels like a complete, luxurious experience.
This tart also makes a phenomenal homemade gift. The effort and care you put into it are evident in every bite, and it’s a far more personal and memorable offering than something store-bought. You can make mini tarts in individual tartlet pans for beautiful, single-serving gifts. Placed in a small box and tied with a ribbon, they become a thoughtful and affordable present for hosts, neighbors, or friends. It’s a way to share something special without breaking the bank.
Embrace the idea of component cooking. If you find yourself with extra shortcrust dough, don't discard it! Roll it out and cut it into simple cookies, baking them until golden. They are delicious on their own or with a cup of tea. If you happen to make a little too much caramel sauce, pour it into a clean jar. It will keep in the refrigerator for a couple of weeks and can be gently reheated to pour over scoops of ice cream, stir into your morning coffee, or use as a dip for apple slices. By viewing the components as valuable in their own right, you ensure nothing goes to waste and you get even more value from your initial effort.
Creative Twists on a Classic: Swaps and Variations
While the classic Chocolate Salted Caramel Tart is perfection on its own, one of the joys of home baking is the ability to add your own personal touch. This recipe is a fantastic canvas for experimentation. Here are a few ideas to inspire you, some with a nod to my own Levantine kitchen.
Crust Chronicles: The buttery shortbread crust is a classic, but you can easily change its character. For a deeper, richer flavor, transform it into a chocolate crust by replacing a few tablespoons of the flour with an equal amount of unsweetened cocoa powder. For a no-roll alternative, create a press-in crust using finely crushed digestive biscuits or plain cookies mixed with melted butter. If you enjoy nutty flavors, substituting a portion of the all-purpose flour with almond flour will give the crust a tender texture and a lovely marzipan-like note.
Caramel Infusions: The caramel layer is ripe for fragrant infusions. To add a touch of warm spice, gently heat the heavy cream with a cinnamon stick or a few bruised cardamom pods before you begin the caramel-making process. Let the spices infuse for about 20 minutes, then strain the cream and proceed with the recipe. This adds a subtle, aromatic depth that is absolutely beautiful. For a floral, Middle Eastern twist, stir a scant teaspoon of orange blossom water into the finished caramel along with the butter and salt. A little goes a long way, but it adds an intoxicating perfume.
Ganache Glam-Up: The dark chocolate ganache is a perfect foil for the sweet caramel, but it can be enhanced too. To intensify the chocolate flavor, dissolve a teaspoon of instant espresso powder into the warm cream before pouring it over the chocolate. Coffee has a magical ability to make chocolate taste more chocolatey. For a truly unique and delicious variation, add a tablespoon of tahini to the finished ganache. The nutty, savory notes of sesame paste are a stunning complement to dark chocolate and create a dessert that feels both familiar and excitingly new. You could even create a beautiful swirl on top by drizzling tahini over the ganache before it sets.
Storing Your Masterpiece: Tips for Freshness
Once you’ve created your beautiful Chocolate Salted Caramel Tart, you'll want to store it properly to keep it tasting its best. Because of its different components, particularly the dairy-based caramel and ganache, this tart must be kept in the refrigerator.
Store the tart in an airtight container or a cake box in the fridge. This is important to protect it from absorbing any other refrigerator odors and to keep the surface of the ganache from drying out. Properly stored, the tart will stay fresh and delicious for up to 4 days. In fact, many people find that the flavor and texture are even better on the second day, as the flavors have had time to meld and settle. The crust will soften slightly over time as it absorbs moisture from the fillings, but it will still be delicious.
One pro tip to help maintain a crisp crust for longer is to brush the inside of the fully blind-baked and cooled crust with a very thin layer of melted dark chocolate or even a whisked egg white (and baking for another minute) before filling. This creates a barrier that helps prevent moisture from the caramel from seeping into the pastry.
Can you freeze this tart? Yes, you can! For best results, freeze it whole before its final sprinkle of salt. Let it set completely in the refrigerator first, then wrap it very well in several layers of plastic wrap, followed by a layer of aluminum foil. This will protect it from freezer burn. It can be frozen for up to one month. To serve, thaw it overnight in the refrigerator (do not thaw at room temperature). Once fully thawed, add the fresh sprinkle of flaky sea salt just before slicing. You can also freeze individual slices, which is perfect for a quick, decadent treat.
Your Chocolate Salted Caramel Tart Questions Answered
Why did my caramel get grainy or crystallize?
Crystallization happens when the sugar molecules clump back together into a grainy texture. This is often caused by stray sugar crystals on the side of the pan or by over-agitating the sugar as it cooks. To prevent this, you can wipe down the sides of the pan with a wet pastry brush as the sugar melts. The inclusion of corn syrup in this recipe also acts as an insurance policy, as it interferes with the formation of large sugar crystals, keeping your caramel smooth.
My tart crust shrank during baking! What went wrong?
Shrinkage is a common issue and it usually happens for two reasons: the dough was overworked, or it wasn't chilled enough. Overworking the dough develops gluten, which makes the pastry elastic and prone to shrinking when heated. Chilling the dough thoroughly before baking is essential—it allows the gluten to relax and solidifies the butter, which helps the crust hold its shape. A good 30 minutes in the freezer before it goes into the oven makes all the difference.
Can I make this tart ahead of time for a gathering?
The components of this Chocolate Salted Caramel Tart are perfect for making in advance. You can prepare and blind-bake the tart shell up to two days ahead; just store it in an airtight container at room temperature. The caramel and ganache can be made and the tart assembled one full day before you plan to serve it. This actually improves the tart, as it gives it ample time to set completely and for the flavors to meld together.
What's the most budget-friendly good-quality chocolate to use?
You don't need to buy expensive, imported chocolate for a fantastic result. My best tip is to look for supermarket own-brand baking bars, often found in the baking aisle. These are specifically formulated for melting and often have a great flavor and a high percentage of cocoa solids for a reasonable price. They are almost always a better choice than chocolate chips, which contain extra ingredients that can affect the texture of your ganache.
My ganache split and looks oily. Can I fix it?
A split ganache happens when the emulsion breaks, usually because it was overheated or the fat-to-liquid ratio is off. But don't panic, it can often be fixed! Let the ganache cool down slightly, then add a tablespoon of cool (not cold) heavy cream or milk and whisk vigorously from the center outwards. This will often help the emulsion come back together into a smooth, glossy state.
How can I serve this for a very large crowd without making three tarts?
For a large gathering, consider making the tart in a 13x9 inch rectangular tart pan with a removable bottom. This shape makes portioning for a crowd incredibly easy. Instead of wedges, you can cut the tart into small, neat squares or bars. A rectangular tart looks just as stunning and allows you to get many more servings from a single recipe, making your budget-friendly dessert stretch even further.
Chocolate Salted Caramel Tart
A decadent and beautiful Chocolate Salted Caramel Tart featuring a crisp, buttery shortbread crust, a soft and chewy salted caramel filling, and a silky smooth dark chocolate ganache. An impressive dessert that's surprisingly budget-friendly.
Prep Time
25 min
Cook Time
35 min
Total Time
5h
Servings
10-12 servings
Ingredients
For 10-12 servings
- For the Shortbread Crust:
- 1 1/2 cups (190g) all-purpose flour
- 1/2 cup (60g) powdered sugar
- 1/4 teaspoon fine sea salt
- 1/2 cup (113g) unsalted butter, cold and cut into 1/2-inch cubes
- 1 large egg yolk
- 1 tablespoon ice-cold water
- For the Salted Caramel Filling:
- 1 cup (200g) granulated sugar
- 1/4 cup (60ml) water
- 2 tablespoons light corn syrup
- 1/2 cup (120ml) heavy cream, warmed
- 1/4 cup (57g) unsalted butter, at room temperature
- 1 teaspoon fine sea salt
- For the Chocolate Ganache:
- 6 oz (170g) dark or semi-sweet chocolate (60-70% cacao), finely chopped
- 2/3 cup (160ml) heavy cream
- 1 tablespoon flaky sea salt, for finishing
Instructions
- 1
Prepare the Crust Dough
In a food processor, pulse the flour, powdered sugar, and fine sea salt to combine. Add the cold, cubed butter and pulse until the mixture resembles coarse breadcrumbs with some pea-sized butter pieces remaining. In a small bowl, whisk the egg yolk and cold water, then add it to the flour mixture and pulse just until the dough starts to come together.
- 2
Form and Chill the Crust
Turn the dough out onto a clean surface and gently form it into a disk. Place it in a 9-inch tart pan with a removable bottom. Use your fingers and the heel of your hand to press the dough evenly across the bottom and up the sides of the pan. Prick the bottom with a fork, then place the tart shell in the freezer for at least 30 minutes to chill thoroughly.
- 3
Blind Bake the Crust
Preheat your oven to 375°F (190°C). Line the chilled tart shell with parchment paper and fill with pie weights or dried beans. Bake for 15-18 minutes, until the edges are lightly golden. Carefully remove the parchment and weights, then bake for another 10-12 minutes, until the bottom is dry and golden brown. Let cool completely.
- 4
Begin the Caramel
In a medium, heavy-bottomed saucepan, combine the granulated sugar, water, and corn syrup. Cook over medium heat, stirring gently only until the sugar dissolves. Once it comes to a simmer, stop stirring and allow it to cook, swirling the pan occasionally, for 8-12 minutes.
- 5
Finish the Caramel
Continue to cook the sugar syrup until it turns a deep amber color. Immediately remove from the heat and carefully, slowly pour in the warm heavy cream while whisking constantly. The mixture will bubble up vigorously. Once the bubbling subsides, whisk in the room temperature butter and fine sea salt until completely smooth.
- 6
Fill and Chill the Tart Shell
Pour the hot caramel into the completely cooled tart crust, spreading it into an even layer. Place the tart in the refrigerator and chill for at least 2 hours, or until the caramel is firm to the touch.
- 7
Prepare the Ganache
Place the finely chopped dark chocolate in a medium heatproof bowl. Heat the heavy cream in a small saucepan over medium heat until it just begins to simmer around the edges. Do not let it boil.
- 8
Emulsify the Ganache
Pour the hot cream over the chopped chocolate and let it sit undisturbed for 5 minutes to melt the chocolate. Starting from the center of the bowl, begin to stir in small circles with a spatula. Continue stirring, widening the circles, until the mixture comes together into a smooth, glossy ganache.
- 9
Assemble the Final Tart
Pour the warm ganache over the set caramel layer in the tart shell. Gently tilt the pan to spread the ganache evenly to the edges. Let the tart sit at room temperature for 15 minutes to slightly cool.
- 10
Final Chill and Garnish
Sprinkle the top of the ganache evenly with the flaky sea salt. Place the tart back in the refrigerator and chill for at least 2 more hours, or until the ganache is fully set. For best results, let the tart sit at room temperature for 15-20 minutes before slicing and serving to take the chill off.
Nutrition Facts
Per serving (estimated)
480 calories
Calories
55g
Carbs
5g
Protein
28g
Fat
3g
Fiber
250mg
Sodium
40g
Sugar