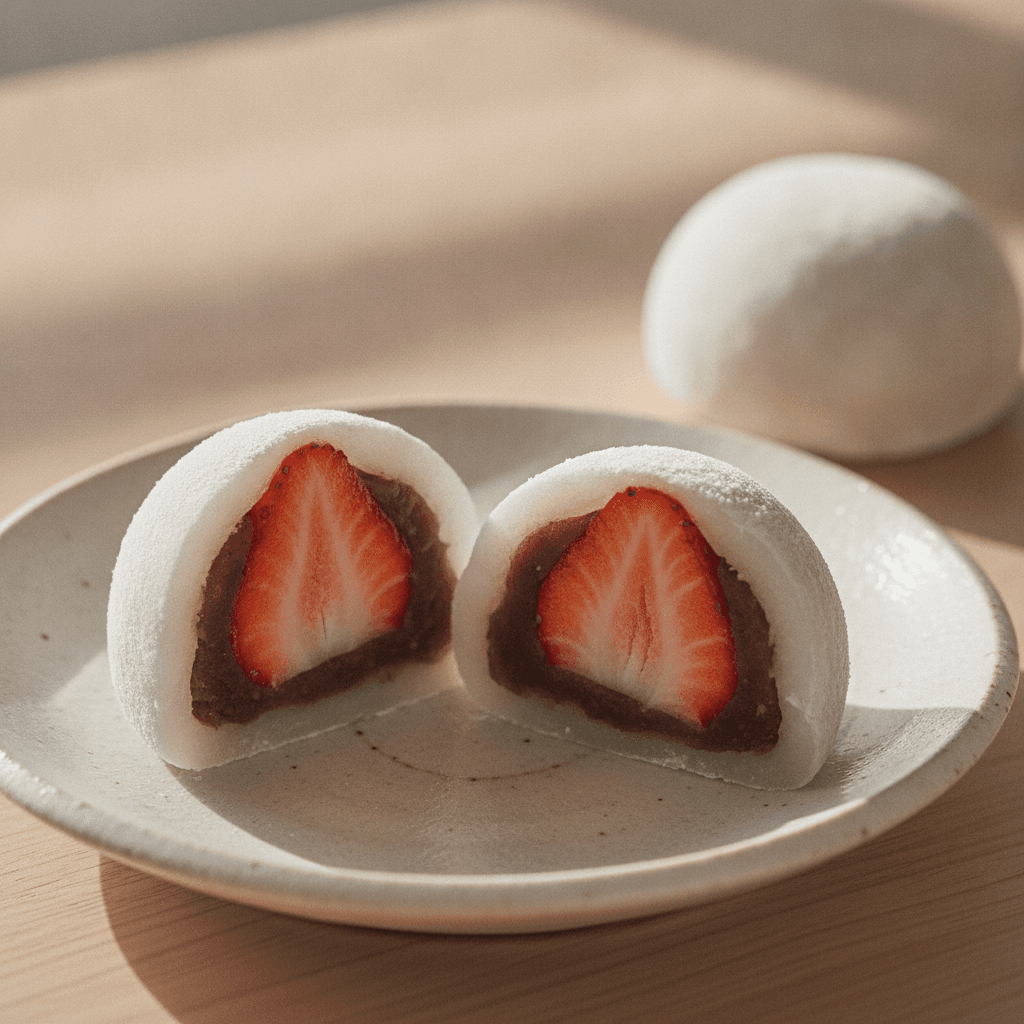
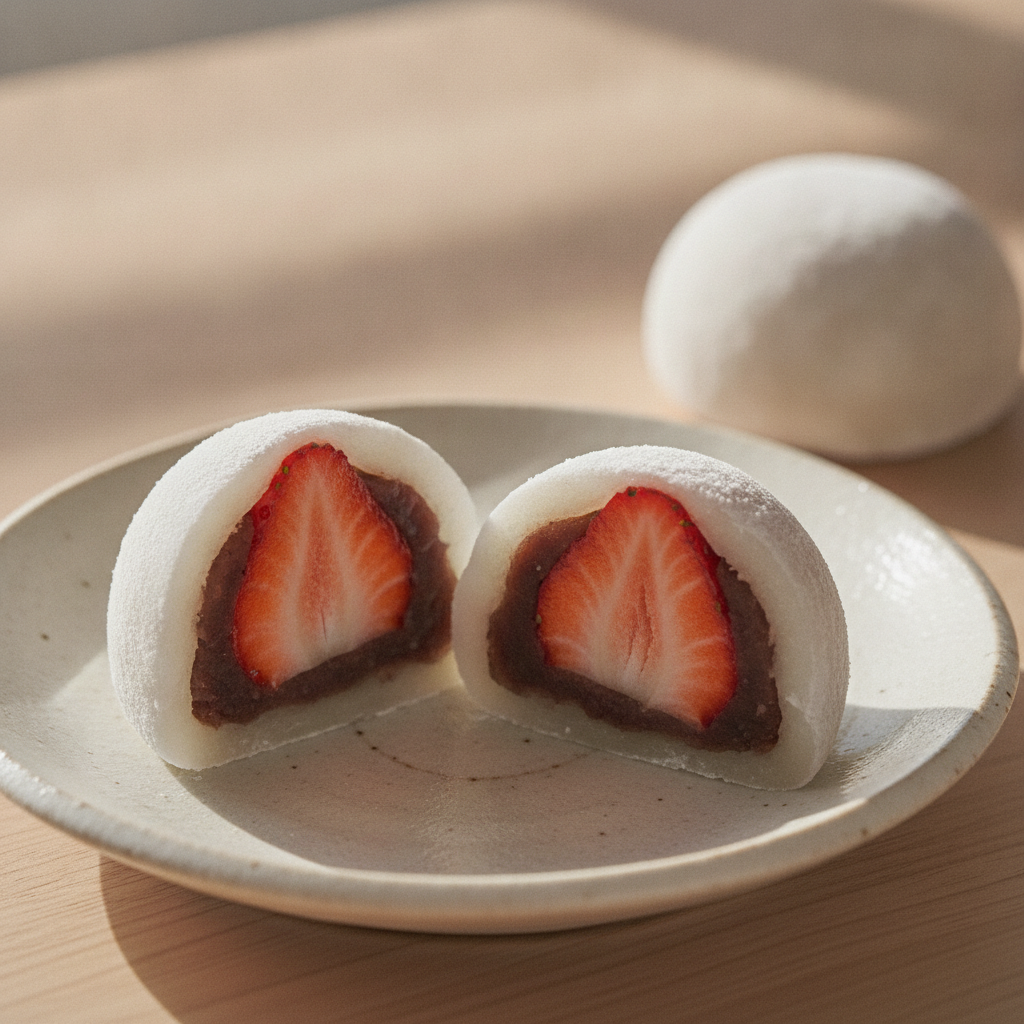
Soft Strawberry Mochi Recipe (Ichigo Daifuku)
Learn to make the best strawberry mochi! My delicious strawberry mochi recipe is soft, chewy, and filled with sweet red bean paste and a fresh berry.
cookwithyara.com/recipes/delicious-strawberry-mochi-recipe-a-sweet-taste
There’s a special kind of magic in creating something that is both incredibly simple in its components and wonderfully complex in its texture. That’s the feeling I get every time I work with mochi dough. It’s a culinary craft that, once you understand it, unlocks a world of delicate, delightful sweets. The goal is a confection that is ethereally soft, with a gentle chew that yields to a sweet filling and, in this case, the bright, juicy burst of a fresh strawberry. This is the heart of our Delicious Strawberry Mochi Recipe.
Many of us look at these perfect little morsels, called Ichigo Daifuku in Japanese, and assume they are far too difficult to create in a home kitchen. The texture seems too perfect, the wrapping too neat. I’m here to tell you that this beautiful art is entirely within your reach. The intimidation melts away once you understand the why behind each step—why we use a specific flour, why the dough is steamed or microwaved, and why it must be handled while warm. Once you grasp these fundamentals, the how becomes an easy, rhythmic process. So let’s demystify this beautiful treat and create something truly special together.
The Science Behind the Perfect Chew
At its core, the unique and utterly addictive texture of mochi comes down to one key scientific process: starch gelatinization. The flour we use, glutinous rice flour (often called mochiko or shiratamako), is composed almost entirely of a type of starch called amylopectin. Unlike the long chains of amylose found in regular rice flour, amylopectin has a highly branched structure. When you mix this flour with water and introduce heat, these branches unfurl and trap water molecules, swelling into a thick, translucent, and sticky gel. This process is what transforms a simple white powder into the elastic, chewy dough that defines mochi. Understanding this helps you appreciate why a delicious strawberry mochi recipe depends so heavily on the right kind of flour.
The sugar in the recipe does more than just add sweetness. It’s hydrophilic, meaning it loves water. By attracting water molecules, sugar acts as a tenderizer, preventing the starch molecules from binding too tightly. This results in a softer, more pliable mochi that stays fresh for longer. It also helps prevent starch retrogradation—the process where the starch molecules recrystallize and push water out, causing the mochi to become hard and stiff. This is why mochi is best enjoyed fresh and why proper storage is key to preserving that signature pillowy texture. Every step, from heating to kneading, is designed to perfect this delicate balance of gelatinized starches and sugar, creating that perfect, satisfying chew.
Tools and Ingredients You'll Need
While this delicious strawberry mochi recipe might seem exotic, the components are surprisingly straightforward. Your success starts with sourcing the right ingredients, as they are the foundation of the final product's texture and flavor. First and foremost is glutinous rice flour. Look for packages labeled “mochiko” or “shiratamako.” While both are glutinous rice flours, shiratamako is made from a different milling process that results in a slightly smoother, more elastic dough, making it a wonderful choice for beginners. Regular rice flour will not work; it lacks the high amylopectin content needed for that signature chew.
Next, you’ll need a sweet filling. Traditional Ichigo Daifuku uses anko, a sweet red bean paste made from azuki beans. You can find this pre-made in cans or packages at most Asian grocery stores. For a lovely contrast, you could also seek out shiroan, a white bean paste. And of course, the star of the show: fresh strawberries. Choose small to medium-sized berries that are ripe, sweet, and firm. For dusting your work surface and preventing sticking, you’ll need either cornstarch or potato starch (katakuriko). As for tools, you don’t need much. A microwave-safe bowl (preferably glass or ceramic), a sturdy silicone spatula, a dough scraper, and a digital kitchen scale for accuracy are all you truly need. A steamer can be used instead of a microwave, which provides a more gentle, even heat for cooking the dough. No matter your equipment, the path to homemade mochi is clear.
The Method, Step by Step
A successful batch of strawberry mochi is all about workflow and understanding the feel of the dough at each stage. Before you even think about the mochi itself, prepare your fillings. Gently wash and hull your strawberries, patting them completely dry. Moisture is the enemy of a clean seal. Then, portion your anko (red bean paste) and flatten it into small discs. Gently wrap each strawberry in a thin, even layer of anko, rolling it between your palms to create a smooth ball. Place these on a lined tray and let them chill slightly; this firms them up and makes the final wrapping process much easier.
Now for the mochi dough. In your microwave-safe bowl, whisk together the glutinous rice flour and sugar. Gradually stream in the water, whisking continuously until you have a smooth, milky, lump-free batter. Cover the bowl loosely with plastic wrap and microwave it on high for about one minute. The mixture will start to set around the edges. Take it out and give it a thorough stir with a wet silicone spatula. This initial stir is crucial for even cooking. Cover and microwave again for another minute. The dough will become more translucent and much thicker. Give it one final, vigorous stir. If it's still opaque or milky in spots, give it another 30 seconds. The final dough should be very sticky, shiny, and almost fully translucent. This is the texture you're looking for in any great strawberry mochi recipe.
Immediately turn the hot dough out onto a surface generously dusted with cornstarch or potato starch. Be careful, as it will be very hot. Dust the top of the dough and your hands as well. Now, you’ll knead it briefly. Fold the dough over onto itself a few times. This step develops its structure and chewiness. Once it’s a cohesive, smooth mass, use a dusted dough scraper to divide it into equal portions. Working one piece at a time, flatten it into a disc, keeping the center slightly thicker than the edges. Place a chilled anko-wrapped strawberry in the center and gently pull the edges of the mochi up and around it, pinching them together at the base to seal completely. Roll it gently in your hands to perfect the shape, brush off any excess starch, and your beautiful, homemade mochi is ready to be enjoyed.
Troubleshooting Your Strawberry Mochi
Even the most carefully followed recipe can sometimes present challenges, but don't worry! Most issues with this delicious strawberry mochi recipe are easy to fix or learn from. Let's walk through a few common hurdles.
If your mochi dough is unbearably sticky: This is normal! Mochi is inherently sticky. The key is to use enough dusting starch (cornstarch or potato starch) on your hands, your work surface, and your tools. Don't be shy with it. If the dough is still too difficult to handle, it might be slightly undercooked. A fully cooked dough will be more translucent and cohesive, making it a bit easier to manage once it cools slightly. Ensure you've microwaved or steamed it until it's no longer milky or opaque.
If the mochi tears while you're wrapping: This usually happens for one of two reasons. Either the dough was rolled too thin, or the filling is too large. When you flatten your mochi portions, try to keep the center of the disc slightly thicker than the edges. The edges are what you'll be stretching and pulling, so they need to be more delicate. Also, choose small to medium-sized strawberries to ensure the mochi can comfortably enclose the entire filling.
If your mochi hardens quickly: This is due to a process called starch retrogradation. Mochi is at its softest peak right after it's made. To slow this process, make sure your dough was fully cooked and that you used the correct ratio of sugar, as sugar helps keep it soft. Storing it in an airtight container at a cool room temperature is best. The refrigerator is the fastest way to make mochi hard and firm, so avoid it unless absolutely necessary.
If the red bean paste is too soft or sticky: Some store-bought anko can be quite soft, making it difficult to wrap around the strawberries. If you find yours is too messy, you can chill it in the refrigerator for 30-60 minutes before using it. This will firm it up considerably, making the process much cleaner and easier. This little tip can make executing the perfect strawberry mochi recipe a much more pleasant experience.
Taking It to the Next Level
Once you've mastered the classic delicious strawberry mochi recipe, a world of creative variations opens up. This foundational technique is a canvas for your culinary imagination. The simplest way to innovate is by changing the filling. Instead of red bean paste, try using shiroan (white bean paste) for a milder, more delicate flavor that allows the strawberry to shine even brighter. You could also experiment with pastes made from black sesame, peanuts, or even a simple scoop of a thick, creamy chocolate spread for a decadent twist.
The dough itself is also ripe for experimentation. Add a teaspoon of high-quality matcha powder to the dry ingredients for a beautiful green tea mochi with a subtle, earthy bitterness that pairs wonderfully with the sweet anko and strawberry. A pinch of ground cardamom or cinnamon could lend a warm, spiced note reminiscent of Levantine desserts. For a beautiful visual effect, you can even add a drop of natural food coloring to the batter before cooking it. Imagine soft pink mochi for a more strawberry-forward theme, or a pale yellow colored with a pinch of turmeric. These small adjustments transform a familiar treat into a personalized masterpiece.
Storing Your Results
Proper storage is essential to preserve the unique, pillowy texture of your homemade strawberry mochi. The number one rule is to avoid the refrigerator whenever possible. The cold, dry environment of a fridge accelerates starch retrogradation, causing the mochi to become firm, hard, and lose its signature chewiness in a matter of hours. This is the biggest mistake people make after successfully creating their own batch.
For the best experience, this delicious strawberry mochi recipe is meant to be enjoyed the day it is made, preferably within a few hours. If you must store it, place the mochi in a single layer in an airtight container. Make sure they aren't touching, or place a small piece of parchment paper between them to prevent sticking. Keep the container in a cool, dark place at room temperature. They will remain pleasantly soft for up to 24 hours. After that, you will notice a significant decline in texture. If you've made a large batch, it's best to share them with friends and family for immediate enjoyment!
Common Questions
Can I use regular all-purpose flour instead of glutinous rice flour?
Absolutely not. The unique chewy, elastic texture of mochi comes specifically from glutinous rice flour (like mochiko or shiratamako), which is very high in a starch called amylopectin. Regular flour has a different starch and protein composition and will result in a pasty, gummy dough, not the soft, stretchy mochi you desire. It is the most critical ingredient in any strawberry mochi recipe.
Is it possible to make this recipe without a microwave?
Yes, of course! Steaming is the more traditional method for cooking mochi dough. To do this, place the bowl of batter in a steamer basket set over simmering water. Cover and steam for about 15-20 minutes, stirring halfway through, until the dough is cooked through and translucent. This method provides gentle, even heat and is preferred by many mochi purists.
My strawberries are very juicy. Will that be a problem?
Juicy strawberries are delicious, but excess moisture can make the mochi soggy from the inside out and can make it difficult to seal. The key is to pat the strawberries completely dry with a paper towel after washing and hulling them. Creating a complete, sealed barrier with the anko paste also helps to contain the strawberry's moisture and protect the delicate mochi skin.
How far in advance can I make these for a gathering?
Mochi is truly at its textural peak on the day it is made. I would strongly recommend making them the morning of your gathering for the best possible quality. You can prepare the anko-wrapped strawberry fillings a day in advance and keep them chilled in an airtight container to save some time on the day of assembly.
Can I freeze strawberry mochi?
While you can technically freeze mochi, it's generally not recommended for Ichigo Daifuku. The fresh strawberry inside does not freeze and thaw well; its texture will become very soft and mushy, and it will release a lot of water, which will ruin the mochi. It is one of those special treats best enjoyed fresh. Making this delicious strawberry mochi recipe is a celebration of the present moment!
Strawberry Mochi (Ichigo Daifuku)
A step-by-step guide to making soft, chewy, and perfectly sweet Strawberry Mochi (Ichigo Daifuku) at home with a fresh strawberry and red bean paste filling.
Prep Time
30 min
Cook Time
5 min
Total Time
35 min
Servings
12 pieces
Ingredients
For 12 pieces
- 1 cup (160g) glutinous rice flour (mochiko or shiratamako)
- 1/4 cup (50g) granulated sugar
- 1 cup (240ml) water
- 1 cup (300g) sweet red bean paste (anko)
- 12 small to medium-sized fresh strawberries
- 1/2 cup (60g) cornstarch or potato starch, for dusting
Instructions
- 1
Prepare the Strawberries
Gently wash and hull the strawberries. Pat them completely dry with a paper towel, as any excess moisture will make the mochi soggy.
- 2
Portion the Red Bean Paste
Divide the sweet red bean paste (anko) into 12 equal portions, about 25g each. Roll each portion into a ball.
- 3
Wrap Strawberries with Anko
Flatten one ball of anko in your palm into a thin disc. Place a dry strawberry in the center and carefully wrap the anko around it, enclosing it completely. Repeat for all 12 strawberries and place them on a tray lined with parchment paper.
- 4
Combine Mochi Ingredients
In a medium-sized, microwave-safe bowl, whisk together the glutinous rice flour and granulated sugar. Gradually pour in the water while whisking to create a smooth, lump-free batter.
- 5
Cook the Mochi Dough (First Stage)
Cover the bowl loosely with plastic wrap. Microwave on high (1000W) for 1 minute. Remove and stir vigorously with a wet silicone spatula to break up any cooked portions.
- 6
Cook the Mochi Dough (Second Stage)
Re-cover the bowl and microwave for another minute. The dough will be much thicker and more translucent. Stir vigorously again, ensuring you scrape the bottom and sides of the bowl.
- 7
Final Cook and Check for Doneness
Microwave for a final 30 seconds. The dough should be shiny, slightly translucent, and very sticky. If you see any opaque white spots, stir and cook for another 20-30 seconds until uniform.
- 8
Prepare the Work Surface
Generously dust a clean work surface or a large baking sheet with cornstarch or potato starch. Scrape the hot mochi dough out of the bowl and onto the dusted surface.
- 9
Knead and Divide the Mochi
Dust the top of the mochi and your hands with more starch. Carefully knead the hot dough for about a minute until it's smooth. Form it into a log and use a dusted dough scraper to divide it into 12 equal pieces.
- 10
Flatten the Mochi Discs
Take one piece of dough and flatten it into a disc about 3-4 inches in diameter. Try to keep the center slightly thicker than the edges to prevent tearing.
- 11
Wrap the Filling
Place one anko-covered strawberry in the center of the mochi disc, with the strawberry tip facing down. Gently pull the edges of the mochi up and around the filling.
- 12
Seal and Shape the Mochi
Pinch the seams together firmly at the base to create a secure seal. Gently roll the mochi between your palms to smooth the shape into a perfect sphere.
- 13
Final Dusting and Serving
Place the finished mochi on a piece of parchment paper. Use a soft pastry brush to gently brush off any excess starch. Repeat with the remaining dough and fillings. Serve immediately for the best texture.
Nutrition Facts
Per serving (estimated)
185 calories
Calories
42g
Carbs
3g
Protein
0.5g
Fat
2g
Fiber
10mg
Sodium
20g
Sugar