

Easy Homemade Crepe Recipe (Foolproof & Authentic)
Learn how to make perfect, delicate crepes with this simple, foolproof crepe recipe. Ideal for sweet or savory fillings, ready in minutes!
cookwithyara.com/recipes/crepe-recipe
There is a special kind of magic in the kitchen that happens with the simplest of ingredients. Flour, eggs, milk—humble staples that, with just a little care, can transform into something truly elegant and delightful. This is the magic of the crepe. It’s a dish that feels sophisticated, a taste of a Parisian café enjoyed right in your own home, yet it begins with a batter so straightforward you’ll have it memorized after the first try. Forget complicated recipes with long ingredient lists and endless steps. The beauty of this authentic crepe recipe lies in its simplicity and the rhythm of the process: the whir of the blender, the patient rest, the gentle sizzle as batter hits a warm pan, and the mesmerizing swirl that creates a wafer-thin pancake, golden and lace-like at the edges.
Imagine a slow weekend morning, the sun streaming into your kitchen. You whip up a simple batter in minutes and let it rest while you sip your coffee. Soon, the air fills with the warm, comforting aroma of freshly cooked crepes. You stack them high, a beautiful, delicate tower ready to be filled with whatever your heart desires. This is more than just a recipe; it’s a formula for creating moments of quiet joy. Whether you plan to serve them for a celebratory brunch, a light lunch, or a cozy dessert, this foolproof crepe recipe promises perfect results every time, proving that the most memorable meals are often the most simple.
The Simple Elegance of the Crepe
While my culinary heart lies in the Levant, I have a deep appreciation for foundational recipes from around the world that share a similar philosophy: simple ingredients, honored with technique, create something timeless. The crepe is a perfect example. Originating from Brittany, a region in the northwest of France, crepes were initially made with buckwheat flour and were a rustic, everyday food. Over centuries, they evolved, with white flour versions becoming the delicate, paper-thin creations we know and love today.
The philosophy behind a perfect crepe is one of balance and finesse. It’s not about muscle or complex steps; it's about understanding how a few key ingredients interact. The process itself is a gentle dance with heat and gravity. A single pan, a ladle of batter, and a flick of the wrist are all that stand between you and a perfect crepe. This is why I adore them. They embody the idea that you don't need a mountain of equipment or a day's worth of effort to produce food that is both beautiful and deeply satisfying. Cooking crepes is a mindful, rhythmic practice that rewards patience with delicious, versatile results. It's the smartest kind of cooking—minimal effort for maximum elegance.
The Anatomy of a Perfect Crepe Batter
A truly exceptional crepe begins with a well-made batter, and a well-made batter is all about understanding the role of each component. There are no passengers in this recipe; every single ingredient is doing important work to create that signature delicate texture and rich flavor. This crepe recipe relies on a classic combination that has been perfected over generations.
- All-Purpose Flour: This is the foundation, providing the essential structure. We use all-purpose flour because it has just the right amount of protein. Too much protein (like in bread flour) would make the crepes tough and chewy, while too little (like in cake flour) might make them too fragile to flip. It's the perfect middle ground for a tender yet sturdy crepe.
- Eggs: Eggs are the ultimate binder. They hold the batter together, add richness from the yolk, and contribute to the beautiful golden color. They provide the protein structure that allows the crepe to be so thin without tearing apart.
- Whole Milk: Milk adds flavor, tenderness, and richness. The fat content in whole milk contributes to a softer, more pliable crepe. While you can use lower-fat milk, the result won’t be quite as luxurious. Some classic French recipes even call for a splash of cream, but I find whole milk provides the perfect balance.
- Water: This might seem like an odd addition, but water is a secret weapon for achieving that coveted paper-thin texture. It thins the batter without adding extra fat or protein, which can weigh it down. This milk-and-water combination is key to a light, delicate crepe rather than a thick, floppy pancake.
- Melted Butter: Flavor, flavor, flavor! Butter adds an unmistakable richness and nutty depth that you simply cannot get from oil. It also helps to prevent the crepes from sticking to the pan, creating those lovely, lacy brown edges. I always use unsalted butter so I can control the salt level myself.
- Granulated Sugar & Salt: These are the quiet supporters, working in the background to elevate everything else. Just a touch of sugar adds a subtle sweetness that complements both sweet and savory fillings without making the crepe overtly a dessert. Salt is crucial for enhancing all the other flavors—it makes the butter taste richer and the flour taste less flat. Never skip the salt!
Together, these simple ingredients create a batter that is perfectly balanced, ready to be transformed into golden, delicate rounds of pure comfort.
From Batter to Bliss: Mastering the Technique
Now that we understand our ingredients, let's walk through the process of bringing this classic crepe recipe to life. The technique is simple, but a few key details make all the difference between good crepes and truly spectacular ones. My favorite method for the smoothest batter is using a blender—it’s fast, efficient, and eliminates any chance of lumps.
First, combine all the wet ingredients in the blender: the milk, water, eggs, and cooled melted butter. Giving these a quick pulse first helps emulsify the fats and liquids. Then, add the dry ingredients: the flour, sugar, and salt. Place the lid on top and blend on medium speed for about 15-20 seconds, just until the batter is completely smooth and uniform. Scrape down the sides if needed and give it one final, short pulse. You're looking for a consistency similar to heavy cream—thin enough to spread easily but not watery.
Now comes the most important step, one that should never be skipped: resting the batter. Transfer the batter to a bowl, cover it, and let it rest in the refrigerator for at least 30 minutes, or even up to 24 hours. This resting period allows the gluten in the flour to relax, which results in a much more tender and delicate crepe. It also allows the flour to fully absorb the liquid, creating a batter with a more uniform consistency.
When you're ready to cook, heat an 8 or 10-inch non-stick skillet or a traditional crepe pan over medium heat. The pan is ready when a drop of water sizzles and evaporates almost instantly. Add a tiny bit of butter and swirl to coat the surface. Pour about 1/4 cup of batter into the center of the pan, and immediately lift the pan from the heat and swirl it in a circular motion to spread the batter as thinly as possible. The first crepe is often a test—a sacrifice to the kitchen gods! Use it to gauge your pan's temperature and your swirling technique. Cook for about 60-90 seconds, until the edges are golden and begin to lift from the pan. Gently flip it and cook for another 30 seconds on the other side. Slide the finished crepe onto a plate and continue with the rest of the batter, stacking them as you go.
Secrets to Foolproof, Paper-Thin Crepes
Over the years, I've learned that a few small details can elevate your crepe-making from a hopeful experiment to a confident success. This crepe recipe is already quite simple, but these tips will ensure you get that perfect, delicate result every single time. Think of them as the secrets whispered from one cook to another.
-
Embrace the Blender: While you can whisk the batter by hand, a blender is your best friend for a guaranteed lump-free result. It shears the flour particles and fats together so effectively that you get a silky-smooth batter in under 30 seconds. This smooth start is crucial for a crepe that spreads evenly and thinly in the pan.
-
Don't Skip the Rest: I mentioned this before, but it bears repeating because it is the single most important step for tender crepes. When you mix flour with liquid, you develop gluten. A 30-minute (or longer) rest allows that gluten network to relax completely. If you cook the batter immediately, the crepes can be slightly rubbery and tough. A relaxed batter is a happy batter, and it produces an exquisitely tender crepe.
-
Master the Pan Temperature: A pan that is too hot will cook the crepe before you have a chance to swirl the batter thin, resulting in a thick, uneven pancake. A pan that is too cool will result in a pale, flimsy crepe that can stick. The sweet spot is medium heat. The pan should be hot enough that the batter sizzles gently upon contact, giving you just enough time—about 3-5 seconds—to swirl it into a perfect circle before it sets.
-
Less Is More with Batter: It’s tempting to pour a lot of batter into the pan to ensure it covers the bottom. Resist this urge! For an 8-inch pan, a scant 1/4 cup is perfect. Too much batter is the enemy of a thin crepe. You want just enough to create a translucent layer across the surface of the pan. You'll quickly get a feel for the right amount after your first one or two attempts.
-
The Confident Flip: Fear is the mind-killer of a good crepe flip. Wait for the visual cues: the surface will look matte and dry, and the edges will be golden brown and will start to pull away from the sides of the pan. You can lift an edge with a thin spatula to peek. Once it's ready, a confident, quick flip is all you need. The second side cooks in a fraction of the time, usually just 20-30 seconds.
A Canvas for Your Cravings: Sweet and Savory Fillings
One of the greatest joys of this crepe recipe is its incredible versatility. The crepe itself is a neutral, delicious canvas, ready and waiting to be painted with the flavors you love most. Whether you’re in the mood for something sweet to cap off a meal or something savory for a light lunch or brunch, the possibilities are truly endless. Here are some of my favorite ways to fill them, with a few nods to my Mediterranean roots.
For a Sweet Tooth:
- Classic Lemon & Sugar: The simplest and, for many, the most perfect filling. Just sprinkle a freshly cooked crepe with granulated sugar and a generous squeeze of fresh lemon juice, then fold and enjoy immediately.
- Chocolate-Hazelnut & Banana: A beloved classic for a reason. Spread a thin layer of your favorite chocolate-hazelnut spread over a warm crepe, top with thinly sliced bananas, and fold. A sprinkle of toasted hazelnuts on top adds a wonderful crunch.
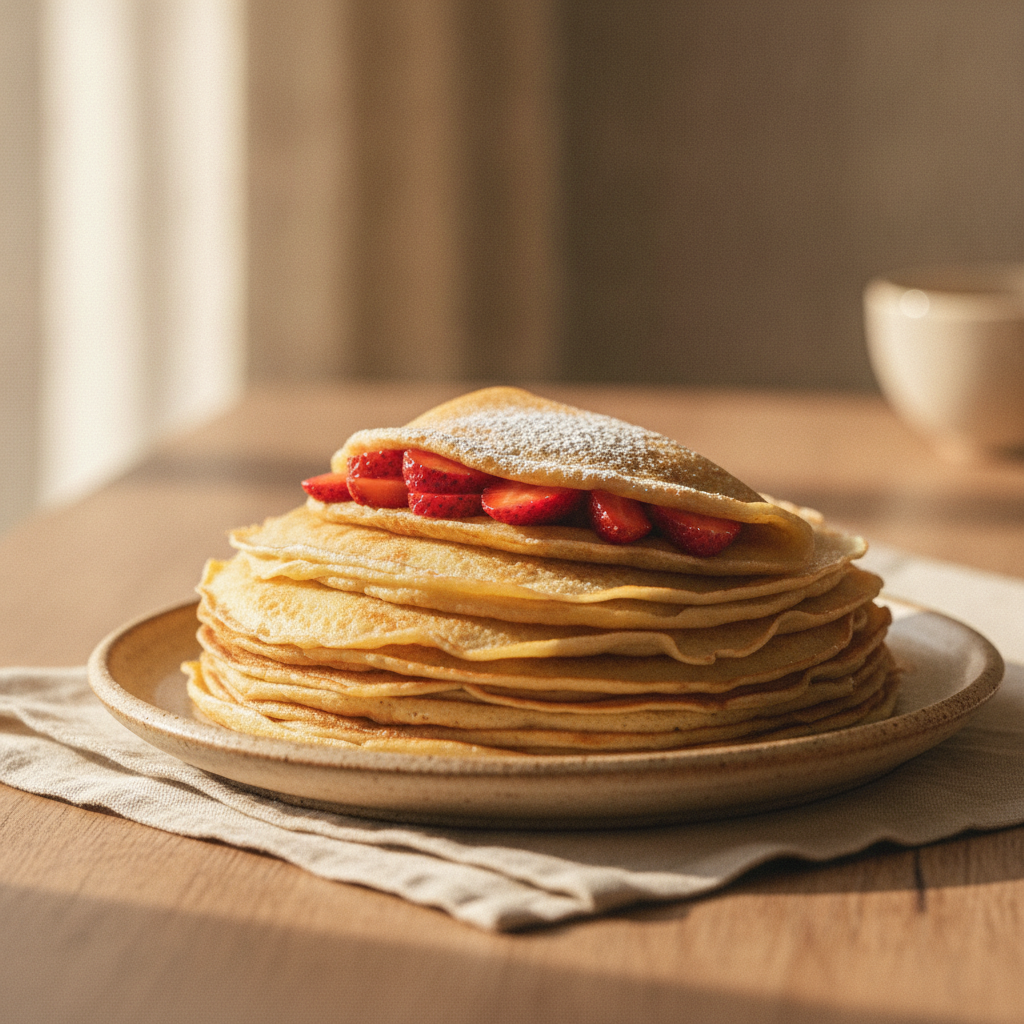
- Rose Cream & Pistachios: For a touch of Levantine elegance, whip some heavy cream with a splash of rosewater and a little powdered sugar until soft peaks form. Dollop this onto a crepe and scatter with chopped pistachios and perhaps a few pomegranate seeds for a beautiful finish.
- Date Molasses & Tahini: Drizzle warm crepes with sweet, rich date molasses and nutty tahini for a flavor combination that is deeply comforting and delicious. It’s a simple yet profound pairing that always wows.
For a Savory Meal:
- Spinach & Feta: A classic Mediterranean pairing. Sauté fresh spinach with a bit of garlic and olive oil until wilted, then crumble in some feta cheese. You can add a pinch of dill or nutmeg for extra warmth. Fill the crepes and fold them into triangles or roll them up.
- Spiced Ground Meat (Hashweh-style): Brown some ground beef or lamb with finely chopped onions, allspice, cinnamon, and toasted pine nuts. This aromatic, savory filling turns crepes into a hearty and satisfying main course.
- Mushroom & Herb: Sauté a mix of mushrooms with shallots, garlic, and fresh thyme until deeply browned and fragrant. Stir in a spoonful of crème fraîche or labneh at the end for a creamy, earthy filling.
- Za'atar, Labneh & Tomato: Spread a crepe with thick, tangy labneh, sprinkle generously with za'atar, and top with fresh, chopped tomatoes and a drizzle of good olive oil. It’s a fresh, vibrant, and incredibly flavorful lunch.
Storing, Freezing, and Reheating Your Crepes
The wonderful thing about this crepe recipe is that it's perfect for making ahead. You can prepare a large batch and have them ready for quick meals throughout the week. Proper storage is key to keeping them fresh and preventing them from sticking together.
To store crepes, allow them to cool completely first. Stack them one on top of the other, with a small square of parchment or wax paper between each one. This small step is crucial and will save you the headache of trying to peel apart a stuck-together stack of crepes later. Once stacked, you can wrap the entire pile tightly in plastic wrap or place them in a large zip-top bag.
They will keep beautifully in the refrigerator for up to 3 days. For longer storage, crepes freeze exceptionally well. Simply wrap the parchment-lined stack in plastic wrap and then a layer of aluminum foil to prevent freezer burn. They can be frozen for up to 2 months. You can thaw them overnight in the refrigerator or on the counter for about an hour.
To reheat, you have a couple of easy options. For the best result, warm a non-stick skillet over medium-low heat. Place a single crepe in the dry pan and warm it for about 20-30 seconds per side, just until it's soft and pliable again. If you're in a hurry, you can also reheat a small stack in the microwave. Cover them with a damp paper towel and heat in 15-second intervals until warmed through.
Your Crepe Recipe Questions, Answered
Why is my crepe batter lumpy?
A lumpy batter is almost always the result of adding the liquid to the flour too quickly, without enough agitation. The easiest way to prevent this is to use a blender, which creates a perfectly smooth batter every time. If mixing by hand, add the wet ingredients to the dry ingredients slowly while whisking constantly.
Do I really need to let the batter rest?
Yes, I can't stress this enough! Resting the batter for at least 30 minutes allows the gluten to relax, which is the secret to a tender, delicate crepe. A non-rested batter will often yield slightly tougher, more rubbery crepes. It’s a passive step that makes a huge difference in the final texture.
Can I make this crepe recipe in a regular non-stick skillet?
Absolutely! You do not need a special crepe pan to make a wonderful crepe recipe. Any good-quality non-stick or well-seasoned cast-iron skillet will work perfectly. The key is a flat bottom and even heat distribution. An 8 or 10-inch skillet is an ideal size.
How do I know when to flip the crepe?
The visual cues are your best guide. The surface of the crepe will lose its wet shine and appear matte. The edges will begin to look dry, turn a light golden brown, and may even start to curl up and lift away from the pan. You should be able to easily slide a thin spatula underneath without it sticking.
Why are my crepes turning out rubbery instead of delicate?
Rubberiness is usually caused by one of two things: over-mixing the batter (developing too much gluten) or not letting the batter rest long enough for the gluten to relax. A blender mixes it quickly without overworking it, and a proper rest is essential. Cooking them on too low a heat for too long can also sometimes cause a chewy texture, so ensure your pan is at a nice, steady medium heat.
Easy Homemade Crepe Recipe
A simple, foolproof recipe for making delicate, paper-thin French crepes at home. Perfect for both sweet and savory fillings.
Prep Time
40 min
Cook Time
20 min
Total Time
1h
Servings
12 crepes
Ingredients
For 12 crepes
- 1 cup all-purpose flour (120g)
- 1 tablespoon granulated sugar
- 1/4 teaspoon fine sea salt
- 2 large eggs
- 3/4 cup whole milk
- 1/2 cup water
- 2 tablespoons unsalted butter, melted, plus more for the pan
Instructions
- 1
Combine Ingredients in Blender
In a blender, add the milk, water, eggs, and cooled melted butter. Blend for 5 seconds to combine. Add the flour, sugar, and salt on top.
- 2
Blend the Batter
Secure the lid and blend on medium speed for 15-20 seconds, or until the batter is completely smooth and free of lumps. Scrape down the sides of the blender if needed and give it one final pulse.
- 3
Rest the Batter (Crucial Step)
Pour the batter into a bowl or pitcher, cover with plastic wrap, and refrigerate for at least 30 minutes. This allows the gluten to relax, ensuring tender, delicate crepes. The batter can be rested for up to 24 hours.
- 4
Heat the Pan
When ready to cook, heat an 8 or 10-inch non-stick skillet or crepe pan over medium heat. The pan is ready when a drop of water sizzles and evaporates quickly. Give the rested batter a quick stir as it may have settled.
- 5
Butter the Pan
Add about 1/4 teaspoon of butter to the hot pan. Swirl it around to coat the entire surface evenly. You only need a very thin layer of butter.
- 6
Pour and Swirl Batter
Pour a scant 1/4 cup of batter into the center of the pan. Immediately lift the pan off the heat and tilt and swirl it in a circular motion to spread the batter into a thin, even layer across the entire bottom of the pan.
- 7
Cook the First Side
Return the pan to the heat and cook for about 60-90 seconds. You'll know it's ready to flip when the surface appears matte and the edges are golden and begin to lift away from the pan.
- 8
Flip the Crepe
Gently slide a thin spatula under the edge of the crepe to loosen it. Using the spatula or your fingertips, confidently and quickly flip the crepe over.
- 9
Cook the Second Side
Cook the second side for just 20-30 seconds more. It doesn't need to brown as much as the first side. It should be cooked through but still pale.
- 10
Stack and Repeat
Slide the finished crepe onto a plate. Repeat the process with the remaining batter, adding a tiny bit more butter to the pan every few crepes as needed. You can stack the finished crepes directly on top of each other; they won't stick while warm.
- 11
Serve and Enjoy
Serve the crepes warm with your favorite sweet or savory fillings. Enjoy them immediately for the best texture and flavor.
Nutrition Facts
Per serving (estimated)
95 calories
Calories
11g
Carbs
3g
Protein
4g
Fat
0.5g
Fiber
65mg
Sodium
2g
Sugar


