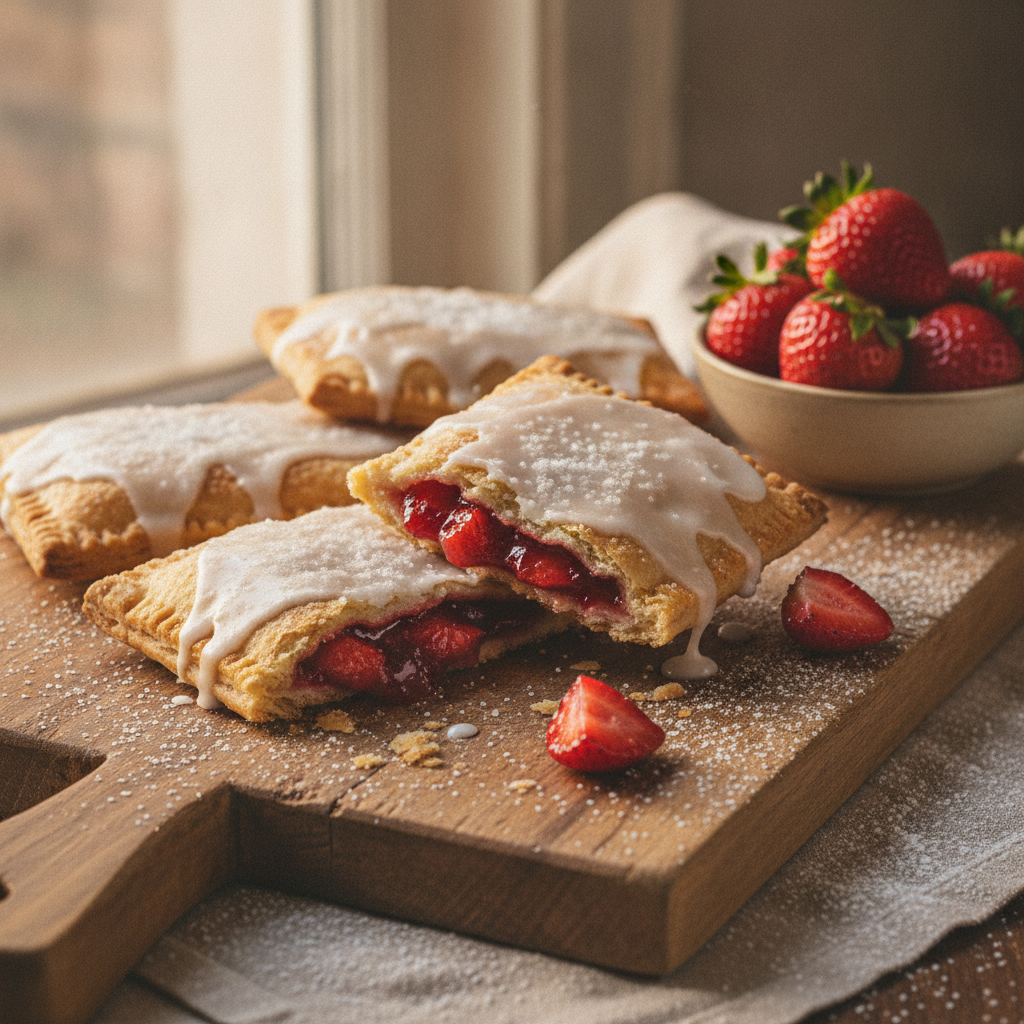
Easy Homemade Pop Tarts (Flaky & Delicious)
Skip the box! My easy homemade pop tarts recipe gives you the flakiest pastry and delicious fruit filling. A perfect breakfast treat for the family.
cookwithyara.com/recipes/homemade-pop-tarts
Let's be honest with each other for a moment. In my kitchen, and I suspect in yours too, the most memorable meals are not born from the most expensive ingredients. They come from care, a little bit of technique, and the magic of transforming simple, humble pantry staples into something truly special. We often think that creating those delightful treats we see in bakeries or on store shelves requires a long list of fancy, costly items. I’m here today to joyfully dispel that myth with one of my favorite from-scratch recipes: incredible, flaky, absolutely irresistible homemade pop tarts.
This is the recipe that proves you can achieve a taste far superior to anything in a foil wrapper, using ingredients that are likely already sitting in your kitchen. We're talking about flour, butter, sugar, and some fruit. That's it. The result is a tender, buttery pastry that shatters with each bite, encasing a warm, vibrant fruit filling that you control completely. Forget the overly sweet, one-note fillings from a box. When you make your own, you taste the real fruit, brightened with a touch of citrus. Best of all, these homemade pop tarts come in at a fraction of the cost of the store-bought version, costing just around a dollar per serving. This is restaurant-quality baking on a home-cook budget, and I can't wait to show you how easy it is to bring this simple joy into your home.
Why This Recipe Is a Budget Winner
In a world where grocery bills seem to climb higher each week, finding recipes that deliver huge satisfaction without breaking the bank is a true victory. This homemade pop tarts recipe is one of those champions. The beauty of its affordability lies in its foundation of universally accessible and inexpensive pantry staples. Flour, sugar, and salt are the building blocks of countless baked goods, and their cost per recipe is incredibly low. The star of the flaky crust, butter, can easily be purchased in bulk when on sale and frozen for months, ensuring you always have it on hand without paying a premium.
Let’s talk about the filling. The flexibility here is where you can really save. Instead of being locked into a specific flavor, you can adapt to what’s in season and on sale. Summer berries, autumn apples, or even winter pears make phenomenal fillings. And don’t forget the freezer aisle! Frozen fruit is often more affordable than fresh, especially out of season, and it works perfectly in the filling, breaking down into a beautiful, jammy consistency. When you compare the cost of making a batch of eight generous, high-quality homemade pop tarts to buying two boxes of their processed counterparts, the savings are significant. You’re not just paying for better flavor; you’re investing in better ingredients without the higher price tag.
Furthermore, this recipe is designed for zero waste. Every scrap of pastry dough can be re-rolled or baked off as-is with a sprinkle of cinnamon sugar for a little bonus treat. Any leftover fruit filling is a delicious topping for yogurt, oatmeal, or even toast. One batch can serve a family for a weekend breakfast or provide special treats for a few days, stretching your efforts and your budget beautifully.
Affordable Ingredients, Maximum Impact
Creating something truly delicious doesn't require a scavenger hunt for rare ingredients. The magic of these homemade pop tarts lies in how we elevate simple, cost-effective items into a symphony of flavor and texture. Let’s walk through the key players and see how to get the most impact for your money.
All-Purpose Flour: This is the workhorse of the baker’s pantry for a reason. It's incredibly versatile and one of the most economical ingredients you can buy. For a tender, flaky crust, you don’t need fancy pastry flour; standard all-purpose flour provides the perfect balance of structure and softness.
Unsalted Butter: The soul of our flaky pastry. Look for butter on sale and stock up—it freezes wonderfully for up to six months. Using very cold, cubed butter is the non-negotiable technique that creates steam pockets as it bakes, resulting in those irresistible layers. There is no worthy substitute here if you're after that classic flaky texture.
Fruit for Filling (Fresh or Frozen): This is your opportunity to be a savvy shopper. In the summer, fresh berries are often abundant and affordable. In the fall, apples are your best friend. But my year-round secret weapon is frozen fruit. It’s picked at peak ripeness and flash-frozen, locking in nutrients and flavor, and it’s almost always cheaper than fresh. It works beautifully for the filling, so you can enjoy strawberry homemade pop tarts even in the middle of winter.
Granulated and Powdered Sugar: These are essential pantry staples that last for ages and are used in small, impactful amounts. Granulated sugar provides just enough sweetness to the filling and a hint of it in the dough, while powdered sugar dissolves easily to create a smooth, simple glaze.
Cornstarch: A small amount of this inexpensive thickener is all you need to turn your fruit and its juices into a perfect, jammy filling that won’t leak out during baking. A single box will last you through dozens of batches.
Lemon: Just one lemon provides all the fresh juice needed to brighten the fruit filling. It cuts through the sweetness and makes the fruit flavor pop. It's a small cost for a massive flavor boost. Never skip this!
By focusing on these basic but high-quality staples, you can confidently create a bakery-level treat. It’s all about the technique, not the price tag.
How to Make Incredible Homemade Pop Tarts
The process of making these homemade pop tarts is a gentle, rewarding rhythm of mixing, chilling, and assembling. It’s simpler than you might think and requires no special equipment outside of a rolling pin and a baking sheet. Let me guide you through the key stages.
First, we create the heart of the recipe: the all-butter pastry. The secret to an incredibly flaky crust is keeping everything as cold as possible. We’ll combine the flour, salt, and a touch of sugar, then cut in very cold, cubed butter until the mixture resembles coarse crumbs with some pea-sized pieces of butter remaining. This is crucial—those little butter pieces will melt in the oven, creating steam and separating the dough into delicate layers. Then, we add just enough ice-cold water for the dough to come together before shaping it into a disk and letting it rest in the refrigerator. This chill time is essential; it allows the butter to firm up again and the gluten in the flour to relax, making the dough easy to roll out later.
While the dough is chilling, we’ll turn our attention to the vibrant fruit filling. This comes together in a small saucepan in just a few minutes. We'll gently cook down our chosen fruit—fresh or frozen—with a bit of sugar, lemon juice for brightness, and a cornstarch slurry to thicken it into a luscious, jam-like consistency. The goal is a filling that’s thick enough to hold its shape and not seep out of the pastry. Once it’s done, we set it aside to cool completely. Placing hot filling on cold dough is a recipe for a soggy bottom, so patience is key here.
Next comes the assembly, which is like a fun kitchen craft project. We’ll roll the chilled dough into a large rectangle and trim the edges to create clean, straight lines. Then, we cut the dough into smaller, even rectangles—these will be the tops and bottoms of our homemade pop tarts. We spoon a modest amount of our cooled filling onto half of the rectangles, being sure to leave a clean border around the edges. A simple egg wash brushed along this border acts as the 'glue' to seal our pastries shut.
Finally, we place the remaining dough rectangles on top, gently pressing down around the filling to remove any air pockets and then firmly crimping the edges with the tines of a fork. This not only looks classic but also ensures a tight seal. A few pokes on top with the fork allow steam to escape during baking, preventing the tarts from puffing up too much. After a final quick chill in the freezer to ensure the pastry is firm, we bake them until they are a beautiful, deep golden brown. The final touch, after they've cooled a bit, is a simple, sweet glaze. It’s a straightforward process that yields spectacular, delicious results every single time.
Stretching It Further for More Meals
One of the greatest joys of cooking from scratch is the ability to be resourceful, and this homemade pop tarts recipe is wonderfully adaptable for stretching into more than just one breakfast. With a little planning, you can make your time in the kitchen go even further.
The dough itself is a fantastic asset to have on hand. Consider making a double batch of the pastry dough from the start. Use half for your pop tarts, and wrap the other half tightly before freezing it. This future-you-will-thank-you step means you're halfway to another batch of homemade pop tarts, or you can use it for something else entirely. That frozen disk of dough can become a beautiful galette with any seasonal fruit, a savory topping for a chicken pot pie, or small, savory hand pies filled with cheese and herbs for a quick lunch.
What about leftover filling? If you find yourself with extra jammy fruit filling, don’t let it go to waste. It’s a delicious, homemade fruit preserve! Store it in a jar in the refrigerator and use it to top morning yogurt, swirl into oatmeal, spread on toast, or even serve alongside a simple pound cake for an easy dessert. You’ve created a gourmet condiment with minimal extra effort.
For larger families or for meal prepping, bake the entire batch of homemade pop tarts and let them cool completely before glazing. You can freeze them on a baking sheet until solid, then transfer them to a freezer-safe bag or container. They can be pulled out one at a time for a quick, special breakfast. A few minutes in a toaster oven or air fryer will bring them right back to their flaky, warm glory, giving you a ready-made treat that feels incredibly luxurious on a busy morning.
Smart Swaps and Variations
While the classic strawberry homemade pop tart is a nostalgic favorite, the true beauty of this recipe is its versatility. Think of the pastry as a blank canvas for any number of delicious fillings and flavor combinations. This is your chance to get creative, use what you have on hand, and tailor these treats to your family's tastes.
Filling Frenzy: The fruit filling possibilities are nearly endless. Try a sweet and tangy raspberry-lemon filling, a warm and spiced apple-cinnamon version in the autumn, or a sophisticated fig and cardamom filling for a touch of Mediterranean flair. You can even venture into savory territory! Imagine a filling of crumbled feta, chopped spinach, and a sprinkle of za'atar for a portable breakfast that’s both unique and satisfying.
Dough Diversions: For a heartier, nuttier pastry, try substituting up to half of the all-purpose flour with whole wheat pastry flour. This adds a lovely rustic quality and a bit of extra fiber. You can also infuse the dough with flavor by adding a teaspoon of cinnamon or a pinch of finely grated lemon zest along with the dry ingredients.
Glaze and Toppings: The simple vanilla glaze is classic, but you can easily customize it. For a lovely floral note that reminds me of my Levantine roots, replace the vanilla extract with a quarter teaspoon of rosewater or orange blossom water. A little goes a long way! For a different finish altogether, skip the glaze and instead brush the unbaked tarts with egg wash and sprinkle generously with coarse turbinado sugar for a crunchy, glittery top. Or, for a simpler approach, a light dusting of powdered sugar after baking is perfectly elegant.
Storage and Reheating Tips
Properly storing your homemade pop tarts will ensure they stay fresh and delicious for as long as possible. Once they have cooled completely, you can store them in an airtight container at room temperature for up to two days. The pastry will soften slightly over time, but they will still be wonderful.
If you want to keep them for longer, the refrigerator is your best bet. Stored in an airtight container, they will last for up to five days. The real magic, however, lies in reheating. To bring back that just-baked flaky texture, avoid the microwave at all costs, as it will make the pastry tough and soggy. Instead, place the pop tart in a toaster oven or a conventional oven at 350°F (175°C) for about 5-7 minutes. This will re-crisp the pastry beautifully and warm the filling through, making it taste as good as new.
For long-term storage, freezing is an excellent option. You can freeze them either baked or unbaked. To freeze unbaked tarts, assemble them fully on a baking sheet and place them in the freezer until solid. Then, transfer them to a freezer-safe bag. They can be baked directly from frozen; just add a few extra minutes to the baking time. To freeze baked tarts, let them cool completely (ideally unglazed), freeze them on a sheet, and then transfer to a bag. Reheat from frozen in the oven until warmed through, then add the glaze if you like.
Interestingly, some fillings, particularly those with warm spices like apple-cinnamon, can even taste better the next day as the flavors have more time to meld together. So don't hesitate to bake a batch ahead of your gathering!
Your Questions Answered
Can I use a store-bought pie crust to save time?
Absolutely! If you're short on time, a refrigerated pie crust is a great shortcut. The texture won't be quite as flaky and buttery as the homemade version, but it will still be incredibly delicious and much better than the boxed variety. Just be sure to follow the package instructions for handling and baking.
How do I stop the filling from leaking out during baking?
There are three key tricks to prevent leaks. First, don't overfill the tarts; about 1 to 1.5 tablespoons of cooled, thick filling is plenty. Second, be sure to leave a clean 1/2-inch border around the edges for sealing. Finally, press down firmly with a fork to crimp the edges, creating a tight seal that locks in all that deliciousness.
What are the most budget-friendly filling options?
Your most economical choices will always be seasonal fruits. Apples in the fall are incredibly inexpensive and make a fantastic spiced filling. In the summer, look for sales on berries. Year-round, my top tip is to use frozen fruit, which is consistently affordable and works perfectly for creating a thick, jammy filling.
Can I make these homemade pop tarts ahead of time?
Yes, this recipe is perfect for making ahead. You can assemble the pop tarts completely, but don't bake them. Instead, place the unbaked tarts on a parchment-lined baking sheet and freeze until solid. Once frozen, you can transfer them to a freezer bag for up to 3 months. Bake them directly from frozen, adding about 5-7 minutes to the original baking time.
My dough was too sticky or too crumbly. What went wrong?
Pastry dough is all about temperature and hydration. If your dough is too sticky, it's likely that your butter was too warm or you added a little too much water. Try chilling it for an extra 30 minutes. If it's too crumbly and won't come together, it needs a bit more ice water. Add it one teaspoon at a time, mixing gently, until it just holds together when you squeeze it.
Do I have to add the glaze?
Not at all! The glaze adds a lovely sweetness and that classic look, but these homemade pop tarts are just as delightful without it. For a simpler finish, try brushing the tops with a little milk or beaten egg and sprinkling with coarse sugar before baking. This creates a beautiful, crunchy, golden-brown crust.
Flaky Homemade Pop Tarts
A recipe for delicious, flaky homemade pop tarts with a sweet strawberry filling and a simple vanilla glaze. Far better and more affordable than store-bought!
Prep Time
25 min
Cook Time
20 min
Total Time
1h 25m
Servings
8 tarts
Ingredients
For 8 tarts
- 2 1/2 cups (300g) all-purpose flour
- 1 teaspoon salt
- 1 tablespoon granulated sugar
- 1 cup (226g) cold unsalted butter, cut into 1/2-inch cubes
- 1/2 cup (120ml) ice water
- 2 cups (300g) fresh or frozen strawberries, finely chopped
- 1/4 cup (50g) granulated sugar
- 2 tablespoons cornstarch
- 1 tablespoon fresh lemon juice
- 1 large egg
- 1 tablespoon milk (for egg wash)
- 1 cup (120g) powdered sugar
- 2-3 tablespoons milk (for glaze)
- 1/2 teaspoon vanilla extract
Instructions
- 1
Prepare the Pastry Dough
In a large bowl, whisk together the flour, salt, and 1 tablespoon of granulated sugar. Add the cold, cubed butter and toss to coat. Using a pastry blender or your fingertips, cut the butter into the flour until the mixture resembles coarse crumbs with some pea-sized pieces of butter still visible.
- 2
Hydrate and Chill Dough
Sprinkle the ice water over the flour mixture, one tablespoon at a time, and mix with a fork until the dough just begins to come together. Do not overmix. Gently gather the dough into a ball, flatten it into a 1-inch thick disk, wrap it tightly in plastic wrap, and refrigerate for at least 1 hour.
- 3
Make the Strawberry Filling
While the dough chills, combine the chopped strawberries, 1/4 cup of sugar, cornstarch, and lemon juice in a small saucepan. Cook over medium heat, stirring frequently, until the mixture thickens and bubbles, about 5-7 minutes. The filling should be very thick and jam-like. Remove from heat and let it cool completely.
- 4
Roll and Cut the Dough
Preheat your oven to 400°F (200°C) and line two baking sheets with parchment paper. On a lightly floured surface, roll the chilled dough into a large rectangle about 1/8-inch thick. Trim the edges to create a neat rectangle, then cut it into 16 smaller rectangles, each about 3x4 inches in size.
- 5
Prepare the Egg Wash
In a small bowl, whisk together the large egg and 1 tablespoon of milk until smooth. This egg wash will act as a glue for the pastry and give it a golden color during baking.
- 6
Fill the Pastries
Arrange 8 of the dough rectangles on the prepared baking sheets. Spoon about 1.5 tablespoons of the cooled strawberry filling onto the center of each rectangle, leaving a 1/2-inch border all around. Do not overfill.
- 7
Seal the Tarts
Brush the empty border of each filled rectangle with the egg wash. Place a second rectangle of dough on top and gently press down around the filling to squeeze out any air pockets. Use the tines of a fork to press and crimp the edges firmly, creating a tight seal.
- 8
Vent and Brush Tarts
Using the fork, poke 2-3 small holes in the top of each pop tart to allow steam to escape. Lightly brush the entire top surface of each tart with the remaining egg wash.
- 9
Chill Before Baking
Place the baking sheets with the assembled tarts into the freezer for 15 minutes. This quick chill helps the butter firm up again, ensuring an extra flaky pastry.
- 10
Bake Until Golden
Transfer the tarts from the freezer directly into the preheated oven. Bake for 18-22 minutes, or until the pastry is a deep golden brown and puffed. Let them cool on the baking sheet for 5 minutes before transferring to a wire rack to cool further.
- 11
Prepare the Glaze
While the tarts are cooling, whisk together the powdered sugar, vanilla extract, and 2 tablespoons of milk in a small bowl until smooth. If the glaze is too thick, add more milk, one teaspoon at a time, until it reaches a pourable consistency.
- 12
Glaze and Serve
Once the pop tarts are just slightly warm, drizzle or spread the glaze over the top. Let the glaze set for about 15-20 minutes before enjoying. These are best served warm.
Nutrition Facts
Per serving (estimated)
410 calories
Calories
48g
Carbs
5g
Protein
23g
Fat
2g
Fiber
310mg
Sodium
25g
Sugar