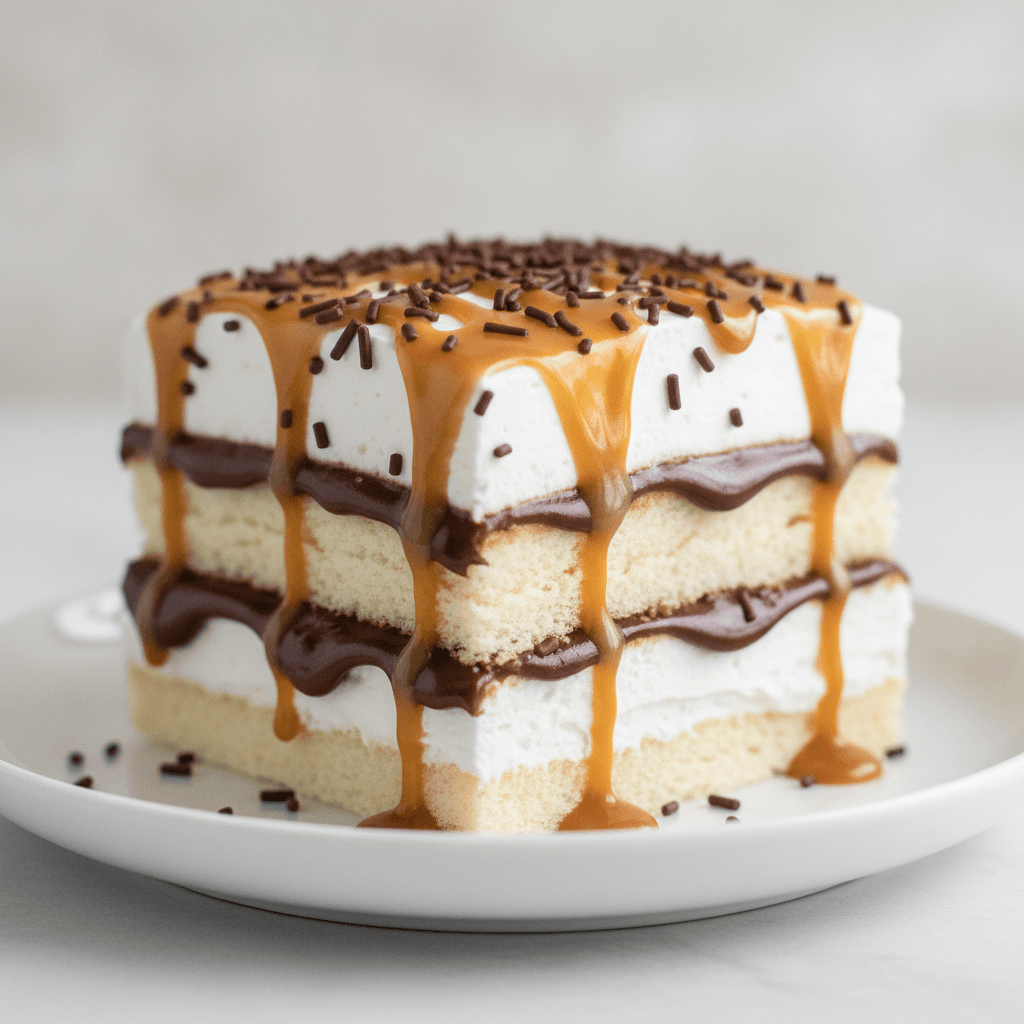
Easy Ice Cream Sandwich Cake Recipe (No-Bake!)
The ultimate easy, no-bake dessert! This crowd-pleasing ice cream sandwich cake layers frozen treats with fudge, caramel, and whipped topping.
cookwithyara.com/recipes/ice-cream-sandwich-cake
There is a special kind of joy that comes from preparing a dessert that looks spectacular, tastes incredible, and requires almost no real effort. In our busy lives, finding these moments of kitchen magic feels like a true gift. We all crave those go-to recipes that we can rely on for family gatherings, weekend treats, or when we need to bring something wonderful to a friend’s home. This is where the simple genius of the ice cream sandwich cake comes into play. It’s a dessert that feels both nostalgic and wonderfully modern, a sweet treat that bridges generations and brings smiles to every face around the table.
Imagine layers of classic ice cream sandwiches, softened just enough to be perfectly sliceable, nestled between clouds of creamy whipped topping and rich ribbons of fudge and caramel sauce. It’s a symphony of textures and temperatures, a delightful contrast of cold, creamy, and soft. The beauty of this recipe lies in its assembly-only nature; there is no oven to preheat, no batter to mix, no complex techniques to master. It’s about thoughtfully layering simple, beloved ingredients to create something far greater than the sum of its parts. This guide is here to walk you through creating the most delicious, show-stopping ice cream sandwich cake you’ve ever had, a dessert that promises pure delight with every single bite.
Why This Ice Cream Sandwich Cake is the Ultimate Easy Dessert
In the world of desserts, some recipes are cherished for their complexity, while others are loved for their straightforward brilliance. This ice cream sandwich cake falls squarely and proudly into the latter category. It has earned a permanent spot in my dessert rotation for so many reasons, chief among them being its incredible ease and universal appeal. It is, without a doubt, one of the most rewarding desserts you can make for the amount of effort required.
The most significant advantage is that it is a completely no-bake recipe. On a warm day, the last thing anyone wants is to turn on the oven and heat up the kitchen. This cake comes together entirely in the freezer, making it a perfect choice for summer get-togethers or any time you want to keep your home cool and comfortable. The preparation is quick and clean, involving little more than unwrapping and layering. This simplicity means you can even get younger family members involved in the assembly, turning dessert-making into a fun, shared activity.
Beyond its practicality, this cake has a powerful nostalgic charm. For many of us, the simple pleasure of an ice cream sandwich is a cherished memory. This recipe takes that humble treat and elevates it into a celebration-worthy centerpiece. Yet, it never loses that approachable, comforting quality. It’s a dessert that feels special without being fussy, impressive without being intimidating. The flavors are classic and beloved—creamy vanilla, rich chocolate, sweet caramel—a combination that is guaranteed to please even the pickiest of eaters. It’s the perfect dessert for large gatherings because it can be made well in advance, freeing you up to focus on other dishes and enjoy the company of your loved ones. A well-made ice cream sandwich cake isn't just a dessert; it's a guaranteed source of happiness.
Choosing Your Ingredients: The Foundation of a Great Cake
While this recipe is famously simple, the final result is directly influenced by the quality of the ingredients you choose. Think of it as curating a small collection of perfect components that will work together in harmony. Taking a moment to select the right items at the grocery store will elevate your ice cream sandwich cake from good to absolutely unforgettable.
First, let's talk about the star of the show: the ice cream sandwiches. The classic rectangular vanilla ice cream sandwich with a soft chocolate wafer is the traditional choice and works beautifully. Look for brands with a good, creamy ice cream filling and wafers that are soft but not crumbly. You want them to hold their shape during assembly. When you get them home, ensure they go straight into the freezer and are fully frozen before you begin. This prevents them from becoming soft and difficult to handle.
Next is the whipped topping. You have two main choices: a frozen whipped topping (thawed in the refrigerator) or making your own stabilized whipped cream. The frozen topping is the easiest and most reliable option, as it's specifically designed to hold its shape when frozen and thawed. It provides a light, airy texture that is crucial for the cake's structure. If you prefer to make your own, you'll need to stabilize it by whipping heavy cream with powdered sugar and a touch of cornstarch or cream of tartar to prevent it from weeping or deflating in the freezer.
For the sauces, quality matters immensely. A rich, dark hot fudge sauce will provide a deep chocolate flavor that contrasts beautifully with the vanilla ice cream. Similarly, a thick, buttery caramel sauce adds a layer of sweet, salty complexity. I recommend warming them just slightly—not hot, just lukewarm—to make them easier to pour and spread evenly over the delicate whipped topping. Finally, consider your garnishes. Mini chocolate chips add a lovely texture, while toasted nuts like pecans or walnuts bring a welcome crunch and savory note. Always ensure any toppings, like sprinkles or chocolate, are from halal-certified sources to maintain the integrity of your beautiful creation.
The Art of Assembly: A Step-by-Step Layering Guide
Assembling your ice cream sandwich cake is a process that is both meditative and exciting. It’s like building a delicious work of art, layer by careful layer. The key to success is preparation. Before you unwrap a single sandwich, make sure you have everything ready to go. Your workspace should be clear, your ingredients should be within arm's reach, and your pan must be properly prepared. This methodical approach, what chefs call 'mise en place,' is what ensures a smooth, stress-free assembly.
First, prepare your 9x13-inch pan. This is a critical step for an easy and clean removal of the finished cake. Take two long pieces of plastic wrap or parchment paper and lay them in the pan in a crisscross pattern, leaving a generous amount of overhang on all four sides. These overhangs will act as handles later, allowing you to lift the entire frozen cake out effortlessly. Once your pan is lined, you can begin.
Work quickly to unwrap about 12 ice cream sandwiches and arrange them in a single, tight layer on the bottom of the pan. You will likely need to cut one or two sandwiches in half to fill in any gaps and create a solid, even base. Don't worry about perfect cuts; they will be hidden. Once the base is set, gently spread half of your thawed whipped topping over the sandwiches. Use an offset spatula to create a smooth, even surface. Next, drizzle about half of your warmed fudge sauce and half of your caramel sauce over the whipped topping. Try to distribute them evenly, but don't overthink it; a marbled effect is beautiful.
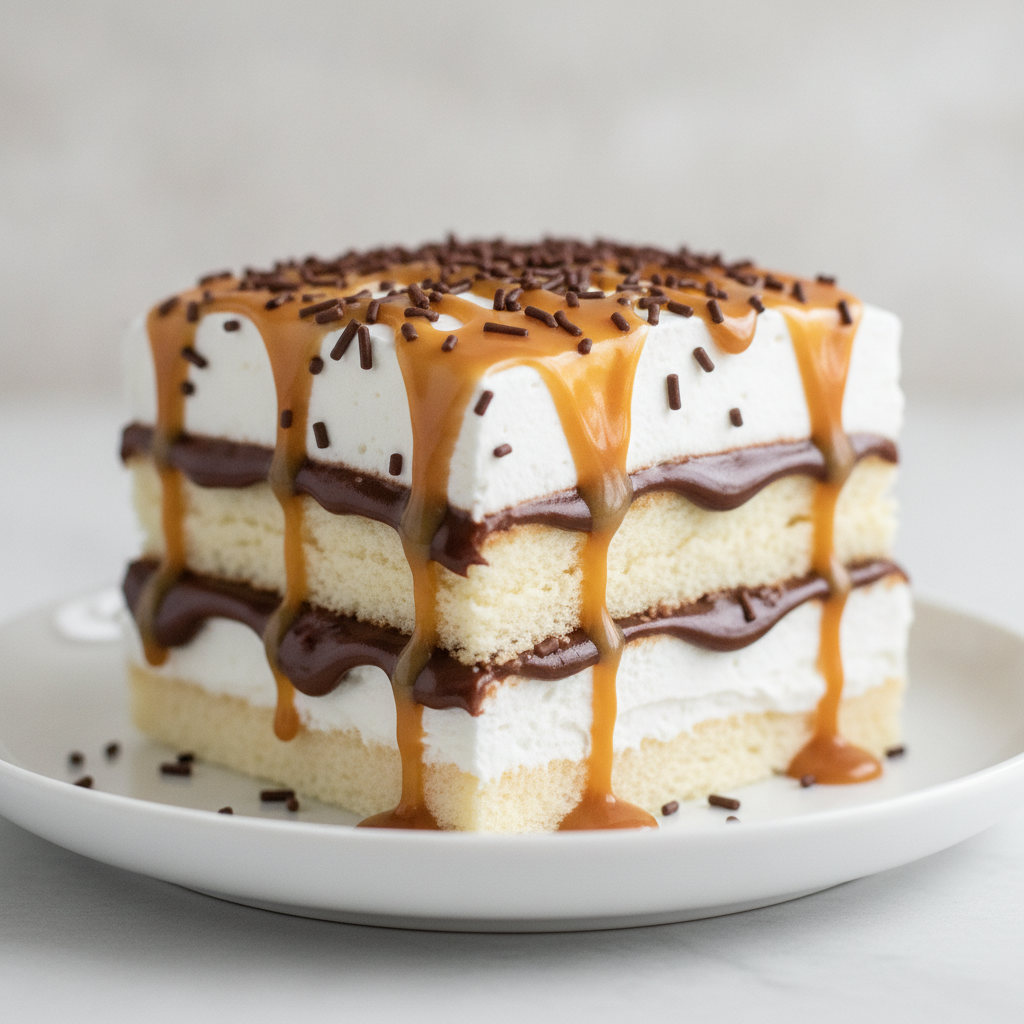
Now, it's time for the second layer. Place the remaining 12 sandwiches on top of the sauce-drizzled whipped topping, arranging them just as you did the first layer. Press down gently to ensure everything is compact. Top this with the remaining whipped topping, spreading it all the way to the edges to completely cover the sandwiches. This final, smooth white layer will be the canvas for your decorations. At this stage, you can sprinkle on some mini chocolate chips or other toppings that you want to be set into the cake itself. The careful process of building this ice cream sandwich cake is what makes the final slice so satisfying.
The Magic is in the Freeze: Why You Can't Skip This Step
Once your ice cream sandwich cake is fully assembled, the most important part of the process begins: the waiting. It might be tempting to slice into it right away, but the time it spends in the freezer is where the true transformation happens. This is not just about getting the cake cold; it's a crucial step that melds the distinct layers into a cohesive, sliceable, and utterly delicious dessert.
During its time in the freezer, a few wonderful things occur. First and foremost, the entire structure solidifies. The whipped topping firms up, the sauces become thick and chewy, and everything locks into place. This ensures that when you go to slice the cake, you get clean, beautiful layers instead of a soft, messy pile. The freezing process allows the cake to hold its shape perfectly from the pan to the plate.
Beyond the structural benefits, the freezing time also allows the flavors and textures to meld. The soft chocolate wafers of the ice cream sandwiches absorb a tiny bit of moisture from the whipped topping, softening them to a texture that is truly cake-like. The ice cream itself becomes one with the creamy topping and rich sauces. When you take a bite, you don’t taste separate ingredients; you taste a single, harmonious dessert. This is the magic that transforms a simple assembly of store-bought items into a homemade masterpiece.
For the best results, you must let the cake freeze for a minimum of four to six hours. However, I’ve found that the ideal texture and flavor are achieved when it's frozen overnight. This extended time ensures it is frozen solid all the way through. This also makes the ice cream sandwich cake the perfect make-ahead dessert for any event. You can prepare it a day or two in advance, leaving you with one less thing to worry about on the day of your gathering. Simply cover it well and let the freezer do all the hard work.
Presentation and Serving Your Ice Cream Sandwich Cake
After your patient waiting, the moment of the grand reveal is here. Presenting and serving your ice cream sandwich cake is the final, rewarding step. A little bit of care at this stage will ensure your dessert looks as incredible as it tastes. The first task is to remove the cake from the pan. Thanks to your careful preparation with the plastic wrap or parchment paper overhangs, this should be simple. Gently tug on the overhangs on opposite sides to lift the entire frozen cake block straight up and out of the pan. Place it on a serving platter or a cutting board.
Now it's time to decorate. While you may have added some toppings before freezing, the final garnishes are best added just before serving. This keeps them looking fresh and vibrant. A final, artistic drizzle of both the chocolate fudge and caramel sauce over the top adds a beautiful visual appeal and an extra punch of flavor. You can then sprinkle on toasted nuts for a lovely crunch, more chocolate chips, or colorful sprinkles to match the theme of your gathering. If you have any fresh berries, they can add a wonderful pop of color and a touch of brightness to cut through the richness.
When you're ready to slice, a small amount of technique goes a long way. For the cleanest cuts, take a long, sharp knife and run it under hot water for a few seconds. Quickly wipe the knife dry and make your first slice, pressing down firmly. The heat from the knife will glide through the frozen layers with ease. Wipe the knife clean and repeat the process for each subsequent slice. This prevents the dark chocolate and caramel from smearing onto the white whipped topping, preserving the look of those beautiful, distinct layers. For optimal texture, you may want to let the cake sit at room temperature for about 5-10 minutes before slicing, which softens it just enough for the knife to pass through easily. This easy ice cream sandwich cake deserves a beautiful presentation, and these simple steps will make it look like it came from a gourmet shop.
Delicious Variations to Try Next
One of the greatest attributes of this ice cream sandwich cake recipe is its versatility. The classic vanilla and chocolate combination is a timeless favorite, but it also serves as a perfect canvas for your culinary creativity. Once you've mastered the basic technique, you can explore a world of different flavor profiles to suit any taste or occasion.
Consider a mint chocolate chip version by using mint chocolate chip ice cream sandwiches. Layer them with hot fudge sauce and top with crushed chocolate mint cookies or Andes mint pieces for an intensely refreshing and decadent treat. Another fantastic option is a cookies and cream theme. Use cookies and cream ice cream sandwiches, layer with a crushed chocolate sandwich cookie-infused whipped topping, and drizzle with white chocolate sauce for a monochromatic and delicious twist.
Don't be afraid to play with different sauces and textures. You could swap the caramel for a fruit-based sauce like strawberry or raspberry coulis for a flavor profile reminiscent of a Neapolitan blend. For added crunch, consider adding a layer of crushed, crispy rice cereal or your favorite halal-certified candy bar, chopped into small pieces, between the whipped topping and the sauces. You can also experiment with different ice cream sandwiches as they become available; chocolate chip cookie sandwiches or even Neapolitan ones can serve as a fantastic base. The core recipe for this ice cream sandwich cake is so forgiving that it invites experimentation. Let your imagination guide you and create a signature version that your family and friends will request again and again.
Ice Cream Sandwich Cake FAQ
How long does this cake need to freeze?
For the best results, the cake needs to freeze for a minimum of 4-6 hours to ensure it is solid enough to slice cleanly. However, I highly recommend freezing it overnight for the optimal texture, as this allows the layers to fully meld together into a cohesive, cake-like consistency.
Can I make my own whipped cream instead of using frozen whipped topping?
Absolutely! Homemade whipped cream is delicious. To ensure it holds up in the freezer without weeping, you must stabilize it. You can do this by whipping 2 cups of heavy cream with 1/2 cup of powdered sugar and 2 tablespoons of cornstarch until stiff peaks form.
How do I store leftovers?
Leftover ice cream sandwich cake should be stored in the freezer. Wrap the remaining portion tightly in plastic wrap or place it in an airtight container to prevent freezer burn. It will keep well for up to one week.
My cake is very hard to slice. Any tips?
If the cake is frozen solid, it can be difficult to slice. Let it sit at room temperature for 5-10 minutes before you plan to serve it. For extra clean cuts, dip a long, sharp knife in hot water, wipe it dry, and then make your slice. Repeat this for each cut.
Can I assemble this in a different shaped pan?
A 9x13-inch pan is standard, but you can certainly adapt this recipe to other pans. A 9x9-inch square pan will yield a taller cake with fewer servings, or you can use a springform pan to create a round ice cream sandwich cake. You will just need to be creative in cutting and arranging the sandwiches to fit the shape.
What are some good halal-friendly toppings?
There are many wonderful halal-friendly options! Toasted nuts like almonds, pecans, or walnuts are excellent. Most semi-sweet chocolate chips and sprinkles are fine, but always check the packaging. Crushed chocolate sandwich cookies or your favorite halal-certified candy bars also make fantastic additions.
Easy No-Bake Ice Cream Sandwich Cake
A simple yet impressive no-bake dessert made by layering ice cream sandwiches, whipped topping, fudge, and caramel sauce. It's the perfect make-ahead treat for any occasion.
Prep Time
20 min
Cook Time
0 min
Total Time
4h 20m
Servings
12 servings
Ingredients
For 12 servings
- 24 classic rectangular vanilla ice cream sandwiches
- 1 container (16 ounces) frozen whipped topping, thawed in the refrigerator
- 1 jar (11.75 ounces) hot fudge sauce
- 1 jar (12.25 ounces) caramel sauce
- 1/2 cup mini semi-sweet chocolate chips
- 1/2 cup chopped pecans, toasted (optional)
- Chocolate sprinkles for garnish
Instructions
- 1
Prepare the Pan
Line a 9x13-inch baking pan with two overlapping pieces of plastic wrap or parchment paper, leaving at least 4 inches of overhang on all sides. This will help you lift the cake out easily later.
- 2
Arrange the First Sandwich Layer
Working quickly, unwrap 12 of the ice cream sandwiches. Arrange them in a single, tight layer in the bottom of the prepared pan. Cut sandwiches as needed to fill in any gaps and create a solid base.
- 3
Add the First Topping Layer
Spoon about half of the thawed whipped topping over the sandwich layer. Use an offset spatula to spread it gently and evenly, covering the sandwiches completely from edge to edge.
- 4
Drizzle the Sauces
Warm the fudge and caramel sauces in the microwave for 15-20 seconds so they are pourable but not hot. Drizzle about half of the fudge sauce and half of the caramel sauce over the whipped topping.
- 5
Arrange the Second Sandwich Layer
Unwrap the remaining 12 ice cream sandwiches and arrange them in a single layer on top of the sauces. Press down gently to create a compact layer.
- 6
Add the Final Topping Layer
Spread the remaining whipped topping over the second layer of sandwiches. Smooth the top with your spatula to create a clean surface for the final garnishes.
- 7
Garnish Before Freezing
Sprinkle the mini chocolate chips and toasted pecans (if using) evenly over the top of the cake. This allows them to set into the whipped topping as it freezes.
- 8
Freeze the Cake
Cover the pan with plastic wrap or foil, being careful not to press down on the topping. Place the cake in the freezer for at least 4-6 hours, or preferably overnight, until completely firm.
- 9
Remove, Garnish, and Serve
When ready to serve, use the plastic wrap overhangs to lift the cake from the pan onto a serving platter. Drizzle with additional sauce and add sprinkles. Let it sit for 5-10 minutes at room temperature before slicing with a hot, dry knife.
Nutrition Facts
Per serving (estimated)
480 calories
Calories
65g
Carbs
6g
Protein
24g
Fat
2g
Fiber
250mg
Sodium
45g
Sugar