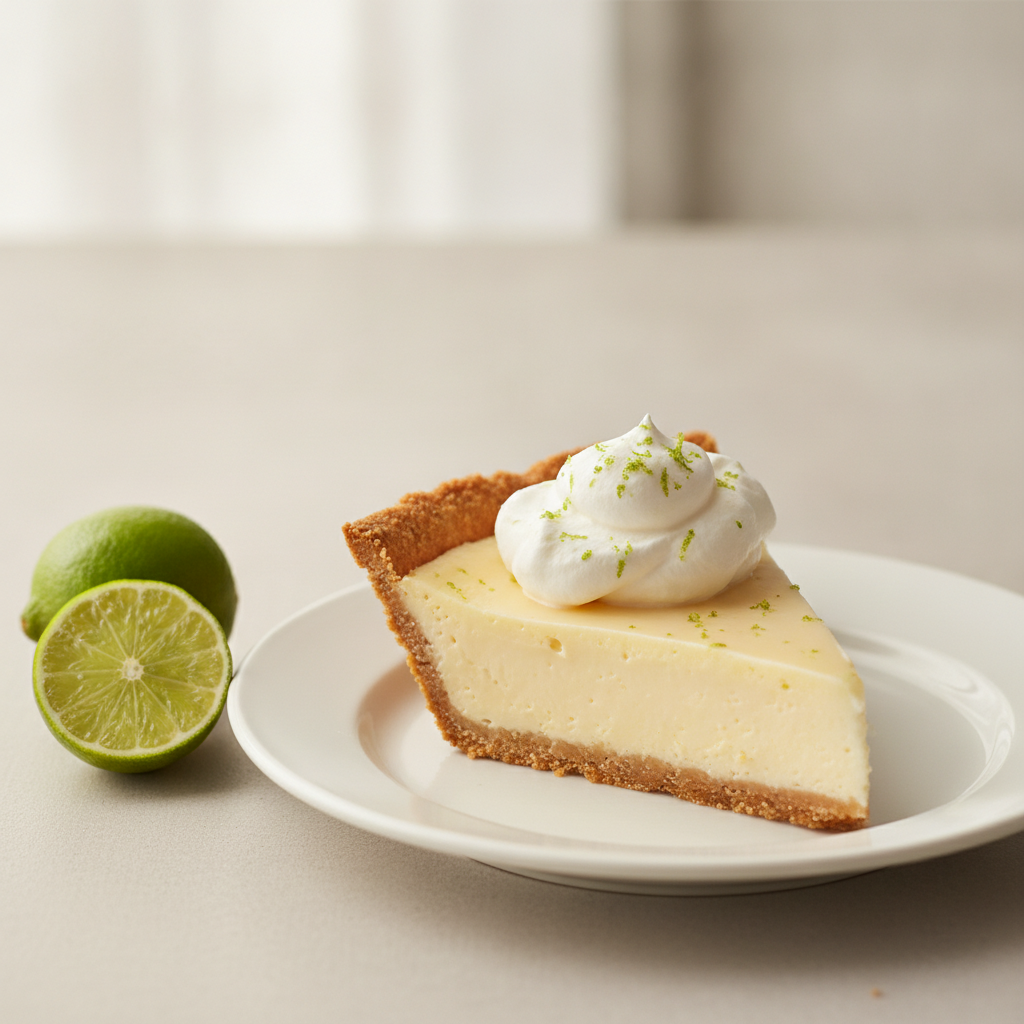
Creamy Key Lime Pie Recipe (No Gelatin)
The BEST Key lime pie recipe! Learn how to make a perfectly creamy, sweet-tart pie with a crisp graham cracker crust. Foolproof, gelatin-free, and so easy.
cookwithyara.com/recipes/key-lime-pie-recipe
There's a special magic in desserts that capture the essence of sunshine. I often find myself drawn to the bright, zesty flavors that remind me of sun-drenched Mediterranean coastlines, where lemon and orange groves perfume the air. While this particular pie hails from a different sunny shore, its soul is one I understand deeply: a perfect, exhilarating balance of sweet and tart. For me, the ultimate comfort isn't always a warm, spiced dish; sometimes, it's the shocking refreshment of a chilled, citrus-forward treat that resets the palate and lifts the spirits. The quest to perfect a key lime pie recipe became a quiet passion project in my kitchen. I wanted to create a version that was deeply creamy without being heavy, intensely flavorful without being puckeringly sour, and held its shape beautifully without the use of gelatin.
This recipe is the culmination of that effort. It’s about celebrating the unique, aromatic flavor of true Key limes and pairing them with a silky, rich custard that melts in your mouth. The secret lies in the simple, classic combination of egg yolks and sweetened condensed milk, baked just until it sets to a perfect wobble. It creates a texture that is pure luxury. We’ll build it all on a foundation of a buttery, crisp graham cracker crust that provides the most satisfying textural contrast. This isn't just a recipe; it's a guide to understanding the delicate dance between acid and sugar, heat and cold, to produce a dessert that is consistently spectacular. Get ready to create a truly unforgettable Key Lime Pie that will have everyone asking for your secret.
The Story Behind This Dish
The story of Key lime pie is a story of place. It was born in the late 19th century in Key West, Florida, a location that shaped its very DNA. At the time, fresh milk and refrigeration were rarities on the isolated Florida Keys. resourceful cooks, known as "Conchs," relied on canned sweetened condensed milk, which was shelf-stable and readily available. This, combined with the abundant, native Key limes and eggs from backyard chickens, formed the holy trinity of the original pie's filling.
The Key lime itself (Citrus aurantiifolia) is a marvel—smaller, more acidic, and far more aromatic than the common Persian limes found in most supermarkets. Its juice is the soul of the pie, lending a floral, intense flavor that is impossible to replicate. The magic happens when this acidic juice reacts with the proteins in the condensed milk and egg yolks, causing the filling to thicken and set, especially when baked. The earliest versions were often not baked at all, relying solely on this chemical reaction. Over time, baking the pie became standard practice to ensure it was fully set and to cook the egg yolks.
What makes a homemade key lime pie recipe so much better than any store-bought version is the commitment to this original spirit. It’s about using real, fresh ingredients to achieve a flavor that is bright and alive, not muted or artificial. A true Key lime pie should have a pale yellow filling, a color gifted by the egg yolks, not the artificial green dye so often seen. Making it at home allows you to control that balance, creating a dessert that honors its simple, brilliant origins.
What Makes This Recipe Special
When developing this key lime pie recipe, my goal was to elevate a classic by focusing on texture and pure, unadulterated flavor. It’s more than just a list of ingredients; it’s a method designed for a perfect outcome every time. Here’s what sets this version apart:
-
Unbelievably Creamy Texture: This pie is all about the mouthfeel. By relying solely on egg yolks and a precise, gentle bake, we achieve a filling that is silky, smooth, and melts on the tongue. It’s rich without being dense, a delicate custard that avoids the rubbery texture that can come from over-baking or unnecessary setting agents. This is a truly gelatin-free recipe, letting the ingredients shine.
-
The Perfect Sweet-Tart Balance: Many Key lime pies lean too far in one direction. This recipe is meticulously balanced. The sweetness from the condensed milk perfectly tempers the sharp, floral acidity of the Key lime juice. Every bite is a delightful burst of citrus followed by a mellow, creamy sweetness that cleanses the palate.
-
A Crisp, Buttery Graham Cracker Crust: A soggy crust can ruin an otherwise perfect pie. My method involves pre-baking the buttery graham cracker crust until it’s golden and fragrant. This step creates a firm, crisp foundation that stands up to the creamy filling, providing a wonderful textural crunch in every single bite. It’s the sturdy, flavorful base this delicate filling deserves.
-
Foolproof Simplicity: Don't let its elegant appearance fool you. This is one of the most straightforward pies you can make. The ingredient list is short, and the steps are simple to follow. The most important ingredients are patience and a gentle hand, especially during the chilling phase, which does all the final work for you.
-
Stunning Natural Beauty: We celebrate the pie’s authentic color—a lovely pale, creamy yellow from the egg yolks and lime juice. When topped with billowy clouds of homemade whipped cream and a sprinkle of vibrant green lime zest, it becomes a simple yet stunning centerpiece for any gathering, proving that natural is always more beautiful.
Breaking Down the Ingredients
A truly great dish starts with understanding what each component brings to the table. In this classic key lime pie recipe, a few simple, high-quality ingredients work in beautiful harmony to create something magical.
The star, of course, is the Key lime. These small, fragrant limes are the heart and soul of the pie. Their juice is tarter and more aromatic than that of larger Persian limes, with distinct floral notes. If you can find fresh Key limes, the effort of juicing them is well worth it for the vibrant flavor. However, a high-quality bottled Key lime juice is an excellent and convenient substitute that will still yield a delicious pie. The lime zest is equally crucial; it contains the lime's essential oils and provides an intense fragrance that perfumes the entire filling.
Next is the foundation of the filling: sweetened condensed milk. This is not just a sweetener; its thick, syrupy consistency provides the pie's body, and its milk proteins react with the lime's acid to naturally thicken the filling. It’s the ingredient that made this pie possible in the first place. Paired with this are egg yolks, which add richness, a beautiful pale-yellow color, and act as the primary binding agent, helping the custard set to a perfectly smooth, silky texture when baked.
For the crust, we rely on classic graham crackers, which provide a honeyed, slightly savory flavor that complements the tart filling beautifully. We crush them into fine crumbs to create a uniform base. That base is held together by unsalted butter, which not only binds the crumbs but also infuses the crust with a rich, nutty flavor as it bakes. A touch of granulated sugar adds a little extra sweetness and helps the crust crisp up in the oven. Finally, the topping of heavy cream, whipped into soft peaks with a little powdered sugar and non-alcoholic vanilla extract, is non-negotiable. Its airy lightness and subtle sweetness provide the perfect cooling counterpoint to the pie's rich, zesty filling.
The Cooking Process Explained
Mastering this key lime pie recipe is about understanding four key stages, each one simple but essential to achieving a perfect result. Think of it as a culinary journey from crumbly, to creamy, to chilled perfection.
First, we build our foundation: the crust. This stage is all about texture. You'll start by processing graham crackers into fine, sandy crumbs. The finer the crumbs, the more tightly your crust will hold together. These crumbs are then tossed with a little sugar before being drenched in melted butter. The goal is to moisten every crumb, so the mixture resembles wet sand. This buttery mixture is then pressed firmly and evenly into the bottom and up the sides of your pie plate. An even crust ensures an even bake. A crucial step here is pre-baking the crust for about 10 minutes. This short bake toasts the crumbs, deepens their flavor, and creates a crisp, sealed barrier that will defy any sogginess once the filling is added.
Next comes the heart of the pie: the filling. This stage is about gentle mixing, not aggressive whipping. You’ll begin by whisking the egg yolks until they are pale and slightly frothy. Then, you'll pour in the sweetened condensed milk and whisk until the mixture is smooth and uniform. The final, magical step is gently folding in the Key lime juice and zest. You will notice the mixture begins to thicken almost immediately as the acid reacts with the milk. Be careful not to overmix here; you just want to combine everything until it's smooth to preserve the delicate, creamy texture.
Third is the bake, a lesson in patience. The prepared filling is poured into the cooled, pre-baked crust and smoothed into an even layer. The pie goes into a moderate oven for a relatively short time, just 15 to 17 minutes. The visual cue for doneness is key here. The edges of the pie should be set, but the center should still have a distinct jiggle or wobble when you gently nudge the pan. It will not look fully solid. This is the secret to a creamy, not rubbery, filling. Pulling it from the oven at this exact moment is critical.
Finally, the most important stage of all: the chill. This is where the pie transforms. First, it must cool completely to room temperature on a wire rack. Rushing this can cause condensation and a soggy crust. Once cool, it heads to the refrigerator for at least four hours, but preferably overnight. During this long, cold rest, the filling will firm up completely, setting into the perfect sliceable, silky custard. Only after it has fully chilled should you even think about topping it with whipped cream and serving.
Mistakes to Avoid
Even the simplest recipes have a few potential pitfalls. By being aware of them, you can ensure your journey to the perfect homemade Key lime pie is a smooth one. Here is some friendly advice to help you get it right on the first try.
-
Don't Overbake the Pie. This is the most common mistake. An overbaked Key lime pie will have a firm, almost rubbery texture and is prone to cracking on the surface. Remember the key visual cue: the pie is done when the center still has a slight wobble to it. It will continue to set as it cools and chills. Trust the process and pull it from the oven at that wobbly stage.
-
Don't Skip Pre-Baking the Crust. It might seem like an unnecessary step, but pre-baking is what guarantees a crisp, sturdy graham cracker crust that won’t turn soggy under the moist filling. That short time in the oven is essential for creating a delicious textural contrast.
-
Don't Rush the Chill Time. I know it’s tempting to slice into it early, but this pie needs to be thoroughly chilled to set properly. A minimum of four hours in the refrigerator is essential, but overnight is even better for the firmest set and deepest flavor. An under-chilled pie will be soupy and impossible to slice cleanly.
-
Don't Use Green Food Coloring. An authentic key lime pie recipe yields a filling that is a pale, creamy yellow, thanks to the egg yolks. The vibrant green pies you sometimes see are the result of artificial food coloring. Embrace the natural beauty of your dessert; its incredible flavor speaks for itself.
-
Don't Get Aggressive with the Filling. When you combine the filling ingredients, whisk them gently until they are just combined and smooth. Over-mixing, especially with an electric mixer, can incorporate too much air, which can affect the final dense, creamy texture we're aiming for.
How to Serve This
Serving this creamy Key lime pie is all about celebrating its refreshing simplicity. This dessert should always be served well-chilled, straight from the refrigerator. The cold temperature enhances its creamy texture and makes the tart lime flavor even more bright and invigorating.
A generous topping of homemade whipped cream is essential. Its light, airy texture and subtle sweetness are the perfect foil for the dense, tart filling. You can either spread the whipped cream over the entire pie for a beautiful, cloud-like appearance or spoon a generous dollop onto each individual slice as you serve it.
For a simple, elegant presentation, garnish with a sprinkle of fresh lime zest right before serving. The tiny green flecks add a pop of color and a burst of fresh citrus aroma. A few very thin slices of Key lime can also make a beautiful garnish on top of the whipped cream.
This key lime pie recipe is a wonderfully versatile dessert. For a quick weeknight treat, a simple slice is all you need. For a weekend gathering, it serves as the perfect light finish to a rich and flavorful meal. Imagine serving it after a dinner of smoky grilled chicken skewers or a hearty lentil soup; its palate-cleansing quality is a welcome delight.
Make-Ahead and Storage Guide
One of the best things about this key lime pie recipe is that it's an ideal make-ahead dessert. In fact, its flavor and texture actually improve with a day's rest in the refrigerator, allowing the flavors to meld and deepen.
Make-Ahead: You can prepare the entire pie, from crust to filling and baking, up to two days in advance. Let it cool completely, then cover it carefully with plastic wrap (try to tent it so it doesn't touch the surface of the filling) and store it in the refrigerator. Wait to prepare and add the whipped cream topping until just before you plan to serve it for the best and freshest texture.
Fridge Storage: Leftover pie will keep beautifully in the refrigerator for up to 4 days. Keep it well-covered to prevent it from absorbing any other fridge odors.
Freezing Instructions: Yes, you can freeze Key lime pie! For best results, freeze the pie without the whipped cream topping. Once the pie has been baked and fully chilled, wrap it tightly in a layer of plastic wrap, followed by a layer of aluminum foil. It can be frozen for up to one month. To serve, thaw the pie overnight in the refrigerator. Once thawed, prepare the fresh whipped cream, top the pie, and serve immediately.
Reader Questions Answered
Can I use a store-bought graham cracker crust?
You certainly can, and it's a great shortcut if you're short on time! However, I truly believe the flavor and crisp texture of a homemade buttered graham cracker crust are superior and worth the extra 15 minutes of effort. If you do use a store-bought crust, I still recommend popping it in the oven for 5-7 minutes to toast it slightly before adding the filling.
My pie didn't set properly. What went wrong?
This is almost always due to one of two things: it was either slightly underbaked or, more commonly, it wasn't chilled for long enough. Be sure to bake it until the edges are set and the center has a slight wobble, and then give it a full, uninterrupted chill time of at least 4 hours, though overnight is truly best for a firm, clean slice.
How can I make this key lime pie recipe gluten-free?
Absolutely! It's a very simple swap. Just substitute the regular graham crackers with your favorite brand of gluten-free graham-style crackers. The process for making the crust is exactly the same, and the delicious filling is naturally gluten-free.
Can I use regular Persian limes instead of Key limes?
You can, but the flavor profile will be different, and it technically won't be a Key lime pie. Persian limes are less acidic and lack the distinct floral aroma of Key limes. Your pie will still be a delicious lime pie, but it will have a more straightforward, less complex tartness. If you can't find fresh or bottled Key lime juice, this is the next best option.
Is it possible to make this dessert with less sugar?
Unfortunately, for this specific recipe, reducing the sugar isn't recommended. The sweetened condensed milk is a critical structural ingredient, providing not just the sweetness but also the bulk and proteins that react with the lime juice to set the pie. Altering its amount would fundamentally change the texture and consistency of the filling.
The Ultimate Creamy Key Lime Pie
A classic key lime pie recipe featuring a buttery graham cracker crust, a silky sweet-tart filling made with real Key lime juice, and a cloud of fluffy whipped cream. This no-fuss, gelatin-free dessert is pure sunshine on a plate.
Prep Time
25 min
Cook Time
15 min
Total Time
4h 40m
Servings
8 servings
Ingredients
For 8 servings
- 1 1/2 cups (150g) graham cracker crumbs (from about 10 whole crackers)
- 1/3 cup (67g) granulated sugar
- 6 tablespoons (85g) unsalted butter, melted
- 4 large egg yolks
- 1 can (14 ounces / 396g) sweetened condensed milk
- 1/2 cup (120ml) fresh Key lime juice (or high-quality bottled)
- 1 tablespoon Key lime zest
- 1 cup (240ml) cold heavy whipping cream
- 1/4 cup (30g) powdered sugar
- 1/2 teaspoon non-alcoholic vanilla extract
Instructions
- 1
Prepare Oven and Pan
Preheat your oven to 350°F (175°C). Have a 9-inch pie plate ready. No need to grease the plate as the butter in the crust will prevent sticking.
- 2
Make the Crust Mixture
In a medium bowl, combine the graham cracker crumbs and granulated sugar. Pour in the melted butter and stir with a fork until all the crumbs are evenly moistened and the mixture resembles wet sand.
- 3
Press Crust into Pan
Tip the crumb mixture into the pie plate. Using your fingers or the flat bottom of a measuring cup, press the crumbs firmly and evenly onto the bottom and up the sides of the plate to form a compact crust.
- 4
Pre-Bake the Crust
Place the pie plate on a baking sheet and bake for 10 minutes, until the crust is fragrant and slightly golden. Set aside on a wire rack to cool completely before adding the filling.
- 5
Prepare the Filling Base
In a large bowl, whisk the egg yolks for about 1-2 minutes until they become pale and slightly fluffy. Pour in the sweetened condensed milk and whisk until the mixture is smooth and fully combined.
- 6
Incorporate Lime Juice and Zest
Gently whisk in the Key lime juice and lime zest until just combined. The mixture will begin to thicken slightly. Do not overmix.
- 7
Fill Crust and Bake
Pour the filling into the cooled, pre-baked crust and spread it into an even layer. Bake for 15-17 minutes. The pie is done when the edges are set but the center still has a slight wobble when you gently nudge the pan.
- 8
Cool and Chill the Pie
Carefully remove the pie from the oven and place it on a wire rack to cool completely to room temperature (about 1 hour). Once cool, cover with plastic wrap and transfer to the refrigerator to chill for at least 4 hours, or preferably overnight, until fully set.
- 9
Prepare Whipped Cream Topping
Just before serving, make the whipped cream. In a large, chilled bowl, beat the cold heavy cream, powdered sugar, and non-alcoholic vanilla extract with an electric mixer on medium-high speed until soft to medium peaks form.
- 10
Garnish and Serve
Spread the whipped cream over the top of the chilled pie or spoon a dollop onto each slice. Garnish with additional lime zest if desired. Serve immediately and store any leftovers in the refrigerator.
Nutrition Facts
Per serving (estimated)
460 calories
Calories
55g
Carbs
8g
Protein
24g
Fat
1g
Fiber
220mg
Sodium
45g
Sugar