Easy Patriotic Mini Ice Cream Sandwiches (Showstopper!)
Wow your guests with these vibrant red, white, and blue Patriotic Mini Ice Cream Sandwiches! Perfect for summer parties and surprisingly easy to make.
cookwithyara.com/recipes/patriotic-mini-ice-cream-sandwiches
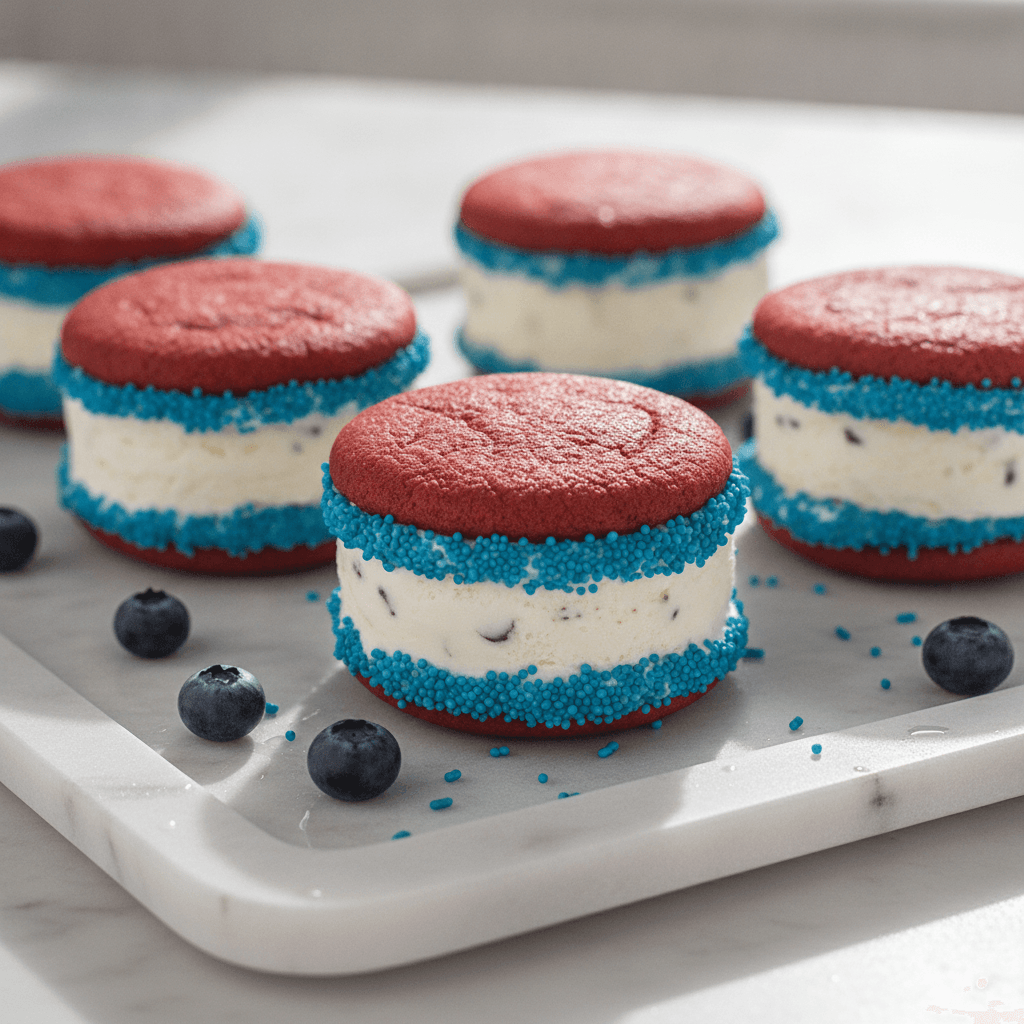
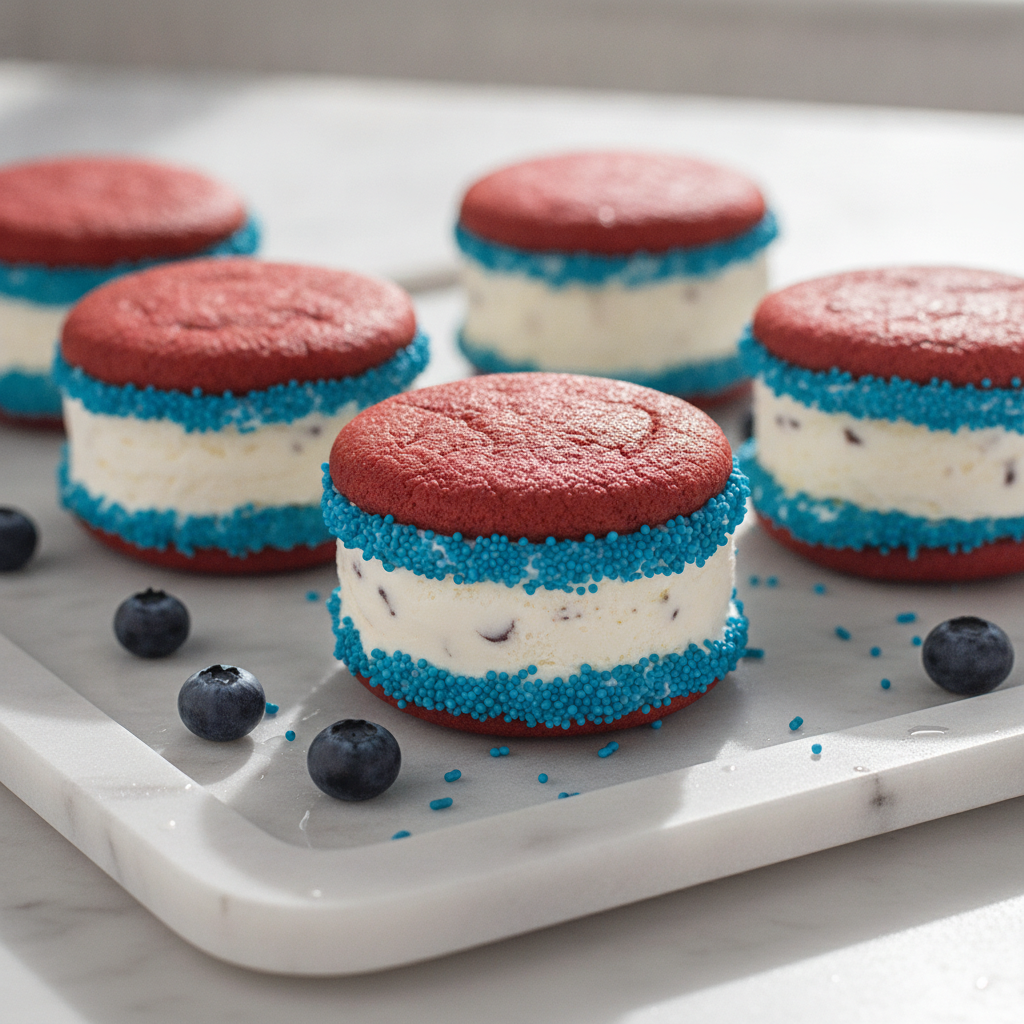
There’s a special kind of magic that happens when dessert arrives after a long, leisurely meal. The conversation lulls for just a moment, forks are put down, and all eyes turn to the platter making its way to the center of the table. Imagine this: a beautiful tray, chilled to the touch, holding rows of dazzling, jewel-like treats. These are not just any dessert; they are vibrant, festive, and perfectly portioned Patriotic Mini Ice Cream Sandwiches. The cookies are a deep, celebratory red, the ice cream is a creamy, pristine white, and the edges are joyfully rolled in a cascade of brilliant blue sprinkles. It's a dessert that elicits gasps of delight before a single bite is even taken. Guests lean in, their faces lit by the warm glow of evening lights, reaching for their phones to capture the moment. It’s a picture-perfect scene, a sweet conclusion to a beautiful gathering. My favorite part about serving these little beauties is the look on everyone's face when I tell them how simple they are to create. They look like they came from a gourmet sweet shop, but I promise you, the process is straightforward and incredibly rewarding. The secret isn't some complex pastry technique; it’s a clever method for assembling them that guarantees perfect, uniform results every single time. Get ready to create a dessert that’s as fun to make as it is to eat.
What Makes This a Showstopper
What elevates a dessert from merely tasty to a true showstopper? It's a combination of visual appeal, flavor experience, and that little touch of surprise. These Patriotic Mini Ice Cream Sandwiches check every single box. Visually, they are simply stunning. The bold, primary-inspired color palette of red, white, and blue is inherently festive and joyful. It’s a color scheme that speaks of celebration, community, and bright, sunny days. The contrast between the soft, matte red of the cookie, the creamy white ice cream, and the crunchy, glittering blue sprinkles creates a visual texture that is incredibly appealing. They are miniature, which adds to their charm; there’s something irresistibly delightful about a perfectly crafted, bite-sized dessert. It invites guests to take one (or three!) without feeling overly indulgent. The experience of eating one is a journey in textures and temperatures. Your first bite breaks through the soft, yielding cookie, which has the perfect amount of chew. Then you reach the cold, creamy vanilla ice cream that immediately begins to melt on your tongue, providing a soothing contrast to the warmth of the day. Finally, you get the satisfying crunch from the sprinkles, a playful end to a perfect bite. This isn't just an ice cream sandwich; it’s a composed dessert that you'd easily find at a high-end scoop shop or a trendy cafe. The beauty of this recipe is that it delivers that gourmet experience without requiring any specialized skills or equipment. It's all about a smart process, which we’ll walk through together, that makes you look like a professional pastry chef with minimal fuss.
The Ingredients That Matter Most
At the heart of any unforgettable dish are high-quality ingredients, and this recipe for Patriotic Mini Ice Cream Sandwiches is no exception. While the list is simple, choosing well will make all the difference. Let's talk about the key players. The foundation of this treat is the soft red cookie. For this, you’ll need good quality, unsalted butter. Using unsalted butter allows you to control the salt level perfectly, and a higher-fat butter will yield a richer, more tender cookie. The color comes from a gel food coloring. This is where you don't want to skimp. Gels provide an intense, vibrant red without adding the extra liquid that can make your cookie dough sticky and difficult to work with. For the pristine white layer, a premium vanilla bean ice cream is essential. Look for one with real vanilla bean specks; the flavor is far superior to artificially flavored options. The creamy, rich texture of a high-quality ice cream is what makes these sandwiches feel so luxurious. And of course, the finishing touch: the blue sprinkles. You have options here. Blue jimmies (the little rod-shaped ones) offer a classic look and a soft crunch. For a finer texture and a beautiful sparkle, you can use blue sanding sugar. For a classic, tiny crunch, nonpareils are perfect. The choice is yours, but make sure they are a vibrant, deep blue to complete the festive look. The supporting cast includes all-purpose flour for structure, granulated sugar for sweetness, a large egg for binding, a good quality (and halal-compliant) vanilla extract for aroma, and a pinch of salt to balance all that sweetness and make the flavors pop.
Building It Step by Step
Creating these beautiful Patriotic Mini Ice Cream Sandwiches is a process of patient assembly, where each step builds upon the last to create the stunning final product. It’s a rhythm of mixing, chilling, baking, and freezing that is deeply satisfying. Think of it as constructing a little piece of edible art. We begin by making the cookie dough. This is a classic creaming method: beating the softened butter and sugar together until they are light, fluffy, and almost cloud-like. This step incorporates air, which is crucial for a tender cookie. Next, we’ll beat in the egg and vanilla, followed by the star of the show for our cookies: the red gel food coloring. This is where you see the dough transform into a beautiful, vibrant crimson. Once the color is uniform, we gradually mix in the dry ingredients—flour, baking powder, and salt—just until combined. Over-mixing develops gluten, which we want to avoid for a soft, tender bite. Now comes the first crucial pause: chilling the dough. This step is non-negotiable. Chilling solidifies the butter, which prevents the cookies from spreading into thin, sad discs in the oven. It makes the dough firm and easy to roll out, ensuring your mini sandwiches have a nice, thick cookie base. While the dough chills, we prepare our ice cream layer. This is the ultimate hack for perfect ice cream sandwiches. We let a container of vanilla ice cream soften just enough to be spreadable, then smooth it into an even layer in a parchment-lined pan and send it back to the freezer to become a solid, frozen slab. Once the cookies are baked and cooled, and the ice cream is rock-solid, the real magic of assembly begins. Using the same small, round cookie cutter you used for the cookies, you’ll press out perfect discs of ice cream. It's incredibly satisfying! Then, you simply sandwich an ice cream disc between two perfectly matched red cookies, give it a gentle press, and immediately roll the exposed ice cream edges in a bowl of blue sprinkles. The final step is one more trip to the freezer, allowing the assembled Patriotic Mini Ice Cream Sandwiches to firm up completely, ensuring they are perfect and mess-free when you serve them. This methodical process guarantees that every single sandwich is as beautiful as the last.
Presentation and Plating Tips
Once your Patriotic Mini Ice Cream Sandwiches are frozen solid, it's time to think about their grand debut. Presentation is what transforms a delicious homemade treat into a memorable centerpiece. The vibrant colors of these sandwiches are the star, so you want to choose a serving vessel that makes them pop. My go-to is a simple, elegant white ceramic platter. The clean white background provides a beautiful canvas that accentuates the bold red and blue. For a more rustic, relaxed feel, a light-colored wooden board or a slate tile also works beautifully. When arranging them, think about creating visual interest. Instead of a simple grid, try arranging them in a concentric circle, an S-curve, or even fanned out on a rectangular tray. A bit of intentional placement goes a long long way. To elevate the platter further, add a few complementary garnishes. A small scattering of fresh blueberries and a few sliced strawberries or raspberries around the sandwiches echoes the color theme and adds a touch of freshness. It makes the entire presentation feel more abundant and thoughtful. Finally, timing is everything. These are frozen treats, so they should be the very last thing you bring out before serving. Serve them directly from the freezer onto your chilled platter. If you have a multi-tiered dessert stand, placing them on top can create a wonderful sense of height and occasion. This little bit of styling effort ensures your beautiful creations get the 'wow' moment they truly deserve.
Scaling Up for a Crowd
One of the best features of this Patriotic Mini Ice Cream Sandwiches recipe is how gracefully it scales up for larger gatherings, community events, or big family get-togethers. The key to success when making a large batch is a smart prep-ahead strategy. Don't try to do it all in one day. The cookie dough can be made up to three days in advance and kept well-wrapped in the refrigerator. You can even freeze the dough discs for up to a month. The cookies themselves can be baked a day or two ahead and stored in an airtight container at room temperature. This breaks up the work into manageable chunks. When you’re ready to assemble, you can prepare a large sheet pan of the vanilla ice cream slab. A standard half-sheet pan is perfect for doubling the recipe. Once it's frozen solid, you can work in batches to cut the discs and assemble the sandwiches. If you have willing helpers, this is the perfect time to form an assembly line! One person can unwrap cookies, another can place the ice cream discs, a third can do the gentle press, and a fourth can be in charge of rolling in sprinkles. It becomes a fun, collaborative activity. As you complete the sandwiches, place them on parchment-lined baking sheets and get them into the freezer immediately. Once they are frozen solid, you can transfer them to large freezer-safe bags or containers, placing sheets of wax paper between the layers to prevent sticking. You can have dozens of these perfect Patriotic Mini Ice Cream Sandwiches ready and waiting in your freezer a week before your event, freeing you up to enjoy the celebration with your guests.
Storing Any Leftovers
While these Patriotic Mini Ice Cream Sandwiches have a tendency to disappear quickly, on the off chance you have a few left over, proper storage is key to keeping them tasting just as fresh and delicious as when you first made them. The enemy of any frozen treat is freezer burn, which happens when air gets to the surface and causes ice crystals to form, ruining the texture. To prevent this, individual wrapping is your best friend. Take each mini ice cream sandwich and wrap it snugly in a small piece of plastic wrap or wax paper. This creates a protective barrier that shields the cookie and ice cream from the harsh, dry air of the freezer. Once they are all individually wrapped, place them inside a larger, airtight freezer-safe container or a heavy-duty freezer bag. This double layer of protection is the secret to long-lasting freshness. Stored this way, your sandwiches will maintain their wonderful texture and flavor for up to two weeks. The cookies will remain relatively soft, and the ice cream will stay creamy. Beyond that, they are still perfectly fine to eat, but the cookies may begin to soften a bit more as they absorb moisture from the ice cream. When you’re ready for another treat, there’s no need to thaw. Simply unwrap and enjoy immediately, perhaps letting it sit for just a minute at room temperature to take the deep chill off.
Variations to Explore
While the classic red, white, and blue combination is a guaranteed winner, this recipe for Patriotic Mini Ice Cream Sandwiches is a fantastic template for creativity. Once you master the technique, you can explore all sorts of fun and delicious variations. Here are a few ideas to get you started:
- Chocolate Lover's Dream: Use your favorite brownie recipe (baked thin in a sheet pan) or a soft double chocolate cookie for the sandwich. Pair it with a high-quality chocolate or mint chip ice cream and roll the edges in mini chocolate chips or chocolate sprinkles.
- Strawberry Fields: Infuse the cookie dough with finely crushed freeze-dried strawberries for an intense, natural flavor and a lovely pink hue. Sandwich it with a creamy strawberry ice cream for a delightful monochromatic look.
- A Touch of Citrus: Add the zest of one lemon or orange to the cookie dough. The bright citrus notes are a beautiful counterpoint to the sweet, creamy vanilla ice cream. Roll the edges in white nonpareils for an elegant, sparkling finish.
- The Weeknight Shortcut: No time to bake from scratch? No problem. Use high-quality store-bought sugar cookie dough and add red food coloring. For an even faster version, buy pre-made vanilla ice cream sandwiches, use your round cutter to trim them into perfect mini circles, and then roll the edges in your festive blue sprinkles. It gives you the look without all the work!
- Dietary-Friendly Versions: This recipe is easily adaptable. For a gluten-free option, substitute the all-purpose flour with a good quality 1-to-1 gluten-free baking blend. For a dairy-free or vegan version, use a plant-based butter substitute in the cookies and sandwich them with a scoop of your favorite coconut, oat, or almond-based vanilla ice cream.
Questions You Might Have
Can I make these Patriotic Mini Ice Cream Sandwiches ahead of time?
Absolutely! They are the perfect make-ahead dessert. You can assemble them completely, wrap them individually, and store them in the freezer for up to two weeks. This makes them ideal for stress-free party planning.
My cookies spread too much in the oven. What went wrong?
The most common culprit is the dough temperature. It's crucial to chill the dough for at least an hour, or until it's very firm. This solidifies the butter, preventing it from melting too quickly in the oven and causing the cookies to spread.
Can I use a different flavor of ice cream?
Of course! While vanilla provides the classic white color, feel free to experiment. A pale-colored ice cream like lemon sorbet, coconut, or even a very light strawberry would be delicious and still look beautiful. Just be mindful that a darker color will change the visual effect.
How do I get such clean, perfect circles of ice cream?
The trick is to freeze the ice cream in a thin, solid slab on a parchment-lined baking sheet. Let it freeze for at least 2-3 hours until it's rock-hard. Then, press your cookie cutter firmly into the slab to punch out a perfect disc. If the cutter starts to stick, you can dip it in a little warm water and wipe it dry between cuts.
What’s the best way to transport these to a party or picnic?
To ensure your Patriotic Mini Ice Cream Sandwiches arrive in perfect condition, transport them in a well-insulated cooler with plenty of ice packs or dry ice. Arrange them in a single layer in a freezer-safe container to prevent them from getting squished. Keep the cooler closed until the moment you are ready to serve.
Patriotic Mini Ice Cream Sandwiches
Vibrant red, white, and blue mini ice cream sandwiches made with soft red sugar cookies, creamy vanilla ice cream, and festive blue sprinkles. The perfect treat for summer celebrations.
Prep Time
45 min
Cook Time
12 min
Total Time
3h
Servings
24 mini sandwiches
Ingredients
For 24 mini sandwiches
- 1 1/2 cups all-purpose flour
- 1/2 teaspoon baking powder
- 1/4 teaspoon salt
- 1/2 cup unsalted butter, softened to room temperature
- 3/4 cup granulated sugar
- 1 large egg
- 1 teaspoon vanilla extract (halal-compliant)
- 1-2 teaspoons red gel food coloring
- 1.5 quarts premium vanilla bean ice cream
- 1/2 cup blue sprinkles (jimmies, nonpareils, or sanding sugar)
Instructions
- 1
Prepare the Dry Ingredients
In a medium bowl, whisk together the all-purpose flour, baking powder, and salt. Whisking helps to evenly distribute the leavening agent and salt, ensuring a consistent texture in your cookies.
- 2
Cream Butter and Sugar
In the bowl of a stand mixer fitted with the paddle attachment, or in a large bowl with a hand mixer, beat the softened unsalted butter and granulated sugar on medium-high speed for 2-3 minutes until light and fluffy. This process, called creaming, incorporates air into the dough for a tender cookie.
- 3
Add Wet Ingredients and Color
Add the egg and vanilla extract to the creamed butter mixture and beat until well combined. Scrape down the sides of the bowl. Add 1 teaspoon of red gel food coloring and mix until the color is vibrant and evenly distributed, adding more if needed to achieve a deep red.
- 4
Combine and Chill Dough
With the mixer on low, gradually add the dry ingredients to the wet ingredients, mixing just until combined. Do not overmix. Form the dough into a disc, wrap it tightly in plastic wrap, and refrigerate for at least 1 hour, or until firm.
- 5
Prepare Ice Cream Slab
While the dough chills, line a 9x13 inch baking pan with parchment paper, leaving an overhang on the sides. Allow the vanilla ice cream to soften at room temperature for about 10-15 minutes, until it's spreadable but not melted. Quickly spread the ice cream evenly in the prepared pan and place it in the freezer for at least 2-3 hours, or until completely solid.
- 6
Roll and Cut Cookies
Preheat your oven to 350°F (175°C) and line two baking sheets with parchment paper. On a lightly floured surface, roll out the chilled cookie dough to about 1/4-inch thickness. Use a small 1.5-inch or 2-inch round cookie cutter to cut out circles, placing them 1 inch apart on the prepared baking sheets.
- 7
Bake and Cool Cookies
Bake the cookies for 9-11 minutes, or until the edges are set. Be careful not to overbake, as you want to maintain the vibrant red color. Let them cool on the baking sheet for 5 minutes before transferring them to a wire rack to cool completely.
- 8
Cut Ice Cream Discs
Once cookies are completely cool, remove the frozen ice cream slab from the freezer. Use the parchment overhang to lift it out of the pan. Working quickly, use the same round cookie cutter to cut out as many ice cream discs as possible. Place the discs on a parchment-lined tray and return to the freezer immediately to stay firm.
- 9
Assemble the Sandwiches
Place your blue sprinkles in a shallow bowl. Working with one at a time, take two red cookies and one ice cream disc. Place the ice cream disc on the bottom of one cookie, top with the second cookie (bottom-side down), and press gently to adhere.
- 10
Roll in Sprinkles
Immediately after forming the sandwich, roll the exposed ice cream edges in the bowl of blue sprinkles until evenly coated. The sprinkles will stick to the soft ice cream easily. Place the finished sandwich on a parchment-lined baking sheet.
- 11
Final Freeze
Repeat the assembly and rolling process with the remaining cookies and ice cream discs. Place the baking sheet with all the finished sandwiches back into the freezer for at least 30 minutes to an hour to allow them to firm up completely before serving.
- 12
Store for Later
If not serving immediately, wrap each sandwich individually in plastic wrap and store them in an airtight container or freezer bag for up to 2 weeks for the best quality.
Nutrition Facts
Per serving (estimated)
150 calories
Calories
18g
Carbs
2g
Protein
8g
Fat
0.5g
Fiber
65mg
Sodium
12g
Sugar