

Easy Rhubarb Bars Recipe (Perfect for Meal Prep!)
Discover the best rhubarb bars with a buttery shortbread crust and oat crumble. An easy, make-ahead dessert perfect for a week of sweet treats.
cookwithyara.com/recipes/rhubarb-bars
There’s a certain rhythm to the week that I’ve come to cherish. It often starts on a quiet Sunday afternoon, with the gentle hum of the oven and the kitchen filled with the comforting scent of butter and sugar. This is the time I dedicate to meal prep, a ritual that sets the tone for the days ahead. While many think of meal prep as endless containers of grains and greens, I believe it should also include something that brings a little joy—a sweet, wholesome treat waiting for you after a long day. That’s where these incredible Rhubarb Bars come in. They are the answer to the midweek craving for something special, without the need to pull out the flour and mixing bowls on a busy Tuesday night.
The daily grind can leave us with little energy for baking from scratch. We crave connection and comfort, but the effort can feel daunting. This is the problem these Rhubarb Bars so elegantly solve. By dedicating a single, focused session of baking, you gift your future self a week of deliciousness. Imagine coming home, brewing a cup of tea, and simply reaching for a perfectly tart, sweet, and crumbly bar you prepared days ago. It’s a small act of kindness to yourself, a delicious reward that makes the entire week feel a little brighter. This recipe is specifically designed for this purpose; it’s a batch-baking dream that tastes even better on day two or three.
Why This Recipe Is Perfect for Meal Prep
Not all baked goods are created equal when it comes to making them ahead of time. Some desserts are at their peak the moment they leave the oven, losing their charm with each passing hour. These Rhubarb Bars, however, are the opposite. They are built to last, with flavors and textures that actually improve as they sit and settle. It’s a quality I actively look for in a meal prep-friendly recipe, and this one delivers beautifully.
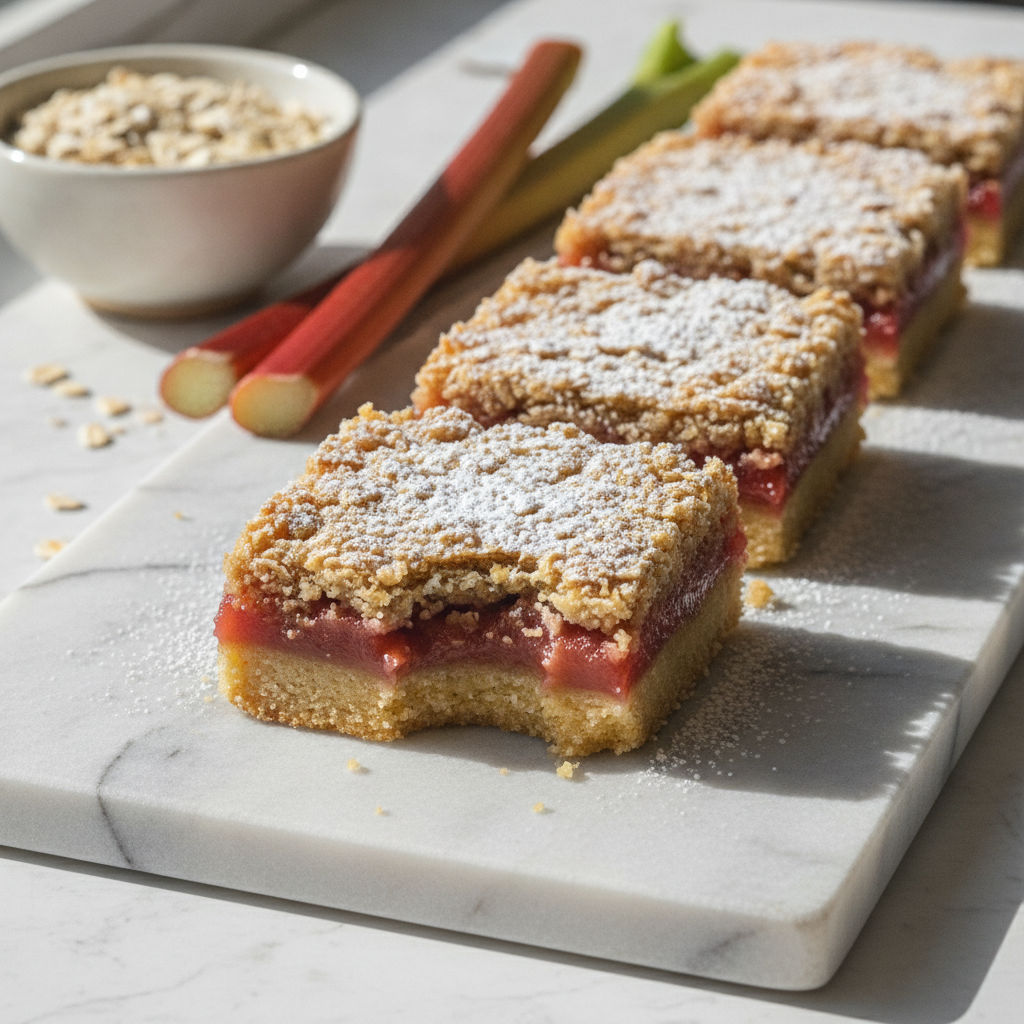
The foundation of these bars is a sturdy, buttery shortbread crust. We pre-bake it just enough to create a crisp, golden base that can stand up to the juicy filling. This crucial step prevents the dreaded soggy bottom, ensuring that each bite has that satisfying, crumbly texture, even days later. It acts as a delicious, reliable barrier that holds everything together.
Above the crust lies the star of the show: the vibrant rhubarb filling. As the bars cool and rest in the refrigerator, the magic truly happens. The sweet and tart notes of the rhubarb meld together, deepening in flavor. The filling becomes jammy and luscious, but thanks to a bit of cornstarch, it sets perfectly without being watery. This means your bars will hold their shape for clean, easy slicing throughout the week. Finally, the generous oat crumble on top provides a delightful textural contrast that remains pleasantly crisp, offering a wholesome, satisfying crunch that doesn’t soften over time. The combination of these three stable layers makes these Rhubarb Bars a meal prep champion.
What You'll Need
Gathering your ingredients for these Rhubarb Bars is a simple affair, but choosing quality components will make all the difference. Think of this as stocking your pantry for a week of wonderful snacks. The list is straightforward, relying on kitchen staples, but I have a few notes to ensure your bars are spectacular every time.
First, let's talk about the rhubarb. If you can find fresh, vibrant red or pink stalks, they are a joy to work with. Look for firm, crisp stalks without blemishes. But one of the best things about this recipe is that it works just as beautifully with frozen rhubarb! This is fantastic news, as it means you can make these bars year-round. If using frozen, there’s no need to thaw it first—just toss it directly with the sugar and cornstarch. You may need an extra minute or two of baking time, but the result will be just as delicious.
For the crust and crumble, cold, unsalted butter is non-negotiable. The cold temperature is what creates those tiny pockets of butter in the dough, which result in a tender, flaky shortbread and a perfectly crisp crumble. I like to cube my butter and pop it back in the fridge while I measure my other ingredients. The other key players are all-purpose flour for structure, granulated sugar for the filling, and brown sugar for the molasses-rich depth in the crumble topping. Rolled oats add a lovely chewiness and heartiness to the topping as well.
To elevate these bars with a touch of my beloved Levantine flavors, I love to add a pinch of ground cardamom or a teaspoon of orange blossom water to the rhubarb filling. These warm, floral notes complement the tartness of the rhubarb in a truly special way. When it comes to storage, I highly recommend glass containers with airtight lids. Glass doesn't absorb odors, and you can see exactly what you have. A large, rectangular container is perfect for storing the bars in a single layer, which helps protect the delicate crumble topping.
The Batch Cooking Method
The true beauty of making these Rhubarb Bars for meal prep lies in the streamlined, assembly-line process. You’re essentially creating three simple components—crust, filling, and crumble—and layering them together. By organizing your workflow, you can move through the recipe efficiently, making the entire experience relaxing and rewarding. This isn't about rushing; it's about a calm, methodical approach to creating something wonderful.
Your first order of business is the crust. While your oven preheats, you'll mix the flour, sugar, and salt, then cut in the cold, cubed butter until the mixture resembles coarse crumbs. Press this firmly and evenly into your baking pan. The most important step here is the blind bake. Giving the crust a 15-minute head start in the oven is what ensures it becomes a crisp, golden foundation that won’t get soggy. This is your active time, and it’s a crucial investment in the final texture.
While the crust is pre-baking, you can multitask by preparing both the filling and the crumble. This is where you hit your rhythm. In one bowl, toss the chopped rhubarb with sugar, cornstarch, and your chosen flavorings like vanilla or orange zest. The cornstarch is essential; it’s a thickener that will absorb the fruit's juices as it bakes, creating a perfectly set, jam-like filling. In another bowl, prepare the crumble by mixing the flour, oats, brown sugar, and spices, then cutting in the remaining cold butter. By the time the oven timer beeps for the crust, your other two components will be ready to go.
Once the crust is lightly golden, the assembly is simple. Spread the rhubarb mixture evenly over the warm crust, then sprinkle the crumble topping all over, making sure to cover the fruit completely. The pan goes back into the oven for a longer bake, during which the filling will become bubbly and thick and the topping will turn a beautiful golden brown. The majority of this recipe's time is passive baking time, giving you a moment to clean up and relax, anticipating the delicious aroma that will soon fill your home. This methodical process makes batch-baking these Rhubarb Bars an incredibly satisfying project.
The Weekly Game Plan
Once your beautiful pan of Rhubarb Bars has been baked and cooled, the fun part begins: planning how you’ll enjoy them throughout the week. Having a batch of these treats ready to go is like having a secret weapon against the afternoon slump or the evening dessert craving. The key to avoiding flavor fatigue is to think of the bar as a versatile base that can be dressed up in different ways.
Day 1 (Sunday/Monday): Enjoy the first bar in its purest form. After the initial cooling period, cut a perfect square and savor it as is. The flavors are fresh and distinct—the buttery crust, the bright, tart filling, and the sweet, oaty crumble. It's wonderful with a simple cup of black tea or coffee, allowing you to appreciate the classic flavor profile you just created.
Day 2 (Tuesday): Elevate your breakfast or mid-morning snack. Crumble one of the Rhubarb Bars over a bowl of thick, creamy Greek yogurt. The combination of the tangy yogurt with the sweet and tart bar is absolutely divine. It adds texture, flavor, and a bit of decadence to a simple staple, turning it into something truly special.
Day 3 (Wednesday): Create a simple, elegant dessert. Gently warm a bar in the microwave or toaster oven for just a few seconds, until it's slightly soft and fragrant. Serve it with a small scoop of a simple vanilla bean ice cream or a dollop of unsweetened whipped cream. The contrast between the warm, gooey bar and the cool, creamy topping is a classic for a reason.
Day 4 (Thursday): Add a nutty crunch. For an afternoon pick-me-up, take a bar and sprinkle it with some toasted, chopped nuts. Pistachios are a fantastic choice, lending their beautiful color and unique flavor that pairs wonderfully with rhubarb. Toasted almonds or walnuts would also be delicious, adding another layer of texture and richness.
Day 5 (Friday): End the week with a drizzle. Give the final bar a little extra flair with a drizzle of something sweet. A touch of honey, a spoonful of melted white chocolate, or even a simple glaze made from powdered sugar and a few drops of milk can transform the bar into a final, celebratory treat. This weekly game plan ensures that each encounter with your Rhubarb Bars feels new and exciting.
Smart Storage and Reheating
Properly storing your freshly baked Rhubarb Bars is the final, crucial step in your meal prep process. How you store them will determine whether they remain delicious and texturally pleasing for the entire week. My goal is always to preserve that perfect balance of a crisp base, a jammy center, and a crumbly topping for as long as possible.
For the first day or two, you can safely store the bars at room temperature. Simply cover the baking pan tightly with foil or plastic wrap, or transfer the cut squares to an airtight container. At room temperature, the crust and crumble will retain their crispness particularly well. This is a great option if you know they'll be eaten quickly.
For longer storage, the refrigerator is your best friend. Cut the bars into individual squares and place them in a single layer in an airtight glass container. I like to place a small piece of parchment paper between each bar if I need to stack them, which prevents them from sticking together and protects the crumble topping. Stored this way, your Rhubarb Bars will stay fresh and delicious for up to a week. The chill of the fridge helps the filling set even more firmly, making them incredibly neat to eat straight from the container.
These bars also freeze exceptionally well, which is perfect for longer-term planning. You can freeze the entire slab before cutting it, wrapped tightly in two layers of plastic wrap and a final layer of foil. Or, for ultimate convenience, freeze individual bars. Wrap each square in plastic wrap and place them in a freezer-safe bag or container. They will keep beautifully in the freezer for up to three months. To thaw, simply transfer a bar from the freezer to the refrigerator overnight.
When it comes to reheating, you have a few options depending on the texture you desire. For a soft, warm, gooey bar, a quick 15-20 seconds in the microwave is perfect. If you want to revive the crispness of the crust and crumble, the toaster oven or a conventional oven is the way to go. A few minutes at 350°F (175°C) will warm the bar through and re-toast the topping, making it taste almost as good as freshly baked.
Customization Ideas
While this classic Rhubarb Bars recipe is absolutely delicious on its own, it also serves as a wonderful canvas for your own culinary creativity. One of the things I love most about cooking is the ability to adapt a recipe to suit your tastes or use what you have on hand. Here are a few of my favorite ways to customize these bars and make them uniquely yours.
Fruit Variations: Rhubarb has a wonderful tartness that can be complemented by other fruits. A classic combination is strawberry-rhubarb; simply replace about a third of the rhubarb with sliced fresh strawberries. For a different twist, try adding raspberries for a deeper color and flavor, or even chopped apples or pears in the autumn for a heartier filling.
Crumble Enhancements: The oat crumble topping is ripe for experimentation. For added texture and flavor, mix in a half-cup of chopped nuts like pistachios, walnuts, or pecans. A few tablespoons of sunflower or pumpkin seeds can also add a delightful crunch. For a richer flavor, try substituting some of the all-purpose flour in the crumble with almond flour.
Spice It Up: This is where you can really bring in some warm, comforting aromas. The recipe calls for cinnamon, but don't hesitate to add other spices. A quarter teaspoon of ground cardamom will lend an exotic, floral note that is heavenly with rhubarb. A pinch of ground ginger can add a gentle, spicy warmth, and a tiny grating of fresh nutmeg will enhance the buttery flavors of the crust and crumble.
Levantine-Inspired Touches: To infuse these bars with a bit of Middle Eastern flair, consider adding a teaspoon of orange blossom water or rosewater to the rhubarb filling. This adds a beautiful, fragrant aroma that is subtle yet transformative. You could also sprinkle some toasted sesame seeds into the crumble topping for a nutty, savory contrast.
Dietary Adjustments: For those with dietary restrictions, this recipe can be adapted. To make gluten-free Rhubarb Bars, simply substitute the all-purpose flour in the crust and crumble with a high-quality, measure-for-measure gluten-free flour blend. Ensure your rolled oats are certified gluten-free as well. The results are just as delicious, making this a treat that more people can enjoy.
Meal Prep FAQ
How do I know when my rhubarb bars are fully baked?
The visual cues are key. You're looking for the crumble topping to be a deep golden brown. Around the edges of the pan, you should see the rhubarb filling bubbling gently. If you gently press the center, it should feel relatively firm, not overly soft or liquidy. It's better to err on the side of slightly overbaking than underbaking to ensure the filling sets properly.
My crust always turns out soggy. What can I do?
The secret to a crisp crust is the blind bake! Don't skip the step of pre-baking the crust on its own for about 15 minutes. This creates a seal and a firm base that can withstand the moisture from the fruit filling. Also, make sure you press the crust mixture down firmly and evenly in the pan to create a dense, solid layer.
Can I use frozen rhubarb for this recipe, and do I need to thaw it?
Absolutely! This is one of the best parts of this recipe. You can use frozen rhubarb, and there is no need to thaw it beforehand. Thawing will release too much water and can make your filling runny. Simply toss the frozen rhubarb pieces directly with the sugar and cornstarch. You may need to add about 5 minutes to the total baking time to compensate.
What's the best way to get clean, perfect squares when cutting?
Patience is your best friend here. It is absolutely essential to let the bars cool completely to room temperature, and then chill them in the refrigerator for at least two hours, or even overnight. This allows the buttery crust and the jammy filling to solidify. Once chilled, use a large, sharp chef's knife. For extra-clean cuts, run the knife under hot water and wipe it dry between each slice.
How can I avoid getting tired of eating the same thing all week?
Variety is all about the little additions! As I mentioned in the game plan, think of the bar as a base. One day, enjoy it with a dollop of yogurt. The next, warm it up and serve it with a scoop of ice cream. Another day, sprinkle it with toasted nuts or drizzle it with a simple glaze. These small changes make each bar feel like a different and exciting treat.
Easy Rhubarb Bars with Oat Crumble
Buttery shortbread crust, a sweet-tart rhubarb filling, and a delicious oat crumble topping make these the perfect make-ahead treat for any occasion.
Prep Time
20 min
Cook Time
50 min
Total Time
1h 10m
Servings
16 bars
Ingredients
For 16 bars
- For the Crust:
- 1 1/2 cups all-purpose flour
- 1/2 cup granulated sugar
- 1/4 tsp salt
- 3/4 cup (1 1/2 sticks) cold unsalted butter, cut into 1/2-inch cubes
- For the Rhubarb Filling:
- 4 cups chopped rhubarb (fresh or frozen), in 1/2-inch pieces
- 1 cup granulated sugar
- 1/4 cup cornstarch
- 1 tsp vanilla extract
- 1 tbsp lemon juice
- For the Oat Crumble Topping:
- 3/4 cup all-purpose flour
- 3/4 cup packed light brown sugar
- 3/4 cup rolled oats (not instant)
- 1/2 tsp ground cinnamon
- 1/4 tsp salt
- 1/2 cup (1 stick) cold unsalted butter, cut into 1/2-inch cubes
Instructions
- 1
Preheat Oven and Prepare Pan
Preheat your oven to 375°F (190°C). Grease a 9x13 inch baking pan or line it with parchment paper, leaving an overhang on the sides to easily lift the bars out later.
- 2
Make the Shortbread Crust
In a medium bowl, whisk together 1 1/2 cups of all-purpose flour, 1/2 cup of granulated sugar, and 1/4 tsp of salt. Scatter the cold, cubed butter over the top and use a pastry blender or your fingertips to cut the butter into the flour until the mixture resembles coarse, sandy crumbs.
- 3
Press and Blind Bake Crust
Pour the crust mixture into your prepared pan. Use your hands or the bottom of a measuring cup to press it down firmly and evenly across the bottom. Bake for 15 minutes, until the edges are just beginning to turn golden. This pre-baking step is crucial for a crisp crust.
- 4
Prepare the Rhubarb Filling
While the crust is baking, prepare the filling. In a large bowl, combine the chopped rhubarb, 1 cup of granulated sugar, and 1/4 cup of cornstarch. Toss well to ensure the rhubarb is evenly coated. Stir in the vanilla extract and lemon juice.
- 5
Prepare the Oat Crumble
In another bowl, prepare the crumble topping. Whisk together 3/4 cup of all-purpose flour, 3/4 cup of brown sugar, 3/4 cup of rolled oats, cinnamon, and salt. Add the cold, cubed butter and cut it in with a pastry blender or your fingers until large, crumbly pieces form.
- 6
Assemble the Bars
Once the crust has finished its blind bake, remove it from the oven. Spread the rhubarb filling evenly over the top of the warm crust. Sprinkle the oat crumble mixture evenly over the rhubarb filling, covering it completely.
- 7
Bake the Rhubarb Bars
Return the pan to the oven and bake for 35-40 minutes. The bars are done when the crumble topping is a deep golden brown and the rhubarb filling is bubbly and thick around the edges. The center should feel set.
- 8
Cool Completely Before Cutting
This step is very important. Remove the pan from the oven and place it on a wire rack to cool completely to room temperature, which will take at least 2 hours. Do not attempt to cut the bars while they are warm, as they will fall apart.
- 9
Chill for Best Results
For the cleanest cuts, cover the cooled pan and transfer it to the refrigerator to chill for at least 2 more hours, or even overnight. The chilling process helps the filling and crust to set firmly.
- 10
Cut and Serve
Once fully chilled, use the parchment paper overhangs to lift the entire slab of bars out of the pan. Place it on a cutting board and use a large, sharp knife to cut into 16 squares. Wipe the knife clean between cuts for the neatest edges.
- 11
Store for the Week
Store the rhubarb bars in an airtight container. They can be kept at room temperature for up to 2 days or in the refrigerator for up to one week for optimal freshness.
Nutrition Facts
Per serving (estimated)
280 calories
Calories
42g
Carbs
3g
Protein
12g
Fat
2g
Fiber
110mg
Sodium
25g
Sugar


