
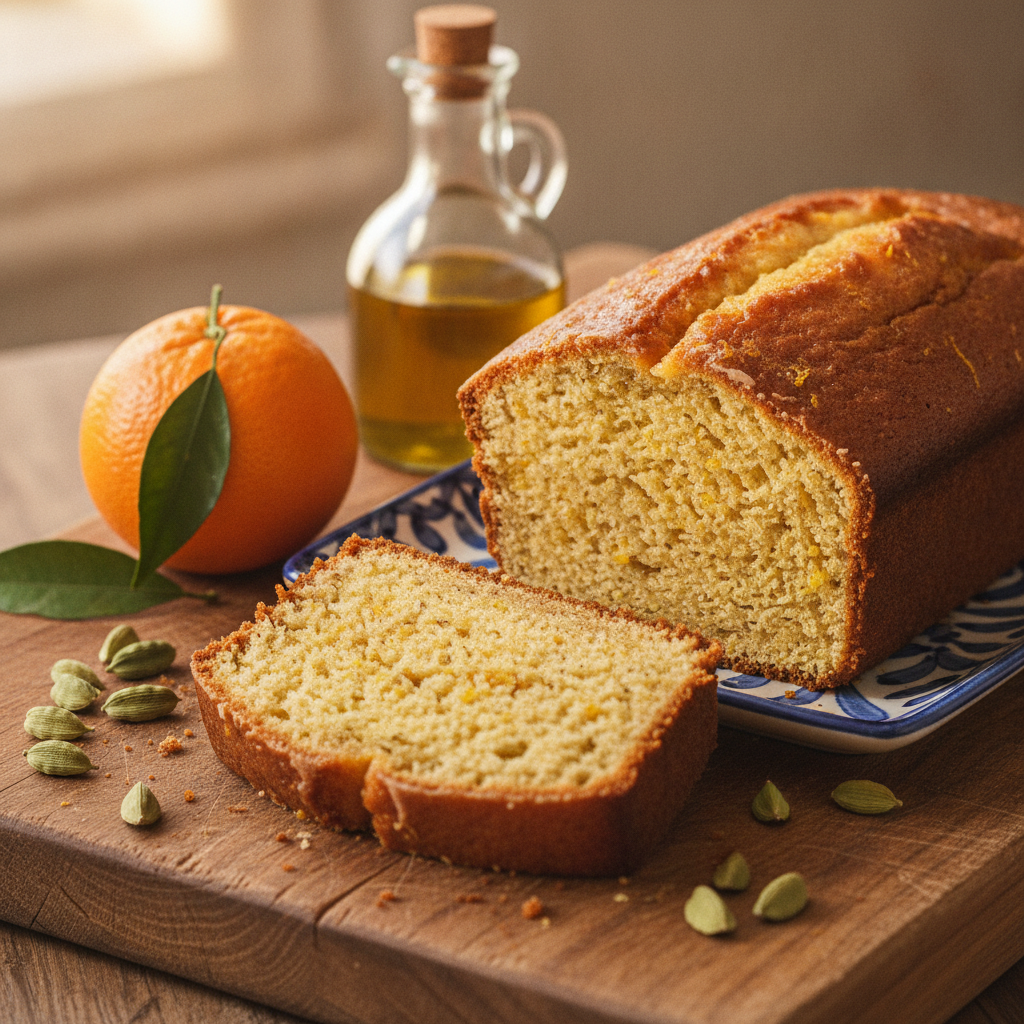
Easy Meal Prep Celebration Cake (Olive Oil & Orange)
This moist, fragrant Olive Oil Celebration Cake is perfect for meal prep! Enjoy a delicious, homemade treat all week long with this simple, make-ahead recipe.
cookwithyara.com/recipes/fathers-day-cake
There's a special kind of peace that settles in on a Sunday afternoon when you know you’ve set yourself up for a successful week. For many of us, the daily question of “what’s for lunch?” or “what’s for dinner?” can feel like a small but constant weight. Meal prepping our main courses is a game-changer, but what about those moments in between? The morning coffee that needs a companion, the 3 PM slump that calls for a little pick-me-up, the quiet evening that deserves a simple, sweet finish. That’s where the true magic of batch cooking can extend beyond savory meals and into the realm of simple joys.
Imagine, instead of scrambling for a snack or settling for something store-bought, you have a slice of gorgeous, homemade cake waiting for you. A cake that tastes even better on day three than it did on day one. This isn't just any cake; this is a Meal Prep Celebration Cake, designed specifically to be made once and savored all week long. The process itself is a form of self-care: the simple rhythm of measuring and mixing, the incredible aroma of citrus and warm spices filling your kitchen. It’s a small investment of time on the weekend that pays off in delicious dividends, transforming mundane moments into small, personal celebrations every single day. This recipe is your key to unlocking that feeling of preparedness and quiet luxury.
Why This Recipe Is Perfect for Meal Prep
Not all cakes are created equal when it comes to making them ahead of time. Many butter-based cakes can become dry and hard in the refrigerator, losing their charm within a day. This Meal Prep Celebration Cake, however, is engineered to thrive over time. Its secret lies in a few key characteristics that make it the ideal candidate for your weekly batch-cooking session. The ingredients are chosen not just for their flavor, but for their longevity and ability to improve with age, ensuring that the last slice of the week is just as delightful as the first.
First and foremost is the use of high-quality extra virgin olive oil instead of butter. This is the cornerstone of the cake's incredible texture and shelf life. Olive oil is a liquid fat, which means it doesn't solidify when chilled. The result is a cake that remains wonderfully moist and tender for days, even when stored in the refrigerator. It also imparts a subtle, fruity richness that adds a beautiful depth of flavor you just don't get with other fats. Secondly, the flavors in this cake are designed to meld and deepen over time. The bright zest of the orange and the warm, aromatic notes of cardamom are lovely when fresh, but after a day or two of resting, they marry together into a truly complex and intoxicating bouquet. The cake essentially matures, becoming more itself with each passing day.
From a structural standpoint, this loaf cake is sturdy yet soft. It holds its shape beautifully when sliced, making it easy to portion, store, and transport without crumbling into a mess. This makes it perfect for packing as a work snack or a special addition to a lunchbox. Finally, it strikes a wonderful nutritional balance for a treat. With the heart-healthy monounsaturated fats from olive oil and the wholesome addition of yogurt, it’s a satisfying option that provides steady energy. It’s a complete package: a delicious, durable, and flavor-developing cake that makes meal prepping a truly sweet endeavor.
What You'll Need
Assembling the ingredients for this Meal Prep Celebration Cake is wonderfully straightforward, relying on pantry staples that are elevated by a few fresh, high-quality elements. When you’re baking for the week ahead, choosing the right ingredients is key to ensuring flavor and freshness that lasts. Let’s walk through the most important components and why they’re chosen for this specific meal prep application.
The star of the show is, without a doubt, the extra virgin olive oil. Don't reach for your cooking-grade olive oil here. Choose a fruity, vibrant, and good-quality oil, as its flavor will genuinely shine through and define the cake's character. Think of it as a primary flavor, not just a fat. Next, you'll need fresh oranges. We use both the zest and the juice, so look for firm, bright-skinned oranges. The zest contains the most potent aromatic oils, providing that incredible citrus perfume, while the juice adds moisture and a tangy sweetness. Using fresh is non-negotiable for the best result.
For our dry ingredients, we use standard all-purpose flour, which gives the cake a perfect balance of tenderness and structure. To this, we add a touch of warmth and Levantine magic with ground cardamom. This spice has a complex profile—slightly sweet, floral, and citrusy—that pairs exquisitely with the orange and olive oil. Plain, full-fat yogurt is another crucial ingredient. It adds a wonderful tang that cuts through the richness and, importantly, contributes significant moisture, which is vital for a cake that needs to stay fresh for days. Of course, you’ll also need staples like granulated sugar, large eggs for binding and lift, baking powder, baking soda, and a pinch of salt to enhance all the other flavors.
When it comes to storage, your choice of containers is important. I highly recommend glass containers with airtight lids, as they prevent any flavor transfer from other foods in your fridge. A glass loaf-pan-sized container is perfect for storing the whole cake, or you can pre-slice it and store the pieces in smaller individual containers. If you plan to freeze a portion, be sure to have quality plastic wrap and aluminum foil on hand for a tight, protective seal. Investing in good storage is the final step to guaranteeing your Meal Prep Celebration Cake stays perfect all week.
The Batch Cooking Method
To truly embrace the meal prep mindset, our approach to baking this Meal Prep Celebration Cake is all about efficiency and foresight. The goal isn't just to bake a cake, but to execute the process in a way that feels streamlined and productive, setting you up for a week of ease. This method is designed to be a smooth, enjoyable kitchen project, perfect for a quiet afternoon. I often recommend baking two loaves at once—one for the current week and one to freeze for a future week when you’re short on time. This is the ultimate batch cooking strategy.
The first and most critical step is the mise en place, or getting all your ingredients prepped and measured before you begin mixing. This prevents any frantic searching for an ingredient mid-process. Zest and juice your oranges, whisk together your flour, baking powder, baking soda, salt, and cardamom in one bowl. In a separate, large bowl, get your wet ingredients ready. This assembly-line approach is key. You'll start by whisking the eggs and sugar together until they are light and pale. This step incorporates air, which is essential for a tender crumb. Then, you'll slowly stream in the olive oil while whisking continuously to create a stable emulsion. This technique ensures the oil is fully integrated, which is vital for that signature moist texture.
Once your wet base is prepared, you'll alternate adding the dry-ingredient mixture and the yogurt. Start and end with the dry ingredients, mixing only until the flour just disappears. Over-mixing is the enemy of a tender cake, as it develops gluten and can make the final product tough. This alternating process helps keep the batter light and prevents you from having to overwork it to incorporate everything. Gently fold in the orange zest and juice at the very end. The total active time here is surprisingly short, perhaps 20 minutes of focused work. The rest is passive time, as the oven does its magic for about 50 minutes. If you're baking two loaves, place them on the same rack with space between them and rotate them halfway through to ensure they bake evenly. The final, non-negotiable step in the batch cooking method is allowing the cakes to cool completely before wrapping and storing. Slicing into a warm cake can ruin its structure, while wrapping it warm can create condensation and lead to a soggy texture. Patience here is paramount for meal prep success.
The Weekly Game Plan
Having a freshly baked Meal Prep Celebration Cake sitting on your counter is a wonderful thing, but having a plan for how to enjoy it throughout the week is what elevates it from a simple treat to a core part of your meal prep strategy. The beauty of this cake is its versatility; it can be a simple slice on its own or a canvas for various pairings that keep it feeling new and exciting each day. Here’s a sample game plan to make the most of your delicious creation.
Sunday: Bake Day. This is your primary investment. Bake your loaf (or two!), let it cool completely, and wrap it securely. The house will smell divine, and you’ll have a tangible reward for your efforts. You might enjoy the very first slice in the evening, fresh from your work, to celebrate a productive day.
Monday: The Classic. Start the week on a high note. Enjoy a simple, unadorned slice with your morning coffee or tea. At this stage, the flavors are bright and distinct. It’s the perfect, simple accompaniment to ease you into the week, requiring zero effort on a busy morning.
Tuesday: The Yogurt Parfait. Take a slice of your Meal Prep Celebration Cake and crumble it into a bowl or a jar. Layer it with spoonfuls of creamy Greek yogurt and a handful of fresh berries or pomegranate seeds. This transforms the cake into a more substantial breakfast or a luxurious afternoon snack with added protein and freshness.
Wednesday: The Toasted Treat. By mid-week, you might want a change in texture. Take a slice and lightly toast it in a toaster oven or a dry skillet for a minute or two. This crisps up the edges and warms the center, releasing all those beautiful aromas again. It’s absolutely heavenly with a tiny drizzle of honey or a sprinkle of toasted pistachios.
Thursday & Friday: The Finishing Touches. As you head towards the end of the week, enjoy the remaining slices as you please. Pack one for an on-the-go snack. Or, for a simple and elegant dessert, serve a slice gently warmed with a scoop of a simple vanilla frozen dessert or a dollop of whipped cream. By following this plan, you never feel like you're eating the same thing. Instead, you're creatively enjoying the fruits of your Sunday labor all week long.
Smart Storage and Reheating
Proper storage is the final, crucial step in ensuring your Meal Prep Celebration Cake remains as delicious on Friday as it was on Sunday. How you store the cake can make all the difference in its texture and longevity. Your two main options are storing it whole or pre-slicing it, each with its own benefits depending on your weekly plan.
For maximum freshness, storing the loaf whole is the best method. Once the cake has cooled completely to room temperature, wrap it tightly in two layers of plastic wrap, followed by a layer of aluminum foil. This triple-layer method creates a formidable barrier against air, which is the primary cause of staleness. A well-wrapped whole loaf can be kept at room temperature in a cool, dark place for up to three days. If you plan to eat it over the course of a full week, the refrigerator is your best bet. The olive oil will keep it from hardening, and it will easily last for seven days. When you want a piece, simply unwrap, slice off what you need, and re-wrap the rest tightly.
Alternatively, you can pre-slice the entire loaf for a grab-and-go approach. This is incredibly convenient for busy mornings. Place the slices in a single layer in an airtight container, preferably glass to avoid any plastic taste. If you need to stack them, place a small square of parchment paper between each slice to prevent them from sticking together. This method is perfect for portion control and easy access.
For longer-term storage, this cake freezes exceptionally well. You can freeze the entire wrapped loaf or individual slices. To freeze slices, wrap each one in plastic wrap and then place them all in a freezer-safe bag or container. They’ll keep beautifully for up to three months. To enjoy, simply thaw a slice at room temperature for about 30-40 minutes or give it a very gentle 15-20 second burst in the microwave. Reheating can also revive the cake mid-week. A few seconds in the microwave restores that soft, just-baked texture. For a more delightful experience, place a slice in a toaster oven at 300°F (150°C) for a few minutes. This warms it through while creating subtly crisp, golden-brown edges—an absolutely irresistible treat.
Customization Ideas
While this Meal Prep Celebration Cake is absolutely perfect as is, one of its greatest strengths is its adaptability. It serves as a wonderful base recipe that you can easily tweak to suit your tastes, use up ingredients you have on hand, or simply create variety from one baking session to the next. Think of this recipe as a template for your own creativity.
One of the easiest ways to customize it is by swapping the citrus. Instead of orange, try using the zest and juice of two large lemons for a brighter, tangier cake that would be incredible with a simple powdered sugar glaze. Meyer lemons would be particularly lovely. You could even use grapefruit for a more complex, slightly bitter note that is sophisticated and unique.
Feel free to play with the spices as well. While cardamom is a classic pairing, you could substitute it with a teaspoon of ground cinnamon and a half teaspoon of nutmeg for a warmer, more traditional spice cake profile. A bit of ground ginger would add a lovely, zesty heat, or you could even add a pinch of ground cloves for a deeper, more festive aroma. For added texture, consider folding in about three-quarters of a cup of chopped nuts. Toasted pistachios would be a fantastic, colorful addition that leans into the Mediterranean theme, while walnuts or pecans would add a classic, buttery crunch.
If you want to make it feel a bit more decadent, you can add a simple glaze. Once the cake is completely cool, whisk together a cup of powdered sugar with two to three tablespoons of fresh orange or lemon juice until you have a smooth, pourable consistency. Drizzle it over the top and let it set. Just be aware that a glazed cake can be a bit stickier to store for meal prep. For dietary adjustments, you can successfully substitute the all-purpose flour with a high-quality 1-to-1 gluten-free baking blend to make it accessible for those with sensitivities.
Meal Prep FAQ
How long will this olive oil cake really stay fresh?
Thanks to the high moisture content from the olive oil and yogurt, this cake has a surprisingly long shelf life. When wrapped properly and stored in the refrigerator, it will stay moist and delicious for a full 7 days. Its flavor even improves in the first few days!
What are the absolute best containers for storing slices?
For pre-sliced cake, airtight glass containers are my top recommendation. Glass doesn't hold onto odors or stains, and it provides a great seal to lock in freshness. If you need to stack slices, separating them with a small piece of parchment paper is a pro tip to prevent any sticking.
Is this cake sturdy enough to pack for work or in a lunchbox?
Absolutely! This is one of its best features for meal prep. It has a tender crumb but is not overly delicate or crumbly. A slice holds its shape perfectly, making it an ideal, no-mess treat to pack for a midday snack at the office or a special surprise in a school lunchbox.
I'm worried I'll get tired of eating the same cake all week. Any tips?
Variety is key! As outlined in the weekly game plan, think of the cake as a base. One day enjoy it plain, the next crumble it over yogurt with fruit, and later in the week try toasting it and serving it warm with a drizzle of honey. These small changes make each experience feel different.
Can I bake this recipe as muffins for better portion control?
Yes, this recipe adapts beautifully to muffins. Simply divide the batter among a lined 12-cup muffin tin, filling each cup about three-quarters full. The baking time will be much shorter, around 18-22 minutes. Check for doneness with a toothpick—when it comes out clean, they're ready. Muffins are fantastic for grab-and-go meal prep.
Meal Prep Olive Oil Celebration Cake
A moist, fragrant loaf cake made with extra virgin olive oil, fresh orange, and warm cardamom. Perfectly sturdy and delicious for meal-prepping a week of treats.
Prep Time
20 min
Cook Time
50 min
Total Time
1h 10m
Servings
10 servings
Ingredients
For 10 servings
- 1 1/2 cups (190g) all-purpose flour
- 1 1/2 teaspoons baking powder
- 1/2 teaspoon baking soda
- 1/2 teaspoon ground cardamom
- 1/4 teaspoon salt
- 1 cup (200g) granulated sugar
- 3 large eggs, at room temperature
- 1 cup (240ml) plain full-fat yogurt, at room temperature
- 2/3 cup (160ml) good-quality extra virgin olive oil
- 1 large orange, for zest and juice (about 1 tbsp zest and 1/4 cup juice)
Instructions
- 1
Preheat and Prepare Pan
Preheat your oven to 350°F (175°C). Grease a 9x5 inch loaf pan thoroughly, then line it with parchment paper, leaving an overhang on the two long sides to act as handles for easy removal later.
- 2
Combine Dry Ingredients
In a medium bowl, whisk together the all-purpose flour, baking powder, baking soda, ground cardamom, and salt. Whisking ensures the leavening agents are evenly distributed, which helps the cake rise evenly.
- 3
Zest and Juice Orange
Thoroughly wash and dry your orange. Use a microplane or fine zester to remove the outer layer of peel, avoiding the white pith. You should have about 1 tablespoon of zest. Then, cut the orange in half and squeeze it to get about 1/4 cup of fresh juice.
- 4
Mix Sugar and Eggs
In a large bowl, add the granulated sugar and eggs. Using an electric mixer or a whisk, beat them together on medium-high speed for about 2-3 minutes, or until the mixture is pale, thick, and has increased in volume. This step incorporates air for a lighter crumb.
- 5
Emulsify the Olive Oil
With the mixer still on low speed (or while whisking continuously), slowly stream in the extra virgin olive oil. Pouring it slowly is crucial for creating a stable emulsion, ensuring the oil is fully integrated into the batter for a moist, even texture.
- 6
Add Yogurt and Orange Juice
Add the room-temperature plain yogurt and the fresh orange juice to the wet mixture. Mix on low speed until just combined. Having these ingredients at room temperature helps them incorporate smoothly into the batter.
- 7
Combine Wet and Dry Ingredients
Add the dry ingredient mixture to the wet ingredients in two or three additions. Mix on the lowest speed or fold gently with a spatula until just a few streaks of flour remain. Do not overmix, as this can lead to a tough cake.
- 8
Fold in Orange Zest
Gently fold the fresh orange zest into the batter with a spatula. This final fold will incorporate the last of the flour and distribute the zest evenly without deflating the batter.
- 9
Pour and Bake
Pour the finished batter into your prepared loaf pan and smooth the top with the spatula. Bake in the preheated oven for 45-55 minutes. The cake is done when a wooden skewer or toothpick inserted into the center comes out clean or with a few moist crumbs attached.
- 10
Cool in Pan
Once baked, remove the loaf pan from the oven and place it on a wire cooling rack. Let the cake cool in the pan for 15-20 minutes. This allows it to set slightly, making it easier to remove without breaking.
- 11
Cool Completely
Using the parchment paper overhangs, carefully lift the cake out of the pan and place it directly on the wire rack. Allow it to cool completely to room temperature, which can take 1-2 hours. Do not slice or wrap the cake while it is still warm.
- 12
Store for the Week
Once completely cool, your cake is ready for storage. Wrap the entire loaf tightly in plastic wrap and foil to store, or pre-slice and place in an airtight container. Refer to the storage tips in the blog post for best results.
Nutrition Facts
Per serving (estimated)
320 calories
Calories
35g
Carbs
5g
Protein
18g
Fat
1g
Fiber
250mg
Sodium
22g
Sugar