The Best Halal Key Lime Pie Recipe (Easy & No-Bake!)
Creamy, tangy, and refreshing! This easy no-bake halal Key Lime Pie recipe features a buttery crust and a luscious filling. The perfect dessert!
cookwithyara.com/recipes/key-lime-pie
There are certain aromas that transport you right back to a feeling of pure comfort. For me, it's often the scent of something baking, the warm, toasty fragrance that promises a sweet reward. But sometimes, comfort comes in a cooler form—the bright, zesty perfume of citrus, a scent that cuts through the quiet of an afternoon and promises something refreshing and utterly delightful. That vibrant aroma is the soul of a perfect Key Lime Pie, a dessert I’ve come to adore for its beautiful simplicity and its incredible balance of flavors.
My culinary heart may belong to the Mediterranean and the Levant, where lemons are our constant companions, but my palate is endlessly curious. I was drawn to the classic American Key Lime Pie because it celebrates citrus in such a focused, unapologetic way. My goal was to create a version that was not only true to the spirit of the original but also incredibly simple to make and completely halal. I wanted a recipe that didn't require any fussy steps, special equipment, or hard-to-find ingredients. The result is this glorious, no-bake filling that sets up like a dream, nestled in a crisp, buttery graham cracker crust. It’s a study in contrasts: the tangy, smooth filling against the crunchy, slightly salty base. In this post, I’ll walk you through every step to mastering this stunning Key Lime Pie, ensuring you end up with a dessert that’s as joyful to make as it is to share.
The Story Behind This Dish
Key Lime Pie is a taste of the sunshine-soaked Florida Keys, a classic American dessert with a history as interesting as its flavor. Its story begins in Key West in the late 19th century, a time before refrigeration was widespread. The local cooks were resourceful, and with fresh milk being a scarcity, they turned to a new pantry staple: sweetened condensed milk. This shelf-stable product was the magic ingredient that, when mixed with the juice of the local key limes and egg yolks, would thicken without baking—a process called souring. The original pies were likely never baked!
The star of the show, of course, is the Key lime itself. Smaller, seedier, and with a thinner rind than the more common Persian lime, the Key lime (Citrus aurantiifolia) has a distinctly intense, floral aroma and a powerful tartness. This unique flavor profile is what makes a true Key Lime Pie so unforgettable. Over generations, home cooks have perfected their versions, some baking them, others sticking to the no-bake tradition. What makes a homemade Key Lime Pie so vastly superior to most store-bought versions is the control you have. You can balance the sweetness and tartness to your exact liking, creating a dessert that is vibrant and alive with flavor, not cloyingly sweet.
What Makes This Recipe Special
There are countless ways to make a Key Lime Pie, but I believe this version strikes the perfect balance of ease, elegance, and incredible flavor. It’s the recipe I turn to when I want a guaranteed crowd-pleaser that doesn't keep me in the kitchen for hours. Here’s why you’ll fall in love with it:
-
Incredibly Creamy, No-Bake Filling: The texture of this pie is pure luxury. It's velvety, smooth, and melts in your mouth. By using a combination of sweetened condensed milk, heavy cream, and the natural thickening power of lime juice, we achieve a perfect set without any baking or gelatin, ensuring it’s completely halal and foolproof.
-
Perfectly Balanced Flavor: This isn't a one-note dessert. The intense, floral tartness of the key lime juice is perfectly mellowed by the sweetness of the condensed milk. The richness of the cream adds another layer of depth, creating a flavor profile that is complex, refreshing, and deeply satisfying.
-
A Crisp, Buttery Graham Cracker Crust: A creamy filling needs a contrasting crunch, and this crust delivers. Made from finely crushed graham crackers, a touch of sugar, and melted butter, it’s pressed into the pan and briefly baked to golden perfection. This quick bake ensures it stays crisp and firm, providing the ideal textural counterpoint to the silky filling.
-
Foolproof for Beginners: You don't need to be an expert baker to make a show-stopping dessert. This recipe uses simple, accessible ingredients and straightforward techniques. There’s no complicated meringue to whip, no water bath to fuss with. It’s a simple process of mixing, pouring, and chilling.
-
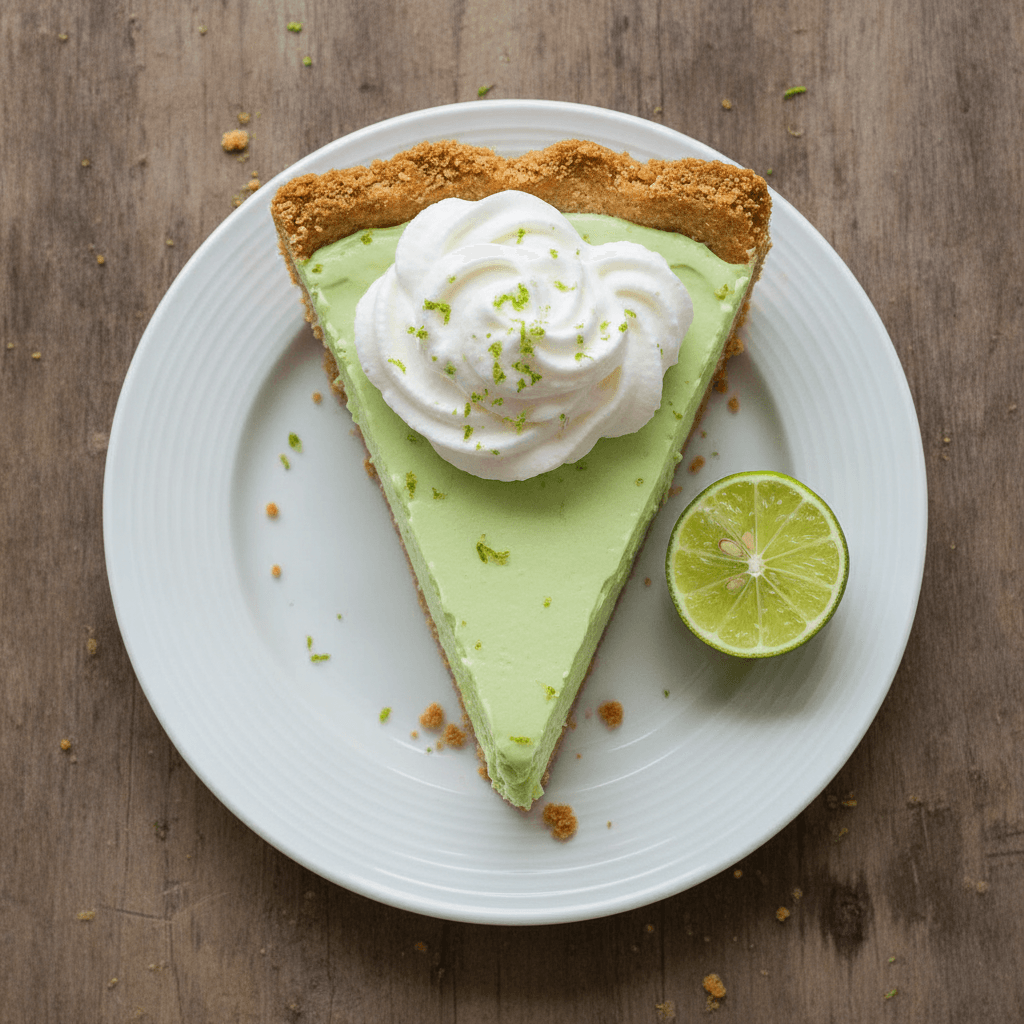
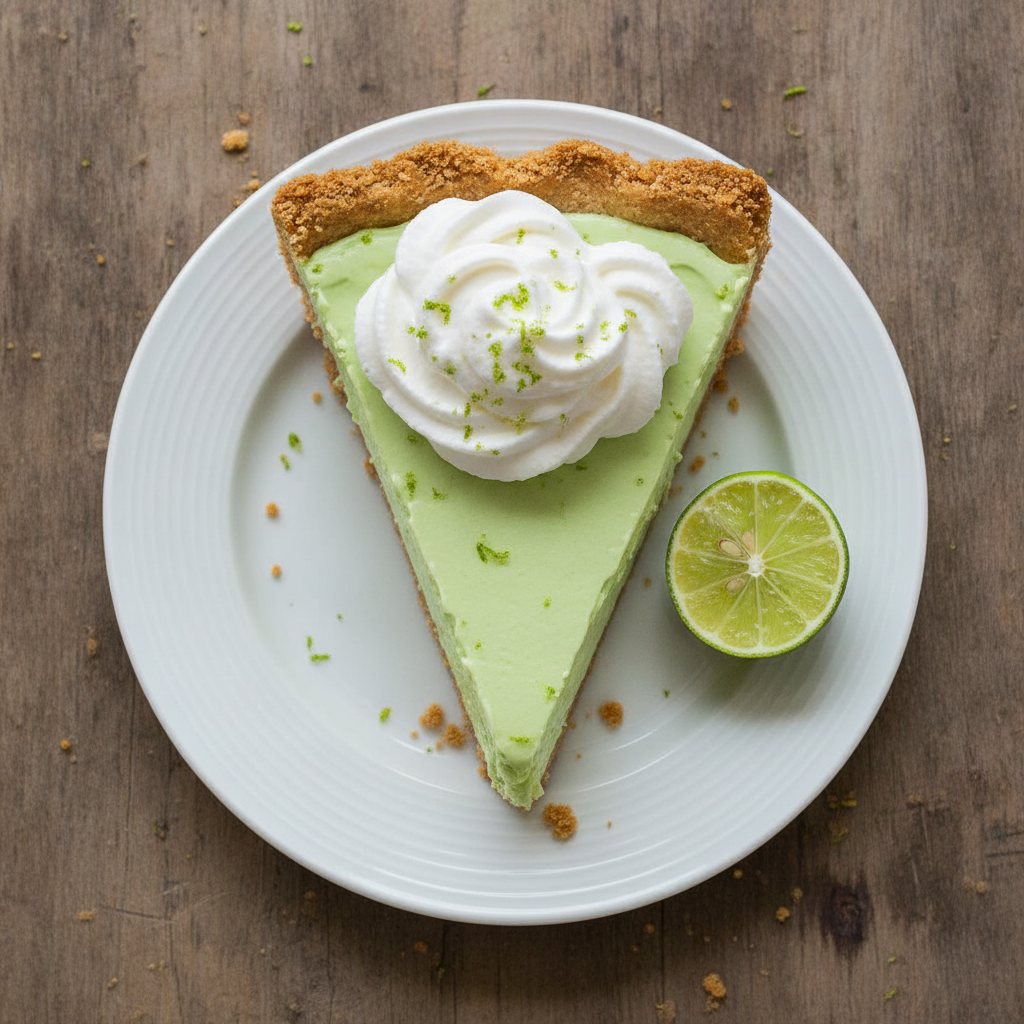
A Stunning Dessert for Gatherings: The pale, creamy green of the filling against the golden-brown crust is naturally beautiful. Topped with swirls of whipped cream and a dusting of lime zest, this Key Lime Pie looks as incredible as it tastes. It’s the perfect centerpiece for a family dinner, a weekend get-together, or any occasion that calls for a memorable sweet treat.
Breaking Down the Ingredients
A truly great dish is all about the quality and interplay of its ingredients. In this Key Lime Pie, each component has a vital role to play in creating the final, harmonious dessert. Let’s explore the key players.
The undeniable star is Key Lime Juice. This is what gives the pie its name and its soul. If you can find fresh key limes, their juice will provide the most aromatic and vibrant flavor. However, they can be small and tedious to juice. A high-quality bottled Key lime juice, like Nellie & Joe's brand, is an excellent and widely available alternative that delivers that signature tart, floral taste. Do not substitute with regular Persian lime juice; it will create a tasty lime pie, but it will lack the unique character of a true Key Lime Pie.
Next is Sweetened Condensed Milk, the workhorse of the filling. This thick, sweet milk provides the sweetness, the creamy body, and, fascinatingly, the structure. The high acidity of the lime juice reacts with the proteins in the condensed milk, causing it to thicken and set without any heat or additional setting agents. It’s a little bit of kitchen science that results in a perfectly smooth texture every time.
To elevate the creaminess, we use Heavy Whipping Cream in two ways. A portion is whipped and gently folded into the filling itself, which lightens the texture from dense to cloud-like and adds a lovely richness. The rest is reserved for the topping, providing a soft, billowy crown that balances the tang of the filling.
The foundation of our pie is a classic Graham Cracker Crust. These humble, slightly sweet crackers, when crushed into fine crumbs, form the perfect base. When selecting them, a quick check of the ingredients is always a good practice to ensure they are halal-friendly. Digestive biscuits are also a fantastic substitute and one I often use, lending a slightly different but equally delicious flavor. These crumbs are bound together with Unsalted Butter, which not only holds the crust together but also adds a rich, nutty flavor that complements the lime beautifully. A touch of sugar is added for sweetness and to help it crisp up during its short time in the oven. Finally, Lime Zest, taken from the lime before juicing, is a non-negotiable. The zest contains the lime’s essential oils, adding an intense, fragrant perfume to the filling that juice alone cannot provide.
The Cooking Process Explained
Creating this Key Lime Pie is a wonderfully simple and rewarding process. It’s less about complex techniques and more about assembling quality ingredients with care. Let’s walk through the journey from start to finish.
The first stage is building our foundation: the crust. We begin by transforming the graham crackers into fine, sandy crumbs. A food processor makes quick work of this, but placing them in a sealed bag and using a rolling pin is just as effective and quite satisfying. Those crumbs are then mixed with a little sugar and a generous amount of melted butter until the mixture resembles damp sand. This buttery concoction is then pressed firmly and evenly into the bottom and up the sides of a 9-inch pie plate. The secret to a non-crumbly crust is to press firmly, using the bottom of a measuring cup to get a tight, even layer. A quick 10-minute bake in the oven sets the crust, making it sturdy and toasty-brown, and then it’s set aside to cool completely.
While the crust cools, we create the luscious filling. This part comes together in minutes. In a large bowl, we whisk together the sweetened condensed milk with the key lime juice and zest. As you whisk, you’ll notice the mixture starts to thicken almost immediately—this is that magical reaction between the acid and the milk proteins. The aroma at this stage is absolutely intoxicating: sweet, tangy, and floral all at once.
To give our filling an ethereal lightness, we whip heavy cream in a separate bowl until it forms soft peaks. You don’t want stiff, over-whipped cream here; soft peaks will fold in much more easily. Using a spatula, we gently fold about a third of the whipped cream into the lime mixture to lighten it, then add the rest, folding just until no white streaks remain. This gentle folding technique preserves the air you’ve whipped into the cream, which is key to the filling's light, velvety texture.
Finally, we bring it all together. The finished filling is poured into the completely cooled crust and the surface is smoothed with the back of a spoon. Now comes the most important, and perhaps most difficult, part: waiting. The pie needs to chill in the refrigerator for at least 6 hours, though overnight is even better. This chilling period is non-negotiable; it’s when the filling firms up to a perfect, sliceable consistency. Once set, it’s ready to be crowned with the remaining whipped cream and served.
Mistakes to Avoid
Even the simplest recipes have little details that can make a big difference. Here is some friendly advice to help you avoid common pitfalls and ensure your Key Lime Pie is absolutely perfect every single time.
-
Don't Substitute Regular Limes for Key Limes. While it might seem like a small change, it completely alters the dessert. Regular Persian limes have a harsher, more straightforward sourness. Key limes possess a unique floral aroma and a more intense, complex tartness that is the hallmark of this pie. If you can't find fresh key limes, a quality bottled key lime juice is your best friend.
-
Don't Rush the Chilling Time. I know it’s tempting to slice into that beautiful pie as soon as possible, but patience is essential. The filling needs a minimum of six hours in the refrigerator to set properly. If you rush this step, you’ll be serving a delicious but messy, soupy pie. Chilling it overnight yields the best texture.
-
Don't Over-mix the Filling. When you fold the whipped cream into the lime and condensed milk mixture, be gentle. The goal is to incorporate the cream while keeping as much of the air as possible. Over-mixing will deflate the cream, leading to a denser, heavier filling rather than the light, airy texture we're aiming for.
-
Do Press the Crust Firmly. A loose, crumbly crust can undermine the whole pie. When you're pressing the buttered crumbs into the pie plate, use some force. The bottom of a flat glass or measuring cup is the perfect tool for compressing the crumbs tightly against the bottom and up the sides of the pan. This, combined with the brief baking time, creates a solid, sliceable base.
How to Serve This
Presenting your beautiful Key Lime Pie is the final, joyful step. With a dessert this classic, simple elegance is the way to go. The most traditional and, in my opinion, best way to serve it is with a generous dollop of freshly whipped cream. You can sweeten the cream with a tablespoon of powdered sugar and a drop of vanilla extract to complement the pie's flavors.
For a visually stunning presentation, spoon the whipped cream into the center of the pie, leaving a border of the pale green filling showing. Alternatively, you can pipe individual rosettes onto each slice just before serving. A final flourish of finely grated lime zest over the cream not only adds a pop of color but also an immediate burst of fresh lime aroma for the person about to enjoy it. Thinly sliced wheels of lime can also be used as a simple, elegant garnish.
For pairings, a simple cup of unsweetened black coffee or a fragrant mint tea provides a wonderful contrast to the pie's sweet and tangy profile. On a warm day, it’s delightful on its own as a refreshing afternoon treat. When slicing, use a long, sharp knife. For the cleanest cuts, dip the knife in hot water and wipe it clean between each and every slice. This little trick ensures your beautiful pie looks just as good on the plate as it does whole.
Make-Ahead and Storage Guide
One of the many beauties of this Key Lime Pie is how well it lends itself to being made ahead of time, making it a perfect dessert for gatherings when you want to minimize last-minute prep.
Make-Ahead: You can prepare the entire pie, without the whipped cream topping, up to two days in advance. Simply assemble the pie and keep it covered tightly in the refrigerator. In fact, the flavor often deepens and improves after a day. Just before you’re ready to serve, whip the fresh cream and garnish the pie.
Fridge Storage: Any leftover pie should be stored, covered, in the refrigerator. It will keep well for up to 4 days. Be aware that the crust may begin to soften slightly after the second day, but it will still be incredibly delicious.
Freezing Instructions: Yes, this Key Lime Pie freezes beautifully! You can freeze the whole pie or individual slices. For a whole pie, chill it until very firm, then wrap it securely in a layer of plastic wrap followed by a layer of aluminum foil. For slices, place them on a baking sheet to freeze individually, then wrap them. It will keep in the freezer for up to one month. To serve, simply thaw it in the refrigerator for a few hours. It's also exceptionally tasty when served semi-frozen, like a creamy, tangy ice cream pie!
Reader Questions Answered
Here are answers to some of the questions I often receive about making this classic dessert.
Can I use regular limes if I can't find key limes?
You can, but it's important to know that the flavor will be different. The resulting dessert will be a 'lime pie' rather than a 'Key lime pie.' Regular Persian limes are less acidic and lack the distinct floral aroma of key limes. If you can't find fresh key limes, I strongly recommend seeking out a bottle of 100% key lime juice online or in most large supermarkets. It provides that authentic flavor and is much easier than juicing dozens of tiny key limes.
How can I make this recipe gluten-free?
Easily! The filling is naturally gluten-free, so you only need to adjust the crust. Simply substitute the graham crackers with your favorite gluten-free crunchy cookies or gluten-free graham-style crackers. Prepare the crust in the exact same way. The results are just as delicious.
My filling seems a little loose. What went wrong?
The most common reason for a loose filling is not allowing enough chilling time. This pie absolutely needs a minimum of 6 hours in the refrigerator to fully set, with overnight being ideal. Another possibility is an incorrect ratio of lime juice to condensed milk. Be sure to measure your ingredients accurately for the best results.
Can I make this in a different type of pan?
Of course! This recipe is very adaptable. You can make it in an 8x8 or 9x9 inch square pan to create Key Lime Pie bars, which are easy to slice and serve to a crowd. You can also divide the crust and filling among individual ramekins or small jars for charming single-serving desserts. Just adjust the chilling time accordingly for smaller portions.
Why did my crust turn out crumbly?
A crumbly crust usually comes down to one of two things: not enough butter to bind the crumbs, or not pressing the mixture firmly enough into the pan. Make sure your crumbs are evenly moistened with the melted butter. Then, use the flat bottom of a glass or a measuring cup to really compact the mixture tightly into the bottom and up the sides of the pie plate. This creates a solid base that will hold together beautifully when sliced.
Easy Halal No-Bake Key Lime Pie
A foolproof recipe for a classic Key Lime Pie with a buttery graham cracker crust and a creamy, tangy, no-bake filling. This refreshing dessert is halal and perfect for any gathering.
Prep Time
20 min
Cook Time
10 min
Total Time
6h 30m
Servings
8 servings
Ingredients
For 8 servings
- 1 1/2 cups (150g) graham cracker crumbs (from about 10 full sheets)
- 1/3 cup (67g) granulated sugar
- 6 tablespoons (85g) unsalted butter, melted
- 1 can (14 ounces / 396g) sweetened condensed milk
- 1/2 cup (120ml) key lime juice, fresh or bottled
- 1 tablespoon fresh lime zest
- 1 1/2 cups (360ml) cold heavy whipping cream, divided
- 1/4 cup (30g) powdered sugar
- 1/2 teaspoon vanilla extract
Instructions
- 1
Prepare Your Oven and Pan
Preheat your oven to 350°F (175°C). Have a 9-inch pie plate ready. This brief baking step is for the crust only and ensures it's perfectly crisp.
- 2
Make the Graham Cracker Crust
In a medium bowl, combine the graham cracker crumbs and granulated sugar. Pour in the melted butter and stir with a fork until all the crumbs are evenly moistened, resembling wet sand.
- 3
Press and Bake the Crust
Tip the crumb mixture into the pie plate. Using your fingers and the flat bottom of a measuring cup, press the crumbs firmly and evenly onto the bottom and up the sides of the plate. Bake for 10 minutes, then remove and let it cool completely on a wire rack.
- 4
Create the Base Filling
In a large bowl, whisk together the sweetened condensed milk, key lime juice, and lime zest. Continue to whisk for about 1-2 minutes; you will notice the mixture begin to thicken naturally as the lime juice reacts with the milk.
- 5
Whip Cream for the Filling
In a separate bowl, using an electric mixer or a whisk, beat 1 cup of the cold heavy whipping cream until soft peaks form. Be careful not to over-whip; you want a light, airy texture.
- 6
Fold in the Whipped Cream
Using a spatula, gently fold the whipped cream into the key lime mixture in two additions. Fold just until no white streaks remain. This technique keeps the filling light and airy.
- 7
Fill the Crust and Chill
Pour the finished filling into the completely cooled crust. Smooth the top with your spatula. Cover the pie loosely with plastic wrap and refrigerate for at least 6 hours, or preferably overnight, until the filling is firm and set.
- 8
Prepare the Topping
Just before serving, make the whipped topping. In a clean bowl, beat the remaining 1/2 cup of heavy cream, powdered sugar, and vanilla extract with an electric mixer until medium-stiff peaks form.
- 9
Garnish and Serve
Top the chilled pie with the whipped cream. You can either spread it over the entire pie or add a dollop to each slice. Garnish with extra lime zest or thin lime slices and serve immediately.
Nutrition Facts
Per serving (estimated)
480 calories
Calories
55g
Carbs
7g
Protein
27g
Fat
1g
Fiber
210mg
Sodium
45g
Sugar