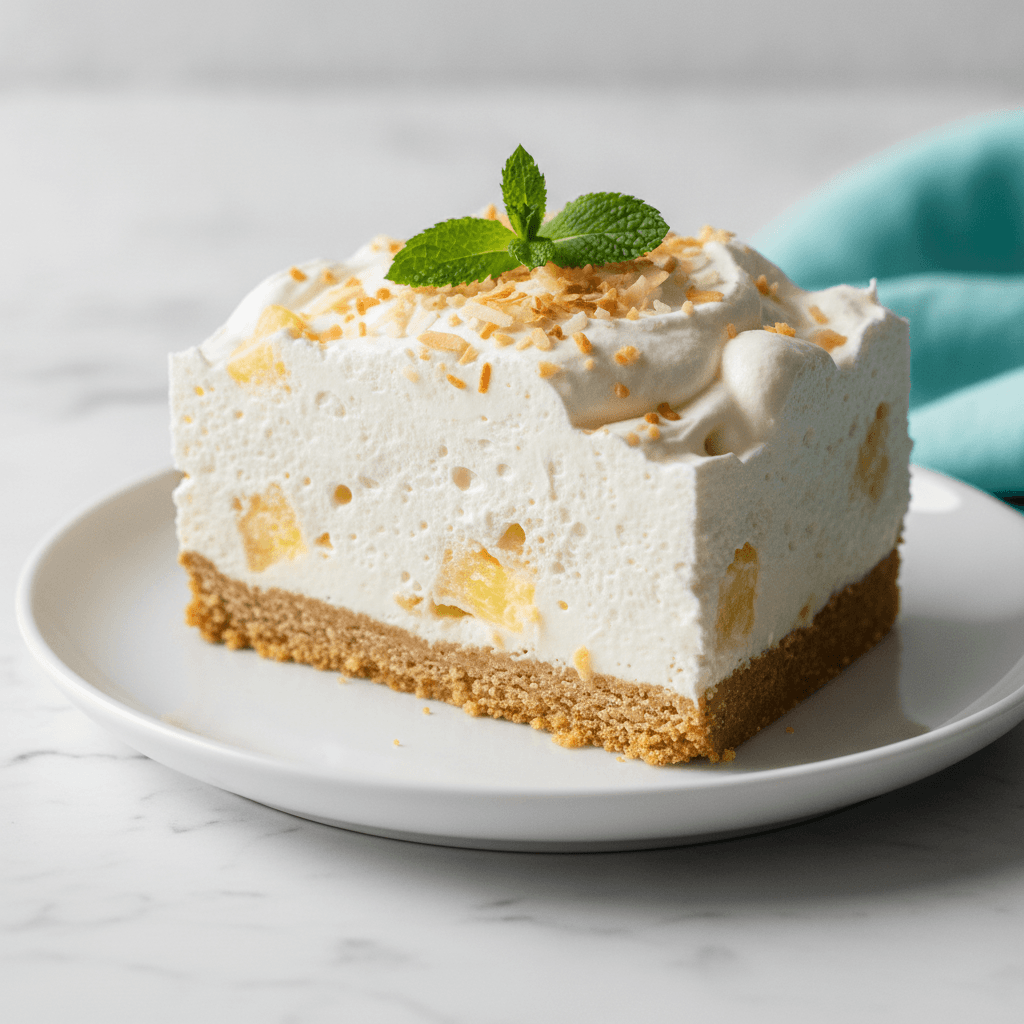
Dreamy No Bake Pineapple Cream Dessert Recipe
Whip up our luscious No Bake Pineapple Cream Dessert! A dreamy, creamy treat with layers of crushed pineapple and biscuits. Perfect for any gathering!
cookwithyara.com/recipes/no-bake-pineapple-cream-dessert
In the world of desserts, there are the grand, ambitious projects that require hours of effort, and then there are the quiet champions—the ones that deliver pure bliss with minimal fuss. This beautiful No Bake Pineapple Cream Dessert falls squarely into the latter category. It’s the kind of recipe I turn to on a warm afternoon when the thought of preheating the oven feels like a chore, yet the craving for something sweet, creamy, and utterly refreshing is undeniable. It’s a dessert that evokes a sense of nostalgia for simpler times, built on a foundation of humble ingredients that transform into something truly spectacular.
I remember the first time I tried a version of this dessert at a large family get-together. Amidst a table laden with complex dishes, this simple, pale-yellow square stood out. The first bite was a revelation: the bright, tangy burst of pineapple cutting through a cloud of rich, cool cream, all held together by a buttery, crumbly biscuit base. It was elegant in its simplicity and deeply satisfying. This recipe is my perfected version of that memory, a tribute to the magic of no-bake desserts. It does require some patience—the chilling time is non-negotiable—but the active preparation is wonderfully straightforward. Consider this your definitive guide to mastering the perfect No Bake Pineapple Cream Dessert, a treat that’s destined to become a staple in your own family gatherings.
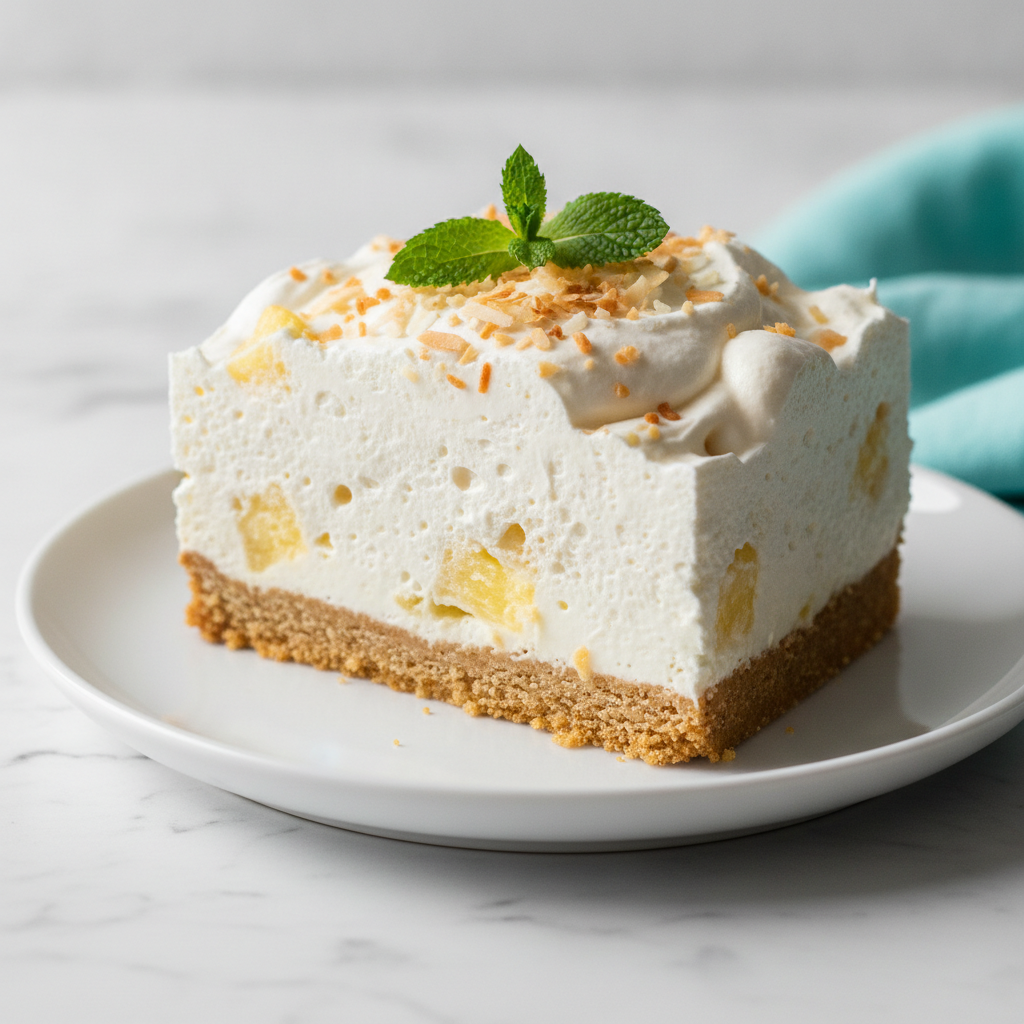
The Origins and History
While this specific No Bake Pineapple Cream Dessert feels like a modern classic, its roots are deeply embedded in the culinary innovations of the 20th century. The concept of the “icebox cake” emerged in the 1920s and 30s, right as home refrigeration became more accessible to the average family. Suddenly, desserts could be chilled and set without an oven, opening up a world of possibilities. Companies capitalized on this, marketing their cookies, wafers, and whipped toppings as key components for these easy, layered creations.
Pineapple’s starring role in this story is tied to the rise of canned goods. For centuries, pineapples were an exotic, expensive luxury. But with the advent of commercial canning operations in places like Hawaii in the early 1900s, this tropical fruit became a pantry staple across North America and beyond. Canned crushed pineapple, in particular, was a cook’s dream—convenient, consistent, and ready to be folded into cakes, salads, and, of course, desserts. This No Bake Pineapple Cream Dessert is a direct descendant of that era of convenience and culinary creativity. It embodies a mid-century optimism, a belief that delicious food could also be effortless. Today, it has evolved from a simple potluck favorite into a dessert celebrated for its refreshing qualities and adaptable nature, beloved by home cooks everywhere for its reliable and delightful results.
Understanding the Flavor Profile
The true beauty of this No Bake Pineapple Cream Dessert lies in its exquisite balance of flavors and textures. It’s a masterful study in contrast. At the forefront is the vibrant, tangy-sweet flavor of the pineapple. Its natural acidity is the key that unlocks the whole dessert, preventing the creamy elements from feeling too heavy. This bright fruitiness is enveloped by the luxurious, velvety richness of the cream cheese and sweetened condensed milk filling. This layer is pure comfort—smooth, dense, and deeply creamy with a gentle sweetness that complements, rather than competes with, the fruit.
The whipped heavy cream folded into the mixture introduces an element of lightness, transforming the dense cream cheese base into an ethereal, almost cloud-like mousse. A hint of pure vanilla extract adds a warm, aromatic depth that ties everything together. Underpinning it all is the buttery biscuit crust. Made from crushed digestive biscuits, it offers a delightful textural counterpoint—a firm, crumbly, and slightly savory foundation that contrasts perfectly with the soft filling above. When you take a spoonful, you get every layer at once: the crisp crumble of the base, the cool weight of the cream, and the juicy burst of pineapple. It’s a symphony of sensations that is both refreshing and incredibly satisfying.
Essential Ingredients Explained
Great cooking often comes down to understanding your ingredients. For this No Bake Pineapple Cream Dessert, a few key players work in harmony to create that signature taste and texture. Using the right ingredients, and preparing them correctly, is the secret to success.
- Crushed Pineapple: This is the star. Always choose pineapple canned in its own juice, not heavy syrup. This gives you control over the sweetness of the final dessert. The most critical step is to drain it exceptionally well. Any excess liquid will result in a runny filling that refuses to set properly.
- Cream Cheese: For that rich, tangy backbone, you must use full-fat, block-style cream cheese. Do not substitute with whipped cream cheese or low-fat versions, as they contain more water and stabilizers that will negatively affect the texture. Bringing it to room temperature is non-negotiable for a perfectly smooth, lump-free filling.
- Sweetened Condensed Milk: This is more than just a sweetener. Its thick, syrupy consistency adds a unique velvety texture and richness that granulated sugar simply cannot replicate. It’s a classic ingredient in many no-bake treats for this very reason.
- Heavy Whipping Cream: Look for a cream with at least 35% fat content. The fat is what allows the cream to trap air and form stable peaks, giving the dessert its light, airy structure. It must be very cold straight from the refrigerator to whip up properly.
- Digestive Biscuits: These are my go-to for the crust. Their slightly wheaty, malty, and not-too-sweet flavor provides the perfect savory balance to the filling. If you can't find them, graham crackers, shortbread cookies, or even vanilla wafers are excellent alternatives.
- Unsalted Butter: This is the glue that holds the crust together. Using unsalted butter allows you to control the final salt level of the dessert. Melt it gently so it mixes easily with the biscuit crumbs.
- Fresh Lemon Juice: Just a teaspoon makes a world of difference. It doesn't make the dessert taste like lemon; instead, it amplifies the pineapple's natural tanginess and brightens all the other flavors, cutting through the richness of the cream.
- Pure Vanilla Extract: A splash of good-quality vanilla adds a layer of aromatic warmth and complexity that elevates the dessert from simple to sublime.
Mastering the Technique
While the ingredient list is simple, the magic of this No Bake Pineapple Cream Dessert truly happens in the technique. Each step is designed to build the perfect texture and flavor. Let’s walk through the key stages to ensure a flawless result every time.
-
Building the Foundation: The crust isn't just a base; it's a critical textural element. You want to pulse the biscuits into fine crumbs, but with a little bit of texture remaining—not a complete powder. When you mix in the melted butter, ensure every crumb is coated. The real secret is pressing it into the pan. Use the bottom of a measuring cup or glass to press the mixture down firmly and evenly. This compaction is what prevents it from crumbling apart when you slice and serve. Chilling the crust while you prepare the filling helps the butter solidify, creating a firm, stable base.
-
The Critical Pineapple Drain: I cannot stress this enough: your pineapple must be as dry as possible. Place the crushed pineapple in a fine-mesh sieve and press down with the back of a spoon. You’ll be shocked by how much juice comes out. This step is the single most important factor in whether your dessert sets into a firm, sliceable square or a disappointing puddle.
-
Achieving Perfect Peaks: Whipping cream is a science. For best results, chill your mixing bowl and beaters in the freezer for 10-15 minutes beforehand. Start beating the cold heavy cream on medium speed until it thickens, then increase the speed. You’re looking for stiff peaks, which means when you lift the beaters out of the cream, the peak that forms holds its shape completely and doesn't droop. This structure is essential for the final dessert's light texture.
-
The Silky-Smooth Filling: The enemy of a good cream cheese filling is lumps. To avoid them, make sure your cream cheese is truly at room temperature. Beat it on its own first until it’s completely smooth and creamy before adding anything else. Then, stream in the sweetened condensed milk, lemon juice, and vanilla, beating until just combined. Don't overbeat at this stage.
-
The Gentle Fold: Now, you must combine the airy whipped cream with the dense cream cheese mixture. Do not stir! This will deflate all the air you just whipped in. Use a large spatula to gently fold the whipped cream in, using a motion that scrapes from the bottom of the bowl up and over the top, rotating the bowl as you go. Be patient and fold just until no white streaks remain.
-
The Final Assembly and Chill: Gently fold in the well-drained pineapple last. Spread this glorious mixture over your chilled crust, smoothing the top. Now comes the hardest part: waiting. The dessert needs to chill for at least four hours, but overnight is even better. During this time, the flavors meld together and the filling firms up completely, making it easy to slice and serve.
Common Pitfalls and How to Fix Them
Even the simplest recipes can sometimes go awry. But don't worry, most issues with this No Bake Pineapple Cream Dessert are easily preventable and fixable. Here are a few common challenges and how to navigate them.
-
Problem: My dessert is runny and didn't set. This is the most common issue and almost always has one of two causes. First, the pineapple wasn't drained well enough, releasing excess liquid into the filling. The fix for next time is to be ruthless when draining; use a fine-mesh sieve and press every last drop out. Second, the heavy cream was under-whipped. If your cream was only at soft peaks, it won't have the structure to hold the filling. Ensure you whip to stiff, sturdy peaks that stand up straight.
-
Problem: The biscuit crust is falling apart. This usually means either the ratio of butter to crumbs was off, or the crust wasn't compacted firmly enough. Ensure you use the full amount of melted butter and that every crumb is moistened. When pressing it into the dish, use a flat-bottomed glass to pack it down tightly and evenly across the bottom and up the sides. Chilling the crust before adding the filling is also a key step to help it solidify.
-
Problem: My cream cheese filling is lumpy. This is almost certainly because your cream cheese was too cold when you started beating it. It needs to be at a soft room temperature to blend smoothly. If you're already faced with a lumpy mix, you can try to salvage it by gently warming the outside of the mixing bowl with your hands while beating on low, but prevention is far easier. Let the cream cheese sit out for at least an hour before you begin.
-
Problem: The dessert tastes too sweet. This can happen if you accidentally used pineapple canned in heavy syrup instead of juice. The brand of sweetened condensed milk can also vary in sweetness. To balance it, a little extra squeeze of fresh lemon juice in the filling can work wonders. In the future, always double-check your canned pineapple.
Regional Twists Worth Trying
Once you've mastered the classic No Bake Pineapple Cream Dessert, you can start to have fun and experiment with new flavor combinations. Think of this recipe as a wonderful canvas for your creativity. Here are a few variations inspired by different culinary traditions to get you started.
-
The Levantine Touch: To give this dessert a beautiful Middle Eastern flair, add 1/2 teaspoon of orange blossom water to the cream cheese filling along with the vanilla. The delicate, floral aroma is absolutely intoxicating. Instead of a plain top, garnish generously with finely chopped raw pistachios. The green of the nuts against the pale cream is visually stunning, and their flavor is a classic pairing with orange blossom.
-
A Tropical Coconut Dream: Lean into the tropical nature of the pineapple by incorporating coconut. Toast about a cup of sweetened shredded coconut in a dry skillet until golden and fragrant. Fold half of the cooled toasted coconut into the finished filling and sprinkle the other half over the top before chilling. This adds a lovely nutty flavor and a delightful chewy texture.
-
The Mango Tango: Swap the pineapple for another tropical star: mango. You will need about 2 cups of finely diced, ripe mango. Because mangoes are less acidic than pineapple, you might want to increase the lemon juice in the filling to a full tablespoon to keep the flavors bright and balanced. This version is exceptionally luscious and smooth.
The Perfect Spread
This No Bake Pineapple Cream Dessert is a showstopper all on its own, but it also plays beautifully with others. When planning a menu for a special weekend dinner or a family gathering, think about accompaniments that complement its creamy, fruity profile without overwhelming it. For a simple and elegant pairing, serve slices with a cup of fragrant, freshly brewed mint tea. The warmth and clean flavor of the mint is a perfect contrast to the cool, rich dessert.
If you're creating a larger dessert table, this dish can be the centerpiece. Surround it with bowls of other fresh fruits to echo its tropical notes—think sliced mangoes, fresh berries, passion fruit, and kiwi. The vibrant colors will look stunning next to the pale cream of the dessert. For a little extra indulgence, a small pitcher of a tart raspberry or passion fruit coulis could be offered on the side for guests to drizzle over their slices, adding another layer of bright, fruity flavor. The key is to keep the accompaniments light and fresh to honor the dessert's refreshing character.
Keeping and Reheating
One of the best qualities of this No Bake Pineapple Cream Dessert is that it's an excellent make-ahead option. As for reheating, this is a dessert best served chilled, so no heat is ever required! Proper storage is key to maintaining its texture and flavor. The dessert should be stored, tightly covered with plastic wrap or a lid, in the refrigerator. It will keep well for up to 4 days.
It's worth noting that the dessert is arguably at its peak on day two. This extra time in the refrigerator allows the flavors to meld and deepen, and the filling sets to the perfect consistency. The biscuit base will soften slightly the longer it sits, which some people actually prefer. If you need to store it for longer, this dessert freezes beautifully. You can freeze the entire pan or individual slices. To do so, wrap it securely in a double layer of plastic wrap and a final layer of aluminum foil to prevent freezer burn. It can be frozen for up to one month. To serve, simply thaw it overnight in the refrigerator. Do not thaw it at room temperature, as this can affect the texture of the cream filling.
Your Questions Answered
Can I make this dessert ahead of time?
Absolutely! This is one of the best make-ahead desserts. You can prepare the entire dessert up to two days before you plan to serve it. In fact, an overnight chill in the refrigerator allows the flavors to meld beautifully and ensures the filling is perfectly set. If you're short on time, you can also make the crust a day in advance, keep it covered in the fridge, and then prepare and add the filling the next day.
Can I use a different fruit instead of pineapple?
Yes, this recipe is quite versatile. Finely diced ripe mangoes, peaches, or even a mix of berries would be delicious. If using berries like strawberries, be sure to dice them and gently pat them dry to remove excess moisture. If using a very sweet fruit like mango, you may want to slightly increase the amount of lemon juice to maintain a nice, tangy balance.
How can I make a gluten-free version of the crust?
Making a gluten-free crust is very simple. Just substitute the digestive biscuits with your favorite gluten-free vanilla or shortbread-style cookies. Grind them into crumbs and proceed with the recipe exactly as written. The ratio of butter to crumbs should remain the same. Always double-check that your chosen cookies are certified gluten-free.
My cream cheese is still a bit cold. What's a quick way to soften it?
For the best results, you should always let cream cheese soften naturally at room temperature for an hour or so. But if you're in a pinch, you can cut the block of cream cheese into smaller cubes and spread them out on a plate. They'll soften much faster than a whole block, usually in about 20-30 minutes. Avoid microwaving it, as this can create hot spots and melt the cheese, ruining the texture of your filling.
How do I scale this recipe for a larger gathering?
This recipe can easily be doubled to serve a bigger crowd. Simply double all the ingredients and prepare it in a larger 9x13 inch rectangular baking dish instead of an 8x8 or 9x9 inch square one. The assembly process is identical. The chilling time should remain the same, but always check that the center is firm before slicing and serving.
No Bake Pineapple Cream Dessert
A lush, creamy no-bake dessert featuring a buttery biscuit crust, a rich cream cheese filling, and sweet, tangy crushed pineapple. An easy and refreshing treat.
Prep Time
25 min
Cook Time
0 min
Total Time
4h 25m
Servings
9 servings
Ingredients
For 9 servings
- 1 1/2 cups digestive biscuit crumbs (from about 200g or 7oz of biscuits)
- 6 tablespoons unsalted butter, melted
- 1 can (20 oz / 567g) crushed pineapple in juice
- 1 block (8 oz / 226g) full-fat block cream cheese, at room temperature
- 1 can (14 oz / 397g) sweetened condensed milk
- 1 teaspoon pure vanilla extract
- 1 teaspoon fresh lemon juice
- 1 1/2 cups cold heavy whipping cream
- Optional for garnish: toasted shredded coconut, fresh mint leaves
Instructions
- 1
Prepare the Crust
In a food processor, pulse the digestive biscuits until they form fine crumbs. Alternatively, place them in a zip-top bag and crush them with a rolling pin. Transfer the crumbs to a medium bowl.
- 2
Combine Crust Ingredients
Pour the melted unsalted butter over the biscuit crumbs. Mix with a fork until all the crumbs are evenly moistened and the mixture resembles wet sand.
- 3
Press Crust into Pan
Tip the crumb mixture into an 8x8 inch or 9x9 inch square baking dish. Use the back of a spoon or the bottom of a flat glass to press the crumbs firmly and evenly into the bottom of the dish.
- 4
Chill the Crust
Place the baking dish with the crust into the refrigerator to chill for at least 15-20 minutes while you prepare the filling. This helps the crust to set firmly.
- 5
Drain the Pineapple Thoroughly
Pour the can of crushed pineapple into a fine-mesh sieve set over a bowl. Use a spatula or the back of a spoon to press down firmly on the pineapple, squeezing out as much juice as possible. This step is crucial to ensure the dessert sets properly.
- 6
Whip the Heavy Cream
In a large, chilled mixing bowl, use an electric mixer to beat the cold heavy whipping cream on medium-high speed. Continue beating until stiff peaks form – the cream should hold its shape when you lift the beaters out.
- 7
Beat the Cream Cheese
In a separate large bowl, beat the room temperature cream cheese with the electric mixer until it is completely smooth and free of lumps. Scrape down the sides of the bowl as needed.
- 8
Combine Wet Ingredients
Pour the sweetened condensed milk, vanilla extract, and fresh lemon juice into the bowl with the smooth cream cheese. Beat on low speed until everything is just combined and smooth. Do not overmix.
- 9
Fold in Whipped Cream
Using a large spatula, gently fold about one-third of the whipped cream into the cream cheese mixture to lighten it. Then, add the remaining whipped cream and continue to fold gently until no white streaks remain. Be careful not to stir, as this will deflate the cream.
- 10
Incorporate the Pineapple
Add the very well-drained crushed pineapple to the cream mixture. Fold it in gently with the spatula until it is evenly distributed throughout the filling.
- 11
Assemble and Chill
Pour the pineapple cream filling over the chilled biscuit crust. Use the spatula to spread it into an even layer, smoothing the top. Cover the dish with plastic wrap.
- 12
Set the Dessert
Refrigerate the dessert for at least 4 hours, or preferably overnight. This chilling time is essential for the filling to set completely so you can get clean slices.
- 13
Garnish and Serve
Once set, slice the dessert into squares. If desired, garnish with toasted shredded coconut or fresh mint leaves just before serving. Keep any leftovers refrigerated.
Nutrition Facts
Per serving (estimated)
480 calories
Calories
55g
Carbs
7g
Protein
27g
Fat
1g
Fiber
250mg
Sodium
42g
Sugar