

Sunshine Lemon Bars with Buttery Shortbread Crust
The ultimate lemon bars recipe! A buttery shortbread crust holds a luscious, tangy lemon filling. Perfect for gatherings and surprisingly easy to make.
cookwithyara.com/recipes/lemon-bars
There's a certain kind of joy that comes from a simple dessert made exceptionally well. In a world of complex recipes and multi-day baking projects, the humble bar dessert stands out for its straightforward charm and comforting appeal. And among these, none shine quite as brightly as the classic Lemon Bar. It’s a slice of pure sunshine, a perfect harmony of textures and tastes that can brighten any table and any occasion. The magic lies in its beautiful contrast: a crisp, buttery shortbread crust that crumbles just so, giving way to a smooth, vibrant lemon curd filling that is both sweet and unapologetically tangy. It's the kind of dessert that wakes up your palate and leaves you feeling refreshed.
Here at Cook with Yara, we celebrate flavors that are bright, fresh, and honest—principles that are at the very heart of Mediterranean and Levantine cooking. The lemon, a cornerstone of our cuisine, is revered for its ability to cut through richness, add a fragrant aroma, and bring life to everything it touches. These Sunshine Lemon Bars are a testament to that philosophy. They aren't just a sweet treat; they are an experience. Imagine pulling a pan of these golden beauties from your oven, the scent of baked butter and warm citrus filling your kitchen. This recipe is my go-to for creating that exact moment of pure, simple delight. It's a foolproof guide to making the most perfect lemon bars you've ever had, with a melt-in-your-mouth crust and a zesty, luscious filling that sets perfectly every single time.
What Makes a Lemon Bar Truly Unforgettable?
A great dessert is more than just a collection of ingredients; it's a study in balance. What elevates a good lemon bar to an unforgettable one is the mastery of its inherent dichotomies. It’s the delightful tension between the sweet and the tart, the crisp and the creamy. The foundation must be flawless—a shortbread crust that is rich and buttery, with a sandy, crumbly texture that provides a sturdy yet tender base. It cannot be too hard, nor can it be soggy. Its purpose is to be the perfect savory-sweet counterpoint to the star of the show.
And that star, the lemon filling, must be unapologetically bold. It should be intensely lemony, a bright burst of citrus that makes you close your eyes for a second. This is achieved not just with juice, but with the fragrant oils from the lemon zest. The sweetness is there to temper the acidity, not to overpower it. The two must dance together in perfect harmony. Finally, the texture of the filling is paramount. It should be like a soft, silky custard—firm enough to hold its shape when cut, yet so smooth and creamy it practically melts on your tongue. Achieving this perfect set, without it becoming rubbery or runny, is the final piece of the puzzle. These are the elements we'll master together to create truly exceptional lemon bars.
The Anatomy of the Perfect Lemon Bar: Key Ingredients
Every ingredient in this recipe plays a crucial, well-defined role. Using high-quality components and understanding their function is the first step towards achieving bakery-level perfection. Let's break down the cast of characters for our Sunshine Lemon Bars.
For the Shortbread Crust:
- Unsalted Butter: The soul of our crust. It must be cold, straight from the refrigerator, and cubed. Cold butter creates tiny pockets of steam as it bakes, which translates into a more tender, flaky texture rather than a dense, greasy one. Using unsalted butter allows us to control the exact amount of salt, which is key for balancing flavor.
- All-Purpose Flour: The structural backbone. It provides the body for the crust. I recommend measuring your flour by weight for the most accurate results, but if using cups, be sure to spoon it into the measuring cup and level it off, rather than scooping directly from the bag, which can compact it.
- Powdered Sugar: Also known as confectioners' sugar, this is my secret for an incredibly tender, melt-in-your-mouth crust. The fine texture of powdered sugar, which contains a bit of cornstarch, inhibits gluten development, resulting in a softer crumb than granulated sugar would provide.
- Fine Sea Salt: A small amount of salt doesn't make the crust salty; it enhances the flavor of the butter and sugar, making the crust taste richer and more complex.
For the Luscious Lemon Filling:
- Granulated Sugar: This provides the necessary sweetness to balance the tartness of the lemons. It also plays a structural role, interacting with the eggs to help the curd set properly.
- Large Eggs: Eggs are the magic ingredient that transforms lemon juice and sugar from a liquid into a creamy, sliceable curd. They provide structure, richness, and color. For the best results, use room-temperature eggs, as they whisk more easily and incorporate more air, leading to a lighter filling.
- Fresh Lemons (Zest and Juice): This is non-negotiable. The vibrant, pure flavor of these lemon bars comes from using fresh lemons. You'll need both the zest, which contains the aromatic oils and provides a floral citrus punch, and the freshly squeezed juice for that signature tangy flavor.
- All-Purpose Flour: Just a small amount is used in the filling as a stabilizer. It helps the egg-based curd to set firmly, ensuring you get clean slices every time without any runniness. It’s a little insurance policy for a perfect texture.
- Fine Sea Salt: Just as in the crust, a pinch of salt in the filling makes the lemon flavor pop and balances the overall sweetness, preventing the bars from tasting flat or overly sugary.
A Note on Lemons: The Heart of the Recipe
When a recipe has "lemon" in the title, you can be sure that the quality of your citrus will define the final result. For our Sunshine Lemon Bars, we must pay homage to this glorious fruit. Forget the bottled juice from the grocery store shelf. Its flavor is often muted, sometimes with a slightly metallic aftertaste, and it completely lacks the aromatic brightness that makes these bars so special.
Fresh is the only way to go. You'll be using both the zest and the juice, and these two components contribute different things. The zest—the thin, yellow outer layer of the peel—is where the lemon's essential oils reside. These oils are intensely fragrant and provide the beautiful, floral aroma and deep citrus flavor that you can't get from juice alone. The juice, on the other hand, provides the sharp, acidic tang that makes the filling so refreshing. Together, they create a full-bodied, authentic lemon experience.
When selecting your lemons, look for ones that are heavy for their size, which indicates they are full of juice. The skin should be bright yellow and firm, without blemishes or soft spots. Standard Eureka lemons, the most common variety found in supermarkets, are perfect for this recipe due to their high acidity and classic tart flavor. If you come across Meyer lemons, know that they are a cross between a lemon and a mandarin orange. They are less acidic and have a sweeter, more floral taste. You can certainly use them, but your lemon bars will be slightly less tangy and will have a more nuanced, perfumed flavor.
To get the most out of your fruit, always zest the lemons before you juice them. A microplane grater is the best tool for this, as it removes only the yellow zest and leaves behind the bitter white pith. When you're ready to juice, press down firmly on the lemon and roll it on your countertop for a few seconds. This helps to break down the membranes inside and will yield more juice. This little bit of extra care is what makes these homemade lemon bars taste infinitely better than anything you could buy.
Mastering the Method: A Step-by-Step Guide
Crafting the perfect lemon bars is a process of two distinct yet interconnected stages: building the perfect foundation and creating the silkiest filling. Following the right techniques here will guarantee a flawless result, so let's walk through it together.
Part 1: The Buttery Shortbread Foundation
The journey begins with the crust. Our goal is a crust that is crisp, tender, and flavorful—the ideal base for the tangy curd. The first critical step is to line your baking pan with parchment paper, allowing some to hang over the sides. This parchment “sling” is your best friend later on, making it effortless to lift the entire slab of bars out of the pan for neat, easy cutting.
To make the dough, you’ll combine the flour, powdered sugar, and salt. Then, you'll add your cold, cubed butter. Using your fingertips, a pastry cutter, or a food processor, work the butter into the dry ingredients until the mixture resembles coarse, sandy crumbs with some pea-sized butter pieces remaining. It's important not to overwork it. Those little butter pieces are key to the texture. Once you have the right consistency, press this mixture firmly and evenly into the bottom of your prepared pan. Use the bottom of a measuring cup or glass to get it really compact and level. This ensures it bakes evenly and provides a solid foundation.
Now for the most important part of this stage: the par-bake. You'll bake the crust on its own, before the filling is ever introduced. This step is essential for achieving a crisp crust and preventing the dreaded “soggy bottom.” Baking it first allows the crust to set and develop a beautiful golden color. You'll know it's ready when the edges are lightly browned and the surface appears dry and set.
Part 2: The Silky Lemon Filling
While the crust is in the oven, you'll prepare the filling. This is a simple whisk-together affair, but the order of operations matters. Start by whisking the granulated sugar and the small amount of flour together in a large bowl. This prevents the flour from clumping when the wet ingredients are added. Next, add your room-temperature eggs and whisk vigorously until the mixture is smooth, pale, and slightly frothy. This dissolves the sugar and incorporates a little air.
Now, add the stars of the show: the lemon zest and freshly squeezed lemon juice. Whisk everything together until it is just combined. You don't want to over-mix at this stage. You might notice some foam or bubbles on the surface; for an ultra-smooth top, you can skim this off with a spoon before pouring.
The Union: A Critical Moment
Here comes the professional secret: you must pour the lemon filling directly onto the hot crust as soon as it comes out of the oven. Do not let the crust cool down. This technique creates a seamless seal between the crust and the filling. The heat from the crust begins to cook the bottom of the filling instantly, preventing it from seeping down and making the crust soggy. It’s a small detail that makes a huge difference. Once poured, immediately return the pan to the oven to finish baking. This careful orchestration of steps is the key to mastering this classic lemon bars recipe.
Secrets to Bakery-Quality Lemon Bars
Beyond the basic steps, there are a few professional tips and techniques that will elevate your lemon bars from simply good to absolutely spectacular. These are the details that ensure a perfect texture, a beautiful appearance, and a flawless finish every time.
-
Embrace the Parchment Paper Sling. I can't stress this enough. Lining your 8x8 or 9x9 inch pan with parchment paper, leaving an overhang on at least two sides, is a game-changer. It eliminates any anxiety about getting that first piece out and allows you to lift the entire cooled slab onto a cutting board. This is the secret to getting perfectly square, clean-edged bars.
-
Don't Over-bake the Filling. This is the most common mistake. An over-baked lemon bar will have a rubbery texture and can sometimes develop a slightly curdled appearance. The visual cue for perfect doneness is that the edges of the filling are set and opaque, but the very center still has a slight wobble or jiggle to it when you gently nudge the pan. It should look like a loosely set pudding. The filling will continue to cook and set from the residual heat as it cools.
-
Patience is a Virtue: Cool Completely. I know it's tempting to slice into them while they're still warm, but you must resist. For the curd to set properly and for you to achieve those clean, sharp cuts, the lemon bars need to cool gradually. First, let them cool completely to room temperature on a wire rack (this can take 1-2 hours). Then, transfer them to the refrigerator to chill for at least 2 more hours, or even overnight. This chilling process is absolutely critical for the final texture.
-
For a Flawless Top, Skim the Foam. After whisking your filling ingredients, you’ll likely see a layer of white foam on the surface. This is just air incorporated from the eggs. If you bake it as is, you may get a thin, crackly white layer on top of your bars. For a perfectly smooth, translucent yellow top, simply use a spoon to gently skim off and discard this foam before pouring the filling over the crust.
-
The Secret to Clean Cuts. Once your bars are thoroughly chilled, use the parchment sling to lift them onto a cutting board. Use a large, sharp chef's knife. For the cleanest possible cuts, run the knife under hot water and wipe it completely dry before each and every cut. This warms the blade just enough to slice through the curd without dragging. Wiping it clean prevents crumbs from the previous cut from marring the next one. This meticulous little ritual is what separates homemade bars from professional-looking ones.
Troubleshooting Common Lemon Bar Issues
Even with a great recipe, things can sometimes go sideways in the kitchen. Don't worry! Most common lemon bar problems are easy to diagnose and fix for next time. Here’s a guide to troubleshooting your bake.
-
Problem: My filling is runny and didn't set.
- Cause: This is almost always due to under-baking. The center should still have a slight jiggle, but it shouldn't be sloshing like a liquid. Every oven is different, so it might need a few more minutes than the recipe states. Another culprit could be an inaccurate measurement of lemon juice—too much liquid can disrupt the egg-to-liquid ratio, preventing a firm set.
- Solution: Trust the visual cues over the timer. Next time, leave it in the oven for another 3-5 minutes and check for that gentle wobble. Also, ensure you are measuring your ingredients precisely.
-
Problem: The crust is soggy.
- Cause: There are two likely reasons. Either the crust was under-baked during the par-baking stage, or you poured the filling onto a cooled crust. A properly par-baked crust should be lightly golden. Pouring the filling onto a hot crust is crucial as it instantly starts to cook the bottom layer of the filling, creating a barrier.
- Solution: Make sure your crust has visible color around the edges before you pull it out for the filling. And work quickly—the filling should be ready to go the moment the crust comes out of the oven.
-
Problem: My bars have a slight metallic taste.
- Cause: This happens when the acidic lemon filling reacts with a metal pan, like aluminum. This is especially true if you store the bars in the same pan they were baked in.
- Solution: Always line your pan with parchment paper. This creates a barrier between the filling and the metal. For baking, glass or ceramic pans are also excellent, non-reactive choices. Never store leftover lemon bars directly in an aluminum pan.
-
Problem: The top of my filling is cracked.
- Cause: Cracking is usually a sign of over-baking or cooling the bars too quickly. When the eggs in the filling get too hot, they can seize up and contract as they cool, causing cracks.
- Solution: Pull the bars from the oven when the center is still slightly jiggly. Allow them to cool gradually at room temperature before moving them to the refrigerator. Avoid drastic temperature changes.
Serving, Storing, and Elevating Your Bars
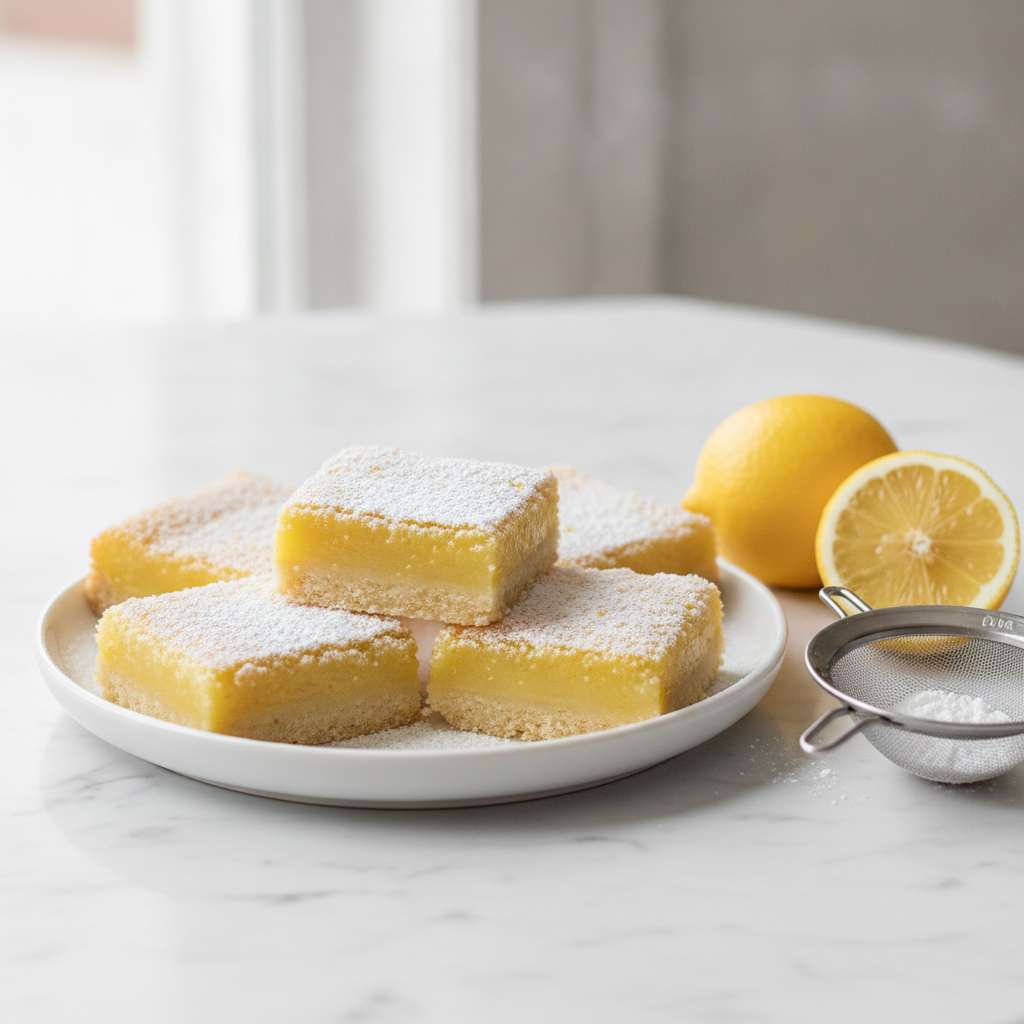
Once your beautiful lemon bars are baked, cooled, and perfectly sliced, the final touch is the presentation. The classic and, in my opinion, most elegant way to serve them is with a generous dusting of powdered sugar. Wait until just before you're ready to serve to do this. If you dust them too early, the moisture from the filling will absorb the sugar, causing it to dissolve and disappear. Use a fine-mesh sieve for a light, even, snow-like coating.
These bars are a stunning dessert all on their own, but they also pair wonderfully with other flavors. For a truly special treat, serve a square alongside a dollop of softly whipped cream to balance the tartness, or with a few fresh berries, like raspberries or blueberries, for a pop of color and a different kind of fruity note. They are the perfect conclusion to a hearty meal, a wonderful addition to a brunch spread, or a delightful companion to a cup of tea in the afternoon.
Storing Your Lemon Bars: To keep your lemon bars fresh and delicious, proper storage is key. They should be stored in the refrigerator due to the egg and butter content in the filling and crust. Arrange the cut squares in a single layer in an airtight container. If you need to stack them, place a sheet of parchment paper between the layers to prevent sticking. Stored this way, they will stay fresh for up to 4-5 days.
Freezing for Later: Yes, lemon bars freeze beautifully! This is perfect if you want to make them ahead of a gathering. For best results, let the slab cool completely, but do not cut it into squares or dust with powdered sugar. Wrap the entire uncut slab tightly in plastic wrap, then a layer of aluminum foil. It can be frozen for up to 3 months. When you're ready to enjoy them, thaw the slab in the refrigerator overnight. Once fully thawed, you can dust with powdered sugar and slice as usual.
Frequently Asked Questions
Why does my lemon filling have a thin white layer on top?
That thin, papery white layer is simply cooked egg foam. When you whisk the eggs and sugar for the filling, you incorporate air, creating bubbles. These light bubbles rise to the surface during baking and form that layer. It's perfectly edible, but if you prefer a pure, glossy yellow top, you can gently skim the foam off the top of the liquid filling with a spoon before pouring it into the crust.
Can I use Meyer lemons instead of regular lemons?
Meyer lemons will work beautifully in this recipe! They are naturally sweeter and less acidic than standard Eureka lemons. Your final lemon bars will have a slightly softer, more floral, and less aggressively tart flavor. It's a wonderful variation if you prefer a milder lemon dessert.
Is it possible to double this recipe?
Absolutely! This recipe can easily be doubled. Simply use a 9x13 inch baking pan instead of an 8x8 or 9x9 inch pan. The baking times should be pretty similar, but you may need to add about 5-10 minutes to the final bake. Just keep an eye out for the visual cues—set edges and a slightly wobbly center.
My shortbread crust came out very hard. What did I do wrong?
A rock-hard crust is usually the result of one of two things: over-baking the crust during the par-bake stage, or over-working the dough. When you mix the butter and flour, stop as soon as it resembles coarse crumbs. Over-mixing develops gluten, which makes the crust tough. Also, be sure to pull the crust from the oven when the edges are just beginning to turn a light golden brown.
How can I make the lemon flavor even stronger?
If you're a true lemon lover and want an even more intense citrus punch, the secret is in the zest, not the juice. Adding more juice can throw off the liquid ratio and prevent the filling from setting properly. Instead, you can increase the amount of lemon zest by about 50%. The zest contains the lemon's fragrant oils and will give you a big boost in flavor without affecting the texture.
Sunshine Lemon Bars
A classic dessert featuring a buttery shortbread crust and a perfectly sweet, tangy, and luscious lemon curd filling. Easy to make and impossible to resist.
Prep Time
20 min
Cook Time
50 min
Total Time
1h 10m
Servings
16 squares
Ingredients
For 16 squares
- For the Shortbread Crust:
- 1 cup (125g) all-purpose flour
- 1/2 cup (113g) unsalted butter, cold and cut into 1/2-inch cubes
- 1/4 cup (30g) powdered sugar
- 1/4 teaspoon fine sea salt
- For the Lemon Filling:
- 3/4 cup (150g) granulated sugar
- 2 large eggs, at room temperature
- 2 tablespoons all-purpose flour
- 2 teaspoons finely grated lemon zest (from about 2 lemons)
- 1/3 cup (80ml) fresh lemon juice (from about 2-3 lemons)
- 1/8 teaspoon fine sea salt
- For Topping:
- 2 tablespoons powdered sugar, for dusting
Instructions
- 1
Preheat Oven and Prepare Pan
Adjust your oven rack to the middle position and preheat to 350°F (175°C). Line an 8x8-inch or 9x9-inch baking pan with parchment paper, leaving an overhang on two sides to create a 'sling'. This will make it easy to remove the bars later.
- 2
Make the Shortbread Crust
In a medium bowl, whisk together the 1 cup of all-purpose flour, 1/4 cup of powdered sugar, and 1/4 teaspoon of salt. Add the cold, cubed butter. Using your fingertips or a pastry cutter, cut the butter into the flour mixture until it resembles coarse crumbs with some pea-sized pieces of butter remaining.
- 3
Press Crust into Pan
Pour the crumb mixture into your prepared pan. Press it down firmly and evenly across the bottom of the pan to form a compact layer. Use the bottom of a flat measuring cup or glass to help create a smooth, even surface.
- 4
Par-Bake the Crust
Place the pan in the preheated oven and bake for 18-22 minutes, or until the edges are lightly golden brown and the surface looks dry. The crust must be hot when you add the filling, so begin preparing the filling immediately.
- 5
Prepare the Lemon Filling
While the crust is baking, prepare the filling. In a large bowl, whisk together the 3/4 cup of granulated sugar and the 2 tablespoons of all-purpose flour. Whisking the dry ingredients first prevents the flour from clumping.
- 6
Combine Wet Ingredients
Add the room-temperature eggs to the sugar mixture and whisk vigorously until smooth and well combined. Stir in the lemon zest, fresh lemon juice, and 1/8 teaspoon of salt. Whisk until everything is just incorporated. Skim off any foam from the surface for a clearer finish.
- 7
Pour Filling over Hot Crust
As soon as the crust comes out of the oven, reduce the oven temperature to 325°F (160°C). Carefully pour the lemon filling evenly over the hot crust. The heat from the crust will help create a seal and prevent a soggy bottom.
- 8
Bake Until Set
Return the pan to the oven and bake for an additional 25-30 minutes. The bars are done when the filling is set around the edges but still has a very slight jiggle in the center. Do not over-bake.
- 9
Cool Completely at Room Temperature
Remove the pan from the oven and place it on a wire rack to cool completely to room temperature. This will take about 1 to 2 hours. Do not attempt to slice the bars while they are warm.
- 10
Chill Before Slicing
Once the bars have cooled to room temperature, cover the pan and transfer it to the refrigerator. Chill for at least 2 hours, or preferably overnight. This step is crucial for the filling to set completely for clean cuts.
- 11
Slice and Serve
When ready to serve, use the parchment paper sling to lift the entire slab out of the pan and onto a cutting board. Dust generously with powdered sugar. Use a large, sharp knife, wiping it clean between cuts, to slice into 16 squares. Store leftovers in an airtight container in the refrigerator.
Nutrition Facts
Per serving (estimated)
185 calories
Calories
25g
Carbs
2g
Protein
9g
Fat
0.5g
Fiber
95mg
Sodium
16g
Sugar


