

Ultimate Philly Cheese Steak Sandwich Recipe (Easy & Halal)
Learn how to make the best Philly Cheese Steak Sandwich at home! This easy, halal recipe features tender beef, melted cheese, and a secret spice blend.
cookwithyara.com/recipes/philly-cheese-steak-sandwich-recipe
There’s a special kind of magic that happens when you bring a platter of perfectly crafted sandwiches to the table. It’s a moment of pure, unadulterated joy. Imagine this: a golden, toasted roll, barely containing a generous pile of sizzling, thinly sliced beef, tangled with sweet, caramelized onions and peppers, all draped in a glorious blanket of melted cheese. The aroma alone—savory, rich, and utterly mouthwatering—is enough to make everyone pause. This isn't just any sandwich; it’s my take on the iconic Philly Cheese Steak Sandwich, a dish that feels like a celebration in every single bite.
When these sandwiches land on the table, conversations hush for a moment. People lean in, their eyes widening as they take in the sight of the gooey, cheesy filling spilling from the sides. It’s a dish that commands attention, one that feels both incredibly indulgent and deeply comforting. You might think that creating such a showstopper requires hours of complicated work, but I’m here to guide you through a process that is surprisingly straightforward. The secret isn't in complex techniques but in respecting the quality of the ingredients and understanding how to bring them together in perfect harmony. The key element that elevates this version is a simple yet profound spice blend, a little touch from my Mediterranean pantry that adds a warmth and depth you won't find in your average sandwich shop. This is more than just a recipe; it’s an invitation to create a memorable meal that will have your loved ones asking for it again and again.
What Makes This a Showstopper
What truly elevates a meal from simple sustenance to a showstopping centerpiece? With this Philly Cheese Steak Sandwich recipe, the answer lies in a symphony of sensory experiences that begin the moment you lay eyes on it. The visual appeal is undeniable. We eat first with our eyes, and this sandwich is a feast. Picture the beautiful contrast of colors: the deep brown of the seared beef, the jewel-toned green and red of the bell peppers, the translucent gold of caramelized onions, and the creamy white of perfectly melted provolone cheese, all nestled within a crusty, golden-brown roll. It’s a composition that promises richness and flavor before you even take the first bite. The sheer abundance of the filling, spilling artfully from the sides, signals generosity and a truly satisfying meal ahead.
The flavor experience is a journey in itself. The first bite is an explosion of textures and tastes. You get the slight crunch of the toasted roll, which immediately gives way to the incredibly tender, savory beef. Then comes the subtle sweetness of the onions and peppers, which have been patiently cooked down to release their natural sugars. Finally, the creamy, slightly sharp provolone ties everything together, coating every element in a luscious, melty embrace. The secret spice blend I use adds a whisper of smokiness and warmth that lingers pleasantly, making each subsequent bite even more compelling. This isn't a one-note dish; it's a complex, layered experience that evolves as you eat. It’s the kind of sandwich you’d expect to find at a high-end gourmet eatery, yet you have the power to create this masterpiece right in your own kitchen, transforming a simple meal into an unforgettable event.
The Ingredients That Matter Most
At the heart of any truly great dish are exceptional ingredients. For our Philly Cheese Steak Sandwich recipe, focusing on quality for a few key components will make all the difference between a good sandwich and an unforgettable one. These are the elements where a little extra attention pays off in incredible flavor and texture.
First and foremost, the beef. This is where you should absolutely invest. I recommend using a well-marbled cut like ribeye. The intramuscular fat in ribeye renders down as it cooks, keeping the meat incredibly juicy, tender, and flavorful. Boneless sirloin is another excellent choice, offering a great balance of flavor and leanness. The key is to have it sliced paper-thin. You can ask your butcher to do this for you on their slicer, which is the easiest way to ensure uniformity. If you're doing it at home, pop the steak in the freezer for about 30-45 minutes until it's firm but not frozen solid; this will make slicing it thinly much easier.
Next, the cheese. Classic provolone is my top pick for its sharp, slightly tangy flavor that cuts through the richness of the beef. Look for a high-quality deli provolone, not the pre-packaged slices, as it will melt more smoothly and offer a far superior taste. For an even creamier, melt-in-your-mouth experience, a good quality white American cheese from the deli counter is a fantastic option. Its melting properties are second to none.
The vessel for this masterpiece is the roll. You need a sturdy roll that can hold up to the juicy filling without falling apart. A classic Italian hoagie roll is perfect. It should have a slightly crusty exterior and a soft, airy interior. This textural contrast is crucial—it provides a satisfying crunch upon the first bite before giving way to the tender filling.
Finally, the aromatics and my personal touch. Sweet yellow onions are essential for their ability to caramelize into jammy, sweet perfection. Green bell peppers add a classic, slightly grassy note, but a mix of red and green adds visual beauty and a touch of sweetness. And my secret weapon: a simple spice blend of smoked paprika, garlic powder, a tiny pinch of allspice, and freshly ground black pepper. This blend adds a subtle warmth and smoky depth that beautifully complements the savory beef and cheese, infusing the entire Philly Cheese Steak Sandwich with a signature flavor that is uniquely delicious.
Building It Step by Step
The process of creating the perfect Philly Cheese Steak Sandwich is a beautiful dance of preparation and timing, where each step builds upon the last to create the final, delicious harmony. It's a culinary journey that's as enjoyable as the meal itself. Let's break it down into manageable stages.
First is the meticulous preparation, or mise en place. This is where you set yourself up for success. Thinly slice your partially frozen beef against the grain, dice your onions, and slice your bell peppers. Whisk together your spices—the smoked paprika, garlic powder, allspice, salt, and pepper—in a small bowl. Slice your provolone if it isn't already. Finally, slice your hoagie rolls lengthwise, leaving the hinge intact. Having everything ready before you turn on the heat ensures a smooth and stress-free cooking process.
Next, we build the flavor base by cooking the vegetables. Heat a generous glug of olive oil in a large skillet or cast-iron pan over medium heat. Add the onions and peppers, and let them cook slowly, stirring occasionally. You’re not looking to rush this step. You want them to soften, sweeten, and develop those beautiful golden-brown caramelized edges. This can take a good 10-12 minutes, but this patience is rewarded with incredible depth of flavor. Once they're perfectly tender and sweet, scoop them out of the pan and set them aside.
The main event is cooking the beef. Increase the heat to medium-high. Add a bit more oil to the hot pan and, working in batches to avoid overcrowding, lay down the thinly sliced beef in a single layer. You want to hear a confident sizzle. The goal here is a quick sear, not a long cook. The thin slices will cook in just a minute or two per side. As you cook, use your spatula to chop and separate the meat into smaller, bite-sized pieces. Once all the beef is cooked, return it all to the pan along with the cooked onions and peppers. This is where the magic starts to happen, as the flavors begin to meld.
Now, for the glorious cheese melt. Toss everything together in the skillet, then divide the mixture into four equal portions, mimicking the shape of your rolls. Lay the slices of provolone cheese directly on top of each pile of beef and vegetables. To encourage a perfect, even melt, you can add a tablespoon of water to an empty part of the pan and immediately cover it with a lid. The resulting steam will envelop the cheese, creating a gooey, luscious blanket in just a minute or so.
Finally, the assembly. Lightly toast the inside of your rolls. Using a long, wide spatula, carefully scoop up one entire portion of the cheesy beef mixture and deftly place it into a toasted roll. The goal is to transfer the entire pile, cheese and all, in one swift motion. This is the final step in crafting your homemade Philly Cheese Steak Sandwich, a true testament to how simple ingredients, handled with care, can create something truly extraordinary.
Presentation and Plating Tips
Presenting your homemade Philly Cheese Steak Sandwich with a little extra flair can elevate the dining experience from a casual meal to a truly special occasion. The visual feast is just as important as the flavors themselves, especially for a dish this photogenic. My favorite way to serve it is to embrace a rustic, generous aesthetic.
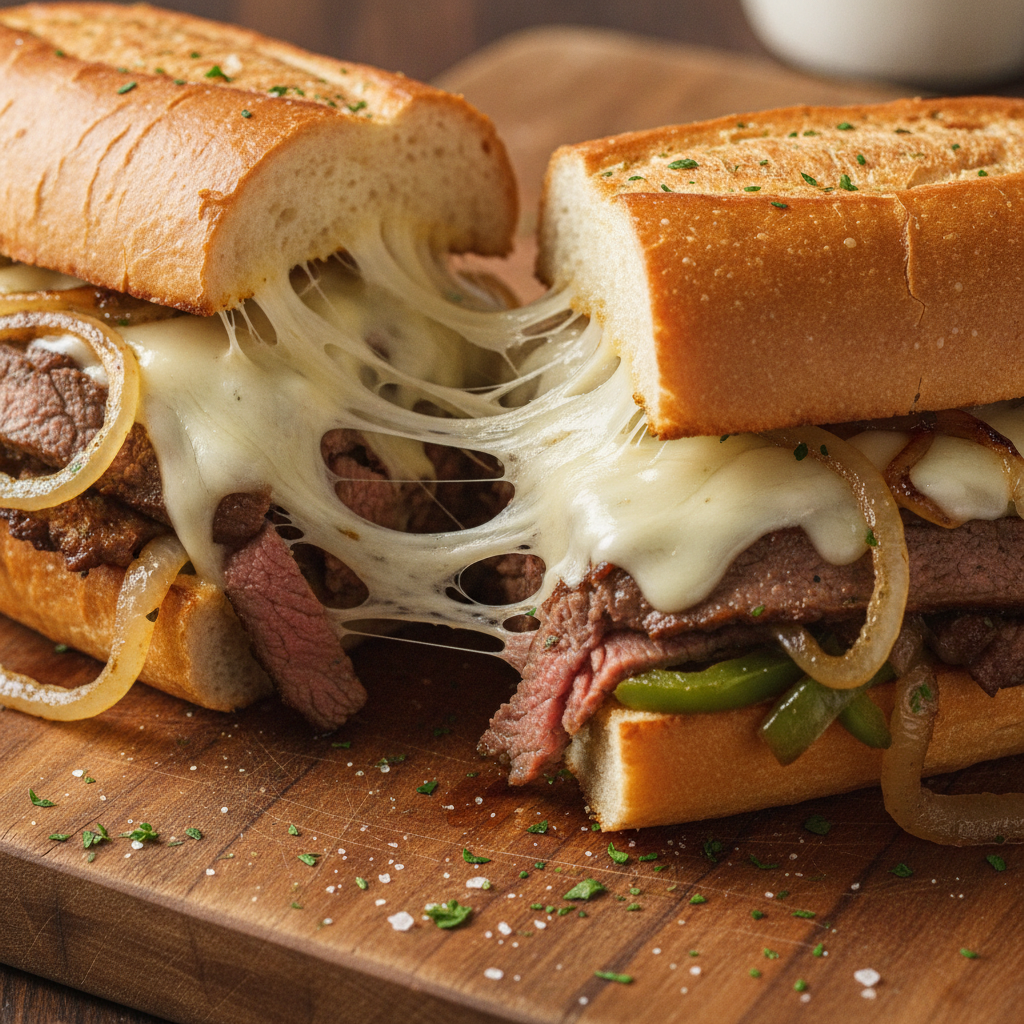
Instead of just placing the sandwich on a plate, consider wrapping each one snugly in a piece of parchment or butcher paper. This not only looks professional, like it came from a gourmet deli, but it also serves a practical purpose by catching any delicious drips and holding the sandwich together. Once wrapped, slice it cleanly in half on a sharp diagonal with a serrated knife. This cross-section is the money shot—it reveals the beautiful layers of tender beef, colorful peppers, and that incredible, gooey cheese pull.
For a family-style presentation, arrange the wrapped and sliced sandwich halves on a large wooden cutting board or a rustic ceramic platter. This creates an inviting, communal feel that encourages everyone to dig in. Scatter some fresh, finely chopped parsley or chives over the top right before serving. This little touch of green adds a vibrant pop of color that contrasts beautifully with the rich, savory tones of the filling, and it contributes a hint of fresh, herbaceous aroma.
When thinking about what to serve alongside this amazing Philly Cheese Steak Sandwich recipe, consider simple accompaniments that won't overshadow the main event. A pile of crispy, golden fries or a simple green salad with a light vinaigrette are perfect partners. Placing small bowls of these sides right on the board with the sandwiches completes the picture, creating a meal that is as visually stunning as it is delicious.
Scaling Up for a Crowd
One of the best things about this Philly Cheese Steak Sandwich recipe is how wonderfully it adapts to feeding a larger group. Turning this into a meal for a crowd is not only possible but can also be a fun, interactive experience for your guests. The key is smart preparation and batch cooking.
To begin, do as much prep work in advance as you can. You can slice all your onions and peppers the day before and store them in an airtight container in the refrigerator. The beef can also be thinly sliced ahead of time. This front-loading of the work means that when your guests arrive, you’re not stuck at the stove but are free to enjoy the gathering. Doubling or tripling the recipe is straightforward; just multiply the ingredients accordingly.
When it comes to cooking for a crowd, a large electric griddle or a wide, flat-top grill pan is your best friend. These surfaces provide ample space to cook the vegetables and beef in large batches without overcrowding, which is crucial for getting a good sear on the meat. Cook all the vegetables first and set them aside in a large bowl. Then, cook the beef in batches, searing it quickly before combining it all back together with the vegetables.
To keep the filling warm and ready for serving, transfer the entire mixture to a slow cooker set to the “warm” or “low” setting. This is a game-changer for parties. It keeps the beef and veggie mix hot and juicy for hours. Set up a station with the slow cooker, a basket of toasted rolls, and a platter of cheese slices (provolone, white American). This allows guests to assemble their own Philly Cheese Steak Sandwich, customizing the cheese-to-filling ratio to their liking. It’s an engaging, delicious, and incredibly efficient way to serve a showstopping meal to a hungry crowd.
Storing Any Leftovers
While a freshly made Philly Cheese Steak Sandwich is an experience unto itself, having leftovers can be a wonderful treat for the next day—if stored correctly. The biggest enemy of a leftover sandwich is a soggy roll, so the number one rule is to always store the filling separately from the bread.
Once the filling has cooled down completely, transfer it to an airtight container. It will keep well in the refrigerator for up to three days. Storing it this way preserves the integrity and texture of the beef and vegetables, preventing them from becoming waterlogged. Do not attempt to refrigerate a fully assembled sandwich, as the bread will absorb all the moisture and become unpleasantly mushy. Any leftover, untoasted rolls can be stored in a bread bag at room temperature.
When you're ready to enjoy your leftovers, reheating the filling is simple and yields fantastic results. The best method is to use a skillet over medium heat. Add the beef and vegetable mixture to the pan and cook, stirring occasionally, until it's heated all the way through. This method helps to re-sear the meat slightly and revives the flavors beautifully. Once the filling is hot, you can top it with a fresh slice of cheese and cover the pan for a minute to melt it, just as you did when making it fresh.
While the filling is reheating, toast a fresh roll. Then, simply assemble your sandwich as you did before. This method ensures you get a leftover meal that tastes nearly as good as the original, with hot, juicy filling, perfectly melted cheese, and a crisp, warm roll. It’s a few extra minutes of effort that makes all the difference in enjoying a top-tier leftover meal.
Variations to Explore
While the classic Philly Cheese Steak Sandwich recipe is a masterpiece of simplicity, it also serves as a fantastic canvas for creative variations. Once you've mastered the original, don't hesitate to experiment with different flavors and ingredients to make it your own. Here are a few ideas to inspire your next sandwich creation.
For those who enjoy a bit of heat, a Spicy Steak & Cheese is a natural evolution. Sauté some thinly sliced jalapeños or serrano peppers along with the onions and bell peppers. You can also add a dash of your favorite hot sauce to the beef mixture or mix some chili flakes into your spice blend for an extra kick.
A Mushroom Lover's Dream is another delicious twist. Mushrooms add a wonderful earthy, umami depth that complements the beef perfectly. Sauté a pound of sliced cremini or shiitake mushrooms until they are deeply browned and have released their moisture, then mix them in with the peppers and onions.
If you're looking for a lighter alternative, consider making a Chicken Philly Sandwich. Substitute the beef with thinly sliced boneless, skinless chicken breasts or thighs. Chicken cooks even faster than beef, so be sure to watch it closely. It pairs wonderfully with the same vegetables and provolone cheese.
For a gluten-free or lower-carb option, you can create a Deconstructed Philly Bowl. Simply skip the roll and serve the hot, cheesy beef and vegetable mixture over a bed of fluffy quinoa, cauliflower rice, or even crisp romaine lettuce for a hearty and satisfying salad. This version packs all the flavor of the original Philly Cheese Steak Sandwich into a wholesome and versatile meal.
Questions You Might Have
Can I use a different cut of beef for this recipe?
Absolutely. While ribeye is my top choice for its marbling and flavor, boneless sirloin or top round are also excellent, leaner alternatives. The most important thing is to slice the beef as thinly as possible against the grain to ensure it remains tender after its quick sear.
What is the best way to slice the beef so thinly at home?
Placing the steak in the freezer for about 30-45 minutes is the key. This firms up the meat, making it much easier to control your knife and achieve those paper-thin slices. A very sharp knife is also essential for clean cuts.
Can I prepare the filling in advance?
You certainly can! You can cook the entire beef and vegetable mixture a day ahead and store it in an airtight container in the refrigerator. When you're ready to serve, simply reheat the filling in a skillet, top with cheese to melt, and assemble on freshly toasted rolls.
What other cheeses work well in a Philly Cheese Steak Sandwich?
Provolone and white American cheese are fantastic choices for their melting quality. However, a mild or sharp cheddar could also be delicious, adding a different kind of tangy flavor. For a truly decadent sandwich, a homemade cheese sauce is also a popular and delicious option.
How can I transport these sandwiches to a potluck or picnic?
To transport them, assemble the sandwiches and wrap each one tightly in aluminum foil. The foil will keep them warm for a short period and hold them together. For best results, try to transport the warm filling in an insulated container and the rolls separately, and assemble them just before serving to prevent sogginess.
The Ultimate Philly Cheese Steak Sandwich
A classic Philly Cheese Steak Sandwich recipe with tender ribeye, caramelized onions, and melted provolone, elevated with a warm, savory spice blend.
Prep Time
20 min
Cook Time
25 min
Total Time
45 min
Servings
4 sandwiches
Ingredients
For 4 sandwiches
- 1.5 lbs boneless ribeye steak, trimmed of excess fat
- 1 large sweet yellow onion, thinly sliced
- 1 large green bell pepper, thinly sliced
- 8 slices provolone cheese
- 4 high-quality hoagie or sub rolls, split lengthwise
- 3 tablespoons olive oil, divided
- 2 cloves garlic, minced
- 1 teaspoon kosher salt
- 1/2 teaspoon freshly ground black pepper
- 1/2 teaspoon smoked paprika
- 1/4 teaspoon garlic powder
- 1/8 teaspoon ground allspice
Instructions
- 1
Prepare the Beef
Place the ribeye steak on a plate and transfer to the freezer for 30-45 minutes. This will firm up the meat, making it much easier to slice thinly. Once firm, use a very sharp knife to slice the steak as thinly as possible against the grain.
- 2
Create the Spice Blend
In a small bowl, combine the kosher salt, black pepper, smoked paprika, garlic powder, and ground allspice. Whisk them together until evenly mixed. This blend will season the beef.
- 3
Sauté the Vegetables
Heat 2 tablespoons of olive oil in a large cast-iron skillet or heavy-bottomed pan over medium heat. Add the sliced onion and bell pepper. Cook, stirring occasionally, for 10-12 minutes until softened and lightly caramelized. Add the minced garlic and cook for one more minute until fragrant.
- 4
Remove Vegetables and Prepare Pan
Using a slotted spoon, remove the cooked vegetables from the skillet and set them aside on a plate. Leave any residual oil in the pan. Increase the heat to medium-high.
- 5
Sear the Beef
Add the remaining 1 tablespoon of olive oil to the hot skillet. Working in two batches to avoid overcrowding the pan, add the thinly sliced beef in a single layer. Cook for 1-2 minutes per side until just browned.
- 6
Chop and Season the Beef
As the beef cooks, use two spatulas or the edge of one sturdy spatula to chop the meat into smaller, bite-sized pieces. Sprinkle the spice blend over the beef as it cooks. Remove the first batch and repeat with the remaining beef.
- 7
Combine Filling Ingredients
Return all the cooked beef to the skillet. Add the sautéed vegetables back into the pan and toss everything together to combine well. Spread the mixture evenly across the skillet.
- 8
Melt the Cheese
Using your spatula, divide the beef and vegetable mixture into four equal portions within the skillet. Drape 2 slices of provolone cheese over each portion. Allow the cheese to melt from the residual heat for about 1-2 minutes until gooey and fully melted.
- 9
Toast the Rolls
While the cheese is melting, you can lightly toast the inside of your split hoagie rolls on a separate griddle, under the broiler, or in a toaster oven until they are just golden and warm. This step prevents the rolls from getting soggy.
- 10
Assemble the Sandwiches
Place an open, toasted roll over one of the cheesy piles of steak in the skillet. Using a long spatula, slide it under the meat and cheese and, in one fluid motion, scoop it all up and into the roll. Repeat for the remaining three sandwiches and serve immediately.
Nutrition Facts
Per serving (estimated)
850 calories
Calories
55g
Carbs
52g
Protein
48g
Fat
4g
Fiber
1450mg
Sodium
9g
Sugar


