Rich Raspberry Chocolate Layer Cake (Easy Recipe)
Indulge in this decadent raspberry chocolate layer cake! Fudgy chocolate cake, tart raspberry filling, and silky chocolate ganache. Perfect for any gathering.
cookwithyara.com/recipes/raspberry-chocolate-layer-cake
There's a certain magic that happens when chocolate and raspberry come together. It’s a classic pairing for a reason—the deep, slightly bitter notes of a good chocolate cake are perfectly lifted by the bright, tart sweetness of fresh raspberries. This isn't just a dessert; it's a celebration on a plate. My recipe for Raspberry Chocolate Layer Cake is designed to be a showstopper, the kind of cake that hushes a room when it’s brought to the table. It looks intricate, tastes luxurious, but I promise you, it's built on simple, straightforward techniques that any home baker can master.
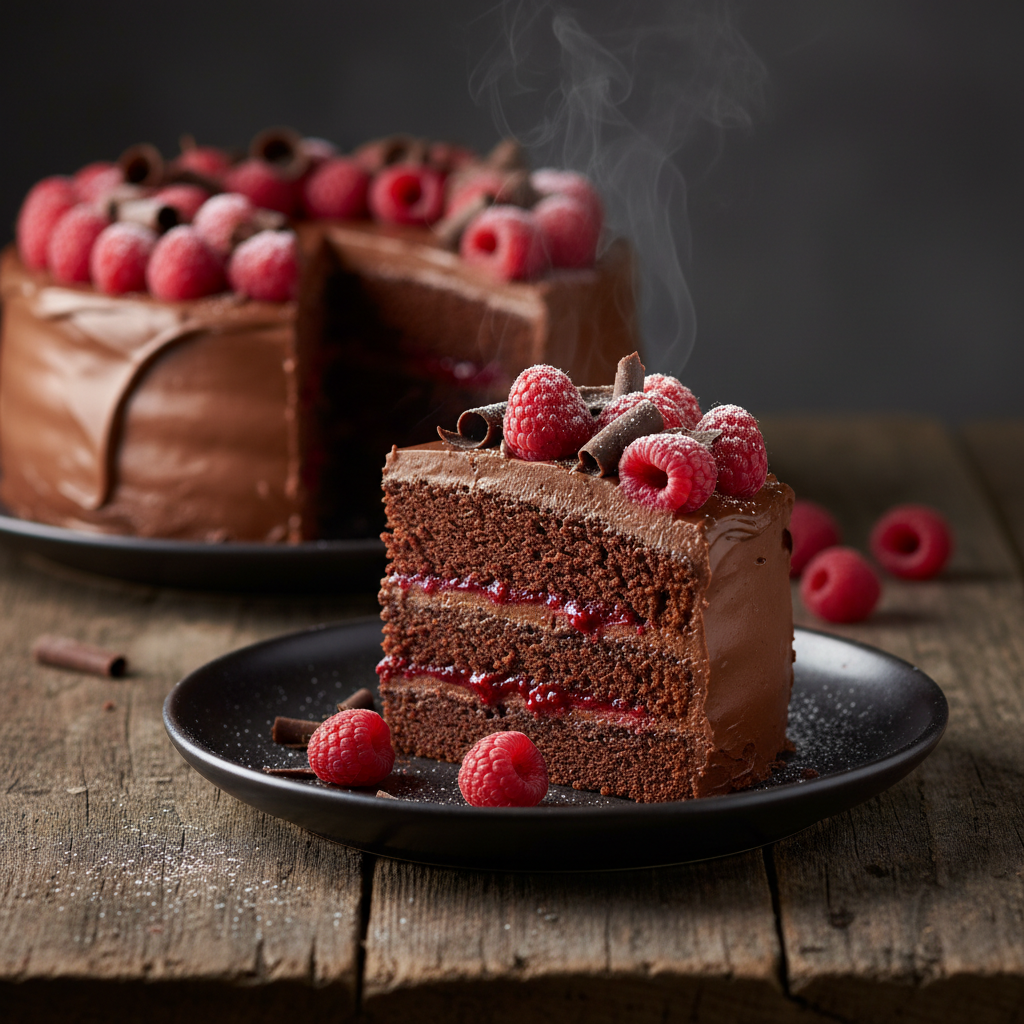
Imagine three layers of impossibly moist, dark chocolate cake, tender and rich with a profound cocoa flavor. Sandwiched between them is a vibrant, ruby-red raspberry filling, made from scratch so you can control the sweetness and let the fruit’s natural tartness shine. The entire creation is then enveloped in a glossy, silky chocolate ganache that drapes over the sides like liquid velvet. It’s a symphony of textures and flavors—soft cake, bright fruit, and smooth, decadent chocolate.
This is the cake you make for special weekend dinners, for family gatherings, or simply for an evening when you want to create something beautiful and delicious. It’s a project, yes, but a joyful one. Each step, from whisking the batter to smoothing the final layer of ganache, is a mindful, rewarding process. Let’s bake this beautiful Raspberry Chocolate Layer Cake together.
Why Raspberry and Chocolate are a Perfect Match
Some flavor combinations are so iconic they feel as if they were destined for each other. Chocolate and raspberry are a prime example of this beautiful culinary synergy. It's a partnership where each element makes the other better, creating a flavor profile that is complex, sophisticated, and deeply satisfying. The success of this pairing lies in the principle of balance, a concept we cherish in Mediterranean and Levantine cooking.
The richness of a good chocolate cake comes from cocoa solids and fats, which coat the palate with a deep, lingering flavor. On its own, this can sometimes feel heavy. This is where the raspberry makes its grand entrance. The fruit's natural acidity and bright tartness cut through the richness of the chocolate, cleansing the palate and preventing the dessert from becoming overwhelming. It adds a high note, a burst of freshness that keeps you coming back for another bite.
Furthermore, the sweetness profiles complement each other perfectly. A well-made dark chocolate cake has a pleasant bitterness, a complexity that is much more interesting than one-note sweetness. The raspberry filling, with its gentle sweetness and sharp tang, balances this earthiness. It's a dialogue between dark and bright, rich and fresh. This dynamic contrast is what makes the Raspberry Chocolate Layer Cake so incredibly memorable and crave-worthy for dessert lovers everywhere.
The Building Blocks of a Perfect Chocolate Cake
A truly spectacular Raspberry Chocolate Layer Cake is built on three pillars of flavor and texture, each one essential to the final masterpiece. Understanding these components is the key to success. Let's break them down.
First, we have the heart of the dessert: the chocolate cake layers. This is not the time for a light, airy sponge. We are aiming for a cake that is deeply moist, fudgy, and intensely chocolatey. The secret lies in a few key ingredients. I use Dutch-processed cocoa powder for its dark color and smoother, less acidic flavor. Blooming the cocoa powder in hot coffee or water is a non-negotiable step; this technique unlocks the cocoa's deepest flavor compounds, making the cake profoundly rich. Buttermilk is our agent of tenderness, its acidity reacting with the leavening agents to create an incredibly soft crumb, while vegetable oil ensures the cake stays moist for days.
Next comes the vibrant raspberry filling. This is where we introduce the bright, zesty counterpoint to the rich chocolate. A homemade filling is far superior to any store-bought jam because you have complete control. We simply cook down fresh or frozen raspberries with a touch of sugar and a squeeze of lemon juice to heighten their natural tartness. A little cornstarch thickens it to the perfect consistency—spreadable, but not so loose that it will ooze out of the cake. This element is the burst of sunshine in our decadent Raspberry Chocolate Layer Cake.
Finally, the glorious finish: the silky chocolate ganache. This is elegance in its simplest form, a luscious mixture of just two ingredients: high-quality chocolate and heavy cream. The ratio is everything here. For this cake, we want a ganache that is pourable when warm but sets to a smooth, fudgy, and spreadable consistency as it cools. Using a good quality semi-sweet or dark chocolate (around 60-70% cacao) is crucial, as its flavor will be front and center. The ganache not only frosts the cake but also seals in all that wonderful moisture, ensuring every slice of this chocolate cake is perfect.
Mastering the Layers: A Guide to Assembly
Assembling a layer cake can seem intimidating, but I like to think of it as a beautiful, meditative process. With a little patience and a few simple techniques, you can build a stunning Raspberry Chocolate Layer Cake that looks as though it came from a professional patisserie. The key to a stable, beautiful cake is working with cool components and allowing for chill time.
First, ensure your cake layers are completely cooled, and preferably chilled. A cold cake is a firm cake, which is much easier to handle and less likely to crumble. Using a long, serrated knife, carefully level the tops of your cake layers so you have a perfectly flat surface to work on. These scraps are the baker's treat! Place your first leveled cake layer on your serving platter or a cake turntable. Now, we create a dam. Pipe a border of your chocolate ganache around the top edge of the cake layer. This sturdy wall of ganache will hold our lovely raspberry filling in place and prevent it from squishing out the sides.
Once your dam is built, spoon a generous amount of the cooled raspberry filling into the center and spread it evenly. Gently place your second cake layer on top, pressing down lightly to secure it. Repeat the process: pipe another ganache dam and fill it with the raspberry mixture. Place the final cake layer on top, upside down, so the perfectly flat bottom of the cake becomes the pristine top of your finished masterpiece. Now, apply a thin layer of ganache all over the cake—this is called a 'crumb coat.' Its job is to trap any loose crumbs. Place the entire cake in the refrigerator for at least 30 minutes to an hour. This step is crucial for a clean, professional-looking finish.
After chilling, you can apply the final, thicker layer of ganache. Use an offset spatula to smooth the top and sides, taking your time to create a beautiful finish. Don't worry about perfection; a few gentle swirls can look incredibly artistic. The assembly of this Raspberry Chocolate Layer Cake is a journey, and taking these steps ensures a stable and beautiful result.
Secrets to a Moist, Fudgy Chocolate Cake
Everyone dreams of a chocolate cake that is deeply moist and fudgy, not dry and crumbly. Over the years, I've gathered a few essential secrets that guarantee a perfect texture every single time. These tips are the difference between a good chocolate cake and a truly unforgettable one.
1. Don't Fear the Oil. While butter adds wonderful flavor, oil is the true secret to a moist and tender cake crumb that stays soft for days. Oil is 100% fat (unlike butter, which contains water and milk solids), and this liquid fat coats the flour proteins, preventing excessive gluten development and resulting in a supremely tender texture.
2. Use Room Temperature Ingredients. This is a rule you'll hear often in baking, and for good reason. When your eggs, buttermilk, and other liquid ingredients are at room temperature, they emulsify more easily into the batter. This creates a smooth, uniform batter that traps air efficiently, leading to a lighter texture and an even bake.
3. Bloom Your Cocoa. As I mentioned earlier, this is a game-changer for flavor. Whisking your cocoa powder into a hot liquid like coffee or water before adding it to the rest of the batter allows the cocoa's starch granules to swell and its flavor compounds to dissolve. This simple step creates a much deeper, more intense chocolate flavor that permeates the entire cake.
4. The Magic of Buttermilk. The acidity in buttermilk serves two purposes. First, it tenderizes the gluten in the flour, resulting in a softer crumb. Second, it reacts with the baking soda, creating carbon dioxide bubbles that give the cake a beautiful lift. Its tangy flavor also adds a subtle complexity that complements the chocolate.
5. Do Not Overmix. Once you combine the wet and dry ingredients, mix only until they are just incorporated. A few small lumps are perfectly fine. Overmixing develops the gluten in the flour, which can lead to a tough, dense, and chewy cake—the opposite of what we want in our Raspberry Chocolate Layer Cake.
6. Never Overbake. This is perhaps the most crucial tip. A chocolate cake will continue to cook from residual heat after you take it out of the oven. Bake it until a wooden skewer inserted into the center comes out with a few moist crumbs attached, but not wet batter. If it comes out completely clean, the cake may already be on its way to being dry.
Decorating Your Raspberry Chocolate Layer Cake
The final decoration is your chance to add a personal touch and turn your delicious cake into a visual work of art. The beauty of this Raspberry Chocolate Layer Cake is that its rich, dark ganache and vibrant filling already make it stunning, so even the simplest decorations will look elegant. You don't need to be a professional cake decorator to make it look special.
For a minimalist and sophisticated look, focus on a perfectly smooth ganache finish. After your final coat, you can heat an offset spatula or bench scraper under hot water, wipe it dry, and run it around the sides and across the top for a glossy, seamless surface. A classic approach is to create beautiful swirls on top with the back of a spoon or your offset spatula, giving it a rustic, inviting texture.
One of my favorite ways to decorate is to let the ingredients tell the story. Arrange a beautiful crown of fresh raspberries in the center of the cake or around the top edge. The pop of red against the dark chocolate is breathtaking. You can also make a few delicate chocolate shavings using a vegetable peeler on a bar of room-temperature chocolate and sprinkle them over the top. A light dusting of unsweetened cocoa powder can also add a touch of elegance.
For something a bit more dramatic, you can create a 'drip' effect. Make a slightly thinner version of the ganache and, once the main cake is chilled and set, carefully spoon it around the top edge, letting it drip artfully down the sides. No matter which path you choose, remember that the goal is to enhance the cake's beauty, not overwhelm it. Let the simple, delicious flavors of this wonderful chocolate cake shine.
Storing and Serving for Maximum Freshness
Once you’ve created your beautiful Raspberry Chocolate Layer Cake, you'll want to ensure every slice is as delicious as the first. Proper storage is key to preserving its texture and flavor. Because of the fresh raspberry filling and the cream-based ganache, this cake must be stored in the refrigerator. Place it in a cake carrier or cover it loosely with plastic wrap and keep it chilled. It will stay fresh and delicious for up to 4 days.
However, here is a crucial tip for serving: cake, especially a rich chocolate cake like this, is always best enjoyed at room temperature. The chill of the refrigerator can dull the flavors and make the cake and ganache seem firm or dense. About an hour or two before you plan to serve it, take the cake out of the refrigerator and let it sit on the counter. This allows the ganache to soften to a silky consistency and the cake's crumb to relax, releasing its full, deep chocolate aroma and flavor.
If you'd like to plan ahead, you can make the components in stages. The chocolate cake layers can be baked a day or two in advance. Once completely cooled, wrap them tightly in plastic wrap and store them at room temperature or in the refrigerator. The raspberry filling can also be made ahead and kept in an airtight container in the fridge for up to a week. You can even assemble and crumb-coat the cake a day before you plan to serve, leaving just the final ganache coat and decoration for the day of your gathering.
Your Raspberry Chocolate Layer Cake Questions, Answered
Can I use frozen raspberries for the filling?
Absolutely! Frozen raspberries work beautifully for the filling. There's no need to thaw them first; simply place them in the saucepan and cook them down as directed in the recipe. They will release a bit more liquid than fresh berries, so you may need to cook the filling for a few extra minutes to let it thicken properly.
My ganache is too stiff or too runny. How can I fix it?
Ganache is very forgiving! If it's too stiff after cooling, you can gently reheat it in a heatproof bowl over a pot of simmering water (or in the microwave in very short 10-second bursts), stirring until it's smooth and spreadable again. If it's too runny, it likely needs to cool down more to thicken. You can also chill it in the refrigerator for 10-15 minute intervals, stirring in between, until it reaches the right consistency.
Can I make this cake with a different fruit?
Yes, this chocolate cake is a wonderful base for other fruit fillings. Sour cherries would be a fantastic choice, creating a Black Forest-style cake. A strawberry or even a passion fruit filling would also provide a lovely tart contrast to the rich chocolate. Just be sure to cook the fruit down into a thick, jam-like consistency so it doesn't make the cake soggy.
How far in advance can I make this Raspberry Chocolate Layer Cake?
You can bake the cake layers up to two days ahead. Wrap them well and store them at room temperature. The entire cake can be fully assembled and frosted one day in advance and kept in the refrigerator. This actually allows the flavors to meld and deepen overnight, making it even more delicious.
Why did my chocolate cake turn out dry?
The most common culprit for a dry cake is overbaking. Chocolate cakes can be tricky because their dark color makes it hard to see browning. Rely on the skewer test—look for moist crumbs, not a completely clean skewer. Another reason could be measuring flour incorrectly. Spoon your flour into the measuring cup and level it off rather than scooping directly from the bag, which compacts the flour and results in using too much.
Can I make this as a two-layer cake instead of three?
Of course! You can bake the batter in two 9-inch round pans instead of three 8-inch pans. The baking time will likely be a bit longer, so start checking for doneness around the 35-40 minute mark. A two-layer cake will be just as delicious and a little simpler to assemble.
Raspberry Chocolate Layer Cake
A decadent and moist three-layer chocolate cake with a bright, homemade raspberry filling and a silky, rich chocolate ganache frosting. A true showstopper for any gathering.
Prep Time
45 min
Cook Time
35 min
Total Time
3h
Servings
12 servings
Ingredients
For 12 servings
- For the Chocolate Cake:
- 2 cups (250g) all-purpose flour
- 2 cups (400g) granulated sugar
- 3/4 cup (75g) unsweetened Dutch-processed cocoa powder
- 2 teaspoons baking soda
- 1 teaspoon baking powder
- 1 teaspoon salt
- 1 cup (240ml) buttermilk, at room temperature
- 1/2 cup (120ml) vegetable oil
- 2 large eggs, at room temperature
- 1 teaspoon pure non-alcoholic vanilla extract
- 1 cup (240ml) freshly brewed hot coffee
- For the Raspberry Filling:
- 3 cups (360g) fresh or frozen raspberries
- 1/2 cup (100g) granulated sugar
- 2 tablespoons cornstarch
- 2 tablespoons fresh lemon juice
- 2 tablespoons water
- For the Chocolate Ganache:
- 12 ounces (340g) high-quality semi-sweet chocolate, finely chopped
- 1 1/2 cups (360ml) heavy cream
Instructions
- 1
Prepare Cake Pans
Preheat your oven to 350°F (175°C). Grease and flour three 8-inch round cake pans. For extra security, line the bottoms with circles of parchment paper, then grease the parchment as well.
- 2
Mix Dry Ingredients
In a large bowl or the bowl of a stand mixer, sift together the flour, sugar, cocoa powder, baking soda, baking powder, and salt. Whisk to combine, ensuring there are no lumps.
- 3
Combine Wet Ingredients
In a separate medium bowl, whisk together the buttermilk, vegetable oil, eggs, and vanilla extract until well combined. Be sure your ingredients are at room temperature for a smooth batter.
- 4
Make the Cake Batter
Pour the wet ingredients into the dry ingredients and mix on low speed until just combined. Slowly stream in the hot coffee and continue to mix on low speed until the batter is smooth. The batter will be very thin; this is normal.
- 5
Bake the Cake Layers
Divide the batter evenly among the three prepared pans. Bake for 30-35 minutes, or until a wooden skewer inserted into the center of the cakes comes out with a few moist crumbs attached. Do not overbake.
- 6
Cool the Cakes
Let the cakes cool in their pans on a wire rack for 15 minutes before inverting them onto the rack to cool completely. Chilling the layers for at least an hour before assembly makes them much easier to handle.
- 7
Prepare Raspberry Filling
While the cakes cool, combine raspberries and sugar in a medium saucepan over medium heat. In a small bowl, whisk cornstarch, lemon juice, and water until smooth. Pour this mixture into the saucepan with the raspberries.
- 8
Cook the Filling
Bring the raspberry mixture to a boil, stirring constantly. Reduce heat and simmer for 5-7 minutes, until the filling has thickened significantly. Remove from heat and let it cool completely.
- 9
Make the Chocolate Ganache
Place the finely chopped chocolate in a medium heatproof bowl. In a small saucepan, heat the heavy cream over medium heat until it just begins to simmer. Pour the hot cream over the chocolate and let it sit undisturbed for 5 minutes.
- 10
Finish the Ganache
After 5 minutes, gently whisk the mixture, starting from the center and working your way out, until the ganache is smooth, glossy, and completely combined. Let it cool at room temperature, stirring occasionally, until it reaches a thick but spreadable consistency (about 1-2 hours).
- 11
Assemble the First Layer
Level your cooled cake layers if needed. Place one layer on your serving plate. Pipe a dam of ganache around the top edge, then fill the center with half of the cooled raspberry filling.
- 12
Build and Crumb Coat
Top with the second cake layer, and repeat with another ganache dam and the remaining raspberry filling. Place the final cake layer on top. Apply a thin layer of ganache over the entire cake to trap crumbs, and chill for 30-60 minutes.
- 13
Frost and Decorate
Once the crumb coat is set, apply the remaining ganache to the top and sides of the cake, using an offset spatula to smooth it or create decorative swirls. Garnish with fresh raspberries and chocolate shavings, if desired. Let the cake set before slicing and serving.
Nutrition Facts
Per serving (estimated)
580 calories
Calories
75g
Carbs
6g
Protein
32g
Fat
5g
Fiber
450mg
Sodium
55g
Sugar