
Easy Rhubarb Vanilla Bean Jelly Recipe
Capture the taste of spring with this easy Rhubarb Vanilla Bean Jelly recipe! Tart rhubarb and warm vanilla create a truly unforgettable homemade preserve.
cookwithyara.com/recipes/rhubarb-vanilla-bean-jelly
There's a special kind of magic that happens in the kitchen when the seasons change. For me, the arrival of spring is heralded by the appearance of slender, ruby-red stalks of rhubarb at the market. It’s a fleeting season, a brief window to enjoy this uniquely tart vegetable, and that’s what makes preserving it so rewarding. There's a deep satisfaction in transforming those humble stalks into something beautiful and delicious that you can enjoy for months to come. It’s a way of bottling a little bit of sunshine, a memory of the season's first warmth, to be opened on a quiet morning later in the year.
This is where my recipe for Rhubarb Vanilla Bean Jelly comes in. It’s more than just a preserve; it’s a culinary alchemy that balances the bright, tangy punch of rhubarb with the warm, floral, and deeply comforting notes of real vanilla bean. Imagine a jewel-toned jelly, glistening in a jar, studded with thousands of tiny black vanilla seeds. When you spread it on warm toast, the heat releases an incredible aroma, a perfect harmony of fruity tartness and sweet fragrance. This recipe is my invitation to you to slow down, connect with the season, and create something truly special. We will walk through every step together, demystifying the process of jelly-making and ensuring you end up with jars of pure, delicious success. From your kitchen to your table, this is a recipe for creating joy.

Why This Rhubarb Vanilla Bean Jelly Belongs in Your Pantry
In a world of fast meals and quick fixes, the act of making something from scratch can feel like a small luxury. But I believe this Rhubarb Vanilla Bean Jelly is more than a luxury—it’s a wonderful, practical, and delicious staple to have on hand. It elevates simple moments and brings a touch of homemade warmth to your table. If you're not yet convinced, here are a few reasons why this will become your new favorite preserve to make.
A Symphony of Flavors. This isn't your average fruit jelly. The flavor profile is complex, sophisticated, and utterly captivating. Rhubarb brings a vibrant, mouth-puckering tartness that is beautifully mellowed by the sweetness of the sugar. Then, the vanilla bean enters, not as a background note, but as a co-star. It adds a creamy, floral, and slightly perfumed warmth that rounds out the rhubarb’s sharp edges, creating a flavor that is both bright and comforting. Each spoonful is a delightful journey from tart to sweet to fragrant.
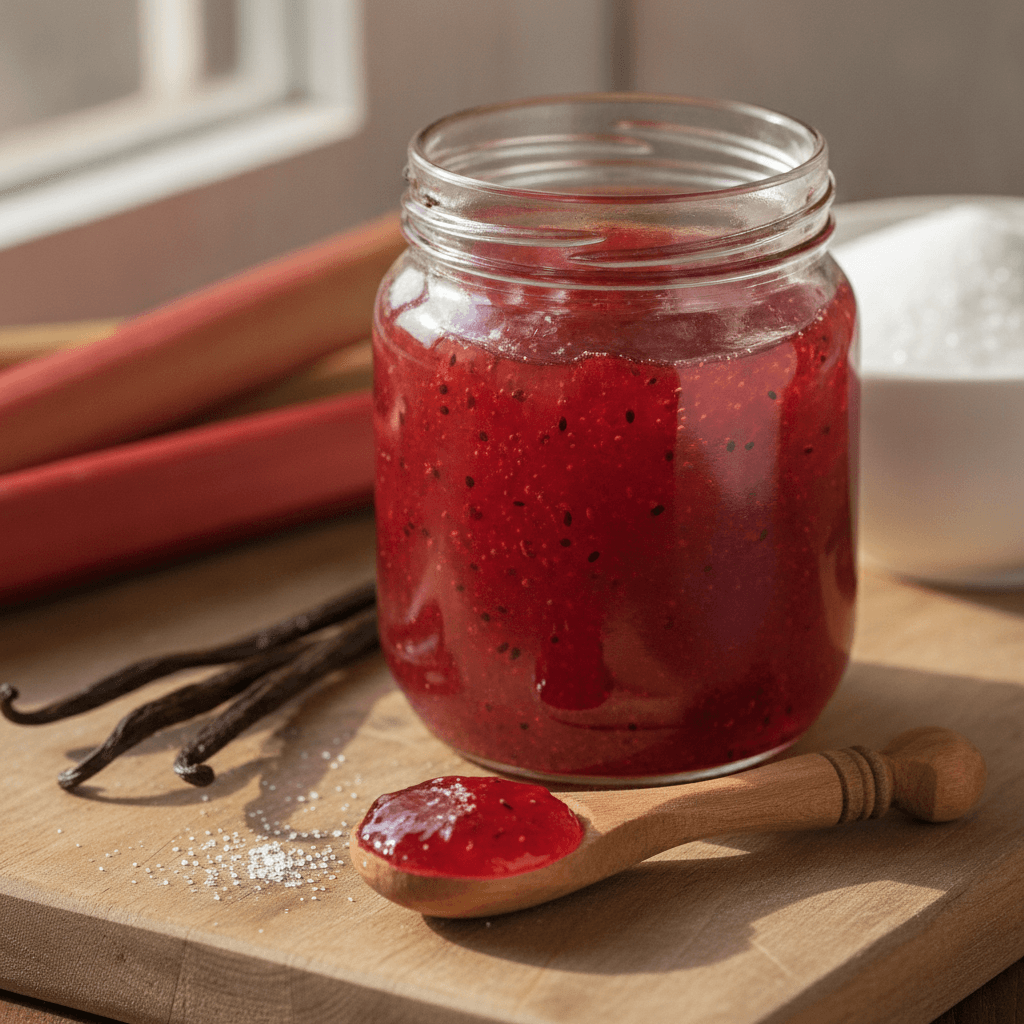
Visually Stunning. Let’s be honest, we eat with our eyes first! The color of this jelly is simply breathtaking. Depending on the color of your rhubarb stalks, it can range from a delicate rose pink to a deep, dramatic ruby red. When the light catches it in the jar, it glows like a gemstone. The tiny black specks of vanilla bean suspended throughout add visual texture and a promise of the rich flavor within. It’s so beautiful, you’ll be proud to display it on your shelf or give it as a gift.
Surprisingly Simple to Master. The idea of making jelly can seem intimidating, conjuring images of complicated equipment and finicky processes. But this recipe is designed to be approachable for everyone. The ingredient list is short and straightforward, and the steps are clear and logical. We’ll use the classic “cold plate test” to know when it’s perfectly set, a time-honored technique that connects you to generations of home cooks. You don’t need to be an expert to create a perfect batch of Rhubarb Vanilla Bean Jelly.
A Taste of the Season, All Year Long. Rhubarb's peak season is frustratingly short. By turning it into this gorgeous jelly, you are essentially pressing the 'pause' button on spring. You can capture that unique, tangy flavor at its absolute peak and enjoy it for many months to come. Opening a jar on a chilly autumn morning brings an instant reminder of warmer, brighter days. It’s a delicious and practical way to practice seasonal eating.
The Perfect Thoughtful Gift. There is nothing quite like receiving a homemade gift, and a jar of this Rhubarb Vanilla Bean Jelly is one of the best. Tied with a simple ribbon and a handwritten tag, it’s a personal and heartfelt present for neighbors, friends, or family. It shows care and effort, and it’s a gift that can be genuinely enjoyed and savored. It’s perfect for housewarmings, thank-yous, or just a simple gesture to brighten someone’s day.
The Anatomy of Perfect Rhubarb Jelly: A Look at the Ingredients
A truly spectacular dish is always built on a foundation of quality ingredients. For a recipe with so few components like this Rhubarb Vanilla Bean Jelly, each one plays a starring role. Understanding what each ingredient does and why it's there is the key to moving from simply following a recipe to truly understanding the craft of cooking. Let's take a closer look at the small cast of characters that create this incredible preserve.
Rhubarb: This is the heart and soul of our jelly. Technically a vegetable, we treat it as a fruit in the culinary world. When choosing rhubarb, look for stalks that are firm, crisp, and have a vibrant color—the deeper the red, the more colorful your jelly will be. Avoid any that are limp or blemished. Rhubarb is naturally very low in pectin, the substance that makes jellies set, which is why the other ingredients are so important. Its defining characteristic is its powerful tartness, a clean, bright acidity that makes it the perfect canvas for the sweetness of the sugar and the warmth of the vanilla.
Granulated Sugar: Sugar in preserving is about so much more than just sweetness. It is a crucial preservative, inhibiting spoilage and allowing you to keep your jelly for months. It also plays a vital structural role. Sugar molecules bind with water molecules, which, when heated to the correct temperature, helps the pectin to form the gel network that gives jelly its signature texture. While it may seem like a lot of sugar, it's essential for both the safety and the final set of your Rhubarb Vanilla Bean Jelly. Reducing it significantly will result in a runny, syrup-like consistency that won't last as long.
Fresh Lemon Juice: This is the unsung hero of the recipe. Lemon juice serves two critical functions. First, it provides a significant boost of natural pectin. Combining the pectin from the lemon with the small amount from the rhubarb helps ensure a reliable set without always needing to add commercial pectin. Second, its acidity is key. It brightens the overall flavor, keeping the jelly from tasting flat or overly sweet, and it also helps to preserve that beautiful, vibrant ruby color of the rhubarb.
Whole Vanilla Bean: This is what elevates the recipe from a simple rhubarb jelly to something truly special. While you could use extract in a pinch, a whole vanilla bean provides an unparalleled depth and complexity of flavor. When you split the bean and scrape out the seeds, you're releasing thousands of tiny flavor powerhouses. These seeds, often called 'vanilla caviar,' infuse the entire jelly. I also recommend adding the scraped pod to the pot while it cooks; the pod itself contains a tremendous amount of flavor that will be extracted during the simmering process. It creates a fragrance and richness that is simply magical.
Water: A very small amount of water is used at the beginning of the cooking process. Its purpose is simply to help dissolve the sugar and prevent the rhubarb from scorching on the bottom of the pot before it has had a chance to release its own juices. Once the rhubarb begins to heat up and break down, it will provide plenty of liquid, but that initial splash of water is a small insurance policy against burning.
Powdered Fruit Pectin (Optional): Pectin is a naturally occurring starch found in fruits and vegetables. Some, like apples and citrus, are very high in it, while others, like rhubarb and strawberries, are low. For this reason, I've listed pectin as an optional ingredient. If you want a guaranteed, firm, commercially-standard set, adding a little powdered pectin is the way to go. If you prefer a slightly softer, more rustic set, you can rely on the pectin from the lemon juice and a slightly longer cooking time. It's a matter of personal preference, and both ways yield a delicious result.
Mastering the Method: A Step-by-Step Walk-through
Now we arrive at the most exciting part: the process of transformation. Watching a few simple ingredients turn into a beautiful, glistening preserve is one of the most satisfying kitchen projects you can undertake. We'll approach this methodically, ensuring you feel confident and clear at every stage. Put on some music, take a deep breath, and let's make some incredible Rhubarb Vanilla Bean Jelly together.
Stage 1: Preparing Your Canvas (Sterilization) Before any cooking begins, the most critical step is preparing your jars. This ensures your jelly will be safe to store. You can sterilize them by running them through a hot cycle in your dishwasher, or by washing them thoroughly with hot, soapy water, rinsing well, and then placing them on a baking sheet in a 225°F (110°C) oven for at least 10 minutes. The lids should be placed in a small saucepan of hot, simmering water (not boiling) until you're ready to use them. This preparation might seem tedious, but it is the foundation of successful preserving. A clean and sterile environment is paramount.
Stage 2: The Alchemy of Cooking With your jars ready, it's time to cook. In a large, wide, heavy-bottomed pot (a wide surface area helps with evaporation and a faster set), combine your chopped rhubarb, sugar, fresh lemon juice, and water. Now for the star of the show: take your vanilla bean, carefully slice it open lengthwise, and use the back of your knife to scrape all of those beautiful seeds into the pot. Don't discard the pod! Toss that in as well; it holds a tremendous amount of flavor. Give everything a good stir to combine. Place the pot over medium heat and bring the mixture to a gentle boil, stirring occasionally to dissolve the sugar completely. As it heats, you’ll notice the rhubarb begin to soften and release its juices, and your kitchen will start to fill with the most amazing aroma.
Stage 3: The Transformation and Simmer Once the mixture is boiling, reduce the heat to maintain a steady, lively simmer. This is where the magic happens. Over the next 15-20 minutes, the rhubarb will completely break down, melting into the sugary syrup and releasing its stunning color. The liquid will thicken, and the bubbles will become smaller and more viscous. You'll need to stir more frequently at this stage to prevent the jelly from sticking to the bottom of the pot. If you are using optional pectin, now would be the time to whisk it in, ensuring it dissolves completely, and boil for one minute more.
Stage 4: The Critical Moment (Testing the Set) How do you know when your jelly is done? We use a classic, reliable method called the cold plate test. Before you start cooking, place a few small ceramic plates in your freezer. When you think the jelly might be ready, turn off the heat. Take one of the cold plates from the freezer and drop a small spoonful of the jelly onto it. Place the plate back in the freezer for 1-2 minutes. Then, take it out and gently push the edge of the jelly with your fingertip. If the surface wrinkles and holds its shape, your jelly is perfectly set. If it's still runny, return the pot to the heat and continue to simmer for another 3-5 minutes before testing again. This test is the most important skill in jelly making, so be patient with it.
Stage 5: Preserving Perfection (Jarring) Once your jelly has passed the wrinkle test, it's ready to be jarred. Carefully remove the pot from the heat and fish out the vanilla bean pod. Using a ladle and a canning funnel (which helps keep the jar rims clean), carefully pour the hot Rhubarb Vanilla Bean Jelly into your hot, sterilized jars, leaving about 1/4-inch of headspace at the top. Use a clean, damp paper towel to wipe the rims of the jars completely clean; any residue can prevent a proper seal. Place the lids on top and screw on the bands until they are just fingertip-tight. You’ll soon hear the satisfying “pop” of the lids sealing as the jars cool—a sound of success for any home canner.
Pro Tips from My Kitchen to Yours
Over the years, I've made countless batches of jams and jellies, and I've learned a few things that make the process smoother and more successful. These little tips can make a big difference in the final quality of your Rhubarb Vanilla Bean Jelly. Think of them as wisdom passed down from one kitchen to another.
Use a Wide, Heavy-Bottomed Pot. This might be the most important tip I can give you. A wide pot increases the surface area of the jelly, which allows water to evaporate more quickly. Faster evaporation means a shorter cooking time, which results in a fresher, brighter flavor and a more vibrant color. A heavy bottom is also crucial as it distributes heat evenly and prevents the sugar from scorching, which can ruin the entire batch.
Don't Be Tempted to Double the Recipe. I know it's tempting, especially when you have a mountain of rhubarb, to just double everything in the pot. Please resist! Making preserves is a science of volume and evaporation. Doubling the batch dramatically increases the volume of liquid, which means it will take much, much longer to reach the setting point. This extended cooking time can cause the sugar to caramelize, dulling the fresh rhubarb flavor and darkening the color. For the best results, make two separate batches instead.
Skim the Foam (If You Wish). As the jelly simmers, a layer of foam might form on the surface. This is just air bubbles and impurities from the fruit, and it's completely harmless. However, it can make the finished jelly look a bit cloudy. For the clearest, most jewel-like jelly, use a metal spoon to gently skim this foam off the surface just before you ladle it into the jars. A little trick is to add a tiny dot of unsalted butter (about 1/4 teaspoon) to the jelly as it cooks, which can help reduce the amount of foam that forms.
Patience is Your Best Friend. When you're waiting for the jelly to set on the cold plate, be patient. Sometimes it can take a few extra minutes of cooking to get there. Rushing the process and jarring the jelly too soon will lead to a runny, syrupy result. Trust the process and the test. Similarly, after jarring, let the jars cool completely, undisturbed, for at least 12 hours on the counter before you test the seals or move them to the pantry. This allows the vacuum seal to form properly.
Don't Waste the Vanilla Pod! After you've removed the vanilla pod from the finished jelly, don't throw it away. Rinse it off, let it dry completely on a paper towel for a day or two, and then stick it into your container of granulated sugar. In a week or so, you'll have beautifully fragrant vanilla sugar, perfect for baking or stirring into your morning coffee. It’s a wonderful way to extract every last bit of value from that precious ingredient.
Beyond the Toast: Creative Ways to Use Your Jelly
While a spoonful of Rhubarb Vanilla Bean Jelly on a piece of warm, buttered sourdough is pure bliss, its uses extend far beyond the breakfast table. This preserve has a wonderful sweet-tart profile that makes it incredibly versatile in both sweet and savory applications. Here are a few of my favorite ways to enjoy it, hoping to inspire you to get creative in your own kitchen.
Elevate Your Breakfast Bowl. Move beyond toast and think about your morning yogurt, oatmeal, or cottage cheese. A generous dollop of this jelly swirled into creamy Greek yogurt with a sprinkle of granola creates a breakfast parfait that feels truly decadent. The tartness cuts through the richness of the dairy, and the vanilla adds a lovely warmth to start your day.
The Star of a Cheese Board. This is where the jelly truly shines. Its sweet and acidic profile is a perfect counterpoint to rich, salty cheeses. Pair it with a creamy goat cheese, a sharp aged cheddar, or a rich, buttery brie. The jelly acts as a palate cleanser between bites and adds a gorgeous splash of color to your board. Serve with simple crackers or slices of baguette to let the pairing sing.
A Simple Glaze for Meats. For a surprisingly delicious savory twist, gently warm the jelly in a small saucepan until it's liquid and pourable. You can then use it as a glaze for grilled chicken or roasted Cornish hens during the last few minutes of cooking. The sugar will caramelize slightly, creating a beautiful, glossy coating, while the rhubarb and vanilla infuse the meat with a unique, tangy flavor.
Baking and Dessert Applications. This jelly makes a fantastic filling for all sorts of baked goods. Use it in classic thumbprint cookies, as a layer between vanilla cakes, or as a topping for a simple cheesecake. You can also spoon it over a bowl of vanilla bean ice cream for an instant, elegant dessert. The contrast of the warm, creamy ice cream and the cool, tart jelly is absolutely divine.
Create a Refreshing Beverage. For a simple and sophisticated non-alcoholic drink, take a spoonful of the Rhubarb Vanilla Bean Jelly and stir it into a glass with a splash of hot water to dissolve it. Then, fill the glass with ice and top it off with sparkling water or club soda. Garnish with a sprig of mint or a slice of lemon. It creates a beautiful pink, fizzy drink that is wonderfully refreshing on a warm day.
Storing, Gifting, and Enjoying Your Preserve
Congratulations, you’ve created beautiful jars of Rhubarb Vanilla Bean Jelly! Now, let's talk about how to store it properly to ensure it stays delicious and safe to eat. Correct storage is just as important as the cooking process itself.
Checking the Seal. After your jars have cooled completely for 12-24 hours, it's time to check the seals. The lid should be concave (curved downward) and should not move or make a popping sound when you press on the center. If a lid does pop back, the jar has not sealed correctly. Don't worry! You can either re-process it in a water bath or simply store that jar in the refrigerator and use it within the next month.
Pantry Storage. Properly sealed jars can be stored in a cool, dark, and dry place like a pantry or cupboard. Kept away from direct sunlight and heat, your jelly will remain at its best quality for up to 18 months. Be sure to label each jar with the contents and the date it was made. Over time, the vibrant color may darken slightly, but the flavor will still be wonderful.
Refrigerator Storage. Once you open a jar, it must be stored in the refrigerator. It will stay fresh and delicious for at least a month, if not longer. The high sugar content acts as a natural preservative even after the seal is broken.
Ideas for Gifting. A jar of homemade jelly is a gift from the heart. To make it extra special, consider adding a few finishing touches. You can cover the lid with a small square of fabric or decorative paper, securing it with a piece of twine or ribbon. A handwritten label detailing the contents, the date, and perhaps a suggestion for how to enjoy it adds a lovely personal touch. These small details transform a simple jar of jelly into a truly memorable and cherished gift.
Your Rhubarb Vanilla Bean Jelly Questions, Answered
It's natural to have questions when you're trying a new recipe, especially with preserving. Here are answers to some of the most common queries I receive about making this Rhubarb Vanilla Bean Jelly.
Can I use frozen rhubarb for this recipe?
Absolutely! Frozen rhubarb works beautifully. In fact, since it breaks down a bit upon thawing, it can even speed up the cooking process. The best part is that you don't need to thaw it first. You can add the frozen rhubarb pieces directly to the pot with the other ingredients; you may just need to add 5-10 minutes to the initial cooking time to allow it to thaw and release its juices.
My jelly didn't set! What did I do wrong and can I fix it?
Don't panic—this is the most common issue in jelly making and it is almost always fixable! A runny jelly usually means it wasn't cooked quite long enough to reach the setting point. To fix it, you can pour the contents of the jars back into your pot, bring it back to a rolling boil, and cook it for another 5-10 minutes. Then, perform the cold plate test again until you get a definite wrinkle. Re-ladle into clean, hot, sterilized jars and seal.
Is it possible to reduce the amount of sugar?
I strongly advise against reducing the sugar in this recipe. As we discussed, sugar is essential for both the preservation and the gelling process. Reducing it will not only result in a very tart, runny syrup, but it will also compromise the shelf-life, making it more susceptible to spoilage. For a safe, properly set, and long-lasting jelly, it's best to stick to the proportions given.
I don't have a whole vanilla bean. Can I use vanilla extract instead?
Yes, you can substitute vanilla extract in a pinch, though the flavor won't be quite as deep or complex. The key is to add it at the very end of the cooking process. If you add it at the beginning, much of the delicate flavor will evaporate with the heat. Once your jelly has passed the cold plate test, remove it from the heat and stir in 1 to 1.5 teaspoons of pure vanilla extract just before ladling it into the jars. You won't get the beautiful black specks, but you will still have a lovely vanilla essence.
Do I really need to process the jars in a water bath canner?
This depends on how you plan to store your jelly. If you are making a small batch that you plan to store in the refrigerator and consume within a month or two, then a water bath is not necessary. However, if you want your jelly to be shelf-stable for long-term storage in the pantry, processing the sealed jars in a boiling water bath for 10 minutes is a required safety step. This process ensures any potential contaminants are eliminated and forces out any remaining air to create a stronger, more reliable vacuum seal.
Rhubarb Vanilla Bean Jelly
A beautifully balanced preserve featuring tart, vibrant rhubarb and the warm, floral notes of real vanilla bean. Perfect for toast, scones, or yogurt.
Prep Time
15 min
Cook Time
30 min
Total Time
45 min
Servings
Makes about 4 (8-ounce) jars
Ingredients
For Makes about 4 (8-ounce) jars
- 4 cups rhubarb, chopped into 1/2-inch pieces (about 1.5 lbs or 680g)
- 3 cups granulated sugar
- 1/4 cup freshly squeezed lemon juice
- 1 whole vanilla bean
- 1/4 cup water
- 2 tablespoons powdered fruit pectin (optional, for a firmer set)
Instructions
- 1
Prepare Jars and Lids
Sterilize four 8-ounce jars and their lids. You can do this by running them through a hot cycle in the dishwasher or washing them in hot, soapy water and placing the jars in a 225°F oven for 10 minutes. Keep the lids in a small pot of simmering water until ready to use.
- 2
Prepare the Vanilla Bean
Place the whole vanilla bean on a cutting board. Carefully slice it in half lengthwise from end to end. Use the back of your knife to scrape all the seeds from the inside of both halves.
- 3
Combine Ingredients
In a large, wide, heavy-bottomed pot, combine the chopped rhubarb, granulated sugar, fresh lemon juice, and water. Add the scraped vanilla bean seeds and the empty vanilla bean pod to the pot. Stir everything together well.
- 4
Bring to a Simmer
Place the pot over medium-high heat. Bring the mixture to a full rolling boil, stirring frequently to dissolve the sugar completely and prevent any sticking on the bottom of the pot. The rhubarb will begin to soften and release its liquid.
- 5
Cook the Jelly
Once boiling, reduce the heat to maintain a steady, vigorous simmer. Cook for 15-20 minutes, stirring often. The rhubarb will break down completely, and the mixture will begin to thicken.
- 6
Add Optional Pectin
If you are using pectin for a firmer set, sprinkle it over the simmering jelly now. Whisk vigorously for one full minute to ensure it dissolves completely and to prevent clumps from forming.
- 7
Test for Set
Place a small spoonful of the hot jelly onto a plate that has been chilled in the freezer. Return the plate to the freezer for 2 minutes. If the jelly wrinkles when you push it with your finger, it is ready. If not, continue simmering for another 3-5 minutes and test again.
- 8
Remove Vanilla Pod
Once the jelly has reached its setting point, remove the pot from the heat. Carefully locate and remove the vanilla bean pod and discard it (or rinse and dry it to make vanilla sugar).
- 9
Fill the Jars
Using a ladle and a canning funnel, carefully pour the hot jelly into the prepared hot, sterilized jars. Leave about 1/4-inch of headspace at the top of each jar.
- 10
Seal the Jars
Wipe the rims of the jars with a clean, damp cloth to remove any drips. Center the hot lids on the jars and screw on the bands until they are just fingertip-tight. Do not over-tighten.
- 11
Process for Shelf Stability (Optional)
For long-term pantry storage, place the sealed jars in a water bath canner, ensuring they are covered by at least 1 inch of water. Bring to a rolling boil and process for 10 minutes. Turn off the heat, remove the canner lid, and let the jars stand for 5 minutes before removing.
- 12
Cool and Check Seals
Place the jars on a towel-lined countertop and let them cool completely, undisturbed, for 12-24 hours. You should hear the lids 'pop' as they seal. Once cool, check the seals by pressing on the center of each lid; it should not flex.
Nutrition Facts
Per serving (estimated)
45 calories
Calories
12g
Carbs
0.1g
Protein
0g
Fat
0.2g
Fiber
1mg
Sodium
11g
Sugar


